/* Anthony Ra
Section-A
ahra@andrew.cmu.edu
project-05 */

function setup() {
    createCanvas(640, 400);
    background(235, 205, 255);
    var varWidth = 100;
    var varHeight = 60;
    var starty = 0;
    var startx = 0;

    for (var y = 0; y < 10; y++) {
        for (var x = 0; x < 18; x++) {
            var py = starty + y * varHeight;
            var px = startx + x * varWidth;
      /* moving cube to just the right */
            if (y%2 == 0) {
              px = (startx - 25) + x * varWidth;
            }
            else {
              px = startx + x * varWidth;
            }
            noStroke();
          /* top of the cube */
            fill(255, 205, 235);
            quad(px, py, px + 25, py - 15, px + 50, py, px + 25, py + 15);
            fill(255, 230, 255);
            quad(px + 5, py, px + 25, py - 12, px + 45, py, px + 25, py + 12);
          /* left side of the cube */
            fill(255, 170, 200);
            quad(px, py, px + 25, py + 15, px + 25, py + 60, px, py + 45);
            fill(255, 200, 225);
            quad(px + 5, py + 8, px + 20, py + 18, px + 20, py + 52, px + 5, py + 43);
          /* right side of the cube */
            fill(255, 145, 180);
            quad(px + 25, py + 15, px + 50, py, px + 50, py + 45, px + 25, py + 60);
            fill(255, 160, 205);
            quad(px + 30, py + 18, px + 45, py + 8, px + 45, py + 43, px + 30, py + 52);
        }
    }
    noLoop();
}
I brought over the color theory from last week’s project and utilized it to make a series of repeating cubes. The inspiration of this popular pattern came from a bus ride back from a haircut I got at Bloomfield. I did a basic sketch on how the variables would be separated and implemented it in code to make a simple pattern that is stress-relieving to the eye.
function setup() {
    createCanvas(400, 600);
    background(0);

}
var squareSize = 80

var bSO = squareSize * (1/8)
var wLO = squareSize * (3/8)
var cr = squareSize * (2/10)
var obl = 5

function TSquare(x,y,w,h) {
    // Red Squares background of grid
    fill(148,3,3)
    stroke(0)
    strokeWeight(4)
    rect(x,y,w,h)

    // White line back
    stroke(255)
    strokeWeight(5)
    line(x-obl, y-obl, x+w, y+h)

    // Blue square rounded corner transparent
    noStroke()
    fill(0, 0, 100, 200)
    //tint(255,127)
    rect(x+ bSO, y + bSO, w-(2 * bSO), h-(2 * bSO), cr, 0, cr, 0)

    // White line foreground
    stroke(255)
    strokeWeight(5)
    line(x+30, y+30, x+w-30, y+h-30)

    //foreground black grid
    noFill()
    stroke(0)
    strokeWeight(4)
    //rect(x,y,w,h)

}

function draw() {
    for(xi=0; xi<width; xi = xi + squareSize){
        for(yj=0; yj<height; yj = yj + squareSize){

           TSquare(xi, yj, squareSize, squareSize)
        }
    }

}
My inspiration for the start of this project was a plaid pattern. As I set out to attempt to recreate it, I made an error that ended up creating a very interesting novel pattern. I then riffed off of this new creation messing around with the alpha function which controls transparency. The pattern is a square of width and height 80 pixels iterated over x and y using for loops.
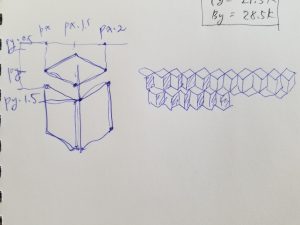
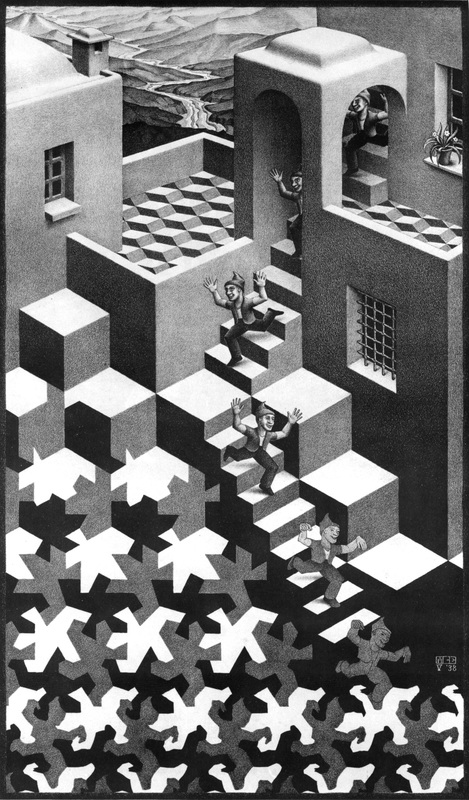
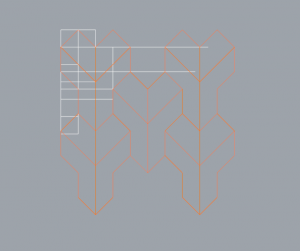
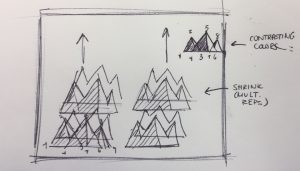
I’m interested in doing a 3D tessellation for the wallpaper. I got the inspiration from the Escher’s distorted architecture drawings and tessellation artworks. Then I’ve done a quick linework in Rhino to have precise placement of lines and lengths of them. So in the code I simple used the beginShape() function and connect all the points to create the geometry. The tricky part is that I’ve used 45 degrees for the diagonal lines, which I will need to calculate the exact location of vertex points using square roots. And in the end I just colored with high contrast colors for it to pop out and be more “3 dimensional”.
The computer graphics/3D art project I chose for this week was “Trapped Summer” by UK based 3D artist and motion designer, Peter Tomaszewicz. This project is described by him as a “humoristic tone to a hot summer,” as it is based around everyday, mundane objects associated with summer, such as fans and beach paddles. As the bright objects are set on vivid yet minimalistic backgrounds, I was immediately drawn to the unique visuals, bright colors, and engaging movement within the video. Tomaszewicz masterfully blends 3D art and animation in order to create interesting, fluid motion and interactions between the plastic and the objects. I found it meaningful how he incorporated the element of plastic, as it makes a statement about this material’s controversial nature, which communicates a subtle environmental message within the seemingly mindless video. Ultimately, I found this video is both thought provoking and visually pleasing.
This week I got inspiration for my Looking Outwards post by viewing the 3-D art of artist Aldo Martinez Calzadilla. His work has been featured in such places as the movies Guardians of the Galaxy 2, Ant Man 2, and Black Panther.
Although this is very interesting, what truly struck me was his work reflecting realistic humans, which I thought was absolutely gorgeous.
One of Calzadilla’s 3D personal modelsCalzadilla playing with texture in this model
I didn’t really believe how this could be produced…through code…so I did some investigation.
I found that he uses software such as Maya, Mari, and Z-Brush, which allows designers to manipulate texture and draw in 3-D on the computer. Below is a video demonstrating how images can be created and edited with Z-Brush as if they were physical things that could be molded and manipulated.
Z-Brush demonstration
I was really stunned by the beauty of Calzadilla’s work, so it was interesting to watch the Z-Brush video to work through how it was he was able to create something so life-like. I usually associate coding with being very cold and unemotional, so it’s an interesting contrast to see how he was able to capture such delicacy and vulnerability in his “subjects” through such a seemingly unfeeling medium.
Artist Zacharias Reinhardt uses 3D graphic software to heighten visual storytelling.
Zacharias Reinhardt is a German 3D artist who uses Blender 3D software to create conceptual digital illustrations. Many of his works, such as Final Takeoff (shown above), convey a strong sense of storytelling that is heightened by the realism of fully rendered models. Unlike 2D illustrations, these graphics allow you to view the artwork from many angles and fully immerse yourself within the 3D space created.
A 3D rendering of the car in Reinhardt’s Final Takeoff allows you to experience his work from any angle (zoom in to see the interior).
While I’ve always been loyal to the art of traditional illustration, seeing works such as these truly heighten visual storytelling without losing any sense of the artist’s expressiveness. By using Blender software to create these otherworldly graphics, Reinhardt brings fantasy a little closer to reality.
/* Dani Delgado
Section E
ddelgad1@andrew.cmu.edu
Project-05
*/

function setup() {
    createCanvas(450, 350);
}

function draw() {
    //draw a dark blue background
    background(28, 33, 82);

    //draw the polka dotted bakcground
    for (var p = 0; p < width - 10; p += 18) {
    	for (var d = 0; d < height - 10; d += 22) {
    		polkaDot(p, d);
    	}
    }

    //draw the blue mountain and the pink shadow
    for (var mx1 = 0; mx1 < width - 60; mx1 += 60) {
     	for (var my1 = 0; my1 < height; my1 += 70) {
     		mountainBase(mx1, my1);
     		mountainShadow(mx1, my1);
        }
    }
    //draw the white  offset outline
    for (var mx2 = 0; mx2 < width - 65; mx2 += 60){
    	for (var my2 = 0; my2 < height; my2 += 70){
    		mountainOutline(mx2, my2);
    	}
    }
    noLoop();
}

function polkaDot(x, y) {
	//draw the polka dotted background
	push();
	translate(x, y);
	noStroke();
	fill(48, 53, 102);
	ellipse(10, 10, 10, 10);
	pop();
}

function mountainBase(x, y) {
    //define the variables to make the mountain points at
    //all variables are fixed based on the first set of triangle coordinates
    //writing out variables like this helps me to understand the placement of my shapes
    var mx1 = 20;
    var mbase = 50;
    var mx2 = mx1 + (mx1 / 2);
    var mpeak1 = mbase - 20;
    var mx3 = mx1 * 2;
    var mx4 = mx2;
    var mpeak2 = mbase - 30;
    var mx5 = mx4 + 15;
    var mx6 = mx4 + 30;
    var mx7 = mx5;
    var mx8 = mx7 + 12;
    var mpeak3 = mbase - 20;
    var mx9 = mx8 + 12;

    //draw the first mountain base
    push();
    translate(x, y);
    fill (108, 113, 182);
    noStroke();
    triangle(mx1, mbase, mx2, mpeak1, mx3, mbase);
    triangle(mx4, mbase, mx5, mpeak2, mx6, mbase);
    triangle(mx7, mbase, mx8, mpeak3, mx9, mbase);
    pop();
}

function mountainShadow(x, y) {
	//repeat variables
    var mx1 = 20;
    var mbase = 50;
    var mx2 = mx1 + (mx1 / 2);
    var mpeak1 = mbase - 20;
    var mx3 = mx1 * 2;
    var mx4 = mx2;
    var mpeak2 = mbase - 30;
    var mx5 = mx4 + 15;
    var mx6 = mx4 + 30;
    var mx7 = mx5;
    var mx8 = mx7 + 12;
    var mpeak3 = mbase - 20;
    var mx9 = mx8 + 12;

    //draw the mountain shadow
    push();
    translate(x, y);
    fill(255, 128, 160);
    noStroke();
    triangle(mx1, mbase, mx2, mpeak1, mx2 + 2, mbase);
    triangle(mx4, mbase, mx5, mpeak2, mx5 + 5, mbase);
    triangle(mx8, mpeak3 + (0.5 * mpeak3), mx6 - 7.5, mpeak3 + 4.5, mx8, mpeak3);
    pop();
}

function mountainOutline(x, y){
    //repeat variables
	var mx1 = 20;
    var mbase = 50;
    var mx2 = mx1 + (mx1 / 2);
    var mpeak1 = mbase - 20;
    var mx3 = mx1 * 2;
    var mx4 = mx2;
    var mpeak2 = mbase - 30;
    var mx5 = mx4 + 15;
    var mx6 = mx4 + 30;
    var mx7 = mx5;
    var mx8 = mx7 + 12;
    var mpeak3 = mbase - 20;
    var mx9 = mx8 + 12;

    //draw the mountain white, offset outline
    push();
    translate (x, y);
    stroke(255);
    strokeWeight(0.75);
    line(mx1 + 5, mbase - 5, mx9 + 5, mbase - 5);
    line(mx1 + 5, mbase - 5, mx2 + 5, mpeak1 - 5);
    line(mx2 + 5, mpeak1 - 5, mx3 + 2, mbase - 15);
    line(mx3 + 2, mbase - 15, mx5 + 5, mpeak2 - 5);
    line(mx5 + 5, mpeak2 - 5, mx6 - 2, mbase - 20);
    line(mx6 - 2, mbase - 20, mx8 + 5, mpeak3 - 5);
    line(mx8 + 5, mpeak3 -5, mx9 + 5, mbase - 5);
    pop();
}
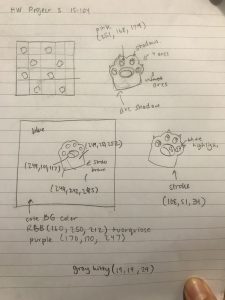
For this project, I wanted to create a crisp pattern that would like nice on a backpack or maybe a skirt. I went through a few ideas, including rain clouds and flower patterns, before deciding on drawing mountain ranges. I have always loved how mountains are graphically represented; the clean lines and clever usage of color blocking to create dimension are just very pleasant to look at for me. With that in mind, I decided to create something similar with a fun color palette.
A quick sketch made to get the concept and main points down onto some paper
As far as coding goes, this was a bit of a challenge for me since I am still trying to fully understand for-loops and creating my own functions. I tried to incorporate functions into my code instead of drawing the shapes in the loops to practice these skills some more (and so that I could relate all of the mountain’s shape points to one primary point using arithmetic and not having the loop mess with these relationships).
In the 2009 James Cameron movie, Avatar, there was the issue of creating an alien species that was going to be realistic and relatable on an emotional point of view. Cameron stated that he wanted to not do the traditional way of make up and spot treatment. Instead he went on a route that used a lot of 3D computer graphics. He set up a rig that would have sensors all around (which is pretty ordinary). However, he ended up actually attaching a camera on a carbon fiber rod right in front of the actor’s face. What made this movie’s computer graphic rendering so much better and different from other movies at the time is that the character’s facial features would be very, very accurate and human-like, thus making them very relatable. One thing I really appreciate and admire from this project is that after viewing a info video about how they made the movie, it reminded me a lot of the facial recognition features and “animojis” that Apple recently featured in their iPhone X and the brand new iPhone XS. However, this was implemented on a larger scale in a fast-paced action movie 8 years prior. That is incredibly impressive.
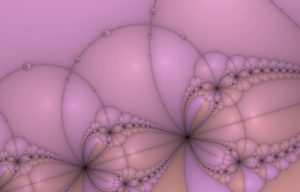
For this looking outwards I wanted to explore a project that I find particularly interesting by former Apple programmer Ben Haller called Attraction Basins. Each of the different art pieces created in this project are made using a form of “equation root finding.” The pieces in this project are very much related to the Mandelbrot Set and the idea of points on a place relating to points on an image, to which the root-finding is utilized iteratively.
The first image below titled “Carapace” was generated using Newton’s Method, which has to do with the idea of finding roots based on a process of successive approximations.
(The image above showing “Carapace” by Ben Haller)
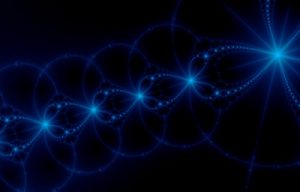
The colors that occur in the pieces are dependent on the length of time and type of root that was converged. At these points of convergence also note the “basins” that occur in these areas. The other piece from Ben Haller’s gallery I wanted to look at is called “Energy.”
(The image above shows “Energy” by Ben Haller)
This piece is based on the Secant Method which is another root finding algorithm that takes a “region of interest” and assumes a linear relationship of the function being analyzed. A graph of how the secant method works can be seen below. Note the relationship between the graph and the art piece generated from it.
I find these 3D Computer Graphics interesting because they relate directly to some form of root finding. So as diverse as the two might read in visual language, there is a common underlying method that carries across all the pieces.
![[OLD FALL 2018] 15-104 • Introduction to Computing for Creative Practice](../../../../wp-content/uploads/2020/08/stop-banner.png)