Project 5 – Wallpaper Sara Frankel

Project 5

// Sara Frankel
// sfrankel
// Project 5
// section A

function setup() {
    createCanvas(600, 600);
    background('lightgreen');

    stroke('green');
    strokeWeight(2);
    for (var xback = 10; xback < width; xback += 20) { //green stripes placed in setup so that they are not redrawn everytime it is called
    	line(xback, 0, xback, height);
    }
    noLoop();
}

function draw() {
	stroke(0);
	strokeWeight(1);
	var diameter = 120;
	for (var xcircle = 0; xcircle < width + diameter/2; xcircle += 155) { // positions and redraws the lemons and limes along the x axis
		for (var ycircle = 0; ycircle < height + diameter/2; ycircle += 155){ // positions and redraws the lemons and limes along the y axis
			fill('orange');
			ellipse(xcircle, ycircle, diameter, diameter);
			fill(243,185,80);
			ellipse(xcircle, ycircle, diameter/2 + 40, diameter/2 + 40);
			
			if(ycircle % 2 === 0) { //makes every odd line, every lemon, the color yellow
				fill(255,255,153);
				ellipse(xcircle, ycircle, diameter, diameter);
				fill('yellow');
				ellipse(xcircle, ycircle, diameter/2 + 40, diameter/2 + 40);
			} 
			
			for (var i = 0; i < 6; i++) { //forms the slices of the citrus fruit
				var angle = i * radians(60);
				line(xcircle, ycircle, (diameter/3) * cos(angle) + xcircle , 
					ycircle + (diameter/3) * sin(angle));
			}	
		
		}
	}
}

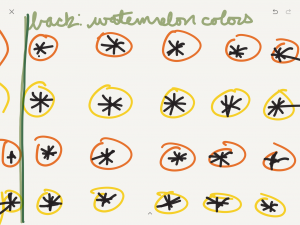
For this project, I decided to make it citrus/summer theme. I made the backdrop watermelon inspired (with the green stripes) and made each row of citrus fruit alternate between oranges and lemons. As the weather gets colder, its sometimes nice to think of the beloved themes of summer.  Below is my sketch, please excuse my artistic ability but I came into the idea thinking about summer and warm beaches (and what is lovely to drink/eat by the ocean).

Romi Jin – Project-05-Wallpaper

sketch

 /*
Romi Jin
Section B
rsjin@andrew.cmu.edu
Project-05
*/

//var x = 0;
//var y = 0;

var faceWidth = 40;
var earWidth = 15;
var earHeight = 40;
var bodyWidth = 40;
var bodyHeight = 60;
var tailWidth = 20;
var body2w = 50;
var body2h = 40;
var eyew = 3;
var eyeh = 5.5;
var nosew = 6;
var noseh = 5;

function setup() {
    createCanvas(600, 600);
    
}

function draw() {
    background(252,236,235);
    bunny();

    for (var x = 35; x < width-35; x += 75) {
        for (var y = 135; y < height; y += 150) {
            bunny(x,y);
        }
    }

    noLoop();
}
 
function bunny(x,y) {


    //left ear
    stroke(128,128,128);
    strokeWeight(.2);
    fill(255);
    ellipse(x,y-100,earWidth,earHeight);
 
    //right ear 
    stroke(128,128,128);
    strokeWeight(.2);
    fill(255);
    ellipse(x-10,y-95,earWidth,earHeight);

    //body
    stroke(128,128,128);
    strokeWeight(.2);
    fill(255);
    ellipse(x,y-30,body2w,body2h/2);

    stroke(128,128,128);
    strokeWeight(.2);
    fill(255);
    ellipse(x,y-40,bodyWidth,bodyHeight);

    //tail
    stroke(128,128,128);
    strokeWeight(.2);
    fill(255);
    ellipse(x-10,y-15,tailWidth,tailWidth);

    //face
    stroke(128,128,128);
    strokeWeight(.2);
    fill(255); 
    ellipse(x,y-75,faceWidth,faceWidth);

    //eye
    noStroke();
    fill(0);
    ellipse(x-10,y-80,eyew,eyeh);

    //nose
    noStroke();
    fill(237,171,166);
    ellipse(x+14,y-75,nosew,noseh);

}

For this project, I wanted to make a simple wallpaper of bunnies! I discovered that this project was easier than I thought it would be. I simply made a new function called “bunny” and placed all the features of the bunny in it, then referenced that function in the for loop (in the draw function).

Eunice Choe – Project-05 – Wallpaper

sketch

/* Eunice Choe
Section E
ejchoe@andrew.cmu.edu
Project-05
*/

function setup() {
    createCanvas(480, 480);
    background(116, 124, 181);
    var ws = 80; // width spacing
    var hs = 50; // height spacing

    for (var y = 0; y < 11; y++) {
        for (var x = 0; x < 7; x++) {
            if (y % 2 == 1){ // even rows with coffee beans
                var py = y * hs;
                var px = (ws / 2) + x * ws; // offset shift to the right by half of width spacing
                stroke(76, 44, 15);
                ellipse(px, py, 10, 5);
                ellipse(px + 10, py + 5, 5, 10)
                ellipse(px, py + 10, 5, 10);

            }
            else { // odd rows with coffee mugs
                var py = y * hs;
                var px = x * ws;
                // cream colored mug shape
                noStroke();
                fill(255, 242, 196);
                arc(px, py, 60, 80, 0, PI, CHORD);
                arc(px + 20, py + 15, 30, 20, 10, HALF_PI);
                // brown mug outline
                stroke(178, 154, 119);
                strokeWeight(4);
                noFill();
                arc(px - 8, py, 60, 80, 0, PI, CHORD);
                // zig zag steam lines
                stroke(255);
                strokeWeight(3);
                line(px - 20, py - 10, px + 15, py - 12);
                line(px + 15, py - 12, px - 15, py - 16);
                line(px - 15, py - 16, px + 10, py - 20);
                line(px + 10, py - 20, px - 5, py - 30);
            }
        }
    }
    noLoop();
}

For my wallpaper project, I decided to created a pattern that alternated coffee mugs and coffee beans. I was inspired to create the mug pattern after seeing a wallpaper online. With the repeating pattern, I was interested in seeing how the mugs and coffee beans turned somewhat abstract over time. I originally did not intend to abstract the mugs, but I actually like how they look in the final result! I like the idea of someone looking twice at the wallpaper before realizing what the pattern is. Overall, this project was good practice for using nested for loops.

Jessica Timczyk – Project 05 – Wall Paper

Wall Paper

// Jessica Timczyk
// Section D
// jtimczyk@andrew.cmu.edu
// Project-05-Wall Paper

var SIZE = 10;

function setup() {
    createCanvas(600, 400);
}

function draw() {
	background(185, 248, 252); // light blue between cirlces
	drawGrid();
	noLoop();
}

function drawGrid() {
	
	// small squares covering background
	for (var y = SIZE / 2; y < height + SIZE / 2; y += SIZE) {
        for (var x = SIZE / 2; x < width +SIZE / 2; x += SIZE) {
            ellipse(x, y, SIZE, SIZE);
        }
    }
	// diagonal stripes
	for ( var i = 0; i <= 150; i ++) {
		x1 = i * 70;
		y1 = i * 70;
		strokeWeight(20);
		stroke(255, 235, 14)
		line(width + 300, x1 + 100, 0, y1 - 600);
	}
	// loop to repeatedly draw squiggle shape
	for (var x = 20; x <= width + 60; x += 50) { 
		for ( var y = 0; y <= height + 80; y += 60) {
			fill(0);
			stroke(255);
			strokeWeight(3);
				beginShape(); // squiggle shape
			vertex(x - 25, y - 5);
			bezierVertex(x - 50, y , x - 45, y + 65, x + 5, y + 25);
			bezierVertex(x - 10, y + 40, x - 30, y + 115, x - 25, y - 5);
			endShape();
		}
	}
}


This wall paper did not turn out how I originally intended it to. I had imagined making a sort of night sky mural but along the way I had gotten distracted by drawing many circles as apposed to a few to make stars. Spiraling off of that I eventually morphed what was a moon shape into the weird squiggly shape and built off of it from there. Although it didn’t turn out how I had originally intended, I very much like how the pattern turned out and I find it very  visually interesting and now reminds me slightly of candy stripes

.

Eunice Choe – Looking Outwards-05

These are three icebergs from the series.

Chaotic Atmospheres, a Switzerland based 3D artist created beautiful renditions of icebergs in his series titled, Caustic Icebergs (2013). I admire this series because the icebergs are very aesthetically pleasing and the artist does a great job of displaying an environment with grace and drama. While all the icebergs appear to be similar, the subtle differences between them allow the viewer to see new compositions that can stand alone. Chaotic Atmospheres used Acropora, which is a voxel modeler by Voxelogic, to create the icebergs. The icebergs all started off from a base, but the artist changed the parameters to make each iceberg unique. The artist also utilized the rendering software, Vue for the glowing water and sky. Chaotic Atmospheres incorporates his artistic sensibilities in the series through his attention to detail and ability to capture a scene in nature in a very realistic and captivating way. The artist’s use of color and various textures can undoubtedly catch someone’s attention.

The artist incorporates a glowing effect to the icebergs and sky.

Philip Gates – Project 05 – Wallpaper

sketch

var xSpacing = 125; //horizontal distance between elements
var ySpacing = 100; //vertical distance between elements

function setup() {
    createCanvas(500, 500);
}

function draw() {

    var stripeHeight = height/5; //set height of horizontal stripes

    //draw black stripes
    fill(0); 
    rect(0, 0, width, stripeHeight);
    rect(0, 2 * stripeHeight, width, stripeHeight);
    rect(0, 4 * stripeHeight, width, stripeHeight);

    //draw blue stripes
    fill("deepskyblue");
    rect(0, stripeHeight, width, stripeHeight);
    rect(0, 3 * stripeHeight, width, stripeHeight);

    for (var y=0; y<5; y++) { //create 5 rows

        //even rows: draw moon & stars
        if (isEven(y)) {   
        for (var x=0; x<4; x++) {   //draw 4 columns
            var i = (x * xSpacing) + 50;  
            var j = (y * ySpacing) + 50;  
            moon(i, j);   //draw 
            starCluster(i + 25, j - 25);
        }
        
        //odd rows: draw sun
        } else {  
            for (var x=0; x<4; x++) {
                var a = (x * xSpacing) + 75;
                var b = (y * ySpacing) + 50;
                sun (a, b);
            }
        }
    }
}


//creates moon
function moon (x,y) {
noStroke();
fill("lemonchiffon");
arc (x,y,50,50,HALF_PI,(PI * 3/2));
fill(0);
arc (x,y,25,50,HALF_PI,(PI * 3/2))
}

//creates three stars
function starCluster (x,y) {
fill(255);
text ("*",x,y);
text ("*",x+10,y+10);
text ("*",x-5,y+18);
}

//creates sun
function sun (x,y) {
    noStroke();
    fill("yellow");
    ellipse(x,y,30,30);
    for (var angle=0; angle < 360; angle +=45) {
        stroke("yellow");
        strokeWeight(2);
        line(x, y, x + cos(radians(angle)) * 30, y - sin(radians(angle)) * 30);
        }
}

//tests for odd/even
function isEven (value) {
    return value % 2 == 0;
}

I am not a visual artist/designer and not the best at drawing, so I skipped straight to brainstorming shapes in code. I knew I wanted to work with some curved shapes since I didn’t entirely master the arc() function earlier in the semester. Playing around with arcs in p5.js led me to the moon shape, which gave me the idea of alternating day/night sky patterns. This week’s lessons on cos() and sin() came in handy when I was trying to draw the sun’s rays, as I was able to use these functions to create a simpler way of creating the circular lines than drawing each individually.

Julie Choi – Looking Outwards 05

(Video from Pixar explaining their process behind the film)

This is the process of how the movie, The Incredibles 1 was simulated before its production. The process of the visual creation of the main characters are made with sketches by designers and is sent off to the animator. The animator then takes the design to simulate one of the scenes on the digital screen. The simulation is a graphically computed shape with certain motions of the characters’ body parts. To make the movie dynamic as it is, a lot of testing and iterations were made through this technology. Their concept of making a normal guy into some powerful character was planned within this platform. I was inspired by their process work that heavily utilized 3D computer graphics since this movie was produced in 2004. I was quite surprised that they had innovative simulations more than a decade ago. Also, The Incredibles is one of my favorite films so it was interesting to take a look at their work behind the project.

Austin Treu – Project 05

atreu-proj-05

//Austin Treu
//atreu@andrew.cmu.edu
//Section B
//Project-05

function setup() {
   	createCanvas(580, 580);
    background(0,0,int(random(255)));

    //set vars for circles
    var tw = 20, th = 20, offset = 20, 
    	circSize = 10, loops = 10, 
		backX = ((loops-1) * tw)/2, backY = ((loops-1) * th)/2,
		backSize = loops*circSize, 
		tileSizeX = (loops) * tw, tileSizeY = (loops) * th,
		//randomize color
		colorRandom = int(random(255));
		backColor = 'rgb(100,0,'+colorRandom+')',
		circColor = 'rgb('+colorRandom+',0,200)',
		lineColor = 'rgb(200, 0,'+colorRandom+')';

	//loop to draw multiple tiles
	stroke(lineColor);
	for(var i = 0; i < (height/tileSizeY); i++){
		for(var j = 0; j < (width/tileSizeX); j++){
			//draw big background circle
			fill(backColor);
			ellipse(backX + j*tileSizeX, backY + i*tileSizeY, backSize, backSize);
			//utilize honeycomb pattern for tile
			fill(circColor);
		    for (var y = 0; y < loops; y++) {
		        for (var x = 0; x < loops; x++) {
		            if(y%2 === 0){
		                var py = ( (y * th)) + i * tileSizeY;
		                var px = ( (x * tw)) + j * tileSizeX;
		                ellipse(px, py, circSize, circSize);
		            }
		            else{      
		                var py = ( (y * th)) + i * tileSizeY;
		                var px = ( (0.5 * offset + x * tw)) + j * tileSizeX;
		                ellipse(px, py, circSize, circSize);          
		            }
		        }
		    }
		    //draw lines around each tile
		    line(j*tileSizeX, i*tileSizeY, (j+1)*tileSizeX, i*tileSizeY);
		    line((j+1)*tileSizeX + 0.5*offset, (i+1)*tileSizeY-th, j*tileSizeX + 0.5*offset, (i+1)*tileSizeY-th);
		    line(j*tileSizeX, i*tileSizeY, j*tileSizeX + 0.5*offset, (i+1)*tileSizeY-th);
		    line((j+1)*tileSizeX + 0.5*offset, (i+1)*tileSizeY-th, (j+1)*tileSizeX, i*tileSizeY);
		}
	}

    noLoop();
}


When I started working on this project, I wanted to use the honeycomb code from Assignment B this week because of how interesting that ended up looking by itself. Ultimately I had to simplify it in order to make the math for the rest of the design work out a bit better, as adjusting everything to deal with the square root of three over two can become a difficult task. The shapes’ randomized fills and stroke correspond with each other and utilize the same random value in different ways.

Ean Grady-Looking Outwards-05

http://niessnerlab.org/projects/thies2016face.html

Title: Face2Face
Creators: Justus Thies, Michael Zollhofer, Marc Stamminger, Christian Theobalt, Matthias Niebner
2016

TUM Visual Computing has created technology that allows “real-time face facial reenactment of a monocular target video sequence (e.g., Youtube video). Which essentially means that if a person is in front of their commodity webcam and have a video playing of another person talking, this webcam can allow the person’s facial expressions to replace the person in the video’s, in real-time. The project creators track facial expressions of the source and target individuals using a ‘dense photometric consistency measure’. Reenactment of the source’s facial expressions on the target is achieved through fast and efficient ‘deformation transfer’ between the source and target.

I find this work more interesting than inspiring, not to say it isn’t inspiring. It is especially interesting how fluid and realistic the facial reenactments look on the target (video example linked below). Obviously, this was made in 2016 and so the technology now is most likely better than what is shown, however, it is great that such technology exists. A more advanced version of this technology could bring a plethora of possibilities to many different fields, including drastically revolutionizing entertainment or even as a potential means of creating holograms.

Video below is a demonstration of the real-time reenactment.

Christine Chen-Looking Outwards-05

Above is Filip Hodas’s piece Post-apocalyptic Hello Kitty created in 2017
Source: https://scene360.com/wp-content/uploads/2017/07/filip-hodas-02.jpg

Filip Hodas, a computer graphic artist from Prague, used computer softwares to create a series of 3D rendering artworks portraying pop culture dystopia. He used Maxon Cinema 4D, Octane Render, Substance Painter and Photoshop to create these stunning renderings. What I admire most about his pieces is how incredibly detailed they are. He used the softwares for illustration, computer animation and visual effects to create pieces that are so detailed that they are almost like photos. I just can’t believe that all the intricate scratches, shadows of depth, and textures are created with computer programs which again make me realize the impressive capacities that computer programs help us achieve.

His sense of style and futuristic ideas behind this series is also very unique and interesting- to think of objects, items and icons of current pop culture, such as Hello Kitty, Mario, Mickey Mouse, Sponge Bob……etc., as things to be turned into defunct, ominous forms when all living on Earth have disappeared millions and millions of years from now. It is also quite shocking for me to see these characters, which seems to be related to innocence because of how popular they are among children, be portrayed in such a negative way. I almost didn’t recognize the items portrayed within the pieces because of how different they are.