Tanvi Harkare – Project 05 – Wallpaper

tanviharkare_sketch

var posX = 75; //starting position of tile x direction
var posY = 20;// starting position of tile y direction
var iteration = 0; //lets program know whether its odd or even row
var count = 0; //know when to terminate the program with noLoop

function setup() {  
    createCanvas(600, 450);
    background(0, 0, 75);
}

function draw() {
    if(iteration === 0){ //even number rows get 4 tiles
        for(var s = 0; s < 4; s++){
            tile(posX, posY);
            posX += 150;
        }
        iteration++;
    }

    else if(iteration === 1){ //odd number rows get 3 tiles to provide hexagonal effect
        for(var d = 0; d < 3; d++){
            tile(posX + 75, posY);
            posX += 150;
        }
        iteration--; 
    } 
    posX = 75;
    posY += 100;

    if(count > 13){
        noLoop();
    }
}

function tile(x, y){ //new function actually producing the tile with x, y parameters
    stroke(220, 219, 214);
    strokeWeight(1);
    line(x, y, x - 50, y + 50);
    line(x - 50, y + 50, x, y + 100);
    line(x, y + 100, x + 50, y + 50);
    line(x + 50, y + 50, x, y);

    line(x, y, x - 40, y + 50);
    line(x - 40, y + 50, x, y + 100);
    line(x, y + 100, x + 40, y + 50);
    line(x + 40, y + 50, x, y);

    line(x, y, x - 30, y + 50);
    line(x - 30, y + 50, x, y + 100);
    line(x, y + 100, x + 30, y + 50);
    line(x + 30, y + 50, x, y);

    line(x, y, x - 20, y + 50);
    line(x - 20, y + 50, x, y + 100);
    line(x, y + 100, x + 20, y + 50);
    line(x + 20, y + 50, x, y);

    line(x, y, x - 10, y + 50);
    line(x - 10, y + 50, x, y + 100);
    line(x, y + 100, x + 10, y + 50);
    line(x + 10, y + 50, x, y);

    count++;
}

The wallpaper that inspired me for my wall paper

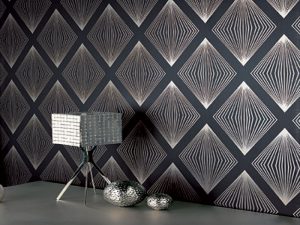
I was inspired by a simple, modern wall paper to create a singular tile that would be repeated in the hexagonal pattern we learned about in Assignment 5B. I created a new function tile(x, y) with two parameters (starting x location and starting y location) to create a set of tiles on a background.

Miranda Luong-LookingOutwards-05

A new experience designed by Local Projects in partnership with Diller Scofidio + Renfro, The Pen at the Cooper Hewitt offers visitors a chance to experiment with creating their own designs. Visitors employ a Pen on interactive tables to explore the museum’s archive of objects, manipulate them and design their own. To do so, visitors draw on a gridded screen and watch as their objects are rendered live as 3D Computer Graphics on another screen adjacent to the first. While I don’t know of the specific algorithm utilized to program the Pen, Cooper Hewitt explains that the Pen’s interface with the interactive tables employs conductive materials common to touchscreen styli. I find this project truly inspiring as it provides a very new and much more immersive way for visitors to engage with works on view in the museum. Reading the project brief and having used the Pen myself, I can tell that its creators wanted to make something very unique, that spoke to the specificities of a design museum. The Pen goes beyond what is offered by an app as it invites visitors to learn about design by designing themselves.

Miranda Luong-Project-05-Wallpaper

sketch

/* Miranda Luong
mluong@andrew.cmu.edu
Section E
Project-05
*/

function setup() {
    createCanvas(600, 400);
    background(80,100,200);
    var tw = width/10;
    var th = 60;
    var oy = 50;
    var ox = 33;
//create 6 rows
    for (var y = 0; y < 6; y++) {
        //for every even row
        if (y % 2 == 0){
            stroke(40,180,40);
            strokeWeight(2);
            //creates 5 sets of twin cherries
            for (var x = 0; x < 5; x++) {
                var py = oy + y * th;
                var px = ox + x * (tw*2);
                //back cherry
                fill(165,40,40)
                ellipse(px-8, py, 25);
                //front cherry
                fill(180,40,40);
                ellipse(px+5, py,30)
                //connecting stem
                noFill();
                arc(px+15, py-10, 50, 50, PI, PI+QUARTER_PI);
                arc(px+22, py-30, 50, 60, 2.25, 3);
                triangle(px-5,py-29,px-1,py-29,px-3,py-27)
                }
        //for every odd row
        } else {
            //creates oranges
            for (var x = 0; x < 5; x++) {
            var py = oy + y * th;
            var px = (ox*2.5) + x * tw*2;
            stroke(40,170,40);
            fill(180,100,40);
            ellipse(px, py, 40);
            //inside orange pattern
            ellipse(px,py,2)
            ellipse(px,py-10,1,12);
            ellipse(px,py+10,1,12);
            ellipse(px-10,py,12,1);
            ellipse(px+10,py,12,1);
                }
            }
        }
    noLoop();
}

function draw() {
    // draw is not called due to noLoop() in setup()
}

I referenced Assignment 2 to create the grid for my wallpaper. I think that assignment was a great exercise for understanding spacing. This was the first time I used the arc module. I never usually create shapes in my projects, but I had a lot of fun making this wallpaper. I decided to draw cherries and oranges because they are my favorite fruit. I tried to play around with colors, which is why I utilized such a bright green to contrast the red and orange.

Curran Zhang- Project 05- Wallpaper

sketch

/*Curran Zhang 
curranz
Project 5
Section A
*/

function setup() {
    createCanvas(600, 600);   
}

function draw() {
    background(128);
    var rectl = 100;
    var rectw = 100;
    var oy = rectw/2;
    var ox = rectl/2;
    var ml = 50;
    var mw = 5;

//Applying the gradient on shapes that are fixed
    for (var x = 0; x < width; x+=rectl) {
        for (var y  = 0; y <height; y+= rectw){
            var R = map(x,0,width,100,300);
            var B = map(y,0,height,100,200);
            var R1 = map(x,0,width,300,100);
            var B1 = map(y,0,height,200,100);

            fill(R,200,B);
            stroke(275);
            strokeWeight(.4);
            rect(x,y,rectl,rectw);

            fill(R1,200,B1);
            noStroke();
            ellipse(x+rectl/2+6,y+rectw/2+4,50,50);  
        }
    }
//Creating variations in color based using the grid
    for (var x = 0; x < 6; x++) {
        for (var y = 0; y < 6; y++) {
            var py = oy + y * rectl;
            var px = ox + x * rectw;
        
            fill('red');
            if (y % 2 == 0) 
                {if (x % 2 == 0){fill('green')}
                };
            if (y % 2 != 0) 
                {if (x % 2 != 0){fill('purple')}
                };
            noStroke();
            ellipse(px,py-1.5,50,50);

            fill(220);
            noStroke();
            arc(px,py,50.8,50.8,0,PI);

            fill(0);
            ellipse(px,py+.5,17,17);
            rect(px-ml/2, py-mw/2+1,ml,mw);

            fill(275)
            stroke(0);
            strokeWeight(1);
            ellipse(px,py,12,12);
            ellipse(px,py,7,7);
        }
    }
}

With the topic of wallpaper, my childhood self use to want my room to be filled with things from the Pokemon games. Thus for the project I decided to create a wallpaper that related to Pokemon. With the usage of PokeBalls, they vary in colors and design. Through for loops and if statements, i was able to vary the different colors within the array.

Romi Jin – Looking Outwards 05

Four researchers at Aalto University present their input on “occluder simplification”, an algorithm they have created that requires very few inputs (does not need to be a perfectly formulated, closed mesh) and easy to implement. In the example below, the simplified triangular shapes or polygons (occluders) of a hairball and bunny.


(example of occluder simplification from triangles)

When applied to larger, more complex shapes, this process could be useful. It is interesting to think about what can be done and what can be advanced in the 3D computer graphics field. In the video below, a before and after is shown, and how much this process simplifies the input, decreasing the input to as low as 2% of the objects.


(The algorithmic process utilized in a 3D route of a city.)

Project – 05 – Wallpaper

Retro Wallpaper

Sean McGadden

I was inspired by 1970’s themes and a retro color scheme. This project was fun to make as it built off past labs and I was easily able to manipulate the primitives to create a modernist feeling wallpaper design. However, the colors were somewhat odd to use so I had to experiment a little before arriving at a scheme I was happy with.

sketch

//Sean McGadden
//Section C @ 1:30
//smcgadde@andrew.cmu.edu
//Project-05

var r = (200);
var g = (200);
var sizeOfCircle = 15
    
    function setup(){
        createCanvas(600,400);
        noLoop();
    }
    
     function draw() {
        background(0);
         
        var numOfCirclesVertically = height / sizeOfCircle
        var numOfCirclesHorizontally = width / sizeOfCircle
//Creating for Loop Circles in Y Direction
        for(var y=0; y < numOfCirclesVertically; y += 1){
//Creating for Lopp Circlesin X Direction
          for(var x = 0; x < numOfCirclesHorizontally; x ++){
//Modulus to create layered shapes
            fill(r,g,0);
            if (x % 5 == 0 &
               y % 5 ==0) {
                
                rect(sizeOfCircle*x, sizeOfCircle * y, x + sizeOfCircle * 5, y + sizeOfCircle * 5);
          
            }
            ellipse(sizeOfCircle/2 + sizeOfCircle*x, sizeOfCircle/2 + sizeOfCircle*y, sizeOfCircle, sizeOfCircle);

              
            print("x is"+x);
            }
          }
//Creating the Sqaures
         for(var y=0; y < numOfCirclesVertically; y += 1){
//        r = 255/numOfCirclesVertically*y;
          for(var x = 0; x < numOfCirclesHorizontally; x ++){
               if (x % 5 == 0 &
               y % 5 ==0) {
                   fill(168, 255, 253);
//Creating Circles on top of Squares
                rect(sizeOfCircle*x + 10, sizeOfCircle * y + 10, sizeOfCircle * 5 - 20, sizeOfCircle * 5 - 20);
                   fill(255, 204, 100);
                 ellipse(sizeOfCircle/2 + sizeOfCircle*(x+2), sizeOfCircle/2 + sizeOfCircle*(y+2), sizeOfCircle*3, sizeOfCircle*3);
              }
          }
          }
     }


Looking Outwards 5 – Sara Frankel


caption: CGI is used throughout the entire movie of The Hobbit.

The movie, The Hobbit, uses CGI, or computer generated imagery, to help develop the feeling of a different world. Every aspect of this movie is produced with CGI. Everywhere from the size of the characters (to distinguish the difference between a hobbit and not), the scenery (the differences between castles, caves, rolling hills, different villages), to building legitimate characters (the dragon, Gollum, and a lot of the little furry friends). I admire this process as by applying CGI to almost every aspect of the movie truly helps to fully develop the quality and almost the legitimacy of the reality of the movie. This movie inspires me with my major in the sense that just applying CGI, or in my case my phrasing, to one’s art will raise the quality and the coherency of the product.

Jonathan Liang – Project 5 – Wallpaper

sketch

//Jonathan Liang
//jliang2
//Section A


x1 = 90;
y1 = 60;
x2 = 30;
y2 = 120;


function setup() {
    createCanvas(480, 400);
    noStroke();
    
}

function draw() {
	background(102, 179, 255);
	for (var x1 = 90; x1 < width; x1 += 200) {
		for (var y1 = 60; y1 < height; y1 += 120) {
			cloud1(x1, y1);
		}
	}
	
	for (var x2 = 30; x2 < width; x2 += 175) {
		for (var y2 = 120; y2 < height; y2 += 120) {
			cloud2(x2, y2);
		}
	}
	man();
	noLoop();
}

function cloud1(x1,y1) {
	noStroke();
	fill('white');
	rect(x1, y1, 85, 10, 20);
	ellipse(x1 + 30, y1 - 5, 25, 20);
	ellipse(x1 + 55, y1 - 10, 45, 35);
	ellipse(x1 + 45, y1 - 25, 40, 40);

}

function cloud2(x2,y2) {
	noStroke();
	fill('white');
	rect(x2, y2, 50, 8, 20);
	ellipse(x2 + 20, y2 - 5, 18, 15);
	ellipse(x2 + 35, y2 - 10, 25, 25);

}

function man() {
	push();
	noFill();
	strokeWeight(5);
	stroke('red');
	rotate(radians(30));
	ellipse(250, 250, 100, 90); //head
	strokeWeight(3);
	ellipse(250, 250, 30, 20); //nose
	arc(225, 250, 20, 20, 0, HALF_PI + QUARTER_PI); //cheek
	arc(275, 250, 20, 20, 0, PI + QUARTER_PI); //cheek
	ellipse(240, 230, 10, 15); //left eye
	ellipse(260, 230, 10, 15); //right eye
	arc(250, 260, 50, 30, 0, PI); //mouth
	pop();

}

When I was young I loved drawing on walls, so no matter what the wallpaper was I would draw something on it. My favorite wallpaper when I was younger was Andy’s wallpaper in Toy Story. So this wallpaper pattern with clouds is something that has resonated with me since childhood. Nevertheless, I would have still doodled on the walls anyway.

Looking outwards 05


This project is a fictional character created by artists Trevor McFedries and Sara Deco who created a 19 year old avatar, Miquela. She is a model and musician and a social media influencer. She has more than a million followers by portraying the lifestyle of an it-girl on Instagram. This project interested me because of the impact that she is having on our society today. Brands are taking her on as a model and an ambassador. Her music is being compared to other virtual musicians such as Gorillaz and Hatsune Miku. What I am fascinated by the most is that she is not a real person yet she feels like one because of how realistic the artists have rendered her (and Photoshop her into photos with real people) to be and her personality/presence on Instagram. She has marked a new era of IA. This project has received both intrigue and criticism where people question whether Miquela is an art project or a social experiment. McFedries and Deco own a company called Brud which is a creative agency specializing in robotics and artificial intelligence and the first computer generated social media persona.

Tanvi Harkare – Looking Outwards 05

A project that deals with 3D computer graphics that I found interesting was the animation called On the Road to Nowhere. This project was done by Mohamed Chahin, who uses a software called Blender 3D to create different types of animations. This project focuses on a small, blue monster who Is riding an orange airplane. Although the animation is short, the quality of the animation is very good; the short animation keeps repeating itself with no obvious sign of it looping repeatedly. Some other aspects of 3D graphics that Blender 3D is capable of includes rigging, modeling, simulations, renderings, and motion tracking. Chahin uses Blender in some of his other works, sometimes pairing it along with Photoshop and other Adobe software.

A capture from Chahin’s animation

I really like these types of projects because they seem like small projects that can be done in a shorter amount of time than other design projects. I am interested in knowing what would happen if you combined these smaller projects to create one big project. I assume that many animations would turn into a movie, or even a video game if it were interactive with a user.   Click here for a link to his full project portfolio.