Meejin Koon // Howeler + Yoon Architecture

For this week’s blog post, I am taking a deeper dive into the Howeler + Yoon Architecture firm from Min Lee’s Week 8 Looking Outwards on Meejin Yoon.

I actually had the pleasure of seeing 2 of their projects on a studio trip to Boston last summer. One project I really want to highlight from this firm is the Collier Memorial on MIT’s campus.

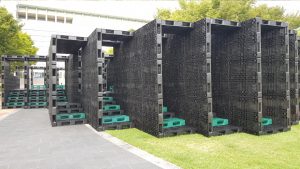
Sean Collier Memorial, MIT, Boston, Howeler + Yoon

This project is a memorial to an officer, Sean Collier, that was shot and killed in 2013. As most memorials result in statues, plaques, benches, etc. I remember being completely inspired by this project’s ambition, structure, and integration into the public landscape.

Now looking further into this project, and learning more about the firm from Meejin Yoon, I have learned that the entire design and structural analysis utilizes computational design. I believe the project mainly utilizes Rhino 3D Modeling Software and Grasshopper, a Rhino plug-in for computational and parametric design.

Computational model of Memorial

The structure being constructed of 32 granite blocks presents new challenges that are wouldn’t be the same for something like poured in place concrete. So for this project, not only was the design computational, but the actual fabrication of these pieces used a combination of manual labor and robotic sawing.

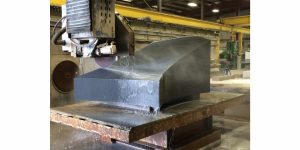
Fabrication of memorial at Quarra Stone Co., in Madison, Wis.

What I really appreciated in Min Lee’s piece is the emphasis on the idea of public/private space. With the Collier memorial, the project has transformed a public area to create new spaces for the public to interact with, rather than look at or observe. This firm is really combining their design goals with the right tools and software to make them happen.

Alexandra Kaplan – Project 09

sketch

/*
Alexandra Kaplan
aekaplan@andrew.cmu.edu
Section C
Project - 09
*/

var img; //image
var w; //width of balloons

function preload () {
    img = loadImage("https://i.imgur.com/0F4euVwm.jpg?2") //loads image
}

function setup() {
    createCanvas(320, 315);
    background(0);
    noStroke();
    img.loadPixels(); // loads pixels
    frameRate(200); // fast
}

function draw() {

    var x = floor(randomGaussian(width / 2, 75)); // draws balloons concentrated in the center
    var y = floor(randomGaussian(height / 2, 75)); // draws balloons concentrated in the center
    var col = color(img.get(x, y)); 
    var d = dist(x, y , width / 2, height / 2);
    w = map(d, 0, width, 1, 10); // balloons in center are smaller than edge
    fill(col); // fill is color of image at x and y
    stroke(col); // stroke color is color of image at x and y
    balloon(x, y, w, w); // draws balloon
}

function balloon(x, y, w){
	strokeWeight(0.5);
	line(x - (w / 12), y, x - (w / 12), y + (w * 2)); // draws balloon string
	strokeWeight(0);
	ellipse(x, y, w, w); // draws filled up balloon 
	triangle(x - (w / 4), y + (w / 1.5), x + (w / 4), y + (w / 1.5), x, y); // draws balloon nubbin
}

I had a lot of fun finding a picture for this project, and I ended up going with a photo I took of my housemate at the end of last year when we filled up another housemate’s room with balloons. For the computational image, I decided that it should be made up of balloon shaped pixels. The pixels are bigger and more concentrated in the center (and therefore a higher resolution) and bigger and less concentrated on the outskirts.

Beginning of image
Closer to end of image
Original Image

Tanvi Harkare – Looking Outwards 09

For this looking outwards, I liked the project that Romi Jin covered in her looking outwards 3 about computational fabrication. As an architecture major, computational design is one of the many ways we can design buildings for the future. The specific computational project was HG’s opening chronometry. I agree with the fact that using a tool called Grasshopper to create parametric designs are a very easy way to create iterations in your design process, versus trying to record all those things by hand. My favorite project by this group is their Hide-and-Seek project, which is an art museum and cultural space. They used computational design to create a labyrinth of corridors that visitors can use to go through series of small spaces. Users are to “hide and discover each other” through different material transparencies and stairs. The main building material is recycled plastic pallets & LED lights for lighting, which is an unusual combination of materials I haven’t seen before.

Click here for a link to the original looking outwards post, and click here for the link to the project!

The Hide & Seek pavilion

Christine Chen-Looking Outwards-09

2017 Nike Air Max Video. Link: https://vimeo.com/192130017

I was captivated by the 2017 Nike Air Max promo video that Vicky discovered. I watched the video over and over again and was just simply fascinated by how well the creators utilized various organic textures, pastel colors of blue and pink, and dynamic forms to create this enchanting motion graphic. I completely agree with Vicky about her comment on the creator’s incredible use of 3D computer graphic to help viewer’s understand the ways in which the materials of the shoes behave when they are under use. To add on to her comment, I think the how the creator’s uses metaphorical graphics, such as movements of the pumping of air balloons, the swirling of light fabric wrapping around the shoes and others, really helps the viewers understand and visualize the functionality and material of the shoes. One of the main pros of the shoe is its incredible lightweight, and the three-dimensional graphics of the forms really help to put emphasis on this. This video again reminds me of what first drew me towards stepping into the world of design and why I chose this major in the first place.

Vicky’s post: https://courses.ideate.cmu.edu/15-104/f2018/2018/09/23/vicky-zhou-looking-outwards-05/


Christine Chen-Project-09-Portrait

Christine Chen-Project-09-Portrait

/*
Christine Chen
Section E
cyc1@andrew.cmu.edu
Project-09
*/
var hiddenImage;

function preload() {
    var imageURL = "https://i.imgur.com/uGrwjUm.jpg";
    hiddenImage = loadImage(imageURL);
}

function setup(){
    createCanvas(480, 480);
    background(100);
    noStroke();
    imageMode(CENTER);
    hiddenImage.loadPixels();
    frameRate(150);
}

function draw() {
    //randomizes pixel location
    var pixelX = random(0, width);
    var pixelY = random(0, height);

    //constrains pixel x values
    var imageX = constrain(floor(pixelX), 0, width); 

    //constrains pixel y values
    var imageY = constrain(floor(pixelY), 0, height);

    //get hiddenImage data
    var locationXYcolor = hiddenImage.get(imageX, imageY);

    //rect size increases with increasing mouseX
    var size = map(mouseX, 0, width, 5, 20)

    stroke(135, 183, 237); //blue
    strokeWeight(0.1); //thin line
    fill(locationXYcolor);
    rect(pixelX, pixelY, size, size);

    //faster on right, slower on left
    //smaller pixels on right need to run faster to show imge
    if (mouseX > width/2){
        frameRate(10);
    } else {
        frameRate(250);
    }
}

//redraws background(start over)
function mousePressed(){
    background(100);
}


For this project, I used my brother’s photo, which I took for his high school senior d. I was playing around with pixel sizes and frame rates. The smaller mouse x is, the smaller the pixels are. Because smaller pixels take more time to draw out a bigger part of the image, I made the frame rate faster for them.I gave the pixels light blue outlines to give the image more of a “mosaic” feeling.

Original photo
Initial stages
When mouse is at the right(large pixels)
When mouse is at the left(small pixels)


Project 09: Jaclyn Saik

sketch

/* Jaclyn Saik 
Section E
project 09 
*/
var ryder;

function preload(){
    var buddy = "https://i.imgur.com/PGxudTG.png"; //my brother eating corn!
    ryder = loadImage(buddy); //variable to contain the pixels in image  
}
function setup() {
    createCanvas(480, 470);
    background("goldenrod");
    ryder.loadPixels(); //loads actual pizels into program 
    frameRate(1000);
}

function draw() {
    var px = random(width); //randomized variable for x position 
    var py = random(height);//randomized variable for y position 
    var ix = constrain(floor(px), 0, width-1); //var for grabbing pixel data
    var iy = constrain(floor(py), 0, height-1);
    var theColorAtLocationXY = ryder.get(ix, iy);
    var rando = random(-30, 30); //variable to randomize stroke weight later
    var stro = random(1, 5); //variable to randomize stroke weight later
    var stroTwo = random(1, 10);

    noStroke();
    fill(theColorAtLocationXY); //fills with the color at that particular pizel
    stroke(theColorAtLocationXY);
    strokeWeight(stro); //randomized stroke weight so stars are unique
    drawStar(px, py); //draws star at random x and y position each time draw is called
    line(px, py, px+rando, py+rando); //pritns "tails" connected to stars

    var theColorAtTheMouse = ryder.get(mouseX, mouseY);
    stroke(theColorAtTheMouse);
    strokeWeight(stroTwo); //makes a line that changes stroke weight 
    line(pmouseX, pmouseY, mouseX, mouseY); //draws line with the mouse, 
    //so you can paint on the canvas a little bit

}

function drawStar(x, y) {
    textSize(random(20, 70)); //randomizes size of star
    text("*", x, y); //creates object that can be manipulated by position later

}

function mousePressed() { //draws "yum" when mouse is pressed
    noStroke();
    textSize(random(10, 40)); //alternates size of text
    fill("yellow");
    text("yum", mouseX, mouseY);

}

For this project, I instantly though of my little brother: he is always posing for funny photos and I especially miss him right now. I chose to use an asterisk to color in his image, since I think it adds a whimsical touch to the image. I added some randomized tails to each asterisk is order to try to create this oil-painting technique where the image looks like it has some motion to it. I also edited the mouse function so that the stroke is randomized each millisecond, so that it appears like your mouse is a brush that is applying varying amounts of paint. Since my brother Ryder is eating corn in this image, when you click your mouse, the word “yum” pops around. It makes him somewhat of a meme, which is how I see him a lot so it makes sense to me.

The original image: my little brother Ryder
When the image is just starting out
As it continues, you can decorate it with yellow “yums” and draw with the mouse to create a line.
Somewhat finished, with yums included
After being left alone for about 3 minutes.

Min Jun Kim- Looking Outwards 9


Multiverse by fuse*

This week I’ve decided to do a peer review of a Han Yu’s looking outward’s post. I found a post that is very interesting and it contains a project that immediately drew my attention. It is a art installation that has heavy usage of both visuals and sounds by a company called fuse*. The project is representative of the vastness of the multiverse that is infinite and always going through the cycle of life- that is, the birthing and the dying of the universe. Personally, I thought that the project was very engaging as an artform that encourages the audience to fall into deep thought. It really showed the immenseness of the universe with huge displays with patterns that never repeats itself. I thought that the experience of the project could have been improved had the screen been wider horizontally (like a room) and had different noises that blend with the visual display- or had other features such as user interation. Otherwise the I would have to agree with the poster about the influence that it has on the viewer- it really does give a sense of the infinite possibility of life. Overall, it was a super unique project with very good execution.

Link to Original Work: https://courses.ideate.cmu.edu/15-104/f2018/2018/09/18/han-yu-looking-outwards-04/
Creator’s name: fuse*
Created in 2018 in Italy

Kai Zhang-Looking Outwards-09

This week for Looking Outwards, I looked through LIngfan Jiang’s post for Looking Outwards 07 about an interactive art installation. Here’s his decription and reflection of the project below.

This week, I am particularly interested in this project called “skies painted with unnumbered sparks”. It was done by an interactive artist, Aaron Koblin collaborated with Janet Echelman in 2014. Made entirely of soft fibers, the sculpture can attach directly into existing city architecture.

Being an architecture student myself, I really like how the artist started to think about the space between the buildings and how art could be involved in it. I really like the contrast between the hard concrete buildings and the smooth, light installation. Most importantly, with computational information visualization and great lighting effects, it really became something its audiences are willing to interact with. It is also amazing how people could just use their phones to draw lines and that would project directly onto the installation.

I think the final form of this art piece is very successful. As I mentioned earlier, this project is done by an interactive artist,  Aaron Koblin and another artist, Janet Echelman, who mainly does amazing huge scale installation art. Therefore, I think the combination of the two artists really created something fascinating.  As for the algorithm behind it, I would assume that the installation becomes a bigger monitor of people’s phones. Whatever is drawn on the phones would project directly on to the installation.

Furthermore, I think this kind of techniques could really make some science fiction movie scenes come true where a lot of projecting figures are floating in the air in the future.

I really appreciate his reflection of this art installation from a perspective of an architect’s point of view. And for a person of the same identity, I do also have many of the same feelings when I see this project.

And I also see something else. Other than the aesthetic aspect of the project, I also see how this is valuable to the public. Often times we have nothing more to do with the architectural or many of the art installtion than being able to snap photos and post them to Instagram. But this kind of the work enables the possibility for the public to become part of the work. By using technology, everyone is able to join the party and become the composer of the great piece. Also, the form of interaction has a decent amount of capacity for everyone who wants to do the work. It creates a virtual connection between people and encourages the interaction between not only people to technology, but people with each other. And I think this the temperature of the technology driven by people with such ambitions to bring everyone together.

John Legelis – Project 09 Portrait

sketch

// John Legelis
// Section D

var imgH = 480
var pR = 10
var colorList = []
var cWidth = 360
var cHeight = 480
var sourceimg = "https://i.imgur.com/PHP8Htm.jpg"
var pimg = "https://i.imgur.com/R1D8XFS.jpg"
var Ploaded
var Sloaded;

function preload() {
    Sloaded = loadImage(sourceimg)
    Ploaded = loadImage(pimg)
}
function setup() {
    createCanvas(360, 480);
    background(0);
    Sloaded.loadPixels()
}
function draw() {
    for (x=0; x < cWidth/pR; x++){
        colorList[x] = []
        for (y=0; y < cHeight/pR; y++){
            colorList[x][y] = Sloaded.get(x*pR, y*pR)
            noStroke(0)
            tint(colorList[x][y])
            image(Ploaded, x*pR, y*pR, pR, pR)
        }
    }
    noLoop()
}

This week’s project seemed at first a bit intimidating but after thinking about it, I decided creating a mosaic representation of a portrait using “tiles” of another image would be an approachable yet interesting approach. The portrait photo this project is based on is a photo I took of my friend in a car holding her small dog named Rocky. The tile photo I used for the mosaic was a close up of Rocky’s face.

The Tile Image
Screenshot of mosaic with tile size 40 pixels.
Screenshot of mosaic with tile size 4 pixels.

Kai Zhang-Project-09-Portrait

sketch

//Kai Zhang
//Section B
//kaiz1@andrew.cmu.edu
//Project-09

var underlyingImage;

function preload() {
    var myImageURL = "https://i.imgur.com/ABkk19M.jpg";
    underlyingImage = loadImage(myImageURL);
}

function setup() {
    createCanvas(480, 480);
    background(0);
    underlyingImage.loadPixels();
    frameRate(500);
}

function draw() {
    var px = random(width);
    var py = random(height);
    var ix = constrain(floor(px), 0, width-1);
    var iy = constrain(floor(py), 0, height-1);
    var theColorAtLocationXY = underlyingImage.get(ix, iy);

    strokeWeight(3);
    stroke(theColorAtLocationXY);
    line(px + 8, py - 8, px - 5, py + 5);
}

So for this project of mine, I tried to think of how I would use graphite to quickly sketch a portrait in the shortest amount of time possible. Usually I would use very dense diagonal lines to do that. So in my code, the “drawing stroke” I chose is a line of roughly 18 pixels long and in 45 degrees with a stroke weight of 3. The stroke weight should be small to achieve a higher resolotion. The subject of the portrait is Lingfan Jiang, and I took this photo for him when he was struggling with his studio work. In the end, I increased the frame rate to 500 frames per second to generate the resulte much faster.

Following are the origianl photo and three stages of the resolution.