Nina Yoo – Looking Outwards- 07

Lev Manovich – The Exceptional and Everyday – 144 hours in Kyiv- 2014

Instagram users in the City

The project of 144 hours in Kyiv takes place in Kyiv, Ukraine where they had tracked instagram usage across the area during the revolution on February 17 –  22. Lev had teamed up with Jay Chow, Alise Tifentale, and Mehrdad Yazdani to execute an aesthetic visual that described the power of social media and how it effects everyday life. While in real life the city was abuzz especially in the square, online was different. Pictures of protesters clashing with police was right alongside with cute instagram pictures posted by other people. It made it seem as if the protest was just a part of everyday life and that was what Lev was trying to convey about how social media can turn serious issues into everyday life. I admire Lev for his ability to express this information in an aesthetic way where it almost seems like a virus is spreading around. Instead of having boring statistical numbers, he took an idea of “lights in the city” and transfered it to track instagram users which is both easy to understand and visually appealing.

Nina Yoo – Project 07 – Curves

sketch
I was really intrigued by the hypotrochoid curve and how it was drawn the site itself. Through this project I was able to play around with the functions of cos and sin which I havent been able to delve into before. It was interesting to play with the numbers and see what different shapes appeared because of the repetitively drawn lines.

/* Nina Yoo
Section E
nyoo@andrew.cmu.edu
Project-07 Composition with Curves*/

var nPoints = 200
function setup() {
    createCanvas(480, 480);
    		frameRate(15);

    
}

function draw() {
	background(200,34,164);
	push();
	//into middle
	translate(width/2, height/2);
	drawHypotrochoidCurve();
	pop();
}


function drawHypotrochoidCurve(){
		//Hyptotrochoid
		//Link: http://mathworld.wolfram.com/Hypotrochoid.html

		var x;
		var y;
		
		var h = 15;
	

		var a = map(mouseX, 0,width,100,300); // (wat u want to effect, orginal range, new range) makes the variables interactive
		var b = map(mouseY, 0, height, 100,300);

		stroke(210,36,117);
		strokeWeight(2);

		beginShape();
			for(var i = 0; i <nPoints; i ++){

				// set variable t within the for loop so it keeps on looping (this acts as the angle for mouse)
				var t = map (i, 0, nPoints, 0 , 330 );

					// equation for the curve
				x = (a - b) * cos(t) + h * cos((a - b) * t); 
				y = (a - b) * sin(t) - h * sin((a - b) * t);
				vertex(x,y); // setting the patternn in the middle

			}
		endShape(CLOSE);


}


Project 7 rrandell

sketch

/* Rani Randell
rrandell@andrew.cmu.edu
Section A
Project 7 */

function setup() {
    createCanvas(400, 400);
}

function draw() {
    background(255, 250, 180) //pastel pallette

    x = constrain(mouseX, 0, width);
    y = constrain(mouseY, 0, height);

    push();
    translate(width, height);
    drawHypotrochoid();
    pop();
}

function drawHypotrochoid() {

    for (var i = 0; i < TWO_PI; i ++) { 
       var a = map(y, 0, mouseX, 0, height); 
       var b = map(x, 0, mouseY, 0, width); 

        x = (a - b) * cos(i) + 200 * cos(((a-b)/b) * i); //equations
        y = (a - b) * sin(i) - 200 * sin(((a-b)/b) * i); // cited at bottom

        noFill();
        stroke(180, 150, 255); 
        strokeWeight(1);
        ellipse(-200, -200, x, y); //lavendar ellipse
        stroke(0, 0, 255);
        rect(-200, -200, x, y); //blue rectangles
        stroke(255, 250, 0) //clear yellow
        ellipse(-100, -100, x / .5, y / .5)
        stroke(255, 100, 240); //hot pink concentric circles
        ellipse(-300, -300, x * .5, x * .5)

    }
    //link to eq: http://mathworld.wolfram.com/Hypotrochoid.html
}

I really wanted this project to feel like an explosion of lines and color, so i mainly experimented with the various ellipses and rectangles after implementing the equations for a hypotrochoid. I included a process pic below:


Yoo Jin Shin-Project-07-Curves

Place mouse on canvas!

// Yoo Jin Shin
// Section D
// yoojins@andrew.cmu.edu
// Project-07-Curves


function setup() {
    createCanvas(480, 480);
}

function draw() {
	background(255);

	// Stroke color and weight based on mouseX
	var R = map(mouseX, 0, width, 170, 250);
	var W = map(mouseX, 0, width, 0.3, 1.5);

	push();
	translate(mouseX, mouseY);

	// Gray shadow curve properties
	stroke(240);
	strokeWeight(4); 
	drawCurve2();

	// Colored curve properties
	stroke(R, 200, 200);
	strokeWeight(W);
	drawCurve1();

	pop();
}

// Hypocycloid Pedal Curve (HPC)
function drawCurve1() { 
	var x;
	var y;
	var t = PI;
	var a = map(mouseX, 0, width, 0, 200);
	var n = map(mouseY, 0, height, 0, 10);

	beginShape();
		for(var i = 0; i < width; i++) {
			// HPC equations from Wolfram
			x = a * ((n - 1) * cos(t) + cos((n - 1) * t)) / n
			y = a * ((n - 1) * sin(t) - sin((n - 1) * t)) / n
			vertex(x, y);
			t += 1.3;
		}
	endShape();
}

// HPC Gray Shadow
function drawCurve2() { 
	var x;
	var y;
	var t = PI;
	var a = map(mouseX, 0, width, 0, 200);
	var n = map(mouseY, 0, height, 0, 10);

	beginShape();
		for(var i = 0; i < width; i++) {
			// Same as Curve1, but shifted slightly left/down
			x = a * ((n - 1) * cos(t) + cos((n - 1) * t)) / n - 5;
			y = a * ((n - 1) * sin(t) - sin((n - 1) * t)) / n - 5;
			vertex(x, y);
			t += 1.3;
		}
	endShape();
}

I looked through several different curves on the Wolfram website and ended up choosing the Hypocycloid Pedal Curve. I really liked the range of patterns that it produced when I mapped its properties to the mouse position. I decided to also gradually alter the color and stroke weight (based on the position) for more variety. I tried creating more depth by adding a slightly shifted and faded duplicate of the colored curve, similar to a shadow. Few of the different curves are shown below: 

carley johnson curves

sketch

/*Carley Johnson
Section E
cbjohnso@andrew.cmu.edu
Project 07
*/

let x = 0;
let y = 0;
let ang = 90;
let col = 0;
let moveC = 1;

function setup() {
  createCanvas(480, 480);
  angleMode(DEGREES);
}

function draw() {
  background(random(100, 255), random(200, 50), random(0, 255), 5);
  stroke(100, 100, 40);

  //moving the color value
  col += moveC;
  fill(col + 50, 20, 20);
    if (col >= 100 || col < 0) {
      moveC = moveC * -1;
  }

  //rotate around the center
  translate(width/2, height/2);
  //rotation increments
  rotate(x);
  x+=1;
  //draws ellipse
  for (i = 0; i < 360; i += 13) {
  ellipse(-mouseX + cos(i++) * width / (400 / 72), width / 20 + sin(i++) * width / (400 / 72), width / 20 + mouseX, width / 20 -mouseY);
  }


}

I was not a fan of this project, the curves were all so daunting and cos/sin is really something that confuses me. I’m satisfied with the spiral the circles rotate around according to your mouse, but this was not a great project for me. Hopefully next week I can produce something more aesthetically pleasing.

Victoria Reiter – Project 07 – Curves

sketch

/*
Victoria Reiter
Section B
vreiter@andrew.cmu.edu
Project-07-Curves
*/

// initial angle of rotation for the shape
var angle = 0;

function setup() {
    // establishes canvas size
    createCanvas(480, 480);
}

function draw() {
    // sets background color
    // the same one as from my ptoject 3... I really like it:)
    // the opacity gives it a cool fading effect!
    background('rgba(255,187,203,0.05)');
    // C's get DEGREES
    angleMode(DEGREES);
    // declares variables that will be used in the mathy-math later on
    var x;
    var y;
    var radius1;
    var radius2;
    var ratio1;
    var ratio2;
    // center x and center y points
    var cx = width / 2;
    var cy = height / 2;
    // color of shape's line will change as mouse moves from right to left
    var strokeColor = map(mouseX, 0, width, 0, 255);
    // color of shape's fill will change as mouse moves from right to left
    var fillColor = map(mouseX, 0, width, 255, 0);
    // makes that angle of rotation will change as mouse moves up and down
    var increment = map(mouseY, 0, height, 0, 7);

    beginShape();
    stroke(strokeColor);
    fill(fillColor);
    push();
    // draws at center of canvas
    translate(cx, cy);
    rotate(angle);
    // math *bows*
    for (var theta = 0; theta < 360; theta +=1) {
        radius1 = 70;
        radius2 = 30;
        ratio1 = map(mouseX, 0, width, 10, 200);
        x = (radius1 * cos(theta) + radius2 * cos(theta * ratio1));
        y = (radius1 * sin(theta) + radius2 * cos(theta * ratio1));
        vertex(x, y);
    }
    // makes the shape rotate
    angle = angle + increment;
    endShape(CLOSE);
    pop();
}

So doing this project, I struggled a bit because, uh, I haven’t had to use cos or sin since highschool….
Anyway. I got inspiration from Spirographs, since I think they’re cool and vintage-y and nostalgic and remind me of being little and stories my parents have told me. But how does one draw a Spirograph??? I took to the internet to find out. I found many very unhelpful resources, and one most-helpful one, here. It listed the equations x = cx + radius1 × cos(θ) + radius2 × cos(θ) and y = cy + radius1 × sin(θ) + radius2 × cos(θ), which I used to design my curve.

I have interactive elements for the shape fill, shape color, density(?) of curves comprising the shape, and speed of rotation.

And I made the background pretty pink with the opacity toyed with for a cool effect, stolen from my own Project 3 assignment because I like this effect so much.

Very trippy, this project. Quite trippy.

Hannah Cai—Looking Outwards—07

https://www.creativeapplications.net/vvvv/melting-memories-drawing-neural-mechanisms-of-cognitive-control/

This project by Refik Anadol Studio caught my eye because it’s so beautiful and haunting—it really looks like something from a sci-fi movie. In reality, it’s a visualization of brain wave activity of participants who were asked to recall specific childhood memories. These memories weren’t mentioned; I’m really curious what they were. Even without that information though, the project still gives off a really nostalgic feeling.

I didn’t really understand the technical details behind the visualization, but the designer(s) seemed to have taken EEG data and input it into algorithms for 3d structures. While the concept behind that is really neat, I feel like the actual structures created would be very subjective based on the algorithm used, and I wish there was more context about the how one was translated into the other. I feel like this type of visualization has a lot of potential in research and education; I’d love to see a more concrete approach used to describe brain activity—for example, what different emotions look like, brain activity mapped to height of data points, etc. However, I do still think the end result of this project is really beautiful and innovative on its own.

Looking Outwards 07 – Data Vis


This was the animation on their website that caught my eye

Studio NAND’s website is like their work; it’s catchy and dynamic. One of their projects, Peak Spotting, took data gathered from Deutsche Bahn, a German railroad company, and created a tool that in real time displays data for all of their lines, and through use of historic data, projects estimations up to 100 days in the future for data like train use. I think that what they’ve made is both utilitarian and well-presented (you can really see that they care for style). It looks like they’ve developed their own industry-oriented app that displays all of the data that Deutsche Bahn records. In part, Deutsche Bahn is to thank for keeping such detailed records, but Studio Nand’s design team did a good job. The animation above is simple but colorful, and the bar charts are pleasant to look at without compromising the reality of the numbers. It’s nothing too abstract, and doesn’t aim to be art, but it’s just straight-up good data.

JasonZhu-LookingOutwards-07


This is a screenshot of the data visualization chart for the many ways to die by Nathan Yau, It is titled How You Will Die and is published on FlowingData.com.

https://flowingdata.com/2016/01/19/how-you-will-die/
Created by Nathan Yau; Date Unknown.

I have long admired this project for several reasons. First and foremost it allows for the right amount of customization. Often times, data visualizations will overdo the interactivity component or not include it at all. This project is in the goldilocks zone of interactivity and customizability. I also very much admire how the information is presented. It takes a simple approach (using circles) to convey a complex amount of statistical data. Fascinating to say the least. I think this plays nicely into how Nathan Yau uses a very computational method visualization in his work. In many ways his artistic sensibilities are nested within the final product. As for the algorithms used, it seems to be various algorithms that pull from a statistical database.

JasonZhu-Project-07-Curves

I liked this project a lot because it began to delve into more abstract realms. While the execution was difficult, I had a lot of fun in the process exploring various types of graphing functions and applications. In trying to determine how to build my proposed idea, I was able to rekindle a long held interest in computational art as well as explore the mathematical side of computing. I believe this project has a host of potential applications that will bode well for me in future projects and courses.

sketch

/* Jason Zhu
jlzhu@andrew.cmu.edu
Section E
Project 07-Curves
*/

function setup() {
    createCanvas(480, 480);
}

function draw() {
	// define constrain variables
	var cx = constrain(mouseX, 0, 480);
	var cy = constrain(mouseY, 0, 480);
	// define color variables
  	var red = cx * .3
  	var green = cy * .3
  	var blue = 100
  	// define additional variables and draw shapes
	background(red * .3 - 15, green * .3 - 15, blue * .3 - 15);
	drawhypotrochoid();
	drawhypotrochoid2();
	drawflowerellipse();
	drawflowerellipse2();
	frameRate(999);
}

function drawhypotrochoid() {
	push();
	translate(width / 2, height / 2);
	noFill();
	// define constraint function
    var cy = constrain(mouseY, 0, 480);
	var cx = constrain(mouseX, 0, 480);
	// define draw variables
	var r1 = 360;
    var a1;
    var b1;
	// define color variables
  	var red = cx * .25
  	var green = cy * .25
  	var blue = 100
  	// define stroke
    strokeWeight(10);
	stroke(red, green, blue);
  	// define shape parameters
    // define alternation parameters
    var a1 = map(cx, 0, width, 0, 25);
    var b1 = map(cy, 0, height, 0, 1);
    // define shape parameters
    beginShape();
    rotate(radians(angle));
		for(var t = 0; t < 360; t += 2) {
			var angle = map(t, 0, 360, 0, 360);
        // equation
			var x = (a1 - b1) * cos(angle) + r1 * cos((a1 - b1) * angle);
			var y = (a1 - b1) * sin(angle) - r1 * sin((a1 - b1) * angle);
			curveVertex(x, y);
			}
		endShape();
    pop();
}

function drawflowerellipse(){
	translate(width / 2, height / 2);
	noFill();
  	// define constrain variables
	var cx = constrain(mouseX, 0, 480);
	var cy = constrain(mouseY, 0, 480);
	// define draw variables
  	var angle = map(cx, 0, width, 0, 360);
  	var a2 = 100 + (.2 * cx);
  	var b2 = 100 + (.2 * cx);
  	// define color variables
  	var red = cx * .6
  	var green = cy * .6
  	var blue = 100
  	// define stroke
    strokeWeight(1);
	stroke(red, green, blue);
  	// define shape parameters
  	beginShape();
	rotate(radians(angle));
  	for (var t = 0; t < 160; t +=2.8){
	    var x = a2 * (cos(t));
	    var y = b2 * (sin(t));
	    curveVertex(x,y);
		}
	endShape();
}

function drawflowerellipse2(){
	noFill();
  	// define constrain variables
	var cx = constrain(mouseX, 0, 480);
	var cy = constrain(mouseY, 0, 480);
	// define draw variables
  	var angle = map(cx, 0, width, 0, 360);
  	var a2 = 30 + (.2 * cx);
  	var b2 = 30 + (.2 * cx);
  	// define color variables
  	var red = cx * .6
  	var green = cy * .6
  	var blue = 100
  	// define stroke
    strokeWeight(1);
	stroke(red, green, blue);
  	// define shape parameters
  	beginShape();
	rotate(radians(angle));
  	for (var t = 0; t < 160; t +=3.8){
	    var x = a2 * (cos(t));
	    var y = b2 * (sin(t));
	    curveVertex(x,y);
		}
	endShape();
}

function drawhypotrochoid2(){
	push();
	translate(width / 2, height / 2);
	noFill();
	// define constraint function
    var cy = constrain(mouseY, 0, 480);
	var cx = constrain(mouseX, 0, 480);
	// define draw variables
	var r1 = 360;
    var a1;
    var b1;
	// define color variables
  	var red = cx * .3
  	var green = cy * .3
  	var blue = 100
  	// define stroke
    strokeWeight(5);
	stroke(red * .3 - 15, green * .3 - 15, blue * .3 - 15);
  	// define shape parameters
    // define alternation parameters
    var a1 = map(cx, 0, width, 0, 25);
    var b1 = map(cy, 0, height, 0, 1);
    // define shape parameters
    beginShape();
    rotate(radians(angle));
		for(var t = 0; t < 360; t += 2) {
			var angle = map(t, 0, 360, 0, 360);
        // equation
			var x = (a1 - b1) * cos(angle) + r1 * cos((a1 - b1) * angle);
			var y = (a1 - b1) * sin(angle) - r1 * sin((a1 - b1) * angle);
			curveVertex(x, y);
			}
		endShape();
    pop();
}


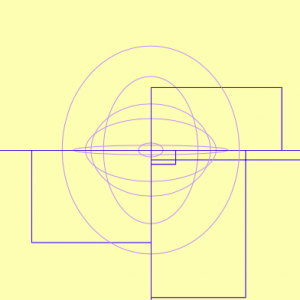
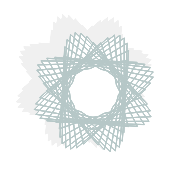
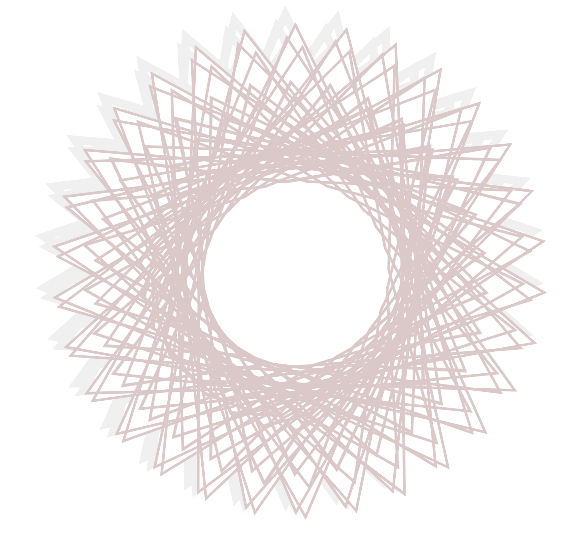
screenshot at the maximum width and minimum height of the canvas.


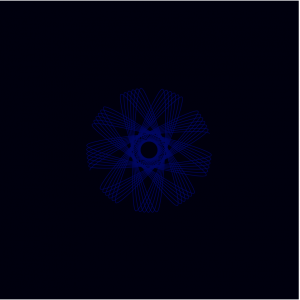
mouse X and mouse Y at the minimum width and height of the canvas.


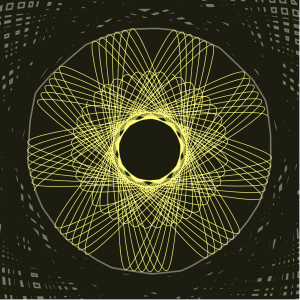
mouse X and mouse Y at the maximum width and height of the canvas.