Looking Outwards-09 on Looking Outwards-Veronica

The exterior of the Israel Pavilion showcasing LifeObject

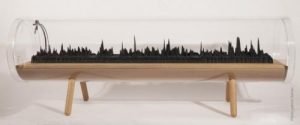
This week I went through my friend Judy’s posts and was inspired by one of the projects she has shared, LifeObject. The project is a biologically inspired interior installation mimicking the behavior of bird’s nests and was designed through 3D scanning and modeling.

Judy wrote in her blog:

There is a system of hierarchy reflected through the process, from design to fabrication to assembly. The entire form is made by the use of gravity and that is where randomness comes into the design.  With the analysis of the bird’s nest, twig-like structures were produced and arranged/bent randomly with a preset value, which means that the form of LifeObject is adaptable. The core is simple, the inner array is varied slightly, and the edges are diverse in static movement.

The introduction and practice of new materials blurred the line between digital fabrication processes and design. And this sort of architectural exploration – properties of materials and modes of transformation – came from the architect’s palette of expression.

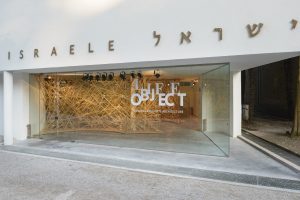
I find the project’s narrative of exploring the relationship between human and nature beyond the binary distinction of nature and culture inspiring. I think the project is successful in conveying and contradicting ideas of ecosystems, eco-literacy and system resiliency. The designers described the project as “an assembly of weak and light found materials with no additional joints or glue, out of which emerges a free-form complex structure that is extremely light, robust and highly resilient”. I think the strength in solidarity and cultural resiliency and tolerance contributes to the conversation of globalization and ongoing cultural issues, and LifeObject presents a stance in the Israeli geopolitical context and responds to the crisis with resiliency.

Kevin Thies- Project 9

Kthies sketch
So originally, I was planning on doing just a greyscale image that used the white space to display grayscale, but my friend Raven (pictured) has been working on a project related to superheros, which made me think of comics and how those were printed early on, so I expanded the project scope to take an image and break it down into simulated CMYK values (it’s just RGB in the end because screens) with each of those being slightly offset from the analyzed pixel. I think it turned out really well and makes cool-looking images!

This is when the distance between “pixels” is 1

This is when the distance between “pixels” is 5
// Kevin Thies
// Section C
// kthies@andrew.cmu.edu
// Project 09 - Computational Portrait

var portrait;           // the image
var pixels = [];        // holds the pixels
var step = 6;           // distance between "pixels"
var radiusV;            // radius of value circles
var radiusR;            // radius of red circles
var radiusG;            // radius of green circles
var radiusB;            // radius of blue circles
var rgb = [];           // holds RGBA values of pixels


// preload image
function preload() {
    var myImageURL = "https://i.imgur.com/sveeELP.jpg";
    portrait = loadImage(myImageURL);
}

function setup() {
    createCanvas(480, 520);
    background(255);
    portrait.loadPixels();
    noLoop();
    noStroke();
}

function draw() {
    // get a grid of positions one step apart

    for(var x = 0; x < width; x += step) {
        for(var y = 0; y < height; y += step) {

            // value ===============================================

            // kept darker than the color values to just balance it out
            // RGB is structured the same way, just not using brightness but direct
            // R, G, and B values

            // sets the radius of the circle, remapping the value of color/brightness
            // to a circle between 0 and step * 1.3 in diameter
            // with step > 1, it means the colors can overlap, hiding the white background
            radiusV = map( brightness( portrait.get(x * 2, y * 2) ),
                          255, 0,
                          0, step * 1.5 );

            // sets the fill color with transparency
            fill(0, 0, 0, 80);

            // draws the ellipse at the point
            ellipse(x, y, radiusV, radiusV);

            // RGB ==================================================

            // rgb takes on the [R, G, B, A] values as an array
            rgb = portrait.get(x * 2, y * 2);

            print(rgb[0] + "  " + rgb[1] + "  " + rgb[2] + "  " + rgb[3]);
            // by filling the color with 255 of not that color, when stacked up the
            // colors match - ex. red = 0,255,255 g = 255,0,255 b = 255, 255, 0
            // basically I translated RGB to CMY

            // red / cyan
            radiusR = map(rgb[0],
                          255, 0,
                          0, step * 1.3);
            fill(0, 255, 255, 80);
            ellipse(x + step / 5, y, radiusR, radiusR);

            // green / magenta
            radiusG = map(rgb[1],
                          255, 0,
                          0, step * 1.3);
            fill(255,0,255, 80);
            ellipse(x - step / 5, y, radiusG, radiusG);

            // blue / yellow
            radiusB = map(rgb[2],
                          255, 0,
                          0, step * 1.3);
            fill(255,255,0,80);
            ellipse(x, y - step / 5, radiusB, radiusB);
        }
    }
}

Christine Seo – Project 09

sketch

//Christine Seo
//Section C
//mseo1@andrew.cmu.edu
//Project 9

var sisterImg;

function preload() {
	//loading the picture
    sisterImg = loadImage("Sister.png");
}

function setup() {
	//set up canvas
    createCanvas(480, 480);
    background(0);
    sisterImg.loadPixels();
    //load 200 times in a minute
    frameRate(200);
}

function draw() {
    var px = random(width);
    var py = random(height);
    var cx = constrain(floor(px), 0, width-1); //constraining the placement of pixels
    var cy = constrain(floor(py), 0, height-1);
    var colorAtLocationXY = sisterImg.get(cx, cy);

    //draw traingles
    noStroke();
    fill(colorAtLocationXY);
		triangle(px-random(20), py-random(20), px-random(20), py-random(20), px+random(20), py+random(20));

}

Potential Final Image
Original image of my sister

I created an abstract portrait of my sister holding flowers.  I wanted to use randomly sized triangles to represent the pixels. I was quite happy with the result as it made the portrait quite abstract but you could still tell what the picture is to a certain degree.


Looking Outwards 09

For this week I’m analyzing  Sean Meng’s review of Avatar from week 5.

It’s been a while since this movie came out and I had nearly forgotten the sheer computational power involved in this movie. To create such realistic environments and personalities, animators had to work with a new system of motion-capture that revolutionized the industry.

What I think is worth mentioning that not only on the generated computer graphics front, there was a huge amount of processing power necessary for the film to exist. The film used a company called Weta Digital and rendered the movie, which consisted of processing 8 gigabytes of data per second running 24 hours for over a month. Often each of Avatar’s frames took several hours to render. And when you consider that is just one frame out of 24 for every second of film, you can imagine why the major processing power at Weta Digital was needed.

avatar computer generated graphics

Project-09-Portrait-Veronica

sketch

//Veronica Wang
//Section B
//yiruiw@andrew.cmu.edu
//Project-09

var underlyingImage;

function preload() {
    //loading image from URL
    var myImageURL = "https://i.imgur.com/25qNlPj.jpg";
    underlyingImage = loadImage(myImageURL);
}

function setup() {
    createCanvas(480, 480);
    background(0);
    //loading pixels from image
    underlyingImage.loadPixels();
    //drawing speed
    frameRate(220);
}

function draw() {
    //random pixel from image
    var px = random(width);
    var py = random(height);
    //constraining pixel to canvas
    var ix = constrain(floor(px), 0, width-1);
    var iy = constrain(floor(py), 0, height-1);
    var theColorAtLocationXY = underlyingImage.get(ix, iy);

    noStroke();
    fill(theColorAtLocationXY);
    push();
    //rotate pixel
    translate(px, py);
    rotate(random(0, PI));
    //scale pixel
    scale(random(0.5, 3));
    //draw pixel as rectangles
    rect(0, 0, 10, 6);
    pop();
}

This is an abstract portrait of my friend Yang. I decided to use randomly sized and rotated rectangles to represent the pixels to create a confetti looking effect. The result ended up looking quite abstract.

Original image
Digital Portrait

Looking Outwards – 09 Min Lee

“Vektron Modular” by Niklas Roy, 2010

The Looking Outwards assignment that I found interesting is Katherine Hua’s assignment on Niklas Roy’s “Vektron Modular”. This project by Roy stores algorithmic sound compositions within microcontroller modules that can be played back on a compatible device. The attached synthesizer on the device can alter parameters of the algorithm that produce the sounds, which is why the audio becomes distorted as Roy plays with the joystick in the video above.

What stood out to me about this project was the inspiration and technical applications that are possible through it. The device was inspired by Sony’s Playstation, which Katherine very accurately describes in her assignment. The application that Niklas Roy found for his device came through the musical exploration possibilities that follow the device. Through various switches on the device, the user is able to explore the binary structures within music and compare different rhythmic patterns and number systems for counting beats. An interesting and productive assessment of this device could be made from a strictly musical production standpoint by using it to create new and interesting instrumentals.


Source: https://courses.ideate.cmu.edu/15-104/f2018/2018/09/21/katherine-hua-looking-outwards-04/

Katherine Hua – Looking Outwards-09

I really liked Min Lee’s looking outwards blog post on this project called Skyline. Skyline is a code-based generative music video that uses Voronoi tessellation. Skyline’s systems have seeds that are categorized into different types of agents that represent a certain behavior or trigger transformations in appearance. The song’s audio spectrum or the animation sequence of the artist acts as the driver of these motions, creating beautiful patterns that come together to make a complex visual conclusion. I agree with how Min that this project is amazing in the way that the artist was able to create a visual representation of musical behavior through patterns of geometric shapes and inkblot-like figures. I’d like to add that I think it’s very interesting that throughout this music video, the shapes come together to form a figure of the vocalist or the face of the vocalist while the visual elements are moving with the sound of the instrumentals.

Raven Kwok_Skyline | STASH MAGAZINE

Curran Zhang- Project 09- Portrait

sketch

/*Curran Zhang
 curranz
 Project 9
 Section A
 */

var Ball = [];
var img = ['https://i.imgur.com/6PlJkcb.jpg',
           'https://i.imgur.com/MIU3YvB.jpg']
                     
var dir;
var picIndex = 1;
var currentIndex = 0;

function preload(){
  pic = loadImage(img[picIndex]);
}

function setup(){
  createCanvas(480,480);
  pic.loadPixels();
  background(50);
  dir = random(5,10);
}

function properties(px,py,pdy){
  b = { x: px,
        y: py,
        dy: pdy,
        speed: ballSpeed,
        ball: ballMake,
        bSize: random(3,6)
      }
  return b; 
}

function ballMake(){
  var xx = constrain(floor(this.x),0,width-1);
  var yy = constrain(floor(this.y),0,height-1);
  var pix = pic.get(this.x, this.y);

  fill(pix)
  stroke(0);
  strokeWeight(0.1);
  ellipse(this.x, this.y, this.bSize, this.bSize);
}

function ballSpeed(){
  this.y += this.dy * random(.1,.3);
}

function draw(){
  //Creating an array of all the individual balls
  newBall =[];
  for (var i = 0; i <Ball.length; i++) {
    var b = Ball[i];
    b.speed();
    b.ball();
    newBall.push(b);
  }
  Ball = newBall;

 //Applying all the drawn properties onto the canvas
  var bb = properties(random(width), 0, dir);
  Ball.push(bb);
}

/*
//Failed attempt to shuffle through the array to switch the image
function mouseClicked(){
picIndex = int(random(0,1))
        while (currentIndex == picIndex){
         picIndex = int(random(0,1))
        }
        currentIndex = bodyIndex;
}
*/

For this project, I used pictures from my friend Kelly. I tried to create a snow falling effect of the individual pixels. I tried to place the pictures into an array which would eventually shuffle through with mouseClicked(), however it would just freeze up. Even though it didn’t work, I am satisfied with the glittery effect that it produces.

Droopy Effect in the Begining
Final Product


Justin Yook – Looking Outwards 09

3D Print of Obama’s Speech

I decided to discuss rjpark’s Looking Outwards 03, about Gilles Azzaro’s 3D printed sculptures based on sound. This project is interesting to me because it is a way for people to visualize audio in physical form. According to the blog post, the artist uses audio samples of events or speeches that he values. I agree that the 3D sculptures serve as a beautiful representation of historical events, whether it may be global or local; memories or past events are very important because they have the power to define individuals or groups of people. In the future, it would be great if the artist used a much bigger 3D printer to make bigger versions of the audio. They can be like landmarks that help bring people together.

Source: https://3dprint.com/124989/3d-printed-sound-fablabs/

Artist: http://www.gillesazzaro.com/

Sarah Yae – Project 9 – Section B

sketch

//Sarah Yae
//smyae@andrew.cmu.edu
//Section B
//Project 9

var basepic;
var sqsize = 5;
var click = 0; 

//Load Image
function preload() {
    var myportrait = "https://i.imgur.com/ZUZbO4M.png";
    basepic = loadImage(myportrait);
}

//Translates original image 
function setup() {

    createCanvas(275, 300);
    background(0);
    basepic.loadPixels();

//Makes certain pixels into rectangles after retrieving that pixel's color 
    for (var x = 2; x < width; x += (sqsize + 2)) {
        for (var y = 2; y < height; y += (sqsize + 2)) {
            var color = basepic.get(x,y);
            fill(color);
            noStroke();
            rect (x, y, sqsize, sqsize);
        }
    }

}

//Turns image into black and white once mouse pressed 
function mousePressed() {

    createCanvas(275, 300);
    background(0);
    basepic.loadPixels();

    for (var x = 2; x < width; x += (sqsize + 2)) {
        for (var y = 2; y < height; y += (sqsize + 2)) {
            var r = basepic.get(x,y)[1]; //Retrieves a pixel's 1st value in its array 
            fill(r, r, r);
            noStroke();
            rect (x, y, sqsize, sqsize);
        }
    }

}

Once you click on the image, the translated image turns black and white. I had a hard time figuring out how  to change the image black and white, but I used pixel array to make it work.

Translated Image with Color
Translated Image into Black and White