var d = 20

function setup() {
    createCanvas(600, 400);

}

function draw() {
    background(0);
    for (var i=0;i<50;i+=1){
        for(var j =-10; j < 50;j +=1){
            fill (255,140);
            rect((50 + j *d * 1.5) + i * 15, 25 +(i *d *1.5), d+20, d); //offsets

        }
    }
}
I created an optical allusion using for loop and offsetting the rectangles so when you look far away you can’t tell if the black negative spaces are straight or not.
var posX = 75; //starting position of tile x direction
var posY = 20;// starting position of tile y direction
var iteration = 0; //lets program know whether its odd or even row
var count = 0; //know when to terminate the program with noLoop

function setup() {
    createCanvas(600, 450);
    background(0, 0, 75);
}

function draw() {
    if(iteration === 0){ //even number rows get 4 tiles
        for(var s = 0; s < 4; s++){
            tile(posX, posY);
            posX += 150;
        }
        iteration++;
    }

    else if(iteration === 1){ //odd number rows get 3 tiles to provide hexagonal effect
        for(var d = 0; d < 3; d++){
            tile(posX + 75, posY);
            posX += 150;
        }
        iteration--;
    }
    posX = 75;
    posY += 100;

    if(count > 13){
        noLoop();
    }
}

function tile(x, y){ //new function actually producing the tile with x, y parameters
    stroke(220, 219, 214);
    strokeWeight(1);
    line(x, y, x - 50, y + 50);
    line(x - 50, y + 50, x, y + 100);
    line(x, y + 100, x + 50, y + 50);
    line(x + 50, y + 50, x, y);

    line(x, y, x - 40, y + 50);
    line(x - 40, y + 50, x, y + 100);
    line(x, y + 100, x + 40, y + 50);
    line(x + 40, y + 50, x, y);

    line(x, y, x - 30, y + 50);
    line(x - 30, y + 50, x, y + 100);
    line(x, y + 100, x + 30, y + 50);
    line(x + 30, y + 50, x, y);

    line(x, y, x - 20, y + 50);
    line(x - 20, y + 50, x, y + 100);
    line(x, y + 100, x + 20, y + 50);
    line(x + 20, y + 50, x, y);

    line(x, y, x - 10, y + 50);
    line(x - 10, y + 50, x, y + 100);
    line(x, y + 100, x + 10, y + 50);
    line(x + 10, y + 50, x, y);

    count++;
}
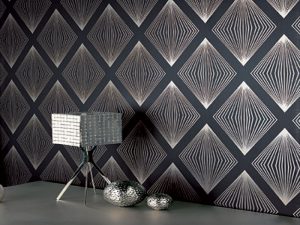
The wallpaper that inspired me for my wall paper
I was inspired by a simple, modern wall paper to create a singular tile that would be repeated in the hexagonal pattern we learned about in Assignment 5B. I created a new function tile(x, y) with two parameters (starting x location and starting y location) to create a set of tiles on a background.
Four researchers at Aalto University present their input on “occluder simplification”, an algorithm they have created that requires very few inputs (does not need to be a perfectly formulated, closed mesh) and easy to implement. In the example below, the simplified triangular shapes or polygons (occluders) of a hairball and bunny.
(example of occluder simplification from triangles)
When applied to larger, more complex shapes, this process could be useful. It is interesting to think about what can be done and what can be advanced in the 3D computer graphics field. In the video below, a before and after is shown, and how much this process simplifies the input, decreasing the input to as low as 2% of the objects.
(The algorithmic process utilized in a 3D route of a city.)
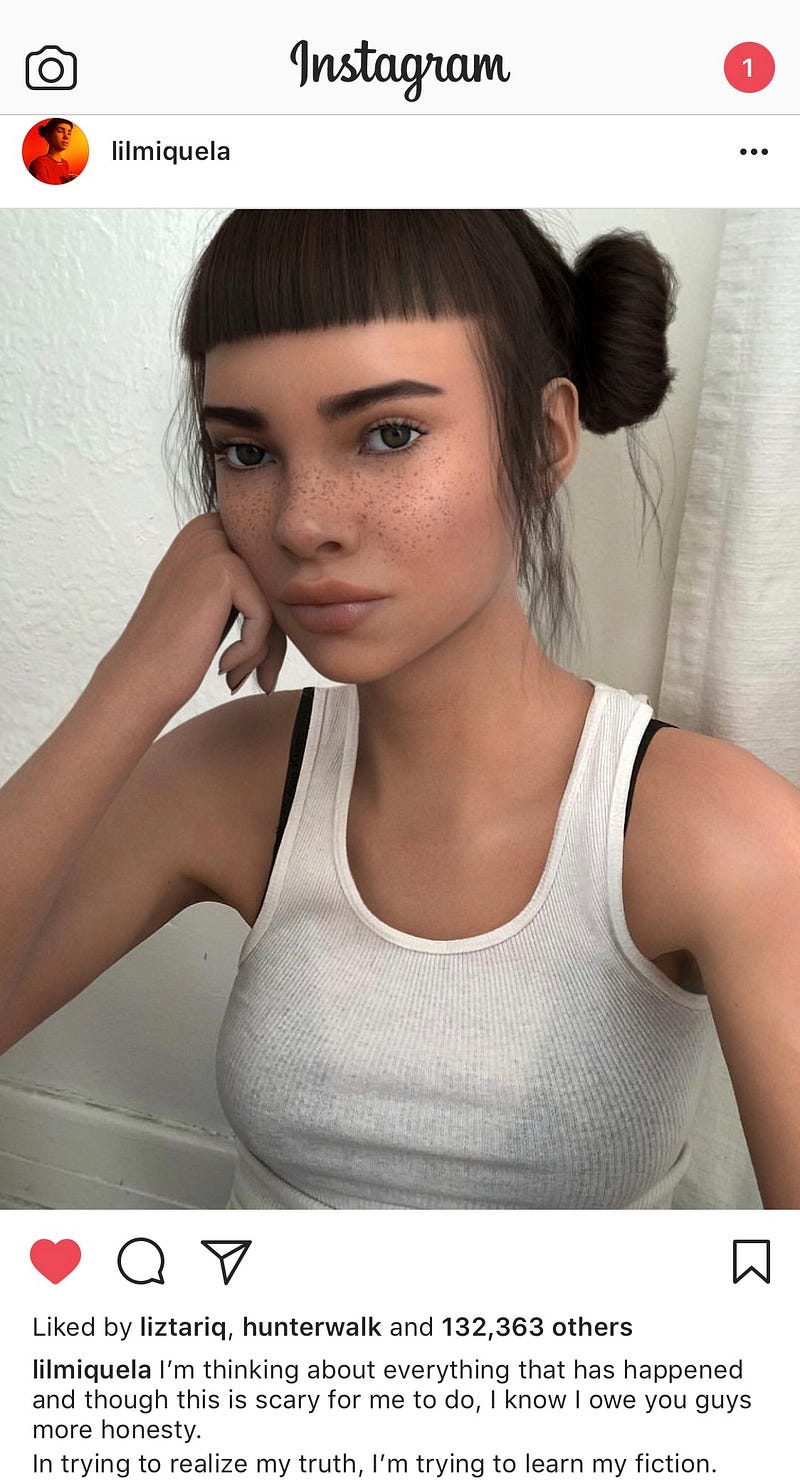
This project is a fictional character created by artists Trevor McFedries and Sara Deco who created a 19 year old avatar, Miquela. She is a model and musician and a social media influencer. She has more than a million followers by portraying the lifestyle of an it-girl on Instagram. This project interested me because of the impact that she is having on our society today. Brands are taking her on as a model and an ambassador. Her music is being compared to other virtual musicians such as Gorillaz and Hatsune Miku. What I am fascinated by the most is that she is not a real person yet she feels like one because of how realistic the artists have rendered her (and Photoshop her into photos with real people) to be and her personality/presence on Instagram. She has marked a new era of IA. This project has received both intrigue and criticism where people question whether Miquela is an art project or a social experiment. McFedries and Deco own a company called Brud which is a creative agency specializing in robotics and artificial intelligence and the first computer generated social media persona.
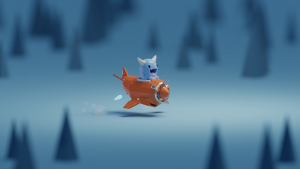
A project that deals with 3D computer graphics that I found interesting was the animation called On the Road to Nowhere. This project was done by Mohamed Chahin, who uses a software called Blender 3D to create different types of animations. This project focuses on a small, blue monster who Is riding an orange airplane. Although the animation is short, the quality of the animation is very good; the short animation keeps repeating itself with no obvious sign of it looping repeatedly. Some other aspects of 3D graphics that Blender 3D is capable of includes rigging, modeling, simulations, renderings, and motion tracking. Chahin uses Blender in some of his other works, sometimes pairing it along with Photoshop and other Adobe software.
A capture from Chahin’s animation
I really like these types of projects because they seem like small projects that can be done in a shorter amount of time than other design projects. I am interested in knowing what would happen if you combined these smaller projects to create one big project. I assume that many animations would turn into a movie, or even a video game if it were interactive with a user. Click here for a link to his full project portfolio.
 /*
Romi Jin
Section B
rsjin@andrew.cmu.edu
Project-05
*/

//var x = 0;
//var y = 0;

var faceWidth = 40;
var earWidth = 15;
var earHeight = 40;
var bodyWidth = 40;
var bodyHeight = 60;
var tailWidth = 20;
var body2w = 50;
var body2h = 40;
var eyew = 3;
var eyeh = 5.5;
var nosew = 6;
var noseh = 5;

function setup() {
    createCanvas(600, 600);

}

function draw() {
    background(252,236,235);
    bunny();

    for (var x = 35; x < width-35; x += 75) {
        for (var y = 135; y < height; y += 150) {
            bunny(x,y);
        }
    }

    noLoop();
}

function bunny(x,y) {


    //left ear
    stroke(128,128,128);
    strokeWeight(.2);
    fill(255);
    ellipse(x,y-100,earWidth,earHeight);

    //right ear
    stroke(128,128,128);
    strokeWeight(.2);
    fill(255);
    ellipse(x-10,y-95,earWidth,earHeight);

    //body
    stroke(128,128,128);
    strokeWeight(.2);
    fill(255);
    ellipse(x,y-30,body2w,body2h/2);

    stroke(128,128,128);
    strokeWeight(.2);
    fill(255);
    ellipse(x,y-40,bodyWidth,bodyHeight);

    //tail
    stroke(128,128,128);
    strokeWeight(.2);
    fill(255);
    ellipse(x-10,y-15,tailWidth,tailWidth);

    //face
    stroke(128,128,128);
    strokeWeight(.2);
    fill(255);
    ellipse(x,y-75,faceWidth,faceWidth);

    //eye
    noStroke();
    fill(0);
    ellipse(x-10,y-80,eyew,eyeh);

    //nose
    noStroke();
    fill(237,171,166);
    ellipse(x+14,y-75,nosew,noseh);

}
For this project, I wanted to make a simple wallpaper of bunnies! I discovered that this project was easier than I thought it would be. I simply made a new function called “bunny” and placed all the features of the bunny in it, then referenced that function in the for loop (in the draw function).
var xSpacing = 125; //horizontal distance between elements
var ySpacing = 100; //vertical distance between elements

function setup() {
    createCanvas(500, 500);
}

function draw() {

    var stripeHeight = height/5; //set height of horizontal stripes

    //draw black stripes
    fill(0);
    rect(0, 0, width, stripeHeight);
    rect(0, 2 * stripeHeight, width, stripeHeight);
    rect(0, 4 * stripeHeight, width, stripeHeight);

    //draw blue stripes
    fill("deepskyblue");
    rect(0, stripeHeight, width, stripeHeight);
    rect(0, 3 * stripeHeight, width, stripeHeight);

    for (var y=0; y<5; y++) { //create 5 rows

        //even rows: draw moon & stars
        if (isEven(y)) {
        for (var x=0; x<4; x++) {   //draw 4 columns
            var i = (x * xSpacing) + 50;
            var j = (y * ySpacing) + 50;
            moon(i, j);   //draw
            starCluster(i + 25, j - 25);
        }

        //odd rows: draw sun
        } else {
            for (var x=0; x<4; x++) {
                var a = (x * xSpacing) + 75;
                var b = (y * ySpacing) + 50;
                sun (a, b);
            }
        }
    }
}


//creates moon
function moon (x,y) {
noStroke();
fill("lemonchiffon");
arc (x,y,50,50,HALF_PI,(PI * 3/2));
fill(0);
arc (x,y,25,50,HALF_PI,(PI * 3/2))
}

//creates three stars
function starCluster (x,y) {
fill(255);
text ("*",x,y);
text ("*",x+10,y+10);
text ("*",x-5,y+18);
}

//creates sun
function sun (x,y) {
    noStroke();
    fill("yellow");
    ellipse(x,y,30,30);
    for (var angle=0; angle < 360; angle +=45) {
        stroke("yellow");
        strokeWeight(2);
        line(x, y, x + cos(radians(angle)) * 30, y - sin(radians(angle)) * 30);
        }
}

//tests for odd/even
function isEven (value) {
    return value % 2 == 0;
}
I am not a visual artist/designer and not the best at drawing, so I skipped straight to brainstorming shapes in code. I knew I wanted to work with some curved shapes since I didn’t entirely master the arc() function earlier in the semester. Playing around with arcs in p5.js led me to the moon shape, which gave me the idea of alternating day/night sky patterns. This week’s lessons on cos() and sin() came in handy when I was trying to draw the sun’s rays, as I was able to use these functions to create a simpler way of creating the circular lines than drawing each individually.
//Austin Treu
//atreu@andrew.cmu.edu
//Section B
//Project-05

function setup() {
   	createCanvas(580, 580);
    background(0,0,int(random(255)));

    //set vars for circles
    var tw = 20, th = 20, offset = 20,
    	circSize = 10, loops = 10,
		backX = ((loops-1) * tw)/2, backY = ((loops-1) * th)/2,
		backSize = loops*circSize,
		tileSizeX = (loops) * tw, tileSizeY = (loops) * th,
		//randomize color
		colorRandom = int(random(255));
		backColor = 'rgb(100,0,'+colorRandom+')',
		circColor = 'rgb('+colorRandom+',0,200)',
		lineColor = 'rgb(200, 0,'+colorRandom+')';

	//loop to draw multiple tiles
	stroke(lineColor);
	for(var i = 0; i < (height/tileSizeY); i++){
		for(var j = 0; j < (width/tileSizeX); j++){
			//draw big background circle
			fill(backColor);
			ellipse(backX + j*tileSizeX, backY + i*tileSizeY, backSize, backSize);
			//utilize honeycomb pattern for tile
			fill(circColor);
		    for (var y = 0; y < loops; y++) {
		        for (var x = 0; x < loops; x++) {
		            if(y%2 === 0){
		                var py = ( (y * th)) + i * tileSizeY;
		                var px = ( (x * tw)) + j * tileSizeX;
		                ellipse(px, py, circSize, circSize);
		            }
		            else{
		                var py = ( (y * th)) + i * tileSizeY;
		                var px = ( (0.5 * offset + x * tw)) + j * tileSizeX;
		                ellipse(px, py, circSize, circSize);
		            }
		        }
		    }
		    //draw lines around each tile
		    line(j*tileSizeX, i*tileSizeY, (j+1)*tileSizeX, i*tileSizeY);
		    line((j+1)*tileSizeX + 0.5*offset, (i+1)*tileSizeY-th, j*tileSizeX + 0.5*offset, (i+1)*tileSizeY-th);
		    line(j*tileSizeX, i*tileSizeY, j*tileSizeX + 0.5*offset, (i+1)*tileSizeY-th);
		    line((j+1)*tileSizeX + 0.5*offset, (i+1)*tileSizeY-th, (j+1)*tileSizeX, i*tileSizeY);
		}
	}

    noLoop();
}
When I started working on this project, I wanted to use the honeycomb code from Assignment B this week because of how interesting that ended up looking by itself. Ultimately I had to simplify it in order to make the math for the rest of the design work out a bit better, as adjusting everything to deal with the square root of three over two can become a difficult task. The shapes’ randomized fills and stroke correspond with each other and utilize the same random value in different ways.
This week I got inspiration for my Looking Outwards post by viewing the 3-D art of artist Aldo Martinez Calzadilla. His work has been featured in such places as the movies Guardians of the Galaxy 2, Ant Man 2, and Black Panther.
Although this is very interesting, what truly struck me was his work reflecting realistic humans, which I thought was absolutely gorgeous.
One of Calzadilla’s 3D personal modelsCalzadilla playing with texture in this model
I didn’t really believe how this could be produced…through code…so I did some investigation.
I found that he uses software such as Maya, Mari, and Z-Brush, which allows designers to manipulate texture and draw in 3-D on the computer. Below is a video demonstrating how images can be created and edited with Z-Brush as if they were physical things that could be molded and manipulated.
Z-Brush demonstration
I was really stunned by the beauty of Calzadilla’s work, so it was interesting to watch the Z-Brush video to work through how it was he was able to create something so life-like. I usually associate coding with being very cold and unemotional, so it’s an interesting contrast to see how he was able to capture such delicacy and vulnerability in his “subjects” through such a seemingly unfeeling medium.
For this looking outwards I wanted to explore a project that I find particularly interesting by former Apple programmer Ben Haller called Attraction Basins. Each of the different art pieces created in this project are made using a form of “equation root finding.” The pieces in this project are very much related to the Mandelbrot Set and the idea of points on a place relating to points on an image, to which the root-finding is utilized iteratively.
The first image below titled “Carapace” was generated using Newton’s Method, which has to do with the idea of finding roots based on a process of successive approximations.
(The image above showing “Carapace” by Ben Haller)
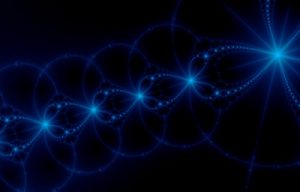
The colors that occur in the pieces are dependent on the length of time and type of root that was converged. At these points of convergence also note the “basins” that occur in these areas. The other piece from Ben Haller’s gallery I wanted to look at is called “Energy.”
(The image above shows “Energy” by Ben Haller)
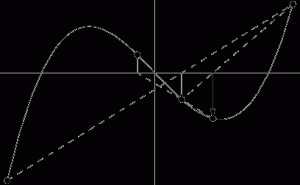
This piece is based on the Secant Method which is another root finding algorithm that takes a “region of interest” and assumes a linear relationship of the function being analyzed. A graph of how the secant method works can be seen below. Note the relationship between the graph and the art piece generated from it.
I find these 3D Computer Graphics interesting because they relate directly to some form of root finding. So as diverse as the two might read in visual language, there is a common underlying method that carries across all the pieces.
![[OLD FALL 2018] 15-104 • Introduction to Computing for Creative Practice](../../../../wp-content/uploads/2020/08/stop-banner.png)