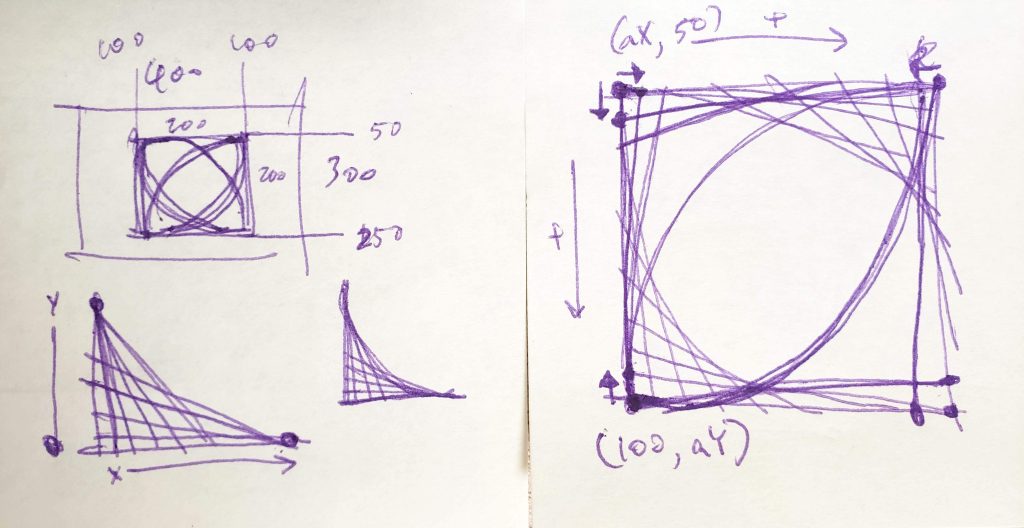
ChristineSeo-Project04

sketch

// Christine Seo
// Section C
// mseo1@andrew.cmu.edu
// Project-04

function setup() {
  createCanvas(300, 400);
  mouseClicked();
}

function draw() {
  
}

function mouseClicked() {
  background(245, 229, 254);
  noStroke();
  
	    push();
	  for(var x = 0; x <= width; x += 30){ //rainbow dashes
	   for(var y = 0; y <= height; y += random(90)){
  	
     var r = random(220);
     var r1 = random(0, 5);
     var r2 = random(10, 40);
     
     colorMode(HSB,200); 
		 var colorC = color(r,r2,220);
		 fill(colorC);
     	ellipse(x, y, r, r1);
	   }
	  }
	  pop();

	 push();
	for (var y = 0; y < height; y += random(80)){ 
    
    strokeWeight(random(1, 5));
    stroke(250);
    line(0, 0, y-80, height/2); //top white lines
    line(width, height, y-80, height/2); //lower white lines
	  }
	pop();

	strokeWeight(random(1, 5));//midline in center
    stroke(250);
	line (0,height/2,width,height/2);


    push();
	for (var y = 0; y < height; y += random(40)){ //dark gray lines left bottom corner
    
    strokeWeight(random(1, 5));
    stroke(100);
    line(0, y, y+10, height);
  	}
	pop();
  
     push();
	for (var x = 0; x < width; x += random(40)){ //dark gray lines right top corner
    strokeWeight(random(1, 5));
    stroke(100);
    line(x, 0,width, x+10);
	  }
	pop();

    push();
  for (var x = 0; x < width; x += random(20)){ // light gray lines right top corner
    strokeWeight(random(1, 2));
    stroke(160);
    line(x-35, 0,width, x+35);
    }
  pop();

    push();
  for (var y = 0; y < height; y += random(20)){ // light gray lines left bottom corner
    
    strokeWeight(random(1, 2));
    stroke(160);
    line(0, y-35, y+35, height);
    }
  pop();


}

For this project, I wanted to play having a color scheme as well as use different corners of the canvas to create lines. When clicked, the movement of the lines are random (with restriction). Although getting the gist of using for() was difficult at first, I was able to get a hang of it and create something that I think is very successful.

Justin Yook – Project 04 – String Art

stringArt

//Justin Yook
//Section C
//jyook@andrew.cmu.edu
//Project 04


var x1 = 0; 
var y1 = 0; 
var x2 = 0; 
var y2 = 300; 

function setup() {
    createCanvas(400, 300);
}

function draw() {
    background(0);
    //generate lines on BOTTOM LEFT (1st curve) (green)
    for (var step1 = 0; step1 <= 1; step1 += .02) {
        x2 = lerp(0, 400, step1);
        y1 = lerp(0, 300, step1);
        stroke(124, 252, 0);
        line(x1, y1, x2, y2);
    }
 
    //generate lines on TOP LEFT (2st curve) (green)
    for (var step2 = 0; step2 <= 1; step2 += .02){
        x2 = lerp(0, 400, 1 - step2);
        y1 = lerp(0, 300, step2);
        stroke(124, 252, 0);
        line(x1, y1, x2, height - y2);
    }

    //generate lines on BOTTOM LEFT (3nd curve) (red)
    for (var step3 = 0; step3 <= 1; step3 += .03) {
        x2 = lerp(0, 400, 2 * step3);
        y1 = lerp(0, 300, step3);
        stroke(255, 0, 0);
        line(x1, y1, x2, y2);
    }

    //generate lines on TOP LEFT (4rd curve) (red)
    for (var step4 = 0; step4 <= 1; step4 += .03){
        x2 = lerp(0, 400, 2 * (1 - step4));
        y1 = lerp(0, 300, step4);
        stroke(255, 0, 0);
        line(x1, y1, x2, height - y2);
    }

    //generate lines on BOTTOM LEFT (5th curve) (blue)
    for (var step5 = 0; step5 <= 1; step5 += .04) {
        x2 = lerp(0, 400, 4 * step5);
        y1 = lerp(0, 300, step5);
        stroke(0, 204, 204);
        line(x1, y1, x2, y2);
    }

    //generate lines on TOP LEFT (6th curve) (blue)
    for (var step6 = 0; step6 <= 1; step6 += .04){
        x2 = lerp(0, 400, 4 * (1 - step6));
        y1 = lerp(0, 300, step6);
        stroke(0, 204, 204);
        line(x1, y1, x2, height - y2);
    }
}

For my string art,  I wanted to create something asymmetrical because a lot of string art I usually see are not. So I decided to make “layers” of curves from the same sides (bottom left, and top left) and give a different color for each layer. Colors are supposed to represent the basic values of red, green, and blue.

Justin Yook – Looking Outwards 04

Sculptures have distinct shape and distance from each other

Yuri Suzuki Design collaborated with High Atlanta to create the Sonic Playground, an outdoors display of sound-interactive sculptures. There are a total of six steel sculptures, and they manipulate sound depending on where visitors stand, listen, and talk. The calculations for each sculpture’s optimization were done with the softwares: Grasshopper, and Rhinoceros 3D; Grasshopper is a software for writing programs visually, and Rhinoceros 3D is for making 3D models. Combination of both softwares allowed the creators to control sound source, direction of the sound, and reflect sound from various sculpture pieces. The creator’s artistic sense is shown through the distinct shapes of the sculptures, and the bright colors added to them in order to make the sculptures seem more fun. I think that this project is interesting because of how interactive it can be; the idea of allowing people to interact by moving around the sculptures adds a new dimension to sound art.

Source: http://www.creativeapplications.net/sound/sonic-playground-playful-acoustics-by-yuri-suzuki-design/

Rjpark – Project 04 – String Art

rjpark_stringart

function setup() {
    createCanvas(400, 300);
    background(0);
}

function draw() {
    // white boxes
    fill(255);
    noStroke();
    rect(100, 0, 100, 150); // top left

    fill(255);
    noStroke();
    rect(300, 0, 100, 150); // top right

    fill(255);
    noStroke();
    rect(0, 150, 100, 150); // bottom left

    fill(255);
    noStroke();
    rect(200, 150, 100, 150); // bottom right

    // variables for x and y coordinates
    x1 = 0; // starting coordinate bottom left
    y1 = 300; // starting coordinate bottom left
    x2 = 0;
    y2 = 150; // creates straight line across at height of 150
    
    x3 = 200; // starting coordinate bottom center left
    y3 = 300; // starting coordinate bottom center left
    x4 = 0;
    y4 = 150; // creates straight line across at height of 150

    x5 = 200; // starting coordinate bottom center right
    y5 = 300; // starting coordinate bottom center right
    x6 = 0
    y6 = 150; // creates straight line across at height of 150

    x7 = 400; // starting coordinate bottom right
    y7 = 300; // starting coordinate bottom right
    x8 = 0
    y8 = 150; // creates straight line across at height of 150

    x9 = 100; // starting coordinate top left
    y9 = 0; // starting coordinate top left
    x10 = 0;
    y10 = 150; // creates straight line across at height of 150

    x11 = 100; // starting coordinate top center left
    y11 = 0; // starting coordinate top center left
    x12 = 0;
    y12 = 150; // creates straight line across at height of 150

    x13 = 300; // starting coordinate top center right
    y13 = 0; // starting coordinate top center right
    x14 = 0;
    y14 = 150; // creates straight line across at height of 150

    x15 = 300; // starting coordinate top right
    y15 = 0; // starting coordinate top right
    x16 = 0;
    y16 = 150; // creates straight line across at height of 150

    // curves
    stroke(0);
    strokeWeight(1);
    // bottom left
    for (var a = 0; a <= 1; a += 0.1) {
        x2 = lerp(0, width/4, a); // lines go out to the right from 0 to 100 pixels
        y1 = lerp(height, height/2, a); // lines go up from 300 to 150 pixels
        line(x1, y1, x2, y2);
    }

    stroke(255);
    strokeWeight(1);
    // bottom center left
    for (var b = 0; b <= 1; b += 0.1) {
        x4 = lerp(width/2, width/4, b); // lines go out to the left from 400 to 300 pixels
        y3 = lerp(height, height/2, b); // lines go up from 300 to 150 pixels
        line(x3, y3, x4, y4);
    }

    stroke(0);
    strokeWeight(1);
    // bottom center right
    for (var c = 0; c <= 1; c += 0.1) {
        x6 = lerp(width/2, 3*width/4, c); // lines go out to the left from 400 to 300 pixels
        y5 = lerp(height, height/2, c); // lines go up from 300 to 150 pixels
        line(x5, y5, x6, y6);
    }

    stroke(255);
    strokeWeight(1);
    // bottom right
    for (var d = 0; d <= 1; d += 0.1) {
        x8 = lerp(width, 3*width/4, d); // lines go out to the left from 400 to 300 pixels
        y7 = lerp(height, height/2, d); // lines go up from 300 to 150 pixels
        line(x7, y7, x8, y8);
    }

    stroke(255);
    strokeWeight(1);
    // top left
    for (var e = 0; e <= 1; e += 0.1) {
        x10 = lerp(width/4, 0, e); // lines go out to the left from 100 to 0 pixels
        y9 = lerp(0, height/2, e) // lines go down from 0 to 150 pixels
        line(x9, y9, x10, y10);
    }

    stroke(0);
    strokeWeight(1);
    // top center left
    for (var f = 0; f <= 1; f += 0.1) {
        x12 = lerp(width/4, width/2, f); // lines go out to the left from 100 to 200 pixels
        y11 = lerp(0, height/2, f) // lines go down from 0 to 150 pixels
        line(x11, y11, x12, y12);
    }

    stroke(255);
    strokeWeight(1);
    // top center right
    for (var g = 0; g <= 1; g += 0.1) {
        x14 = lerp(3*width/4, width/2, g); // lines go out to the left from 300 to 200 pixels
        y13 = lerp(0, height/2, g) // lines go down from 0 to 150 pixels
        line(x13, y13, x14, y14);
    }

    stroke(0);
    strokeWeight(1);
    // top right
    for (var h = 0; h <= 1; h += 0.1) {
        x16 = lerp(3*width/4, width, h); // lines go out to the left from 300 to 400 pixels
        y15 = lerp(0, height/2, h) // lines go down from 0 to 150 pixels
        line(x15, y15, x16, y16);
    }
}

My inspiration for this project was sine waves and my own twist to the project was dividing things into 2. So, I first split the sine wave into the arch and the dip. Then I divided the canvas into top and bottom and put the arch on the bottom half and the dip on the top half. Afterwards, I chose 2 colors (white and black) and made every box in both the top and bottom half of the canvas switch colors (without the same colored boxes on top of each other). Then I colored in the lines/curves I made with the opposite color of the box that they’re in. Lastly, I shifted the top half of the canvas by half a curve (or 1 box). The resulting image is what I have above.

Project 04 – Parametric Flower (try scrolling)

sketch

// Kevin Thies
// kthies@andrew.cmu.edu
// Section C
// Project 04 - String Art -
// not a web generator :'(
// just a parametric  flower

var lerps; // how many iterative lerp points on lines
var lerpStep = .1;
var sides = 6; // polygon of n sides

var x; // x coordinate of exterior axis
var y; // y coorinate of exterior axis
var lerpX; // lerp on x axis
var lerpY; // lerp on y axis

var radius; // shortcut for the radius of polygon

function setup() {

    // basic setup stuff
    angleMode (DEGREES);
    createCanvas (300,400);
    background (140);

    // defining variable that depend on p5js
    radius = width/2 - 20; // there's that shortcut
    lerps = 1 / lerpStep; // here's the amount of lerps on the lines

}

function draw() {

    // put origin in center of canvas
    translate (width/2, height/2);

    //have a for loop that rotates petals
    for (var i = 0; i < sides; i ++) {

        // have a for loop that draws one half of a petal
        for (var j = 0; j < lerps; j ++) {

            // law of sines calculation for the axis that makes up exterior lines
            var HYPOTENUSE = radius / sin(90);
            x = HYPOTENUSE * sin(90 - (360 / sides));
            y = HYPOTENUSE * sin(360 / sides);


            //get lerp values on new axis
            lerpX = lerp (x, radius, lerpStep * j);
            lerpY = 1 - lerp (y, 0, lerpStep * j);

            // connect the points on the lines
            line (radius - radius * lerpStep * j, 0, lerpX, - lerpY);


            //This here is just the same as the above except flipped    //
            push();                                                     //
            scale(1,-1);                                                //
                                                                        //
            // law of sines calculation for next line                   //
            var HYPOTENUSE = radius / sin(90);                          //
            x = HYPOTENUSE * sin(90 - (360 / sides));                   //
            y = HYPOTENUSE * sin(360 / sides);                          //
                                                                        //
            //get lerp values on new axis                               //
            lerpX = lerp (x, radius, lerpStep * j);                     //
            lerpY = 1 - lerp (y, 0, lerpStep * j);                      //
                                                                        //
            // connect the points on the lines                          //
            line (radius - radius * lerpStep * j, 0, lerpX, - lerpY);   //
            pop();                                                      //
        }

        //rotate the full petal around to make a polygon
        rotate (360/sides);
    }
}

// number of sides changes based on scrolled direction
function mouseWheel() {

    // cover all that was just drawn
    background(140);

    // on scroll, change number of splines but don't take it as input
    sides += event.delta/50;
    return false;
}

This was a tough project, mostly because I had to go back and partially re-learn trigonometry. That being said I started by making a parametric spider web generator, but that didn’t fit the guidelines nearly well enough. So I took a lot of what I’d learned and wrote for that and turned it into this. Also, shoutout to the Law of Sines, you’re my hero. Maybe one day I’ll be able to break out the web generator, but until then, here’s a parametric flower.

Hannah Cai—Project 4—String Art

/* Hannah Cai
Section C
hycai@andrew.cmu.edu
Project-04-String Art
*/

var x1 = 100;
var y1 = 50;
var x2 = 300;
var y2 = 250;
var t = 25;


function setup() {
    createCanvas(400,300);
    background(0);
}

function draw() {
    frameRate(40); //slowed down speed
    background(0,5); //translucent background
    stroke(255);
    strokeWeight(.3);

    //dotted square frame
    for (i = 100; i <= 300; i += 5) {
        point(i,50);
        point(i,250);
    }
    for (i = 50; i <= 250; i += 5) {
        point(100,i);
        point(300,i);
    }

    // bottom left and top right corner curves
    line(x1,250,100,y1);
    line(300,height - y1,width - x1,50);
    line(width - x1,250,100,height - y1);
    line(300,y1,x1,50);

    // top left and bottom right corner curves
    line(100,y2,x1,50);
    line(300,height - y2,width - x1,250);

    //string animation
    x1 += .5;
    y1 += .5;
    x2 -= .5;
    y2 -= .5;

    //constrain movement within square
    x1 = constrain(x1,100,300);
    y1 = constrain(y1,50,250);
    x2 = constrain(x2,100,300);
    y2 = constrain(y2,50,250);

    //resets string animation when it hits the square's sides
    if (x1 == 300 & y1 == 250 && x2 == 100 && y2 == 50) {
        x1 = x2;
        y1 = y2;
        y2 = 250;
    }
}

sketches/notes

Since this project required four curves, I focused on drawing those curves, and this animation sort of evolved from that process. It took a while for me to figure out how to make curves, and for me to figure out the math for each curve. I know that we were supposed to use for() loops for our strings, but I found using if() made more sense for all the different curves, since there were quite a few different parameters. I’ll probably edit my code to use for() loops instead of if() for the string code as a challenge for myself sometime in the future.

Sharon Yang Project 04 String Art

Project 04

/*Sharon Yang
Section C
junginny
Project-04
*/

function setup() {
    createCanvas(400, 300);
}

function draw() {
    background(255);
    var x1;
    var x2;
    var y1;
    var y2;
    var colorLR = 20;
    var colorLG = 45;
    var colorLB = 80;
    //Left curve
    x1 = 0;
    x2 = 0;
    y1 = 0;
    y2 = 0;
    push();
    for (var jL = 1;jL <= 100; jL+=1) {
        translate(jL,jL);
        strokeWeight(1-(jL/20));
        stroke(colorLR,colorLG,colorLB);
        for (var iL = 1;iL <= 50; iL+=2.8) {
            x2 = iL*8;
            y1 = iL*6;
            line(x1-jL,height-y1-jL,x2-jL,y2-jL);
        }
    //Change color value - gradient
    colorLR+=10;
    colorLG+=10;
    colorLB+=10;
    }
    pop();
    //Right curve - resetting variables
    x1 = 0;
    x2 = 0;
    y1 = 0;
    y2 = 0;
    colorLR = 25;
    colorLG = 50;
    colorLB = 90;
    push();
    for (var jR = 1;jR <= 100; jR+=1) {
        translate(-jR,jR);
        strokeWeight(1-(jR/20));
        stroke(colorLR,colorLG,colorLB);
        for (var iR = 1;iR <= 50; iR+=2.8) {
            x1 = iR*8;
            y2 = iR*6;
            line(x1,0,width,y2);
        }
    //Change color value - gradient
    colorLR+=10;
    colorLG+=10;
    colorLB+=10;
    }
    pop();
}

Using for loops to create various lines to put them together into a harmonious art piece helped me explore the order in for loops and/or nested for loops. I played with the stroke weights as well as the colors to create an effect of a gradient.

Looking Outwards – Music and Computation

A MaxMSP patch that turns weather data into music – January 2016

I’ve looked at weather data before as a part of site analysis. I can’t see the connection to this.

Algorithmic Composition is, as the username suggests, an algorithmic composer. Since 2009, they’ve been blogging and posting tutorials on just that. They made the MaxMSP (Max being a visual programming language focused on media) patch above that translates weather data into sound. What’s impressive to me is how much more it does; the patch has options for changing instruments, octaves, pitch, and tempo for the four tracks that can be mixed. As a result, it can do so much with just a single data set, although just by listening to it I can’t see how someone could trace it back to its origins.

Algorithmic Composition says

“You don’t have to be a programmer to make algorithmic music, just an interest in creating music in new ways”

and I think that shows through in their work. It’s making music in a new way.

ChristineSeo-LookingOutwards-04


Classyfier is a project where a table has the ability to choose the music genre that fits into the situation by detecting the beverages that people are consuming. It is programmed through Wekinator, Processing and the OFX collection, by Benedict Huebener, and 2 other students in Copenhagen Institute of Interaction Design. The music can be changed to the next song by tapping on the table. Huebener originally has passion for mechanics and aesthetics. He applies physical and digital prototyping techniques in order to take on problems in today’s society, which dictated him to take on this project.

I found this project very intriguing because I believe that this kind of technology relating to sound can be used in the bigger world. I think that this is a very possible project that can be actually carried on to a further extent to use in the future. The use of technology to respond to sounds in order to appropriately use in a certain context relates to convenience for humans. This project is aids human’s convenience and does not affect in a harmful way, which I think is very important since technology is consistently developing today. The man made machine table that can use its intelligence due to training, is very fascinating. I wish this project can work for multiple uses, not only limiting to sound of wine glasses, beer cans, and spoons clicking against mugs. Overall, this project is very successful in its use and the conceptual idea must be carried forward, and shared to a wider audience.

http://www.creativeapplications.net/processing/the-classyfier-ai-detects-situation-and-appropriates-music/

Sharon Yang Looking Outwards – 04

The computed audio artwork is called ‘Déguster l’augmenté’ created by Erika Marthins. She aims to add a new dimension to the perception of food and experience of meals. She has explored three desserts and transformed them into generative art pieces; the record made of chocolate that brings the sense of taste to a different sensation – auditory is what I especially admire. The regular records are made of wax; recreating the texture as well as the algorithm – the lines on the record that creates the sounds – using chocolate that can emulate it. The collaboration between the chefs, artists and scientists is incredibly innovative and unparalleled which brings attention to the creators’ ingenuity and artistic sensibilities. She achieves bringing a change into a highly common experience or a highly common object through a technological innovation, allowing us to interact with them to a whole new level.