Dani Delgado – Looking Outwards 5

A screencapture of “Miquela”

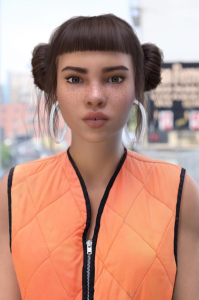
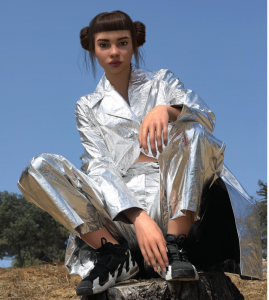
Lil Miquela is an  instagram “model” created using 3D computer modeling techniques. While not much is known about the artist or their motivation to create a full social media page for their model, other than that they work for a startup named Brud, I find it very impressive that the page amassed thousands of followers who believed Miquela was a real person from Brazil. While there is much controversy that surrounds this project because of this, I believe that as an art piece, this project is both beautifully rendered and raises some important questions: Have computer graphics advanced so far that we can  create realities indistinguishable from our own? Are we now a society focused on purely visuals without needed any further context? Do we not care? The instagram, which has been publishing content since 2016,  is only gaining a larger and larger following with time.

While this is not necessarily traditional computer graphics, I believe that Miquela is an impressive work of both computer generated and performance art (as we follow “her” lifestyle, we become a part of the artist’s performance).

Lil Miquela was hired by many brands to “model” their clothes due to her popularity.

Link to “her” instagram: https://www.instagram.com/lilmiquela/

Rachel Lee Project 05 Section E

sketch

/* Rachel Lee
Section E
rwlee@andrew.cmu.edu
Project 05
*/


var spacing = 80; // spacing between elements
var kiwiSize = 60;

function setup() {
    createCanvas(480, 480);
    background(255, 210, 225);

    // drawing kiwi
    for (var x = 75; x < width - 75; x += spacing) { // width of rows
        for (var y = 85; y < height - 85; y += spacing * 1.2) { // length of columns
            noStroke();
     // brown kiwi skin
            fill(165, 115, 65);
            ellipse(x, y, kiwiSize, kiwiSize);
   
    // green kiwi flesh
            fill(190, 215, 90);
            ellipse(x, y, kiwiSize * 0.9, kiwiSize * 0.9);

    // beige kiwi core
            fill(240, 240, 205);
            ellipse(x, y, kiwiSize * 0.5, kiwiSize * 0.5);
    
    // kiwi seeds
            fill(0);
            ellipse(x - 15, y, 3, 3);
            ellipse(x + 15, y, 3, 3);
            ellipse(x, y - 15, 3, 3);
            ellipse(x, y + 15, 3, 3);
        }
    } 

    // text that aligns with kiwi
    for (var a = 45; a < width - 75; a += spacing) {
    	for (var b = 105; b < height - 85; b += spacing * 0.9) {
            fill(40, 140, 70);
            textSize(9);
            textFont('Akkurat Mono');
            text("kiwi dreams", a, b * 1.3);    
    	}
    }
    noLoop(); // drawing only once
}


function draw() {

}


I decided to base my wallpaper on my current favourite fruit, the kiwi. I wanted to incorporate more playful colors as well as a dreamier caption, since it is turning cold in Pittsburgh and I miss warm weather. I was inspired by a cherry printed shirt I came across when I was online shopping, and numerous fruit illustrations I found on Pinterest (such as this pomegranate one). Overall, it was really fun playing with symmetry and pattern, and I would like to continue this project to perhaps feature alternating sliced and whole kiwis.

Pomegranate pattern I took inspiration from
Cherry shirt I came across when online shopping

Eliza Pratt – Looking Outwards 05

Artist Zacharias Reinhardt uses 3D graphic software to heighten visual storytelling.

Zacharias Reinhardt is a German 3D artist who uses Blender 3D software to create conceptual digital illustrations. Many of his works, such as Final Takeoff (shown above), convey a strong sense of storytelling that is heightened by the realism of fully rendered models. Unlike 2D illustrations, these graphics allow you to view the artwork from many angles and fully immerse yourself within the 3D space created.

A 3D rendering of the car in Reinhardt’s Final Takeoff allows you to experience his work from any angle (zoom in to see the interior).

While I’ve always been loyal to the art of traditional illustration, seeing works such as these truly heighten visual storytelling without losing any sense of the artist’s expressiveness. By using Blender software to create these otherworldly graphics, Reinhardt brings fantasy a little closer to reality.

Dani Delgado Project 05 – Wallpaper

sketch

/* Dani Delgado
Section E
ddelgad1@andrew.cmu.edu
Project-05
*/

function setup() {
    createCanvas(450, 350);
}

function draw() {
    //draw a dark blue background
    background(28, 33, 82);

    //draw the polka dotted bakcground
    for (var p = 0; p < width - 10; p += 18) {
    	for (var d = 0; d < height - 10; d += 22) {
    		polkaDot(p, d);
    	}
    }

    //draw the blue mountain and the pink shadow
    for (var mx1 = 0; mx1 < width - 60; mx1 += 60) {
     	for (var my1 = 0; my1 < height; my1 += 70) {
     		mountainBase(mx1, my1);
     		mountainShadow(mx1, my1);
        }
    }    
    //draw the white  offset outline 
    for (var mx2 = 0; mx2 < width - 65; mx2 += 60){
    	for (var my2 = 0; my2 < height; my2 += 70){
    		mountainOutline(mx2, my2);
    	}
    }
    noLoop(); 
}

function polkaDot(x, y) {
	//draw the polka dotted background
	push();
	translate(x, y);
	noStroke();
	fill(48, 53, 102);
	ellipse(10, 10, 10, 10);
	pop();
}

function mountainBase(x, y) {
    //define the variables to make the mountain points at 
    //all variables are fixed based on the first set of triangle coordinates
    //writing out variables like this helps me to understand the placement of my shapes
    var mx1 = 20;
    var mbase = 50;
    var mx2 = mx1 + (mx1 / 2);
    var mpeak1 = mbase - 20;
    var mx3 = mx1 * 2;
    var mx4 = mx2;
    var mpeak2 = mbase - 30;
    var mx5 = mx4 + 15;
    var mx6 = mx4 + 30;
    var mx7 = mx5;
    var mx8 = mx7 + 12;
    var mpeak3 = mbase - 20;
    var mx9 = mx8 + 12;

    //draw the first mountain base
    push();
    translate(x, y);
    fill (108, 113, 182);
    noStroke();
    triangle(mx1, mbase, mx2, mpeak1, mx3, mbase);
    triangle(mx4, mbase, mx5, mpeak2, mx6, mbase);
    triangle(mx7, mbase, mx8, mpeak3, mx9, mbase);
    pop();
}

function mountainShadow(x, y) { 
	//repeat variables
    var mx1 = 20;
    var mbase = 50;
    var mx2 = mx1 + (mx1 / 2);
    var mpeak1 = mbase - 20;
    var mx3 = mx1 * 2;
    var mx4 = mx2;
    var mpeak2 = mbase - 30;
    var mx5 = mx4 + 15;
    var mx6 = mx4 + 30;
    var mx7 = mx5;
    var mx8 = mx7 + 12;
    var mpeak3 = mbase - 20;
    var mx9 = mx8 + 12;

    //draw the mountain shadow
    push();
    translate(x, y);
    fill(255, 128, 160);
    noStroke();
    triangle(mx1, mbase, mx2, mpeak1, mx2 + 2, mbase);
    triangle(mx4, mbase, mx5, mpeak2, mx5 + 5, mbase);
    triangle(mx8, mpeak3 + (0.5 * mpeak3), mx6 - 7.5, mpeak3 + 4.5, mx8, mpeak3);
    pop();
}

function mountainOutline(x, y){
    //repeat variables
	var mx1 = 20;
    var mbase = 50;
    var mx2 = mx1 + (mx1 / 2);
    var mpeak1 = mbase - 20;
    var mx3 = mx1 * 2;
    var mx4 = mx2;
    var mpeak2 = mbase - 30;
    var mx5 = mx4 + 15;
    var mx6 = mx4 + 30;
    var mx7 = mx5;
    var mx8 = mx7 + 12;
    var mpeak3 = mbase - 20;
    var mx9 = mx8 + 12;

    //draw the mountain white, offset outline
    push();
    translate (x, y);
    stroke(255);
    strokeWeight(0.75);
    line(mx1 + 5, mbase - 5, mx9 + 5, mbase - 5);
    line(mx1 + 5, mbase - 5, mx2 + 5, mpeak1 - 5);
    line(mx2 + 5, mpeak1 - 5, mx3 + 2, mbase - 15);
    line(mx3 + 2, mbase - 15, mx5 + 5, mpeak2 - 5);
    line(mx5 + 5, mpeak2 - 5, mx6 - 2, mbase - 20);
    line(mx6 - 2, mbase - 20, mx8 + 5, mpeak3 - 5);
    line(mx8 + 5, mpeak3 -5, mx9 + 5, mbase - 5);
    pop();
}

For this project, I wanted to create a crisp pattern that would like nice on a backpack or maybe a skirt. I went through a few ideas, including rain clouds and flower patterns, before deciding on drawing mountain ranges. I have always loved how mountains are graphically represented; the clean lines and clever usage of color blocking to create dimension are just very pleasant to look at for me. With that in mind, I decided to create something similar with a fun color palette.

A quick sketch made to get the concept and main points down onto some paper

 
As far as coding goes, this was a bit of a challenge for me since I am still trying to fully understand for-loops and creating my own functions. I tried to incorporate functions into my code instead of drawing the shapes in the loops to practice these skills some more (and so that I could relate all of the mountain’s shape points to one primary point using arithmetic and not having the loop mess with these relationships).

Jenna Kim (Jeeyoon Kim)- Looking Outwards-5


(Guide to Snow Simulation in Frozen)

Frozen Snow Simulation is a project by the graphics community to illustrate real snow in the animation environment. Since already existing 3D graphics only have techniques for solids and liquids, and making graphics for wet and dense snow is difficult, the graphics team had to use a grid that creates self collision and breaking of the snow. The algorithm used for this project is called Matterhorn, which made basis for most of the snow effects in the movie. The designers started with Matterhorn and changed the look for a perfect snow. The creator’s artistic sensibilities manifested in the final form because he carefully considered the composition, details of the snow, and style/ elegance of the whole animation into Frozen. I admire this project because in order to create the real, specific effects of the snow, a team of forty people came together to simulate snow that gives both reality and fits into the style of the movie.

Link: http://www.cgmeetup.net/home/making-of-disneys-frozen-snow-simulation/

Project 05: Wallpaper

circle

/*
Samantha Ho
sch1
Project 05
Section E
*/
function setup() {
    createCanvas(600, 400);
    noStroke();
}

function draw() {
    background(250, 230, 230);
    //repeating the pattern linearly along the x axis
    for (var y = 0; y < height; y += 120) {
        for (var x = 0; x < width; x += 90) {
            var r = (y / 400 * 200);
            var g = (y / 400 * 255);
            var b = (x / 400 * 200);
            stroke(r, g, b);
            //creating the top pattern1
            line(x + 10, y + 10, x + 10, y + 50);
            line(x + 20, y + 5, x + 20, y + 45);
            line(x + 30, y + 0, x + 30, y + 40);
            line(x + 40, y + 5, x + 40, y + 45);
            line(x + 50, y + 10, x + 50, y + 50);
            //creating base1
            line(x + 30, y + 45, x + 10, y + 55);
            line(x + 38, y + 50, x + 18, y + 60);
            line(x + 48, y + 55, x + 28, y + 65);

        }
    }

    for (var y = 0; y < height; y += 120) {
        for (var x = 0; x < width; x += 90) {
            var r = (y / 400 * 60);
            var g = (x / 400 * 200);
            var b = (y / 400 * 200);
            stroke(r, g, b);
            //creating the top pattern1
            line(x + 10, y + 10, x + 10, y + 50);
            line(x + 20, y + 5, x + 20, y + 45);
            line(x + 30, y + 0, x + 30, y + 40);
            line(x + 40, y + 5, x + 40, y + 45);
            line(x + 50, y + 10, x + 50, y + 50);
            //creating base1
            line(x + 30, y + 45, x + 10, y + 55);
            line(x + 38, y + 50, x + 18, y + 60);
            line(x + 48, y + 55, x + 28, y + 65);

            var r = (y / 200 * 20);
            var g = (x / 200 * 20);
            var b = (y / 200 * 50);
            stroke(r + 30, g + 100, b + 100);
            //creating the top pattern2
            line(x + 30, y + 70, x + 30, y + 115);
            line(x + 40, y + 75, x + 40, y + 110);
            line(x + 50, y + 80, x + 50, y + 105);
            line(x + 60, y + 75, x + 60, y + 110);
            line(x + 70, y + 70, x + 70, y + 115);
            //creating front side
            line(x + 5, y + 12, x - 15, y);
            line(x + 5, y + 28, x - 15, y + 16);
            line(x + 5, y + 45, x - 15, y + 32);

            //ellipse
            var r = (width / x * 20);
            var r = (width / y * 20);
            var r = (width / y * 20);
            noStroke();
            fill(r, g, b)
            ellipse(x + 9, y + 110, 2, 2)
        }
    }

}

I wanted to go with a line pattern and use the negative space to insinuate shadow. Originally I had a full black background, but it was difficult to distinguish shapes due to the contrast. Inevitably, I decided on the lighter background and was rather satisfied with what I came up with.

inspiration/ concept to get me started

Jenna Kim (Jeeyoon Kim)- Project 5- Wallpaper

jennakim05

/* Jenna Kim (Jeeyoon Kim)
Section E
jeeyoonk@andrew.cmu.edu
Week 5 Project: Mr. Avocado and Ms. Eggy
*/
function setup() {
    createCanvas(600, 600);
    noStroke();
}

function draw() {
    background(245, 138, 125);

    for (var y = 0; y < height; y += 100) { //avocado peel
        for (var x = 0; x < width; x += 70) {
            fill(79, 50, 54);
            ellipse(x, y, 30, 30);
            ellipse(x, y + 30, 40, 40);
      }
    }
    for (var y=0;y < height;y += 100){ //inside of avocado
      for (var x = 10;x < width;x += 70){
        fill(204, 228, 182);
        ellipse(x - 10, y, 25, 25);
        ellipse(x - 10, y + 25, 35, 35);
        fill(79, 50, 54); 
        ellipse(x - 15, y, 3, 3); //left eye
        ellipse(x - 7, y, 3, 3); //right eye
      }
    }

    for (var y = 0;y < height;y += 100){ //avocado seed!
      for (var x = 10;x < width;x += 70){
        fill(79, 50, 54);
        ellipse(x - 10, y + 30, 15, 15);
      }
    } 
    for(var y = 70;y < height * 3 / 2;y += 100){ //egg! 🙂
    for(var x = 30;x < width;x += 70){
      fill(255); //white part
      ellipse(x, y, 40, 50);
      fill(252, 210, 94); //yolk
      ellipse(x, y, 20, 20);
      fill(252, 210, 94); //eyes
      ellipse(x - 10, y - 10, 4, 4); //left eye
      ellipse(x + 10, y - 10, 4, 4); //right eye
    }
  }
    noLoop();
}

For this project, I designed a pattern for a kind of pajamas I want for myself. 🙂
I made a pattern of avocados and eggs, my favorite food. Although this project was also challenging as the assignments a and b, I enjoyed using my creativity and apply what I learned from this week’s lecture and recitation. Through keep experimenting with the coding, I started to understand the loops fully than before. I know that next time, I can further improve by using % operator.

Mimi Jiao – Project 5 – Section E

sketch

/*
Mimi Jiao
wjiao@andrew.cmu.edu
Section E
Project-05
*/
var h = 5;
var w = 25;
var gap = 5;
function setup() {
    createCanvas(400, 400);
}

function draw() {
    background(0, 0, 255);

    //adds an extra interactive element so that the wallpaper
    //changes as the mouse is held and dragged 
    if (mouseIsPressed) {
        w = mouseX / 10;
        h = mouseY / 10;
    }

    //draws vertical rectangles in the for loop
    for (var y = 0; y < 40; y ++) {
        //draws horizontal rectangles in every quarter of the canvas
        for (var x = 0; x < 4; x ++) {

            //white longer rectangles
            push();
            noStroke();
            rect(x * (width / 4), y * (h + gap), w, h);
            pop();

            //empty fill green outline longer rectangles
            push();
            noFill();
            stroke(0, 255, 0);
            rect(w + (x * width / 4), gap + (y * (h +  gap)),
                 w, h);
            pop();

            //red fill longer rectangles
            push();
            fill(255, 0, 0);
            rect((3 * w / 2) + (x * width / 4),
                 y * (h + gap), w, h);
            pop();

            //black fill shorter rectangles
            push();
            fill(0);
            rect(w * 3 + (x * width / 4), gap + (y * (h +  gap)),
                 w / 2, h);
            pop();

        }            
    }
}

This project was an extension of one of my past projects for another class I’m taking, Color for Communciations, Products, and Environments. For that project, I created a repeating grid on Adobe Illustrator and made many different versions of it with different colors to study color interactions. I wanted to apply the same idea this time using code as my medium of expression, which allows me to play with more colors using the RGB colorspace that the CMYK colorspace doesn’t cover. In addition, it lets me play around with the interactive mouse, a function I really enjoy using.


Alice Fang – Project 5 – Wallpaper

sketch

/*
Alice Fang
Section E
acfang@andrew.cmu.edu
Project-05-Wallpaper
*/

var citrusSize = 80;

function setup() {
    createCanvas(600, 600);
    background(176, 196, 222);
    noStroke();
}

function draw() {
	var offset = 5; // offset for fruit outlines

	// draw oranges
	for (x = 75; x < width; x += 150){ 
		for (y = 75; y < height; y += 150){
			noStroke();
			fill(244, 164, 96); 
			ellipse(x, y, citrusSize, citrusSize);

			// orange outline
			noFill();
			strokeWeight(5);
			stroke(220, 120, 30);
			ellipse(x + 5, y + 5, citrusSize, citrusSize);

			// orange dot details
			point(x + 20, y - 20);
			point(x + 15, y - 15);
			point(x + 10, y - 20);
		}
	} 
	var citrusX = 150; // width between lemon and lime
 	var citrusY = 150; // height between rows of lemon/lime
 	textStyle(ITALIC);

	// draw lemon and lime wedges
	for (x = 0; x < 6; x++) {
		for (y = 0; y < 5; y++) {
			var px = x * citrusX; // horizontal spacing between wedges
			var py = y * citrusY + 10; // vertical spacing between wedges
			
			if (x % 2 == 1) { // lemon wedges for even columns
				noStroke(); 
				fill(255, 250, 205);
				arc(px, py, citrusSize, citrusSize, 0, PI);
				
				fill(240, 230, 140); // lemon wedge shading
				triangle(px, py+5, px+5, py+30, px-10, py+30);
				triangle(px+2, py, px - 40, py + 10, px-35, py + 25);
				triangle(px+2, py, px+15, py + 30, px+30, py+10);

				text("lemon", px-10, py-50);
			}
			else { // lime wedges for odd columns
				noStroke();
				fill(154, 190, 20); 
				arc(px, py, citrusSize, citrusSize, 0, PI);
			
				fill(200, 255, 80); // lime wedge shading
				triangle(px, py+5, px+5, py+30, px-10, py+30);
				triangle(px+2, py, px - 40, py + 10, px-35, py + 25);
				triangle(px+2, py, px+15, py + 30, px+30, py+10);

				text("lime", px-10, py-50);
			}
			noFill();
			strokeWeight(5); // offset outline (citrus rind)
			stroke(255, 215, 10);
			arc(px - offset, py - offset, citrusSize, citrusSize, 0, PI);
		}
	}
	noLoop();	
}

This was inspired by a pajama set that I own, and my own affinity for citrus prints (I also own a tshirt that has a different style of citrus illustration). For some reason, I’m drawn to these fruits, and I thought it would be an interesting way to combine the two different citrus clothing that I own. It was definitely good practice in nested loops, and getting more familiar with the % operator, since I wrote the lemons and limes separately before deciding to combine them into a nested for loop.

The pajama set with lemons and other fruit
Explorations of citrus illustration

Jaclyn Saik-Looking Outwards 05

Dalmiro Buigues is a 3D graphics and motion designer from Buenos Aires. He is a director at the Argentinian design studio “Buda”, and has created 3D work for a variety of high profile clients like Nickelodeon and FOX. One project that really stood out to me was a series of 6 animations he created for the Argentinian launch of the running shoe NIKE EPIC REACT. Each animation sequence is defined by a descriptions of wearing the shoe, and the resulting video includes graphics that show this paired with actual users describing the experience.

It’s like riding a marshmallow unicorn.

It’s like jumping into a cotton candy pool.

It’s like a pillow fight in space

It’s like jumping on velvet springs.

It’s like huging a real size jelly bear.

it’s like diving on a cake made of clouds.”

Original sketches, without 3D graphics
Now with graphics applied.

I was drawn to this project because there was so much information published about the process. First, I watched the final video, and the graphics were stunning in their complexity and photorealistic lighting, even though the animated character were cartoons. I think it’s impressive and important to note that the entire video is spoken in spanish, and yet I could understand practically everything that was going on because the visuals were so compelling and informative of the mood. I think Buigues’s main goal was to create a happy-go-lucky feeling with bright colors and big, smilling characters, and juxtapose the seriousness of the shoe and the task of running with the pleasure of comfort and high jumping and other fun activities that he chose to animate.

I think it is especially interesting to see the process work because I can see Buigues’s original sketches, where he was brainstorming the character, and then I can see renderings using photoshop or other 2D-focused software, and then move onto the final stills, where he used CG software to create these fantastic effects like reflected lighting on space helmets and spongey-yet-metallic texture of springs. I am curious about computer graphic software now because I want to learn more about how you can create characters that have set widths and heights and limbs that maintain their form, and then move them within a space so that the light adjusts accordingly. I know this is how they animate most films now, and I think this is one of the most complex and widely consumed forms of computer art today.