Claire Lee – Project 03 – Dynamic Drawing

project – 03 – seoyounl

var canvasW = 480
var canvasH = 640

function setup() {
    createCanvas(canvasW, canvasH);

}

function draw() {
    var drinkY = 300;
    var drinkH = 200;
    var drinkOpacity = 200 - (mouseY / 8);

    background(100 + (mouseX / 10), 150 + (mouseX / 10), 255);
    // background color changes with mouseX
    
    noStroke();
    fill(255, 200, 200);
    ellipse(canvasW / 2, 240, 300, 300);

    noStroke();
    fill(0);
    ellipse(180, 160, 15, 15);

    noStroke();
    fill(0);
    ellipse(300, 160, 15, 15);

    noStroke();
    fill(0);
    rect(235, 190, 10, 305);

    stroke(0);
    strokeWeight(4);
    line(210, 190, 270, 190);


    noStroke();
    fill(240, 130, 30, drinkOpacity);
    rect(170, drinkY + (mouseY / 4), 140, drinkH - (mouseY / 10));
    // drink height and opacity changes with mouseY
  
    noStroke();
    fill(60); 
    rect(0, 500, canvasW, canvasH - 500); 

    stroke(255);
    strokeWeight(4);
    noFill();
    rect(170, 250, 140, 250); 

    push();
    translate(0, (mouseY / 4.3));  
    rectMode(CENTER);
    noStroke();
    fill(255, 255, 255, 100);
    rect(200, 292, 50 - (mouseY / 100), 50 - (mouseY / 100), 5);
    pop(); 

    push();
    translate(0, (mouseY / 5)); 
    rectMode(CENTER);
    noStroke();
    fill(255, 255, 255, 100);
    rect(250, 320, 50 - (mouseY / 100), 50 - (mouseY / 100), 5);
    pop();

    push();
    translate(0, (mouseY / 4.3)); 
    rectMode(CENTER);
    noStroke();
    fill(255, 255, 255, 100);
    rect(280, 292, 50 - (mouseY / 100), 50 - (mouseY / 100), 5);
    pop();
    // ice cubes change size and position


}

This project was a really interesting way to experiment with changing shapes, colors, opacity, size, and position in a piece. I really enjoyed learning some new functions, and some other things I wish I could’ve implemented are rotations (in the ice cubes) and some more complex figures.

Carly Sacco – Project-03- Dynamic Drawing


sketch

//Carly Sacco
//Section C
//csacco@andrew.cmu.edu
//Project 3

var x = 300;
var y = 400;
var dx = 1 ;
var dy = -1;

function setup() {
    createCanvas(640, 480);	
}

function draw() {
	background(95, mouseX * .7, 227);
	//fish head
	fill(50, 162, 168);
	noStroke();
	push();
	translate(width / 2, height / 2);
    rotate(PI / 4);
    rect(-50, -50, 300, 300, 30);
	pop();
	
	fill(184, 213, 214);
	noStroke();
	push();
	translate(width / 2, height / 2);
    rotate(PI / 4);
    rect(-25, -25, 250, 250, 30);
	pop();
	
	//fish eyes
	fill('white');
	ellipse(290, 315, 50, 65);
	ellipse(350, 315, 50, 65);
	
	fill('black');
	//letting the black of the eye move based on the mouse
	eyeY = constrain(mouseY, 310, 330);
	ellipse(290, eyeY, 35, 35);
	ellipse(350, eyeY, 35, 35);
	
	//fish  mouth
	fill(227, 64, 151);
	noStroke();
	push();
	translate(320, 410);
	rectMode(CENTER)
    rotate(mouseX / 150); //the mouth spins based on mouseX
    rect(0, 0, 100, 100, 30);
	pop();
	
	fill(120, 40, 82);
	noStroke();
	push();
	translate(width / 2, height / 2);
    rotate(PI / 4);
    rect(95, 95, 50, 50, 30);
	pop();	
	
	//fins
	fill(209, 197, 67);
	quad(460, 350, 510, 300, 510, 450, 460, 400);
	quad(200, 350, 150, 300, 150, 450, 200, 400);
	
	//bubbles
	var bub = random(25, 60);
	fill(237, 240, 255);
	ellipse(x, y, 50, 50);
	ellipse(x, y, bub, bub);
	ellipse(200, y, bub, bub);
	ellipse(mouseX * .5, mouseY * .5, bub, bub);
	ellipse(mouseX * .25, mouseY * .25, bub, bub);
	ellipse(mouseX * .75, mouseY * .75, bub, bub);
	ellipse(mouseX * .5, mouseY * .25, bub, bub);
	ellipse(500, y, bub, bub);
	ellipse(250, 500, bub, bub);
	x += dx;
	y += dy;

	//so that they bounce off the edges
	if (x > 640) {
		dx = -dx;
	}
	if (y < 0) {
		dy = -dy;
	}
	if (y > 480) {
		dy = -dy;
	}
	if (x < 0) {
		dx = -dx;
		dy = random(1,5);
	}	
}


I thought making a fish with aspects that moved based on the cursor would be a fun way of how humans normally try to get fish’s attention. I learned a lot about how certain things can be controlled and how with others it’s fun to let them just run.

Rachel Shin- LO3

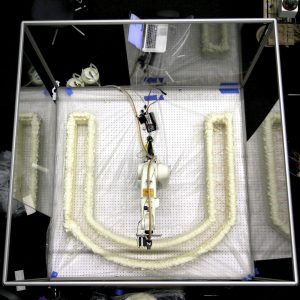
The building-scale 3D printing employs small robotic agents to build a mini version of construction structures with material that acts as a mold and “thermal insulation layer.” MIT developed this system to provide 3D printing models for building models so that architectures and scientists could better visualize and collaborate to produce and build strong, technologically advanced buildings. The technology that MIT established also allowed building utilities to be incorporated into the model so that it can accurately predict future circumstances and provide solutions to any uprising issues in the model. I found this interesting because it improves the rate of success as well as minimizes any risk of danger or negative influence on civilians’ safety. I suppose the algorithms used to generate work comes from positioning potential structures as well as generating buildings with accurate angles and arrangement of components of the structure. The creator’s artistic sensibilities are manifested in the final form because it is literally an enlarged version of the building-scale 3d printed model while guaranteeing success of any wiring or plumbing or sturdiness involved.

Stefanie Suk – Looking Outwards – 03

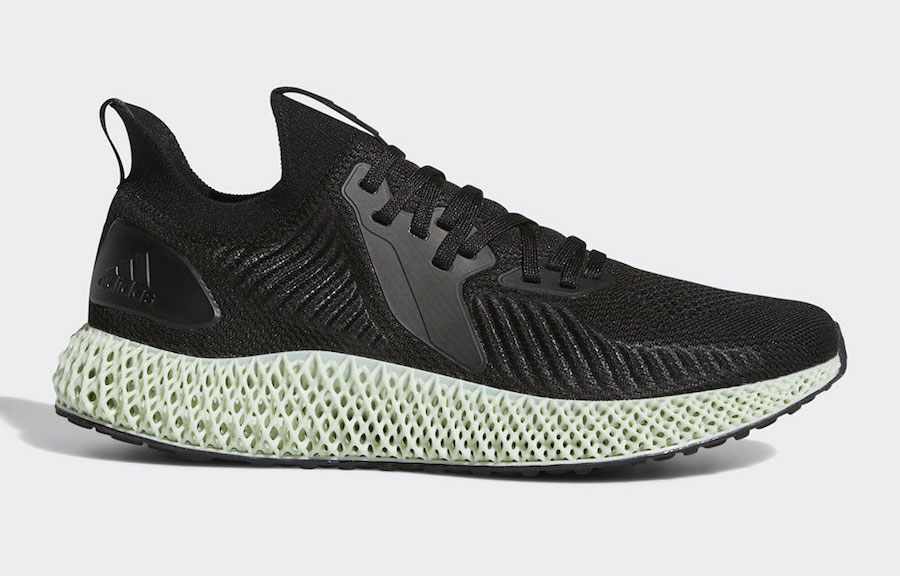
Image of 3D Printed Shoe from Adidas and Carbon

Adidas has been exploring the application of 3D printing to sneakers in the past few years. It was not that long ago when Adidas was able to release their innovative 3D printed shoe, which was created with a Silicon Valley startup company called Carbon. The 3D printing method they use to manufacture is told to be printed with zero support material, in other words, the company is not only able to reduce complex traditional manufacturing processes but they can reduce raw material costs as well. This printing method, which Carbon calls the Digital Light Synthesis (DLS) technology, is applied to producing Adidas’s 3D printed shoes. What I admire about this production is how effective 3D printings are to create Adidas runner shoes all economically, environmentally, and visually. The open and dense lattice structure of the shoe’s cushion not only gives aesthetic patterns but it also offers a perfect lockdown fit to the feet and stable cushioning to the shoe. Thus, the lattice also shows the creator’s artistic sensibilities to create the most suitable structure for the shoes. The fact that Carbon and Adidas was able to come up with a 3D printed shoe using the perfect material and structure shows how much they have been studying the 3D printing technology, and shows how successful they were with their final product. This success really made me admire the AdidasXCarbon collaboration for 3D printed shoes. 

3D Printed Shoes (Futurecraft 4D) in Collaboration with Carbon and Adidas

Stefanie Suk – Project 03 – Dynamic Drawing

sketch

//Stefanie Suk
//15-104 D
//ssuk@andrew.cmu.edu
//Dynamic Drawing

var a = 251; //background color
var b = 224; //background color
var c = 233; //background color
var angle = 0;

function setup() {
    createCanvas(640, 480);
}
function draw() {
    a, b, c = mouseX/4; 
    // background color change when mouse is moved 
    background(a, b, c);
    noStroke();
    push();
    translate(mouseY + 75, width/2)
    rotate(radians(angle));
    ellipseMode(CENTER);
    fill(130, 175, 255);
    stroke(217, 255, 147);
    strokeWeight(20);
    ellipse(0, 0, 200, 500);
    pop();
    angle = angle + 5
    // rotating oval position change; left when mouse moves up right whien mouse moves down
    let circlex = width - mouseX;
    let circley = height - mouseY;
    fill(230, 111, 183);
    ellipse(circlex, height/2, circley, circley); 
    // pink circle size and position change; left when mouse moves right, right when mouse moves left, big when mouse moves up, small when mouse moves down
    let cirx = height - mouseY;
    let ciry = width - mouseX;
    fill(185, 111, 230);
    ellipse(mouseX, height/2, mouseY, mouseY); 
    // purple circle size and position change; moves along the mouse, big when mouse moves down, small when mouse moves up
    fill(111, 208, 230);
    ellipse(cirx, height/2, ciry, ciry); 
    // blue circle size and position change; left when mouse moves down, right when mouse moves up, big when mouse moves left, small when mouse moves right 
    translate (mouseX + 10, height/2);
    ellipseMode(CENTER);
    fill(255, 147, 147);
    stroke(213, 68, 98);
    strokeWeight(15);
    ellipse(mouseX - 150, mouseY - 200, mouseX/2, mouseY/2); 
    // pink orange oval shape position change; long when mouse moves down and left, wide when mouse moves up and right,
}

For this project, I studied the various possibilities in the change of the shape, ellipse. Ellipse is one of my favorite shape to study because although it is a simple, single lined structure, there are so many varieties of different ellipse we can create. I tried to incorporate as many different aspects of image elements possible, like the changes in sizes, angles, colors, and position as I move the cursor around different places within the canvas. 

Rachel Shin – Project 03

For this project, I decided to start with the rotating squares that I learned in recitation. From there, I layered shapes with differing positions, sizes, angles, and a change in background color to create a cohesive art piece. I thought it was fun to experiment with stroke, stroke colors, shapes, layering, rotating, and mouseX/mouseY positions to create a moving art piece.

reshin-03-project-dynamic

//Rachel Shin
//reshin@andrew.cmu.edu
//15-104
//Section B
//Project 03- Dynamic Drawing

    var angle = 0;
    var angle2 = 0;

function setup() {
    createCanvas(480, 640);
}

function draw() {
    
    //background: color change based on mousex
    background(109, 140, 148);

    if (mouseX > width/2) {
        background(202, 220, 224);
    }

    //circle1: size change, position same
    noFill();
    strokeWeight(10);
    stroke(230, 197, 211);
    ellipse(50, 50, mouseX, mouseX);

    //circle2: size change, position same
    noFill();
    strokeWeight(20);
    stroke(194, 79, 83);
    ellipse(430, 430, -mouseX, -mouseX);

    //circle3: size change, position same
    noFill();
    strokeWeight(30);
    stroke(79, 121, 194);
    ellipse(430, 50, mouseX, mouseX);

    //circle4: size change, position same
    noFill();
    strokeWeight(40);
    stroke(139, 194, 79);
    ellipse(50, 430, -mouseX, -mouseX);

    //rect 1: size change, position same
    noStroke();
    fill(139, 173, 137);
    rect(20, 50, (-mouseX/3), (mouseY/2));

    //rect2: size change, position same
    noStroke();
    fill(246, 250, 190);
    rect(20, 460, mouseX/5, mouseY/8);

    //circle3: size same, position change
    fill(173, 146, 108);
    ellipse(mouseX/2, mouseY/3, 100, 200);


    //spinning squares
    noStroke();
    fill('white');
    push();
    rotate(degrees(angle));
    rect(mouseX, 5, 50, 50);
    pop();
    angle = angle + 2;

    
    push();
    translate(195,195);
    rotate(degrees(angle2));
    rect(mouseX-100, 5, 50, 50);
    pop();
    angle2 = angle2 - 2;

    //baymax
    if (mouseY > height/2) {
        //if vertical position is at 240 or more, draw baymax
        noStroke();
        fill('white');
        ellipse (200, 300, 100, 70);

        noStroke();
        fill('black');
        ellipse (175, 300, 15, 15);

        noStroke();
        fill('black');
        ellipse (225, 300, 15, 15);

        noStroke();
        fill('black');
        rect (175, 300, 50, 5);

        text("HI, I'M BAYMAX, YOUR PERSONAL HEALTH CARE COMPANION", 50, 400, 400, 50);
    }


}


Sarah Kang – Project 03- Dynamic Drawing

dydraw

//sarah kang
//section c
//sarahk1@andrew.cmu.edu
//project-03-dynamic-drawing

var angle = 0; //angle for rectangle rotation
var ogX = 0;
var ogY = 0;

function setup() {
    createCanvas(640, 480);
}

function draw() {
    background(0);
    strokeWeight(1.5);
    stroke(255, 255, 255);

    //top row small rectangles

    fill(mouseY, 102, mouseX);
    push();
    translate(70, 70);
    rotate(radians(angle * -1));
    rect(ogX, ogY, mouseX / 8, mouseY / 8);
    pop();
    push();
    translate(170, 70);
    rotate(radians(angle * -1));
    rect(ogX, ogY, mouseX / 8, mouseY / 8);
    pop();
    push();
    translate(270, 70);
    rotate(radians(angle * -1));
    rect(ogX, ogY, mouseX / 8, mouseY / 8);
    pop();
    push();
    translate(370, 70);
    rotate(radians(angle * -1));
    rect(ogX, ogY, mouseX / 8, mouseY / 8);
    pop();
    push();
    translate(470, 70);
    rotate(radians(angle * -1));
    rect(ogX, ogY, mouseX / 8, mouseY / 8);
    pop();
    push();
    translate(570, 70);
    rotate(radians(angle * -1));
    rect(ogX, ogY, mouseX / 8, mouseY / 8);
    pop();

    // middle medium rectangles, rotating in opposite direction

    fill(mouseX, 166, mouseY);
    push();
    translate(600, 230);
    rotate(radians(angle));
    rect(ogX, ogY, mouseX / 4, mouseY / 4);
    pop();
    push();
    translate(450, 230);
    rotate(radians(angle));
    rect(ogX, ogY, mouseX / 4, mouseY / 4);
    pop();
    push();
    translate(300, 230);
    rotate(radians(angle));
    rect(ogX, ogY, mouseX / 4, mouseY / 4);
    pop();
    push();
    translate(150, 230);
    rotate(radians(angle));
    rect(ogX, ogY, mouseX / 4, mouseY / 4);
    pop();
    push();
    translate(0, 230);
    rotate(radians(angle));
    rect(ogX, ogY, mouseX / 4, mouseY / 4);
    pop();

    //bottom big rectangles

    fill(mouseX, 255, mouseY);
    push();
    translate(100, 420);
    rotate(radians(angle * -1));
    rect(ogX, ogY, mouseX / 2, mouseY / 2);
    pop();
    push();
    translate(320, 420);
    rotate(radians(angle * -1));
    rect(ogX, ogY, mouseX / 2, mouseY / 2);
    pop();
    push();
    translate(540, 420);
    rotate(radians(angle * -1));
    rect(ogX, ogY, mouseX / 2, mouseY / 2);
    pop();

    angle = angle + 5; // rotation speed and direction

    //changing rotation speed, controlled by mouseX

    if(mouseX >= 320){
      angle = angle + 10;
    }
}

For this assignment, I was inspired by the parametric graphic references provided in the guidelines and wanted to emulate it through my drawing.

LookingOutwards 03- Claire Yoon

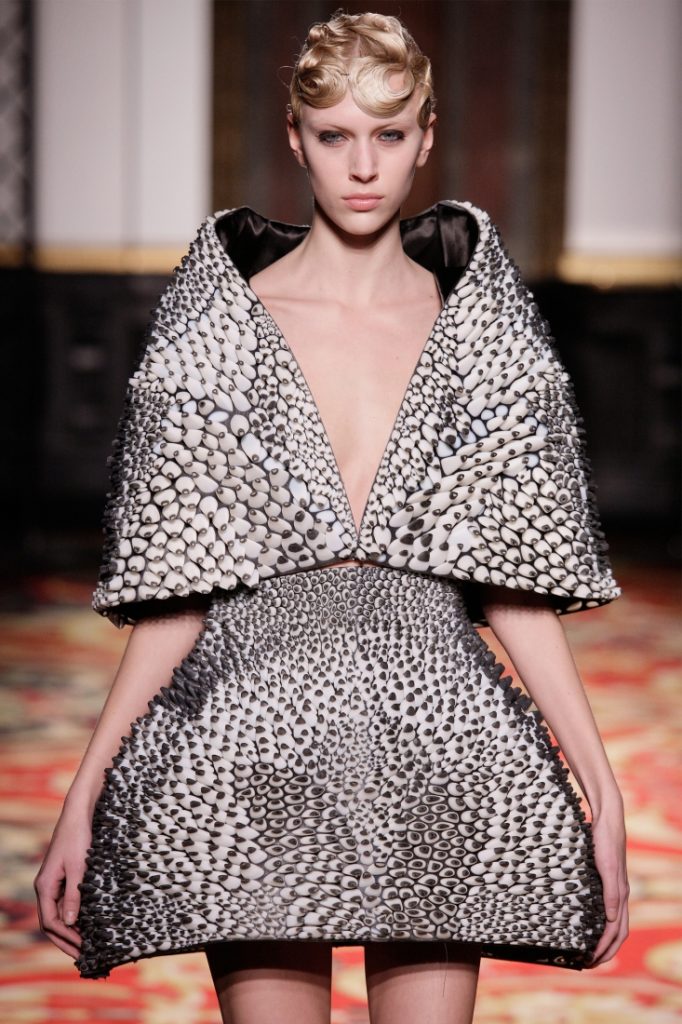
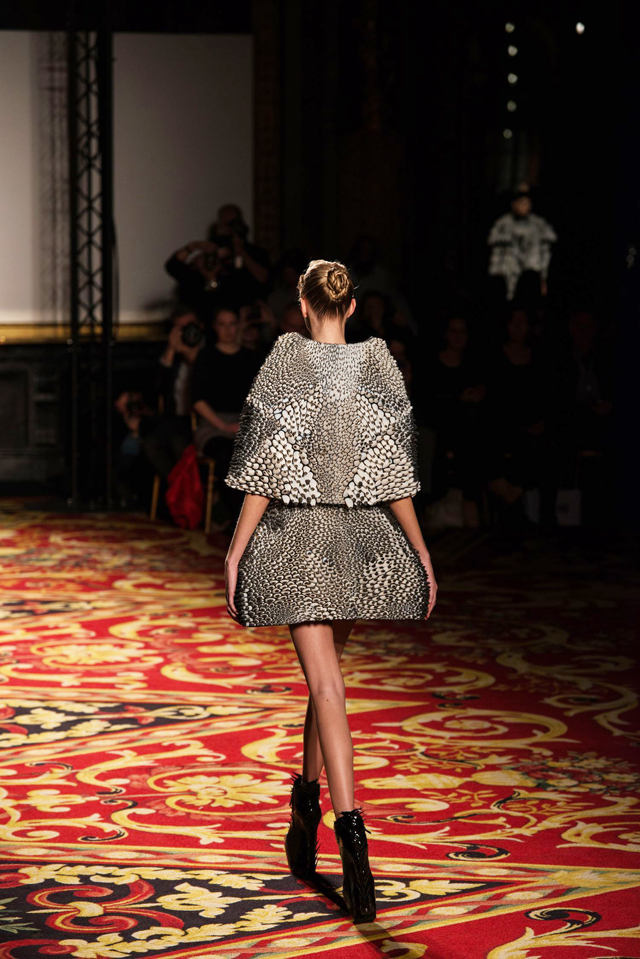
Stratasys 3D Printed Cape & Skirt with Objet Connex Multi-material 3D Printed Technology

Anthozoa is a 3D-printed dress that debuted during Paris Fashion Week Spring 2013. MIT collaborated with fashion designer Iris Van Herpen for her show “Voltage.” They used Stratasys’ unique Objet Connex multi-material 3D printing technology that incorporates both hard and soft materials, which add a nice contrast and movement to the piece. When you look at this design up close they seem rather like underwater corals or something that is related to nature.

I was amazed by the complexity but yet cohesiveness to the design. Unlike other dresses that also have variety of textures by incorporating 3D printing definitely adds more depth and texture to the design making it especially unique.

Shannon Ha-Looking Outwards-03

Photo taken from MIT Media Lab Website
All Copyrights by The Media Matter Group

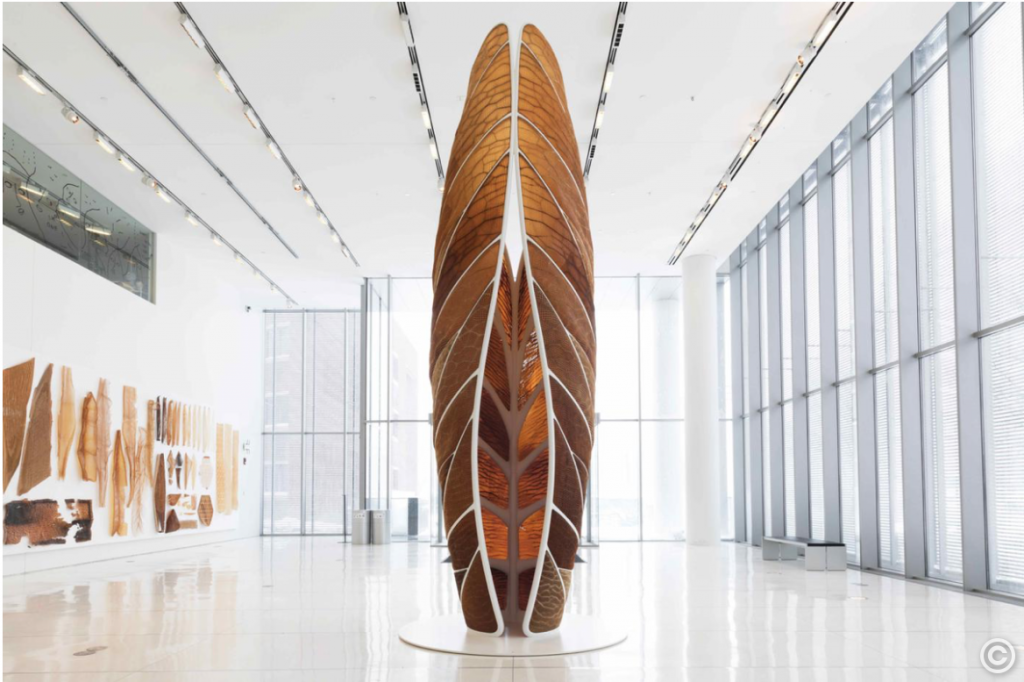
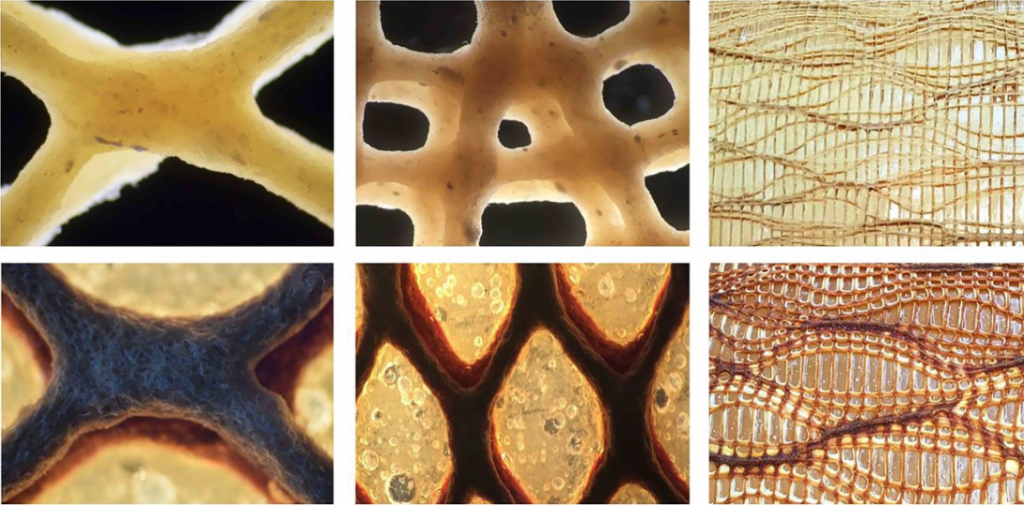
Aguahoja is a project that explored how natural materials that have been put to waste by humans can be digitally designed and computationally fabricated by 3D printers or other robots. A lot of focus is geared towards the creation of biopolymer composites that can be used in an industrial setting. The aim is to disrupt the vicious cycle of obsolescence and the production of synthetic waste. The shape and material of composition is informed by physical properties, environmental conditions and fabrication constraints. All these factors are calculated into the 3D printing in order to best mimic biological patterns.

Photo taken from MIT Media Lab Website
All Copyrights by The Media Matter Group

I think in the case of Aguahoja, there doesn’t seem to be a direct connection to the creator’s artistic sensibilities, but I think in a way the fact that their is a strong emphasis in a naturally formed shape, shows that they form is valued over function to some extent.

Fallon Creech-LookingOutwards-03

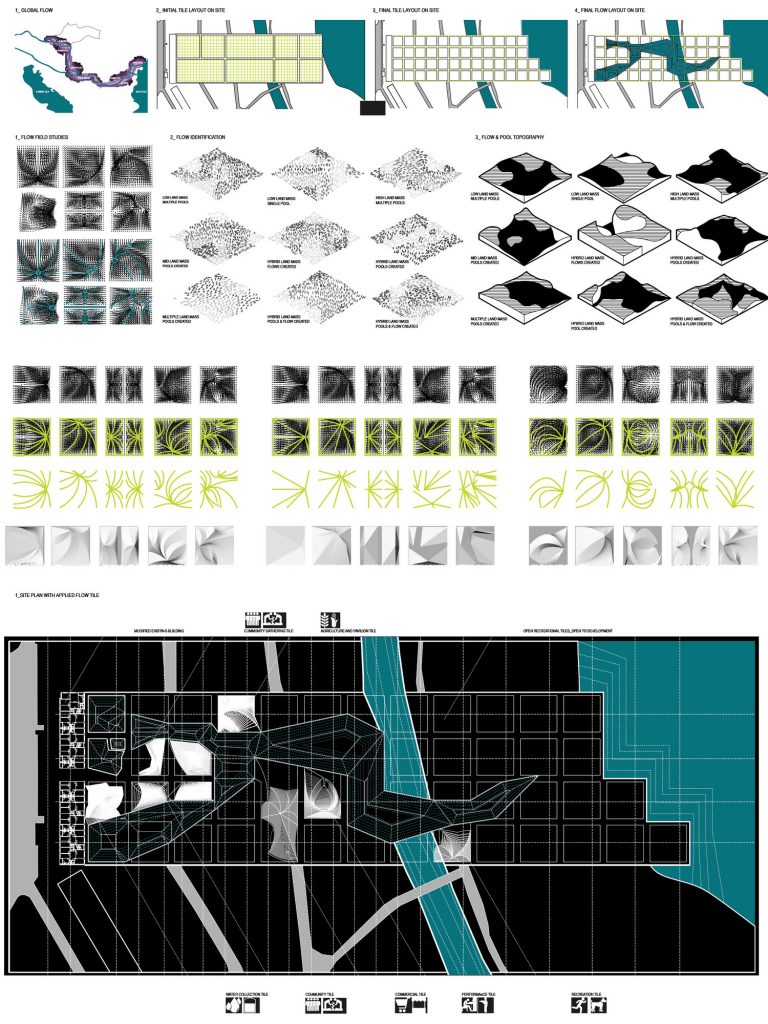
Series of site analyses using topography and ecological processes to generate flows

Dana Kupkova’s Advanced Synthesis Option studios confront ecological and biological processes using datasets in parametric software such as Grasshopper, which forces the architectural design to ultimately respond to the information generated from the program. Her studios analyze the natural ecology and environments of specific sites to generate designs whose forms are dependent on the nature of the site; this degree of specificity and synthesis of location produces highly contextual forms.

Kupkova’s work is admirable because the resultant forms respond to a complex set of variables inputted into a computational process; it intelligently uses information that is inherently natural and difficult to predict to produce functional spaces. The means of analysis and product seem highly incompatible, but they do, however, work complementary in that the parametric outputs rely solely on the input of ongoing ecological data.