Lanna Lang – Looking Outwards – 11

Addie Wagenknecht’s “Optimization of Parenting, Part 2” // 2012

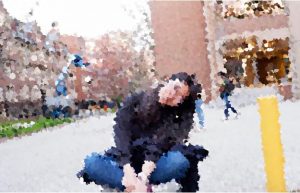
This project is a robot arm that rocks a baby’s crib when it hears the baby cry or awakes from his/her sleep, simulating a mother’s arm trying to soothe her baby at night. What first drew me to this piece was the fact that it was developed with support by The STUDIO for Creative Inquiry here at CMU while Wagenknecht was doing a residency here. I love the fact that she played with the dichotomy of the baby and its mother but without the intimacy – the exact opposite of how an actual mother would feel towards her newborn. Wagenknecht unraveled the created façade of women and family and the false sense of balance between parenting and career in America.

I think this piece is so effective because the disparity Wagenknecht wanted to convey to her audience is very clear in all the decisions she made to complete this piece. The robotic arm is blatantly industrial, from its structure to its color of factory-like orange to represent the idea of industry – mirroring the precise, reactive nature that parenting demands and suggesting the idea of impossible, flawless perfection that parenting is the opposite from because of human error and learning on the spot.

This project is obviously influenced and inspired by her own experience of being a mother and is critiquing that exact choice. She was also influenced by the observation she had of mothers in society as a whole and the notion of being a mother: she witnessed that mothers were expected to become full-time parents, resulting in female artists losing their creative practice they had spent their entire life building. She wanted to question if the role of the mother could be replaced by technology (as other roles were replaced with – like the vacuum or the refrigerator) without affecting the development of the baby.

Video record of the installation “Optimization of Parenting. Part 2”

Margot Gersing – Looking Outwards -09

Death Mask representing the past, present and future.

I decided to look at Julia Nishizaki’s post on the Vespers. Theses are 3D-printed ‘death masks’ by Neri Oxman and her Mediated Matter Group at MIT. These are modern interpretations of traditional death masks using cutting edge materials, processes and visuals. Part of the reason why I decided to write on this post in particular was because I had never heard of a death mask before. After reading about this a death mask is a traditional mask that was supposed to capture the wearer’s last breath.

At MIT, Oxman, has interpreted this as a representation of the past present and future. My favorite part about these mask is the part representing the future synthetically engineered microorganisms to produce specific pigments or chemicals and are specific to the individual’s genetic makeup. It is so cool how they utilize living organisms within the artificial mask and they work together to create one cohesive piece.

Julia mentions the possibilities of this being a step towards wearable technology and interfaces and I thought this was a really interesting point. I like the idea that these technologies in the future might use microorganisms as part of the piece.

Charmaine Qiu – Project 09


sketch

Finished Portrait

When mouse is dragged on canvas

In this project, I had fun creating an interactive portrait of myself. I mimicked splashes of paint dropping down when the mouse is dragged on the canvas. I got to utilize what I learned from the previous assignments and incorporate them in my project.

//Charmaine Qiu
//charmaiq@andrew.cmu.edu
//Section E
//Project 09

var underlyingImage;
//create an empty array
var xarray = []
var yarray = []
//load the image from imgur.com
function preload() {
    var myImageURL = "https://i.imgur.com/cplu0CL.jpg";
    image = loadImage(myImageURL);
}

function setup() {
    createCanvas(400, 300);
    background(0);
    image.loadPixels();
    frameRate(100000000); //generate the image in a faster speed
}

function draw() {
    var px = random(width); //the location for x coordinate
    var py = random(height); //the location for y coordinate
    var ix = constrain(floor(px), 0, width-1); //constraining within the canvas
    var iy = constrain(floor(py), 0, height-1); //constraining within the canvas
    var theColorAtLocationXY = image.get(ix, iy);//fill in the color according to color of image
    noStroke();
    fill(theColorAtLocationXY);
    //draw the ellipses
    ellipse(px, py, 6, 6);
    //get the color of image at the mouse
    var theColorAtTheMouse = image.get(mouseX, mouseY);
    stroke(theColorAtTheMouse);
    //loop over the length of the array
    for (var i = 0; i < xarray.length; i ++){
        //fill with the color at the mouse
        fill(theColorAtTheMouse);
        ellipse(xarray[i], yarray[i], 5, 5);
        //make the ellipses go down mimicking paint drooling down
        yarray[i] += 0.5;
        }
  }
  //when mouse is dragged, add the mouse position to the array
function mouseDragged(){
    xarray.push(mouseX);
    yarray.push(mouseY);
  }

 //when mouse is pressed, a new array is created
function mousePressed(){
    xarray = [];
    yarray = [];
  }

Margot Gersing – Project 09

mgersing-09

//Margot Gersing - Project 09 - mgersing@andrew.cmu.edu - section E

var img; //original image
var sizeOne; //pixel size one
var sizeTwo; //pixel size two


function preload() {
    img = loadImage('https://i.imgur.com/Tx6sITJ.jpg?2'); //preload the image
}

function setup() {
    createCanvas(500, 761); //cnavas side of the image
    sizeOne = 1; //setting pixel size one to one
    sizeTwo = 20; //setting pixel size two to 20
    imageMode(CENTER);
    noStroke();
    background(255);
    img.loadPixels(); //pixelate the image
    frameRate(10000); //fast frame rate to load pixels faster

}

function draw() {
    //map the pixels size from 1 to 20, based on mouse postion
    var size = map(mouseY, 0, height, sizeOne, sizeTwo);
    var sizeW = map(mouseX, 0, width, sizeOne, sizeTwo);
    var x = floor(random(img.width));
    var y = floor(random(img.height));
    var pix = img.get(x, y);
    fill(pix, 128);
    ellipse(x, y, size, sizeW); //pixel is a ellipse based on the mapped size from mouse position
}

My grandmother, 11 or 12 (1940s)

For this project I decided to do a portrait of my grandmother when she was 11 or 12. I really like this photo of her and how it serves as a view into the past. It’s interesting to use such an old photo (1940s) in such a modern context and project.

I decided to have the pixels size dependent on the mouse position. This way you can control the way the image looks. The timing of when and where your mouse is also affects how the image will turn out.

variations on the image dependent on the mouse location and time.

Jasmine Lee – Project 09 – Portrait

compportrait

//Jasmine Lee
//jasmine4@andrew.cmu.edu
//Section C 
//Project-09 (Computational Portrait)

var baseImage;

function preload() {
    var myImageURL = "https://i.imgur.com/Iprm8zU.jpg";
    baseImage = loadImage(myImageURL);
}

function setup() {
    createCanvas(400, 523);
    background(255);
    baseImage.loadPixels();
    frameRate(10000000);
    grid();
}

//creates grid "cloth" in background
function grid() {
    //creates the vertical lines
    for (var gridA = 0; gridA < width; gridA += 10){
        noStroke();
        fill(255, 238, 186);
        rect(gridA, 0, 2, 523);
    }
    //creates the horizontal lines
    for (var gridB = 0; gridB < height; gridB += 10) {
        noStroke();
        fill(255, 238, 186);
        rect(0, gridB, 400, 2);
    }
}

function draw() {

    var px = random(width); //randomixes location of crosstitch
    var py = random(height); //randomizes location of crossstitch
    var la = random(0, 30); //used for randomizing length of line
    var lb = random(0, 20); //used for randomizing length of line
    var a = random(1,15); //used for randomizing width of beads
    var b = random(1,15); //used for randomizing height of beads
    var ix = constrain(floor(px), 0, width - 1); //randomizes color of crosstitch
    var iy = constrain(floor(py), 0, height - 1); //randomizes color of crosstitch
    var theColorAtLocationXY = baseImage.get(ix, iy);
    var theColorAtMouse = baseImage.get(mouseX, mouseY);

    //draw cross-stitches
    strokeWeight(1);
    stroke(theColorAtLocationXY);
    line(px, py, px + 10, py - 10);
    line(px, py - 10, px + 10, py);

    //draw lines
    strokeWeight(random(0.2, 2));
    stroke(theColorAtMouse);
    line((mouseX - la), (mouseY - lb), (mouseX + la), (mouseY + lb));

    //draw lines-glint
    stroke(0.1);
    stroke(255, 255, 255, 150);
    line ((mouseX - la), (mouseY - lb - 0.5), (mouseX + la), (mouseY + lb - 0.5));

    //draw beads
    noStroke();;
    fill(theColorAtMouse);
    ellipse(mouseX, mouseY, a, b);
 
    //draw bead-glint
    fill(255, 255, 255, 150);
    ellipse(mouseX + 2, mouseY - 2, a - (a - 2), b - (a - 2));
}

//clears canvas when mouse is clicked
function mousePressed() {
    clear();
    //redraws grid after clearing canvas
    grid();

}


For this project, I chose to use a cross-stitching motif. I was inspired by the embroidery theme so I also included shiny “beads” and “thread” that follow the mouse cursor, as if the viewer was stitching along with the program. The resulting image, with movement of the mouse, results in a fuzzy image reminiscent of a especially fuzzy sweater.

Sketch of the intended elements of the project.
The resulting images after 2 min, 5 min, and 5 min (with the mouse effects).
The original image used.

Joanne Chui – Looking Outwards 09

Flight Patterns by Aaron Koblin

For this Looking Outwards, I decided to focus on my friend Ammar Hassonjee’s Looking Outwards which is about Aaron Koblin’s project Flight Patterns. It is interesting in how it uses lines to visualize three dimensional flight patterns through America. I thought it was interesting how these scientists took data and input that into an algorithm that creating such a captivating visualization.

I agree with Ammar in how it is interesting that Aaron was able to show movement and directionality just using data. I also liked how Adobe after effects was also used to further edit the visualization.

Portrait – Joanne Chui – Project 09

sketch

/*
Joanne Chui
Section C 
Project 8
*/

var underlyingImage;

function preload() {
    var myImageURL = "https://i.imgur.com/cYVj323.png";
    underlyingImage = loadImage(myImageURL);
}

function setup() {
    createCanvas(500, 500);
    background(0);
    underlyingImage.loadPixels();
    frameRate(100000);
}

function draw() {
    var px = random(width);
    var py = random(height);
    var ix = constrain(floor(px), 0, width-1);
    var iy = constrain(floor(py), 0, height-1);
    var theColorAtLocationXY = underlyingImage.get(ix, iy);
    var value = brightness(theColorAtLocationXY);
    var scaleBrush = map(value, 0, 225, 0, 50);

    noStroke();
    fill(theColorAtLocationXY);
    ellipse(px, py, scaleBrush, scaleBrush);

}

function mouseDragged(){
  var theColorAtTheMouse = underlyingImage.get(mouseX, mouseY);
  noStroke();
  fill(theColorAtTheMouse);
  var brushSize = random(10, 50);
  ellipse(mouseX, mouseY, brushSize, brushSize);
}

I varied the circles that populated the picture based on the brightness. Where the image is brighter, the size of the circle would be bigger. I also included an interactive portion where the user would be able to brush in the photo if they dragged the mouse, creating a more dynamic and abstract image.

using the mouse as a brush tool
size of the circle based on brightness of image
original photo

Xiaoyu Kang – Project 09 – Computational Portrait

sketch

//Xiaoyu Kang
//xkang@andrew.cmu.edu
//Section B
//Project-09

var baseImage;

function preload() {
	//loadimage
    var imageURL = "https://i.imgur.com/WFLOSwy.jpg";
    baseImage = loadImage(imageURL);
}

function setup() {
    createCanvas(500, 320);
    background(0);
    baseImage.loadPixels();
    frameRate(150);
}

function draw() {
	//define location
    var x = random(width);
    var y = random(height);
    //define color
    var ix = constrain(floor(x), 0, width - 0.1);
    var iy = constrain(floor(y), 0, height - 0.1);
    var ColorXY = baseImage.get(ix, iy);

    //draw circle
    noStroke();
    fill(ColorXY);
    ellipse(x, y, 6, 6);

    //draw square
    noStroke();
    fill(ColorXY);
    rect(x + random (-2, 2), y + random (-2, 2), 3, 3);

    //draw bigger circle when mouse is pressed
    var ColorMouse = baseImage.get(mouseX, mouseY);
    if (mouseIsPressed){
        fill(ColorMouse);
        ellipse(mouseX, mouseY, 10, 10);
	}
}

For this project, I used my friend Claire’s photo to generate the portrait. I used an combination of circle and suqare shapes appearing at random location to create the final image. I also wrote the code that when the mouse clicks, a bigger circle appears at the mouse location.


lee chu – looking outwards 09

An interesting post I saw was Mike’s looking outwards 09, about Tai’s post, about Refik Anadol, a media artist from Turkey, who currently lives and works in Los Angeles. He thoroughly explores the relationship between architecture and media arts, merging machine learning and visual/audio experiences. He creates installations, but has also projected his work onto existing architecture.

As Mike had mentioned, what’s most impressive is the rigorous amount of effort to perfectly map projections onto a piece of irregular architecture, such as the Disney Hall in Los Angeles. Look at some of his work here.

one of refik’s renderings – melting memories

Sewon Park – PO – 9

sketch

//Sewon Park
//sewonp@andrew.cmu.edu
//Section B
//Project 9

var Hyun;

function preload() {
    var myImageURL = "https://i.imgur.com/Up7Loks.jpg";
    Hyun = loadImage(myImageURL);
}

function setup() {
    createCanvas(480, 480); //Converted the picture size to 480 by 480
    background(0);
    Hyun.loadPixels();
    frameRate(100000000000000000); //Increased frame rate so picture renders faster
}

function draw() {
    var px = random(width);
    var py = random(height);
    var ix = constrain(floor(px), 0, width-1);
    var iy = constrain(floor(py), 0, height-1);
    var theColorAtLocationXY = Hyun.get(ix, iy);

    noStroke();
    fill(theColorAtLocationXY);
    ellipse(px+5, py, 4, 4); //Mickey Mouse left ear
    ellipse(px, py+6, 10, 10); //Mickey Mouse Head
    ellipse(px-5,py,4,4); //Mickey Mouse right ear

    var theColorAtTheMouse = Hyun.get(mouseX, mouseY);
    stroke(theColorAtTheMouse);
    rect(pmouseX, pmouseY, 1, 1);
}

For this project, I used a picture of my good friend Hyun Kang. He really likes Disney movies and Mickey Mouse so i made the recurring shape as the classic Disney logo.

Original Image
Image almost finished rendering