Final Project

fp luca

var s = 0;//score
var trasharr = [];//store trash into array
var buildingsarr = [];
var speed;

function setup() {
    createCanvas(400, 400);
    rectMode(CENTER);
    noStroke();
    frameRate(10);

    for (var i = 0; i < 3; i++){
        trasharr[i] = initializeTrash();
    }

    for (var i = 0; i < 15;i++){
        buildingsarr[i] = initializeBuildings();
    }
}


function draw() {

    background(0);

    //establish scene

    sky();

    scene();

    for (var i = 0; i < 3; i++){
        drawTrash(trasharr[i]);
        moveTrash(trasharr[i], speed)
    }

    for (var i = 0; i < 15; i++){

        drawBuildings(buildingsarr[i],i);
    }

    fill(0,255,0);
    text("Player Score:" + s,20,20);


}

function initializeTrash(){
    var trash = {x:60,y:random(250,400),
             w:30,h:30,
             r:random(0,255),g:random(0,255),
             b:random(0,255)};

    return trash;//store trash       
             
}

function drawTrash(trash){
    
    fill(trash.r,trash.g, trash.b);
    rect(trash.x,trash.y, trash.w, trash.h);

    speed = 5;

    if (trash.x >= 350){
        trash.x = 60
        speed = -speed;
    }
}


function moveTrash(trash, speed){
    trash.x += speed;
}

function scene(){
    //sea
    fill(69, 123, 157);
    rect(200,300,400,200);
}

function initializeBuildings(){
    //cityscape

    var buildings = {x:random(-30,50),y:0,w:50,h:random(30,180)}

    return buildings;//store buildings
}

function drawBuildings(buildings,i){//including forloop "i" for building x para.

    push();
    rectMode(CORNER);
    translate(width/2,height/2);
    rotate(radians(180));

    fill(0);
    rect(i*buildings.x,buildings.y,buildings.w,buildings.h);
    pop();

}

function sky(){
    //fill changes according to time of day.
    var hr = hour();

    if (hr >= 0 & hr < 4){
        fill(1,8,79);
    } else if (hr >= 4 & hr < 8){
        fill(0,173,255);
    } else if (hr >= 8 & hr < 12){
        fill(255,255,112);
    } else if (hr >= 12 & hr < 16){
        fill(255,221,64);
    } else if (hr >= 16 & hr < 20){
        fill(255,121,84);
    } else if (hr >= 20 & hr < 23){
        fill(107, 73, 132);
    } else if (hr >= 23){
        fill(99,30,80);
    }

    rect(200,100,400,200);
}

function mousePressed(trash){
    if (dist(mouseX,mouseY,trash.x,trash.y)<30){
        //remove trash
        trash.y = 450;
        s = s + 1;
    }
}

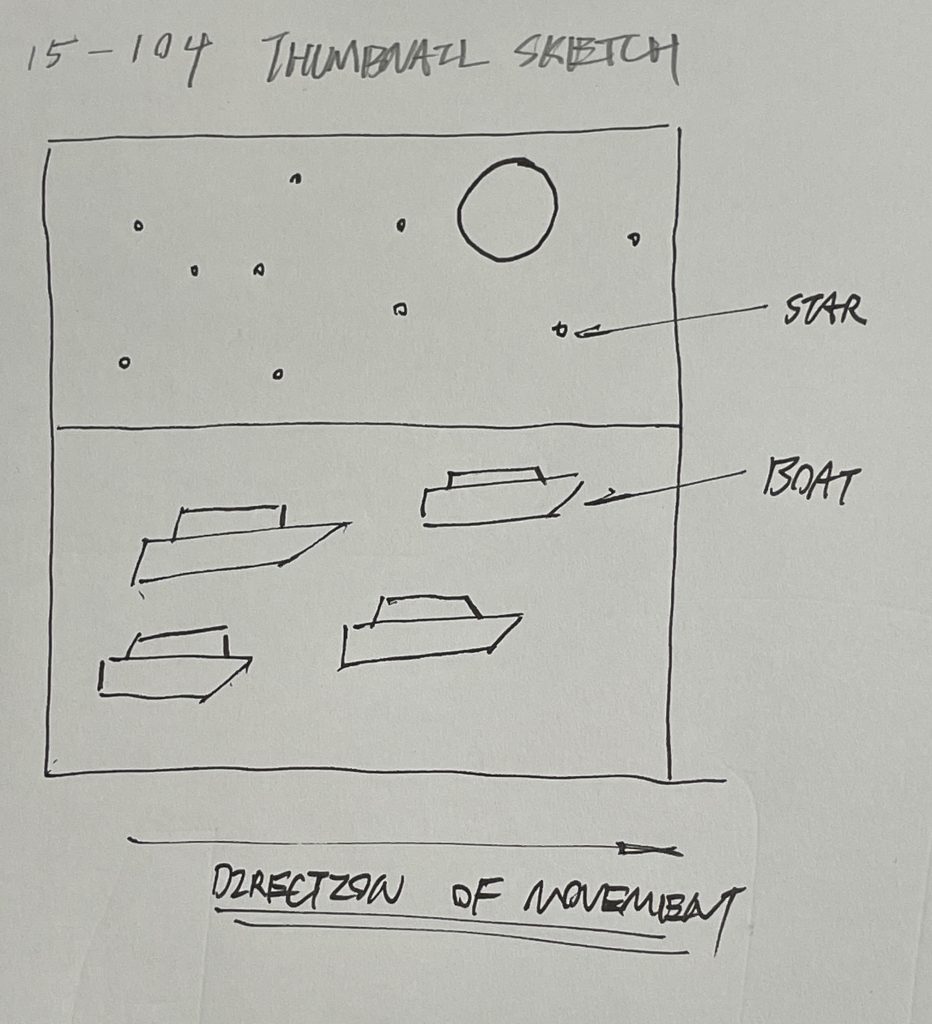
I want to focus on the problem of plastic pollution in our ocean ecosystem in this project. This issue inspires me because plastic containers and packaging are essential to our daily lives, and we rarely recycle them correctly. Many plastic wastes end up incinerated, buried in landfills, or floating in the ocean. Our mistakes and carelessness are causing harm to the planet’s natural ecosystems, which is getting increasingly common in the Anthropocene. In my project, I added visual elements to show that humans cause this problem, such as the city in the background. If I had more time to work on this project, I would use vertices to create my trash to give them a more realistic look. Also, I would make the trash move more randomized so the game could be more engaging and unpredictable. Many of the interactions and visual effects that I plan to achieve did not work as expected, primarily because of my time management on this project. In hindsight, I should make edits to my program more regularly to give myself more time to reflect and improve.

Project: Generative Landscape

luca generative landscape

//lucacao
//sectionD
//Project11

var boat = [];//array to store boat number
var speed = 1;


function setup() {
    createCanvas(480, 480);
    noStroke();
    frameRate(5);

    for (var i = 0; i < 10;i++){
        bx = random(width);//boat x position
    }
}

function draw() {
    background(220);
    sea(); 
    sky();
    moon();

    for(var i = 0; i < 5; i++){
        drawBoat();
        boat++;
        print(boat);
    }
}

function sea() {
    fill(0, 64, 108);
    rect(0,240,480,240);
}

function sky(){
    fill(0, 37, 62);
    rect(0,0,480,240);

    for (var i = 0; i < 100;i++){
        var starx = random(0,480);
        var stary = random(0,240);
        fill(255,255,255);
        ellipse(starx,stary,3,3);
        starx += speed;
        
    }
    // noLoop();
}

function moon(){
    fill(252, 202, 70);
    ellipse(350,80,100,100);
}

function drawBoat(){
    var blength = random(50,100);
    var bheight = random(20,30);
    var bx = random(0,480);
    var by = random(240,480);

    this.bx += this.speed;

    fill(0);
    rect(bx,by,blength,bheight);
    rect(bx+20,by-10,blength/2,bheight/2);
    triangle(bx+blength,by+bheight,bx+blength,by,
        bx+blength+30,by-10);
    
}


For my landscape, I wanted to depict a scene with boats and stars moving at night. In my thumbnail sketch, I divided the canvas into halves, with a sky which is the top half, and the sea at the bottom half. I thought it would be more visually interesting with objects moving on all areas of the canvas. During this project, I faced difficulty trying to animate my objects, but I solved the problem by creating multiple functions which helped me clarify my code structure and tackle specific problems. The randomness in my code exists in the size and position of the boat.

LO: Societal Impact of Digital Art

For this week’s blog, I read the article “How Artists Can Bridge the Digital Divide and Reimagine Humanity” by Agnes Chavez. The article talks about how art, technology, and science can become tools to increase digital literacy. Chavez categorized the digital divide into “first-level” and “second-level” and stated that solving the problem on both levels is essential. The “first-level” is having affordable access to information and devices; the “second-level” gives people the necessary knowledge to become digital content producers. The PASEO festival is an example that describes how art and technology can support learning and create a positive attitude towards digital media, which bridges the divide on the “second-level.” Later, the author also discussed creating shareable digital resources and implementing the STEMarts model to support access to digital content. The article outlined multiple methods to bridge the digital divide and highlighted the importance of digital technology in connecting people and communities across economic sectors, which I found inspiring.

Chavez, A., “how artists can bridge the digital divide and reimagine humanity”. “How Artists Can Bridge the Digital Divide and Reimagine Humanity”. Available at: https://www.arts.gov/impact/media-arts/arts-technology-scan/essays/how-artists-can-bridge-digital-divide-and-reimagine-humanity [Accessed November 12, 2021].

Project: Sonic Story

luca sonic story

//Luca Cao
//lucacao@andrew.cmu.edu
//Section D

//Story: 
//pan put on stove. Sound 1
//Gas starts. Sound 2
//Steak cooks on pan and sizzle. Sound 3
//eats steak. Sound 4

var pan = {x:200,y:400,d:100,r:73,g:80,b:87,
            hx:200,hy:480,hw:15,hh:70,dy:20};//object pan
var stv = {x:200,y:200,d:150,r:33, g:37, b:41};//object stove
var stk = {x:200,y:200,w:40,h:60,r:220,g:24,b:54,dy:30};//object steak
var metal;
var gas;
var steak;
var eat;

function preload(){
    metal = loadSound("https://courses.ideate.cmu.edu/15-104/f2021/wp-content/uploads/2021/11/metal.wav");
    gas = loadSound("https://courses.ideate.cmu.edu/15-104/f2021/wp-content/uploads/2021/11/gas1.wav");
    steak = loadSound("https://courses.ideate.cmu.edu/15-104/f2021/wp-content/uploads/2021/11/steak.wav");
    eat = loadSound("https://courses.ideate.cmu.edu/15-104/f2021/wp-content/uploads/2021/11/eat.wav");

}

function soundSetup(){
    metal.setVolume(5);
    gas.setVolume(0.5);
    steak.setVolume(1);
    eat.setVolume(2);
}

function setup() {
    createCanvas(400, 400);
    noStroke();
    frameRate(2);
    useSound();
}

function draw() {
    background(255, 243, 176);

    //platform
    push();
    fill(173, 181, 189);
    rect(0,0,400,400);
    fill(108, 117, 125);
    rect(0,320,400,90);
    pop();

    //controls
    push();
    if (pan.y <= 350){
        fill(0,255,0);
        ellipse(300,350,10,10);
        ellipse(350,350,10,10);
    }
    pop();

    //stove
    push();
    fill(stv.r,stv.g,stv.b);
    ellipse(stv.x,stv.y,stv.d,stv.d);

    if (pan.y <= 300){
        stv.r = 200;
        stv.g = 0;
        stv.b = 0;
        gas.play();
    }
    pop();

    //pan
    push();
    rectMode(CENTER);
    fill(pan.r,pan.g,pan.b);
    ellipse(pan.x,pan.y,pan.d,pan.d);
    rect(pan.hx,pan.hy,pan.hw,pan.hh);
    pan.y = pan.y - pan.dy
    pan.hy = pan.hy - pan.dy

    if (pan.y <= 200){
        gas.stop();
        pan.dy = 0; 
    }
        //pan.hy = 280
    
    pop();


    //steak
    if (frameCount >= 15){
        fill(stk.r,stk.g,stk.b);
        ellipse(stk.x,stk.y,stk.w,stk.h);
        steak.play();
        

        if (frameCount >= 20){
            stk.r = 157;
            stk.g = 2;
            stk.b = 8;

            if (frameCount >= 25){
                stk.r = 106;
                stk.g = 4;
                stk.b = 15;

                if (frameCount >= 35){
                    stk.r = 80;
                    stk.g = 6;
                    stk.b = 23;
                    stk.y = stk.y - stk.dy;
                    steak.stop();

                    if (frameCount >= 45){
                        eat.play();
                    }

                    if (frameCount >= 50){
                        eat.stop();
                        background(0);
                        noLoop();
                    }
                }
            }
        }
    }
}

I created the story of cooking a steak. I started by animating all my visual assets and making sure that they appear at the right time. After that, I added sound into my code based on the position of the assets, as well as the frame count. I stored all the values on my characters in object form, which helped me to better manipulate them. During the process, I had difficulties preloading sounds into my code and I later realized that I used the wrong template for my code. I enjoyed making this project because, besides visual interaction, I also get to experiment with sonic interaction and make the outcome more engaging.

Project: Computational Portrait (Custom Pixel)

project pixel sketch luca

var img;//image
var imgang = 90;//image angle

function preload(){
  img = loadImage('https://i.imgur.com/XCeFp0s.png');//load image from imgur.com
}

function setup() {

  createCanvas(391, 480);
  //background for contrast
  noStroke();
  imageMode(CENTER);
}

function draw() {

  background(0,0,0);

  for (var col = 0; col < img.height; col+=10){//I did column for height because my image was incorrectly loaded.
    for (var row = 0; row < img.width; row+=10){//row for height.

      var c = img.get(row,col);//extract pixel from image and set as color

      //set image to correct and central position
      push();
      translate(391,0);
      rotate(radians(imgang));
      fill(color(c));//fill with picture colors
      ellipse(col,row,7,7);//ellipses as pixels
      pop();

    }
  }

  push();//needs to be separate because of background setting

  //draw head
  stroke(230,230,0);
  strokeWeight(5);
  line(50,150,320,150);
  line(50,150,50,400);
  line(50,400,320,400);
  line(320,400,320,150);
  line(125,360,255,360);

  //moving eyes
  var wall1 = constrain(mouseX,120,150)
  var c = constrain(mouseY,225,255);
  var wall2 = constrain(mouseX,240,280)

  //eyes
  fill(230,230,0);
  ellipse(wall1,c,30,30);
  ellipse(wall2,c,30,30);

  pop();

}


I enjoyed making this project. I faced challenges when I tried to load my images and match pixels according to the image. I changed the image link to a direct link on Imgur and solved the problem. For the pixels, I used a for loop to match the pixels to the image, and by changing the number of increments for each run, I was able to change the size and density of my pixels. For my composition, I did not want to create a photorealistic representation, instead, I wanted some sort of interaction with the image, so I created the yellow face. Overall, this project was a challenge, but I learned more about images in p5.js.

LO: A Focus on Women and Non-binary Practitioners in Computational Art

I looked at the work of Kate Hollenbach for this week’s blog. Hollenbach works professionally as a programmer, artist, and educator. Most of her art projects focused on users’ relationships with digital interfaces and information. I especially admired one of her projects called USER_IS_PRESENT, which uses original software to explore user habits when interacting with their smart devices. The software developed by Hollenback allowed devices to simultaneously record video from the front and back cameras and screen record. The artist later used rendering techniques to layer those recordings together into one channel. The outcome gave viewers a new perspective to look at users and their habits on digital platforms. I think the result is artistic but informative at the same time. By layering three interfaces that we usually only experience separately, Hollenbach created a new visual environment for interaction and research.

Hollenbach, USER_IS_PRESENT, 2017

Link

LO: The Creative Practice of an Individual

Gilberto Esparza is an artist based in Mexico, and his work explored the relationship between the built environment and the natural environment. Esparza mainly used electronics and robotics as his medium to express, making his work futuristic and engaging. Furthermore, I think his work achieved great depth in discussing our impact on the natural world. I especially admired Esparza’s Urban Parasites project and his Nomadic Plants project. What I found interesting across Esparza’s projects was the interaction between his robots and their surrounding environment. In the Urban Parasites project, Esparza made robot insects from industrial wastes, and he designed the robots to be autonomous. The robot insects convert the city’s light energy into the electricity that they require to function. In the Nomadic Plants project, Esparza’s robots acquired energy from contaminated waters in the city. What was most interesting about Esparza’s work is how he focused on how the robots would blend into the urban environment and people’s interaction with those robots. His projects inspired people living in urban communities to reflect on the consequences of urbanization and pollution. Finally, Esparza’s project lecture presented videos and photographs and introduced his process with sketches, which was engaging.

An urban parasite.

Video

Website

Project: Curve with Composition

luca curve

//lucacao
//section D

var np = 200;


function setup() {
    createCanvas(480, 480);
}

function draw() {
    background(127, 222, 255);
    stroke(229, 116, 188);
    fill(229, 116, 188);
   
        push();
        translate(120,120);
        drawEightCurve();
        pop();//draw first shape

        push();
        translate(240,240);
        drawEightCurve();
        pop();//draw second shape

        push();
        translate(360,360);
        drawEightCurve();
        pop();//draw third shape

        push();
        translate(360,120);
        drawEightCurve();
        pop();//draw fourth shape

        push();
        translate(120,360);
        drawEightCurve();
        pop();//draw fifth shape

}

function drawEightCurve(){
    var x;
    var y;
    var t;
    var a = mouseX/2;


    beginShape();
    for (var i = 0; i < np; i++){
        var t = map(i,0,np,0,TWO_PI);
        x = a*(sin(t*5));//x parametric
        y = a*(sin(t*5))*cos(t*5);//y parametric
        vertex(x,y);//draw shape
    }
    endShape();


}

I found this project quite challenging because it requires an understanding of parametric functions, which I am not too familiar with. I watched some Khan Academy and learned the general features of the functions. I wanted to make my shapes change in size, so I used “mouseX” to control that. The function that I chose also creates a dynamic composition. Most of my process was actually changing around the variables and see what it does to the shapes. Overall, I am happy with the outcome.

LO: Information Visualization

I looked at Santiago Ortiz’s work for this week’s blog, and I admired his History Words Flow project. John B. Sparks’s Histomap in 1931 inspired Ortiz to create this interactive project. The project depicts a colorful background and a timeline at the bottom; when users move the cursor horizontally along the timeline, words that describe that period in history will pop up. Also, when the viewer moves the cursor up and down, the text size changes. I think these features create a more interactive learning experience instead of just reading raw text and data. Ortiz did not share much about his process, except that he selected the words based on Wikipedia’s article list, organized in chronological order. I love how the project is in conversation with previous historical visualizations, which allowed me to see how advancements in technology made different ways of representing information possible. Ortiz’s research in information visualization is an excellent example of how various academic fields can benefit from clear and interactive visualizations.

link

Project 6: Abstract Clock

luca’s clock

function setup() {
    createCanvas(480, 480);
    noStroke();
}

function draw() {

    //set variables as time
    var sc = second();//second of clock
    var mt = minute();//minute of clock
    var hr = hour();//hour of clock
    var yh = hr*20;//y position of hour ellipse

    //color change

    background(0,0,0)

     if (yh >= 400 & yh < 420){//20:00 - 21:00
        background(99,30,80);
    } else if (yh >= 420 & yh < 480){//21:00-00:00
        background(57,25,84);
    } else if (yh >= 0 & yh < 80){//00:00-04:00
        background(1,8,79);
    } else if (yh >= 80 & yh < 120){//04:00-06:00
        background(0,173,255);
    } else if (yh >= 120 & yh < 160){//06:00-08:00
        background(252,255,181);
    } else if (yh >= 160 & yh < 240){//08:00-12:00
        background(255,255,112);
    } else if (yh >= 240 & yh < 300){//12:00-15:00
        background(255,221,64);
    } else if (yh >= 300 & yh < 360){//15:00-18:00
        background(255,121,84);
    } else if (yh >= 360 & yh < 400){//18:00-20:00
        background(167,60,90);
    }
   

    fill(233, 236, 239);
    //text(hr + ':' + mt + ':' + sc, 30, 300);//clock for reference

    push();
    stroke(233, 236, 239);
    strokeWeight(5);
    line(50,0,50,sc*8);
    line(200,0,200,mt*8);
    line(400,0,400,yh);
    pop();

    //clock hands
    ellipse(50,sc*8,60,60);//second
    ellipse(200,mt*8,90,90);//minute
    ellipse(400,yh,135,135);//hour


}

I enjoyed looking at the different approaches to keep time. I showed the passing of time through the movement of the circles and the changes in the background color. The left, middle, and right circles depict seconds, minutes, and hours, respectively. As the hour circle moves up and down, the background color also changes, reflecting the day’s time.