![[OLD FALL 2017] 15-104 • Introduction to Computing for Creative Practice](wp-content/uploads/2020/08/stop-banner.png)
/*
* Name | Ai Fukuda
* Course Section | C
* Email | afukuda@andrew.cmu.edu
* Project | 09
*/
var underlyingImage;
function preload() { // load image
var myImageURL = "https://i.imgur.com/HE5yzx9m.jpg";
underlyingImage = loadImage(myImageURL);
}
function setup() {
createCanvas(300, 300);
background(0);
underlyingImage.loadPixels(); // load pixel data of image
frameRate(15);
}
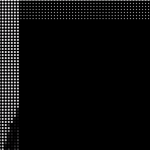
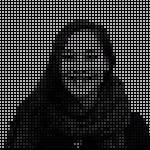
function makeCorner(x, y) { // x-coordinate & y-coordinate
noStroke();
for (var i=0; i<width; i+=6) { // horizontal lines of dots
var colorLocationH = underlyingImage.get(i, y); // gets color value of image at (i,y)
noStroke();
fill(colorLocationH); // fills circles with color of image at (i,y)
ellipse(i, y, 2, 2);
// vertical lines of dots
var colorLocationV = underlyingImage.get(x, i); // gets color value of image at (x,i)
noStroke();
fill(colorLocationV); // fills circles with color of image at (x,i)
ellipse(x, i, 4, 4);
}
}
var timer = 0;
function draw() { // draw at a defined time (0, 6, 12, etc.)
makeCorner(timer, timer);
timer += 6;
}
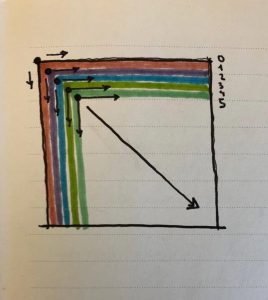
Using the sample code given for this project as a starting point, I wanted to create more directionality & structure in how the points aggregated to create the underlying portrait. Starting at the top-left corner of the canvas, I wanted the pixels to aggregate horizontally until the edge of the canvas, then vertically (see sketch). I ended up writing a code which does all the horizontal and vertical pixels in each row simultaneously, however, through the variance in point sizes I was able to make the aggregate of the pixels more engaging and interesting and am overall content with the result.