Project-03-Dynamic-Drawing-Veronica

sketch


/*
Veronica Wang
Section B
yiruiw@andrew.cmu.edu
Project-03
*/

var r1 = 100; //size of ellipse 1
var r2 = 80; //size of ellipse 2
var r3 = 120; //size of ellipse 3
var locX = 200; //rotation center of ellipses
var locY = 250; //rotation center of ellipses
var angle = 1; //first angle of rotation
var angle2 = 1; //second angle of rotation
var angle3 = 1; //third angle of rotation
var angle4 = 1; //fourth angle of rotation
var on = true; //background color


function setup() {
    createCanvas(640, 480);
}

function draw() {
//change background between black and white    
    if (on == true) {
        background(255);
      } else {
        background(0);
      }

    noStroke();
    //red ellipse
    fill(255, 0, 0, 150);
    ellipse(320, 100, mouseX, mouseX);
    //blue ellipse
    fill(0, 0, 255, 150);
    ellipse(locX,locY, mouseX, mouseX);
    //green ellipse
    fill(0, 255, 0, 150);
    ellipse(400, 450, mouseX, mouseX);

    //magenta ellipse
    push();
    translate(locX, locY);
    rotate(radians(angle));
    noStroke();
    fill(255, 0, 255, 150);
    ellipse(mouseX / 8 + 0.5 , mouseY / 8 + 1, r1 + mouseY / 2, r1 + mouseY / 2);
    pop();
    angle = angle + 1;

    //cyan ellipse
    push();
    translate(locX + 10, locY);    
    noStroke();
    fill(0, 255, 255, 150);
    rotate(radians(angle));
    ellipse(mouseX / 2 + 0.5 , mouseY / 2 + 1, r2 + mouseY / 1.5, r2 + mouseY / 1.5);
    pop();
    angle2 = angle2 + 2;

    //yellow ellipse
    push();
    translate(locX + 50, locY);    
    noStroke();
    fill(255, 255, 0, 150);
    rotate(radians(angle));
    ellipse(mouseX / 5 + 0.5 , mouseY / 6 + 1, r3 + mouseY / 3, r3 + mouseY / 3);
    pop();
    angle3 = angle3 + 0.5;

    //white line
    push();
    translate(locX, locY + 50);    
    noStroke();
    fill(255, 255, 255, 150);
    rotate(radians(angle));
    rectMode(CENTER);
    rect(mouseX / 5 + 0.5 , mouseY / 6 + 1, 10, 1000);
    pop();
    angle3 = angle3 + 0.5;

    //black line
    push();
    translate(100, 100);    
    noStroke();
    fill(0, 0, 0, 150);
    rotate(radians(angle));
    rectMode(CENTER);
    rect(mouseX / 2 + 0.5 , mouseY / 2 + 1, 20, 1000);
    pop();
    angle4 = angle4 - 1;

    //white line apprears at mouse click
    if (mouseIsPressed) {
        if (mouseButton == LEFT) {
            stroke(255);
            strokeWeight(30);
        } else {
            stroke(0);
        }
        line(0, 200, width, 50);
    }
}

//change background between black and white
function mousePressed() {
  if (on == true) {
    on = false;
  } else {
    on = true;
  }
}

In this project I explored different color models and the relationship between colors. I played around with ellipses of colors red, green, blue, cyan, magenta, and yellow, as well as the overlaps of these colors. The background also changes from white to black.

Jisoo Geum – Looking Outwards – 03


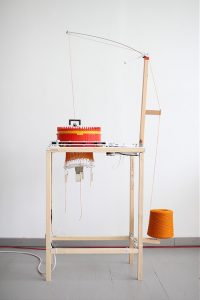
Circular Knitic 2014, created by Varvara Guljajeva and Mar Canet.http://www.varvarag.info/circular-knitic/

Circular Knitic is an automated machine made by an artist duo, Varvara Guljajeva and Mar Canet, which renders textile designs into a physical form through knitting.

The duo first began the project in 2012 when they were interested in working with knitting machines. Although knitting machines have existed since 1976, they became obsolete over time due to the lack of accessibility. As a solution, the duo developed an idea of an open source contemporary knitting machine that can be made by digital fabrication media. They achieved the goal in 2014 by creating Circular Knitic and uploaded the open source file on GitHub so that anyone who has the access to 3D printer, laser cutter, makerbeam, and Arduino can build the machine on their own. The algorithm that was used for their early design of Circular Knitic was a board that holds control over obsolete machines and knit patterns through a computer. At a glance, the machine itself did not seem like an artwork, which is the reason why it fascinated me the most. Circular Knitic was a machine made by digital fabrication ‘machines’ that can create an infinite amount of new artworks through soft sculpture. Furthermore, the fact that anyone can have access to the machine and render their own unique vision seemed like a perfect example of new media. The images that come to my mind when I think about digital fabrication are usually hard objects such as a sculpture with intricate surface patterns and cutouts (or even products such as fidget spinners). But making a machine that produces soft fabrics that not only is an artwork on its own but also can become a resource for daily life and fashion was inspiring. The duo has shown passion in creating interactive artworks using coding and visual arts for many years, but I could see their vision the most clearly in Circular Knitic project since it is a work of art that requires the most interaction.


Anthony Ra – Project03 – Dynamic Drawing

sketch

/* Anthony Ra
Section-A
ahra@andrew.cmu.edu
Project-03-DynamicDrawing */


/* assigning altering variables */
var tor = 150;
var tot = 3;
var torr = 100;
var tort = 5;
var torrr = 30;
var tortt = 0.5;
var dir = 1;
var speed = 2;
var speedd = 5;

function setup() {
  createCanvas(640, 480, WEBGL);
  frameRate(100);
  noCursor();

}

function draw () {

/* altering color of background */
  var r = map(mouseX, 0, height, 220, 215);
  var g = map(mouseX, 0, height, 255, 0);
  var b = map(mouseX, 0, height, 0, 255);
  background(r, g, b);

  noStroke();
  rotateX(mouseX * 0.01);
  rotateY(mouseY * 0.01);
  ambientLight(40, 210, 60);
  ambientMaterial(90, 200, 100);
  speed = mouseX / 20;
  torus(tor + speed*dir, tot + speed*dir);

/* movement of larger torus */
  noStroke();
  rotateX(mouseX * 0.01);
  rotateY(mouseY * 0.01);
  ambientLight(150, 30, 50);
  ambientMaterial(100, 50, 100);
  speed = mouseX / 20;
  torus(torr + speed*dir, tort + speed*dir);

/* movement of smaller torus */
  noStroke();
  rotateX(mouseX * 0.01);
  rotateY(mouseY * 0.01);
  ambientLight(50);
  ambientMaterial(150);
  speedd = mouseX / 10;
  torus(torrr + speedd*dir, tortt + speedd*dir);

}

This process was definitely a bit more challenging than the previous projects because I was thinking more about which lines of code was going to work rather than what I wanted my end product to look like. Something new that I played with is the implementation of 3-dimensional shapes and its movement along the mouse. I felt that toruses best represented the different angles that can be controlled by the mouse.

Adam He – Looking Outwards – 03

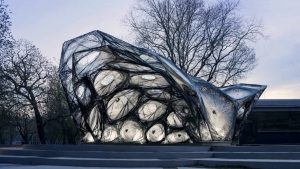
Installation fabricated digitally using parametric modeling by Achim Menges

In the highly parametric society we have today, architects are getting more interested in biomimetics. Using generative modeling, architects and designers  utilize computational science to create systematic pattern and structure that mimic the ecology of the nature. Achim Menges has his research field concentrated at the area of digital fabrication and computational design in relations to morphology. In this project, he attempts to integrate biomimetic investigations and cutting-edge robotic fabrication together. Menges employs fiber as the outer skin that wraps the whole structure, which in other words, is demonstrating how natural organic materials and artificial steel frames harmonize the overall design of the installation. Achim Menges tries to challenge the conventional ways of thinking towards architecture, and approaches to the designs that unfold morphological complexity. Trying to find a balance between the opposites such as space and material, form and structure, Menges uses digital fabrication to create novel designs that have not yet been done previously.

The link below has more detailed information about this installation.

ICD/ITKE Research Pavilion 2013/14, Design Society

Tanvi Harkare – Project 03 – Dynamic Drawing

tharkare project 3

/* Tanvi Harkare
Section B
tharkare@andrew.cmu.edu
Project-03-Dynamic Drawing */ 

var r = 1.9;
/*taking the canvas height and width and divided by 255,
the max number allowed in an RGB value. This ensure that no matter
where mouseX or Y is, the colors will continue changing*/

function setup() {  
    createCanvas(640, 480);
}

function draw() {
    noStroke();
    background(255 - mouseX/1.9); //fades background out from black to white
    var i = 0; //keeps count of how many rectangles are created
    var posX = 10; //starting x point for rectangle
    var posY = 5; //starting y point for rectangle
    while(i < 130){
        push();
        translate(mouseX, mouseY);
        rotate(radians(mouseX));
        fill(10, mouseX/r, mouseY/r);
        rect(posX, posY, mouseX/12.8, mouseY/12.8); //range for rectangle size is 10 to 50 pixels. 
        i++;
        posX += 50;
        if(posX >= width){ //creates a new row of rectangles
            posX = 10;
            posY += 50;
        }
    }
    pop();
}

I had a lot of fun with this project, especially in experimenting with the while loop. An example of this is analyzing what happens when certain functions are included inside the loop. My push() function is included in the while loop, while the pop() function is called after the while loop ends. Doing vice versa also creates a similar drawing. Depending on the location of the mouse in the x and y direction, the color, size, position, and angle of the rectangles change. Additionally as the mouse moves across the canvas, the background fades from black to white. I was inspired by simple geometric shapes to create a drawing that catches the eye.

Project 03 – Min Lee

sketch

function setup() {
    createCanvas(640, 480);
    background(208, 57, 64);
}

function draw() {
	background(208, 57, 64);

	translate(320, 240);

	var squareRotate = map(mouseX, 0, width, 0, TWO_PI);
	var squareSize = map(mouseX, 0, width, 0, 200);
	var squareSize2 = map(mouseY, 0, width, 0, 200);
	var squareSize3 = map(mouseY, 0, height, 0, 200);
	var rgbR = 1;
	var rgbG = 2;
	var rgbB = 0.5;
	var circleR = map(mouseX, 0, width, 350, width + 150);
	var faceSize = map(mouseX, 0, width, 1, 10);
	var textChange = map(mouseX, 0, width, 80, -60);
	var mouthChange1 = map(mouseX, 0, width, 30, 60);
	var mouthChange2 = map(mouseX, 0, width, 20, 50);

	//circle around head
	noStroke();
	fill(156, 38, 40);
	ellipse(0, 0, circleR + 420, circleR + 420);
	fill(208, 57, 64);
	ellipse(0, 0, circleR + 400, circleR + 400);
	fill(163,45,47);
	ellipse(0, 0, circleR + 360, circleR + 360);
	fill(188, 49, 52);
	ellipse(0, 0, circleR + 320, circleR + 320);
	fill(211, 66, 74);
	ellipse(0, 0, circleR + 280, circleR + 280);
	fill(163,45,47);
	ellipse(0, 0, circleR + 250, circleR + 250)
	fill(188, 49, 52);
	ellipse(0, 0, circleR + 220, circleR + 220);
	fill(211, 66, 74);
	ellipse(0, 0, circleR + 180, circleR + 180);
	fill(208,57,64);
	ellipse(0, 0, circleR + 140, circleR + 140);
	fill(217,87,98);
	ellipse(0, 0, circleR + 100, circleR + 100);
	fill(213, 70, 75);
	ellipse(0, 0, circleR + 90, circleR + 90);
	fill(208, 57, 64);
	ellipse(0, 0, circleR + 60, circleR + 60);
	fill(217,87,98);
	ellipse(0, 0, circleR + 50, circleR + 50);
	fill(213, 98, 120);
	ellipse(0, 0, circleR + 30, circleR + 30);
	fill(60, 125, 195);
	ellipse(0, 0, circleR, circleR);

	//head
	push();
	rotate(0 + squareRotate);
	noStroke();
	fill(247, 204, 160);
	arc(0, 0, 209, 225, 0, PI);
	arc(5, 12, 200, 200, 0, 270);
	//hair
	noStroke();
	fill(150,86,3);
	arc(-width/4 + 65, -20, 50, 200, 0, PI, CHORD);
	//ear
	fill(247,204,160);
	ellipse(-width/4 + 70,20,30,40);
	//hair
	fill(150,86,3);
	arc(-width/4 + 85, -20, 30, 140, 0, PI, CHORD);
	arc(-width/4 + 105, -20, 20, 100, 0, PI, CHORD);
	//eyes
	fill(255, 255, 255);
	stroke(0, 0, 0);
	strokeWeight(1);
	ellipse(0, 25, 8, 8);
	ellipse(45, 25, 8, 8);
	//mouth
	noFill();
	stroke(0, 0, 0);
	strokeWeight(2);
	curve(5, mouthChange1, 10, 40, 40, 40, 50, mouthChange2);
	//eyesbrows
	noFill();
	stroke(0, 0, 0);
	strokeWeight(4);
	line(41, 8, 51, 8);
	line(-5, 8, 5, 8);
	//#nocap
	noStroke();
	fill(43, 43, 43);
	arc(-5, -20, 230, 210, PI, TWO_PI);
	fill(35, 35, 35);
	rect(-125, -40, 240, 30, 5, 5, 5, 5);
	pop();

	//'Hello' text
	rotate(-PI/15);
	textAlign(CENTER);
	textSize(textChange);
	fill(194, 203, 152);
	textFont('Georgia Italic');
	text("That's all Folks!", 0, 150);
}

For this project, I wanted to create a “Looney-Tunes style” graphic in which I could create an interactive cartoon. It involved a lot of tinkering, but I ended up making a dynamic drawing in a style that I prefer and that is within my skill range.

Eunice Choe – Project-03

sketch

/*Eunice Choe
Section E
ejchoe@andrew.cmu.edu
Project-03*/

var sunD = 70;
var skyR = 65;
var skyG = 82;
var skyB = 97;
var cloudD = 100;
// heat waves
var diam = 50;
var dir = 1;
var speed = 2;
// ferris wheel
var ferrisDiam = 350;
var ferrisCarDiam = 50;
// ferris wheel base
var baseDiam = 100;

function setup() {
    createCanvas(480, 600);
}

function draw() {

// background changing from dark to light - changing color
    background(skyR, skyG, skyB);
    skyR = map(mouseY, 0, height, 187, 65);
    skyG = map(mouseY, 0, height, 222, 82);
    skyB = map(mouseY, 0, height, 255, 97);
// sun & cloud moving with mouse - changing position
    noStroke();
    fill(247, 225, 136);
    var m = constrain(mouseY, 380, 0);
    var q = constrain(mouseY, 150, 0);
    ellipse(m, constrain(mouseY, 100, height), sunD, sunD);
    fill(255, 255, 255);
    ellipse(q, constrain(mouseY, 150, height), cloudD, cloudD);
    ellipse(q + 50, constrain(mouseY, 150, height), cloudD * .85 , cloudD * .85);
    ellipse(q - 60, constrain(mouseY, 150, height), cloudD * .5 , cloudD * .5);
// heat waves from sun - changing size
if (mouseY < 100){
    push();
    stroke(255);
    noFill();
    ellipse(380, 100, diam, diam);
    ellipse(380, 100, diam*1.5, diam*1.5);
    ellipse(380, 100, diam*2, diam*2);
    pop();
    diam += dir * speed;
    if (diam > 300){
      diam = 0;
    }
}
// ground
    noStroke();
    fill(177, 177, 177);
    rect(0, 400, width, height);
// ferris wheel base
    push();
    fill(183, 103, 44);
    ellipse(width / 2, height / 2, baseDiam, baseDiam);
    strokeWeight(20);
    stroke(183, 103, 44);
    line(width / 2, height / 2, 380, 550);
    line(width / 2, height / 2, 100, 550);
    pop();
// ferris wheel
    push();
    stroke(183, 103, 44);
    strokeWeight(10);
    noFill();
    ellipse(width / 2, height / 2, ferrisDiam, ferrisDiam);
    pop();
// ferris wheel spokes
    push();
    translate(width / 2, height / 2);
    stroke(183, 103, 44);
    strokeWeight(3);
    rotate(millis() / mouseX / 6);
    line(ferrisDiam / 2, 0, 0, 0);
    line(-ferrisDiam / 2, 0, 0, 0);
    line(0, ferrisDiam / 2, 0, 0);
    line(0, -ferrisDiam / 2, 0, 0);
    pop();
// ferris wheel cars
    push();
    fill(202, 87, 87);
    translate(width / 2, height / 2);
    rotate(millis() / mouseX / 6); // changing speed depending on mouseX position
    ellipse(ferrisDiam / 2, 0, ferrisCarDiam, ferrisCarDiam);
    fill(93, 87, 202);
    ellipse(-ferrisDiam / 2, 0, ferrisCarDiam, ferrisCarDiam);
    fill(189, 118, 222);
    ellipse(0, ferrisDiam / 2, ferrisCarDiam, ferrisCarDiam);
    fill(87, 202, 101);
    ellipse(0, -ferrisDiam / 2, ferrisCarDiam, ferrisCarDiam);
    pop();


}

This project was really difficult for me, but I had fun experimenting with different variables. I wanted to incorporate movement with a spinning circle so I created a moving ferris wheel. I also chose to show contrast with the day/night theme and the varying speeds of the ferris wheel.

Rjpark – Project 03 – Dynamic Drawing

rjpark_dynamicdrawing

// create variables for randomizing color of circles
var r1 = 255;
var b1 = 0;
var g1 = 255;
var r2 = 0;
var b2 = 255;
var g2 = 255;
var r3 = 255;
var b3 = 255;
var g3 = 0;
var r4 = 170;
var b4 = 255;
var g4 = 170;
// create variables for direction change
var angle = 0;

function setup() {
    createCanvas(640, 480);
}

function draw() {
    background(0);
    // restrict mouseX to 0-640
    var x = max(min(mouseX, 640), 0);
    // create variable for size change of circles
    var size = x * 400 / 640;
    push();
    rotate(radians(angle));
    // pink circle
    fill(r1, b1, g1);
    ellipse(x, 0, size, size);
    // blue circle
    fill(r2, b2, g2);
    ellipse(640, x, size, size);
    // yellow cirlce
    fill(r3, b3, g3);
    ellipse(640 - x, 480, size, size);
    // green circle
    fill(r4, b4, g4);
    ellipse(0, 480 - x, size, size);
    pop();

    if (x < 250) {
        // colors change
        r1 = 0;
        b1 = 255;
        g1 = 255;
        r2 = 255;
        b2 = 255;
        g2 = 0;
        r3 = 170;
        b3 = 255;
        g3 = 170;
        r4 = 255;
        b4 = 0;
        g4 = 255;
        // direction changes
        angle = 0;
    }
    if (x > 250) {
        // colors change
        r1 = 255;
        b1 = 0;
        g1 = 255;
        r2 = 0;
        b2 = 255;
        g2 = 255;
        r3 = 255;
        b3 = 255;
        g3 = 0;
        r4 = 170;
        b4 = 255;
        g4 = 170;
        // direction changes
        angle += 5;
    }
}

The 4 things I changed about the circles according to the movement of the mouse across the screen (not up and down) were color, direction, size, and position. As the mouse moves towards the right, the colors change, the size of the circles increase and the circles start to rotate. In addition, the circle follows the mouse across the screen until rotation.

Looking Outwards 3- Sara Frankel


Caption: Combining technology with the art of the instrument, this artist creates a playable violin with a 3D printer.

This project harmonizes the art of code and music together. It does so by means of using a 3D printer to produce a playable violin. What I admire about this project is the fact that someone was capable of making a plastic shape make music. This is inspirational to me in the sense that, being a music major, music is found everywhere in many different kinds of mediums. The fact that someone is able to speak through an instrument made by a machine is amazing as it truly speaks for the modern day; this project is the culmination of the art of code and music. An aspect of this project that would incorporate an algorithm is the fact that when the bow of the instrument is brought to the string, how the instrument will produce a sound.

Ean Grady-Project3-Dynamic Drawing

sketch

//Ean Grady
//section B
//egrady@andrew.cmu.edu
//Project-03

function setup() {
    createCanvas(640, 480);
    fill(255);
}

function draw() {
    var r = int(mouseX)
    var g = int(mouseY)
    background(r, g, 100);
    var m = max(min(mouseX, 640), 0);
    var z = max(min(mouseY, 480), 0);
    var size = m;
    var size2 = z;
    noStroke();
    ellipseMode(RADIUS);
    fill(mouseY, mouseX, 100)
    ellipse(m * 200 / 400, z, size, size2);
    rect(200 + m * 200 / 400, z/2, size, size2);
    ellipse(400 + m * 200 / 400, z/3, size, size2);
    fill(mouseX, mouseY, 100)
    rect(100 + m * 200 / 400, z/4, size, size2);
    ellipse(350 + m * 200 / 400, z/5, size, size2);
    size = 400 - size;
    fill(mouseY, mouseX, 150)
    ellipseMode(CENTER);
    rect(300 + m * 200 / 400, z, size, size2);
    ellipse(150 + m * 200 / 400, z/2, size, size2);
    fill(mouseY, mouseX, mouseY)
    ellipse(250 + m * 200 / 400, z/3, size, size2);
    rect(50 + m * 200 / 400, z/4, size, size2);
    ellipse(450 + m * 200 / 400, z/5, size, size2);
    size = 320 - size;
    fill(mouseY, mouseX, 50)
    ellipseMode(CORNERS);
    ellipse(z * 200 / 400, m, size, size2);
    rect(200 + z * 200 / 400, m/2, size, size2);
    ellipse(400 + z * 200 / 400, m/3, size, size2);
    fill(mouseX, mouseY, 150)
    ellipse(100 + z * 200 / 400, m/4, size, size2);
    ellipse(150 + z * 200 / 400, m/5, size, size2);
    size = 340 - size;
    fill(mouseX, 100, mouseY);
    ellipseMode(CORNER);
    rect(250 + z * 200 / 400, m, size, size2);
    ellipse(300 + z * 200 / 400, m/2, size, size2);
    fill(mouseX, 100, mouseY)
    ellipse(350 + z * 200 / 400, m/3, size, size2);
    fill(100, mouseX, mouseY)
    ellipse(450 + z * 200 / 400, m/4, size, size2);
    rect(50 + z * 200 / 400, m/5, size, size2);
    fill(mouseY, mouseX, 100)
    ellipse(75 + z * 200 / 400, m/5, size, size2);
}

I really enjoyed this project because it allowed me to get familiar with using the mouseX and mouseY variables, I also began to start feeling a lot more comfortable with programming in p5.js through making the dynamic drawing. Essentially, what I did was start with the example dynamic drawing as a template and then worked from there.