Dani Delgado – Looking Outwards 07

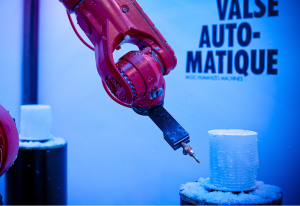
The KUKA robot, ready to sculpt a new object.

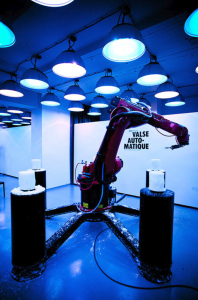
The data visualization project I chose to explore was Valse Automatique – a wildly interesting project which uses various softwares to analyze and transform live music into an industrial design piece, combining the fields of music, design, performance art, and computer science. The project itself, developed by Studio.Nand in 2010, was made possible by programming a robot using a custom language (KRL) to move in tune with the musical notes as they were processed by the computers and then sculpt a block wax by using built-in bunsen burners to create the objects.

This project analyzes music real-time and uses this data to sync the lights and the robot’s moments to the notes.

This project is just absolutely incredible to me, as it places product design in a theatrical performance complete with a score, choreography, and lights.   The amount of vision and ambition that it took to complete this project is something that I hope to one day attain.

A video showing the process of this project.

Website: https://nand.io/projects/valse-automatique

Dani Delgado Project 06 – Abstract Clock

sketch

/*Dani Delgado
Section E
ddelgad1@andrew.cmu.edu
Project 06
*/

function setup() {
    createCanvas(480, 375);
    
}

function draw() {
	background(250);

	//set the time variables 
    var h = hour();
    var m = minute();
    var s = second(); 

	//draw the static background / peices 
	//draw the "city"
	//draw the buildings
	noStroke();
	fill(60, 60, 80, 90);
	rect(0, 0, width, height / 2 + 20);

	//draw the building shadows
	noStroke();
	fill(20, 20, 40, 90);
	rect(90, 0, 10, height / 2 + 20, 60, 0, 0, 0);
	rect(350, 0, 10, height / 2 + 20, 0, 60, 0, 0);

	//draw a moving person
	//set the moving variables
	var mapp = map(m, 0, 60, width, 0);
    var personX = mapp;
    var speed = m; 

	//draw the person walking on a minute long loop
    push();
    personX += speed;
	ellipseMode(CORNER);
	noStroke();
	fill(0, 45, 50, 60);
	ellipse(personX, 70, 40, 40);
	rect(personX, 110, 40, 200, 80);
    pop();

	//draw the window 
	fill(230, 247, 255, 40);
	noStroke();
	rect(0, 0, width, height / 2 + 20);

	//draw the window highlights
	stroke(255, 255, 255, 90);
	strokeWeight(50);
	line(300, 0, 480, 200);
	strokeWeight(10);
	line(230, 0, 410, 207);
	strokeWeight(100);
	line(0, 150, 180, 350);

	//draw the window frame shadow
	noStroke();
	fill(80);
	rect(355, 0, 30, height / 2 + 20);
	rect(30, 0, 30, height /2 + 20);

    //window frame
	fill(120);
	rect(355, 0, 25, height / 2 + 17, 0, 0, 50, 0);
	rect(30, 0, 25, height /2 + 17, 0, 0, 50, 0);

	//draw the table
	noStroke();
	fill(157, 115, 70);
	rect(0, height / 2 + 20, width, height);
	fill(137, 95, 50);
	rect(0, 350, width, height);

	//draw the shadow of the mug
	 //make the mug shadow rotate bassed on the hour
    if (h >= 12) {
		h -= 12;
	}
	h = map(h, 0, 11, 0, 360);
	push();
	translate(160, 280);
	rotate(radians(h) - 0.25 * (TWO_PI))
	fill(127, 85, 40, 85);
	rect(0, 0, 100, 80, 60);
	pop();

	//draw the mug
	noStroke();
	fill(204, 255, 212);
	rect(115, 220, 120, 80, 0, 0, 90, 90);
	fill(164, 215, 172);
	ellipse(175, 220, 120, 20);
	fill(77, 51, 0);
	ellipse(175, 225, 100, 10);

	stroke(204, 255, 212);
	strokeWeight(10);
	noFill();
	arc(115, 255, 45, 45, radians(80), radians(300), TWO_PI);

	//draw the steam and make it move 
	//the steam moves up and down with each second 
	//first set the needed variables 
	//and then create an if statement that makes it move up or down every other second
	var steam1Y = 200;
	var steam2Y = 180; 
	if ((s % 2) > 0) {
        steam1Y = 200;
        steam2Y = 180;
	} else if (( s % 2) == 0) {
		steam1Y = 190;
		steam2Y = 170;
	}
	//draw the steam itself 
	//left puff of smoke
	fill(255);
	noStroke();
	ellipse(155, steam1Y + 10, 8, 8);
	ellipse(152, steam1Y + 5, 10, 10);
	ellipse(159, steam1Y - 2, 15, 15);
	ellipse(155, steam1Y - 10, 15, 15);
	ellipse(162, steam1Y - 14, 16, 16);
    //right puff of smoke
	ellipse(195, steam2Y, 10, 10);
	ellipse(200, steam2Y - 6, 12, 12);
	ellipse(198, steam2Y + 5, 8, 8);
	ellipse(197, steam2Y - 10, 15, 15);
    ellipse(202, steam2Y - 14, 18, 18);
    ellipse(198, steam2Y - 20, 12, 12);
	
   
}

This project was a bit challenging for me, especially when coming up with a concept to go with. However, completing the extra credit assignment really helped me to understand the mechanics that goes into making a clock work. I went with a coffee shop idea after looking at how the shadows around my coffee cup collection on my desk change as the day goes on and I thought that it would make a cute clock idea.

There are a few details I wish I could have ironed out but overall I think that this clock is cute and fun.
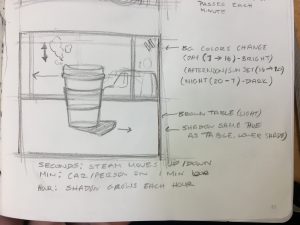
The steam moves with seconds, the person outside the window moves along with the minutes, and the shadow of the cup rotates with each hour.

An initial sketch of the clock landscape
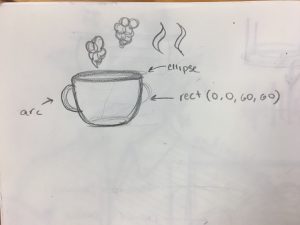
mug and steam development


Dani Delgado – Looking Outwards 06

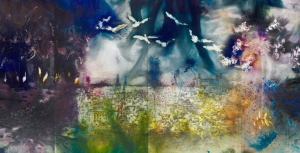
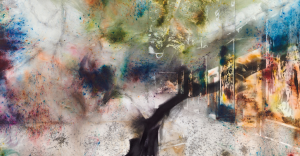
A piece in “The Spirit of Painting” exhibit by Cai – it is currently displayed in the Museo Nacional del Prado, Madrid.

Randomness is considered an almost imperative (CHECK THE WORD MAN) part of the creative process, whether it be through allowing one’s thoughts to run wild or through implementing actual forms of randomness into the process to create a random output. This second form of randomness can be seen clearly in the work of Cai Guo-Qiang, an artist who utilizes gunpowder to create his work.
His primary body of work manifests itself in two forms – fireworks that are set off according to his coded programs and controlled explosions on canvas – both of which have random outcomes in that there is no way to know what they will look like until the final product has been produced (this type of randomness is similar to weather in that you can expect what is to come but there is no specifics that are known).

A piece in “The Spirit of Painting” exhibit by Cai – it is currently displayed in the Museo Nacional del Prado, Madrid. This work contains some acrylic underlays.

Cai, who had a background in fine art painting, began exploring gunpowder as a medium because of its connection to nature and how it creates art in an organic, non-sequential way. This method of working is very inspirational to me, mainly because it is so different from what I do; my process usually contains some randomness in the initial idea phase, but once it comes to a final product, I usually like to have full control over what my work will look like. So, to embrace the random and explosive nature of gunpowder and create art out of it is simply fascinating to me.

Youtube Video of his process:

His website: http://www.caiguoqiang.com/

Dani Delgado – Looking Outwards 5

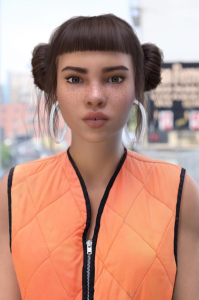
A screencapture of “Miquela”

Lil Miquela is an  instagram “model” created using 3D computer modeling techniques. While not much is known about the artist or their motivation to create a full social media page for their model, other than that they work for a startup named Brud, I find it very impressive that the page amassed thousands of followers who believed Miquela was a real person from Brazil. While there is much controversy that surrounds this project because of this, I believe that as an art piece, this project is both beautifully rendered and raises some important questions: Have computer graphics advanced so far that we can  create realities indistinguishable from our own? Are we now a society focused on purely visuals without needed any further context? Do we not care? The instagram, which has been publishing content since 2016,  is only gaining a larger and larger following with time.

While this is not necessarily traditional computer graphics, I believe that Miquela is an impressive work of both computer generated and performance art (as we follow “her” lifestyle, we become a part of the artist’s performance).

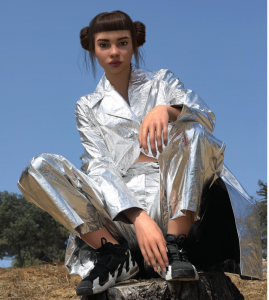
Lil Miquela was hired by many brands to “model” their clothes due to her popularity.

Link to “her” instagram: https://www.instagram.com/lilmiquela/

Dani Delgado Project 05 – Wallpaper

sketch

/* Dani Delgado
Section E
ddelgad1@andrew.cmu.edu
Project-05
*/

function setup() {
    createCanvas(450, 350);
}

function draw() {
    //draw a dark blue background
    background(28, 33, 82);

    //draw the polka dotted bakcground
    for (var p = 0; p < width - 10; p += 18) {
    	for (var d = 0; d < height - 10; d += 22) {
    		polkaDot(p, d);
    	}
    }

    //draw the blue mountain and the pink shadow
    for (var mx1 = 0; mx1 < width - 60; mx1 += 60) {
     	for (var my1 = 0; my1 < height; my1 += 70) {
     		mountainBase(mx1, my1);
     		mountainShadow(mx1, my1);
        }
    }    
    //draw the white  offset outline 
    for (var mx2 = 0; mx2 < width - 65; mx2 += 60){
    	for (var my2 = 0; my2 < height; my2 += 70){
    		mountainOutline(mx2, my2);
    	}
    }
    noLoop(); 
}

function polkaDot(x, y) {
	//draw the polka dotted background
	push();
	translate(x, y);
	noStroke();
	fill(48, 53, 102);
	ellipse(10, 10, 10, 10);
	pop();
}

function mountainBase(x, y) {
    //define the variables to make the mountain points at 
    //all variables are fixed based on the first set of triangle coordinates
    //writing out variables like this helps me to understand the placement of my shapes
    var mx1 = 20;
    var mbase = 50;
    var mx2 = mx1 + (mx1 / 2);
    var mpeak1 = mbase - 20;
    var mx3 = mx1 * 2;
    var mx4 = mx2;
    var mpeak2 = mbase - 30;
    var mx5 = mx4 + 15;
    var mx6 = mx4 + 30;
    var mx7 = mx5;
    var mx8 = mx7 + 12;
    var mpeak3 = mbase - 20;
    var mx9 = mx8 + 12;

    //draw the first mountain base
    push();
    translate(x, y);
    fill (108, 113, 182);
    noStroke();
    triangle(mx1, mbase, mx2, mpeak1, mx3, mbase);
    triangle(mx4, mbase, mx5, mpeak2, mx6, mbase);
    triangle(mx7, mbase, mx8, mpeak3, mx9, mbase);
    pop();
}

function mountainShadow(x, y) { 
	//repeat variables
    var mx1 = 20;
    var mbase = 50;
    var mx2 = mx1 + (mx1 / 2);
    var mpeak1 = mbase - 20;
    var mx3 = mx1 * 2;
    var mx4 = mx2;
    var mpeak2 = mbase - 30;
    var mx5 = mx4 + 15;
    var mx6 = mx4 + 30;
    var mx7 = mx5;
    var mx8 = mx7 + 12;
    var mpeak3 = mbase - 20;
    var mx9 = mx8 + 12;

    //draw the mountain shadow
    push();
    translate(x, y);
    fill(255, 128, 160);
    noStroke();
    triangle(mx1, mbase, mx2, mpeak1, mx2 + 2, mbase);
    triangle(mx4, mbase, mx5, mpeak2, mx5 + 5, mbase);
    triangle(mx8, mpeak3 + (0.5 * mpeak3), mx6 - 7.5, mpeak3 + 4.5, mx8, mpeak3);
    pop();
}

function mountainOutline(x, y){
    //repeat variables
	var mx1 = 20;
    var mbase = 50;
    var mx2 = mx1 + (mx1 / 2);
    var mpeak1 = mbase - 20;
    var mx3 = mx1 * 2;
    var mx4 = mx2;
    var mpeak2 = mbase - 30;
    var mx5 = mx4 + 15;
    var mx6 = mx4 + 30;
    var mx7 = mx5;
    var mx8 = mx7 + 12;
    var mpeak3 = mbase - 20;
    var mx9 = mx8 + 12;

    //draw the mountain white, offset outline
    push();
    translate (x, y);
    stroke(255);
    strokeWeight(0.75);
    line(mx1 + 5, mbase - 5, mx9 + 5, mbase - 5);
    line(mx1 + 5, mbase - 5, mx2 + 5, mpeak1 - 5);
    line(mx2 + 5, mpeak1 - 5, mx3 + 2, mbase - 15);
    line(mx3 + 2, mbase - 15, mx5 + 5, mpeak2 - 5);
    line(mx5 + 5, mpeak2 - 5, mx6 - 2, mbase - 20);
    line(mx6 - 2, mbase - 20, mx8 + 5, mpeak3 - 5);
    line(mx8 + 5, mpeak3 -5, mx9 + 5, mbase - 5);
    pop();
}

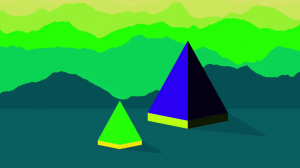
For this project, I wanted to create a crisp pattern that would like nice on a backpack or maybe a skirt. I went through a few ideas, including rain clouds and flower patterns, before deciding on drawing mountain ranges. I have always loved how mountains are graphically represented; the clean lines and clever usage of color blocking to create dimension are just very pleasant to look at for me. With that in mind, I decided to create something similar with a fun color palette.

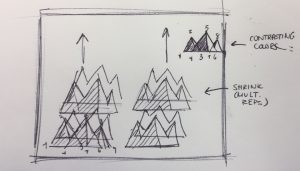
A quick sketch made to get the concept and main points down onto some paper

 
As far as coding goes, this was a bit of a challenge for me since I am still trying to fully understand for-loops and creating my own functions. I tried to incorporate functions into my code instead of drawing the shapes in the loops to practice these skills some more (and so that I could relate all of the mountain’s shape points to one primary point using arithmetic and not having the loop mess with these relationships).

Dani Delgado – Looking Outwards 04

An example of the Atlas environment

The sound related project I chose to research is Atlås: an “anti-game environment” that generates music by completing self-generated tasks. The “anti-game” means that the app will solve these tasks by itself, without any need for human input.

This app was created by Agoston Nagy, who wanted to question human cognition and “more broadly corporate driven automatisms and advanced listening practices” which have been ingrained in most people. Nagy created the app using primarily JavaScript (and p5js) and Pure Data to synthesize the sounds together. Learning that most of this digital environment was created using JavaScript – the same language which we are learning – was encouraging and exciting for me because it means that if I keep pushing myself, maybe I could create something as beautiful, seamless, and imaginative as Atlås.

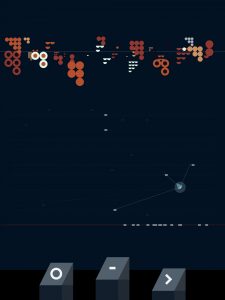
A screenshot of the Atlas interface. Sound is created as the simple shapes appear in the background.

Above: A video showing a demo of the Altas app: you can see how the music is created and the included animations which build the landscape.

Dani Delgado Project 04 – String Art

sketch

/* Dani Delgado
Section E
ddelgad1@andrew.cmu.edu
Project-04
*/
function setup() {
    createCanvas(400, 300);
    background(10);
   
}
function draw() {
	//draw the sixth layer of lines (brownish black lines)
	//these lines are on the "inside" of all other line layers (its the lowest layer)
    for(var g = 0; g < 1.5 ; g += 0.09) {
	    //set the stroke style
		strokeWeight(0.2);
		stroke(35, 19, 0);
		//determine the lerp values
		x1 = lerp(0, width / 2.15, g);
        y1 = lerp(0, height * 2.15, g);
        x2 = lerp(width * 2.15, 0, g);
        y2 = lerp(height / 2.15, 0, g);
        //draw the curves
		line(x1, 0, width, y1);
		line(x2, height, 0, y2);
		line(x1, height, width, y2);
		line(x2, 0, 0, y1);
    }
	//draw the fifth layer of lines (brown lines)
	//these lines are on the "inside" the above layers of lines
	for(var f = 0; f < 1.4 ; f += 0.08) {
	    //set the stroke style
		strokeWeight(0.3);
		stroke(51, 34, 0);
		//determine the lerp values
		x1 = lerp(0, width / 1.9, f);
        y1 = lerp(0, height * 1.9, f);
        x2 = lerp(width * 1.9, 0, f);
        y2 = lerp(height / 1.9, 0, f);
        //draw the curves
		line(x1, 0, width, y1);
		line(x2, height, 0, y2);
		line(x1, height, width, y2);
		line(x2, 0, 0, y1);
    }
   //draw the fourth layer of line (dark orange lines)
   //these lines are "inside" the above layer of lines
    for(var e = 0; e < 1.3; e += 0.07) {
		//set the stroke style
		strokeWeight(0.4);
		stroke(102, 68, 0);
		//determine the lerp values
		x1 = lerp(0, width / 1.75, e);
        y1 = lerp(0, height * 1.75, e);
        x2 = lerp(width * 1.75, 0, e);
        y2 = lerp(height / 1.75, 0, e);
        //draw the curves
		line(x1, 0, width, y1);
		line(x2, height, 0, y2);
		line(x1, height, width, y2);
		line(x2, 0, 0, y1);
    }
    //draw the third layer of lines (medium orange lines)
    //these lines are "inside" the above layer of lines
    for(var d = 0; d < 1.2; d += 0.06) {
		//set the stroke style
		strokeWeight(0.6);
		stroke(204, 136, 0);
		//determine the lerp values
		x1 = lerp(0, width / 1.5, d);
        y1 = lerp(0, height * 1.5, d);
        x2 = lerp(width * 1.5, 0, d);
        y2 = lerp(height / 1.5, 0, d);
        //draw the curves
		line(x1, 0, width, y1);
		line(x2, height, 0, y2);
		line(x1, height, width, y2);
		line(x2, 0, 0, y1);
	}
	//draw the second layer of lines (light orange lines)
	//these lines are "inside" of the abvoe layer of lines
	for(var c = 0; c < 1.1; c += 0.05) {
		//set the stroke style
		strokeWeight(0.8);
		stroke(255, 204, 102);
		//determine the lerp values
		x1 = lerp(0, width / 1.5, c);
        y1 = lerp(0, height, c);
        x2 = lerp(width * 1.5, 0, c);
        y2 = lerp(height, 0, c);
        //draw the curves
		line(x1, 0, width, y1);
		line(x2, height, 0, y2);
		line(x1, height, width, y2);
		line(x2, 0, 0, y1);
	}
	//draw the uppermost line set (creme colored lines)
	//the first line set will curve the corners 
	for(var i = 0; i < 1; i += 0.04) {
		//set the stroke style
		strokeWeight(1);
	    stroke(250, 240, 220);
	    //determine the lerp variables
        x1 = lerp(0, width, i);
        y1 = lerp(0, height, i);
        x2 = lerp(width, 0, i);
        y2 = lerp(height, 0, i);
        //draw the curves
		line(x1, 0, width, y1);
		line(x2, height, 0, y2);
		line(x1, height, width, y2);
		line(x2, 0, 0, y1);
}
    
}

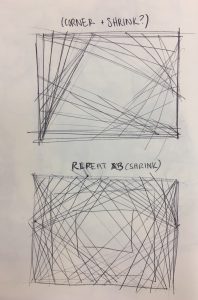
Some initial concept sketches to decide how I wanted to place the lines

Since this is my first experience with for loops (outside of the other class assignments), I found this to be very challenging since I first had to solidify the conceptual aspect of the code before I could begin to work on the physical coding. Once I got into the groove of it though I had fun with the assignment!

Dani Delgado Looking Outwards-03

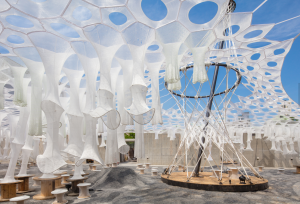
A snapshot of the Lumen Project in the day.

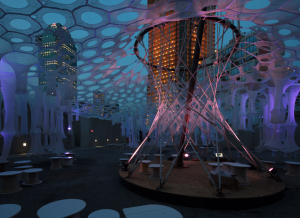
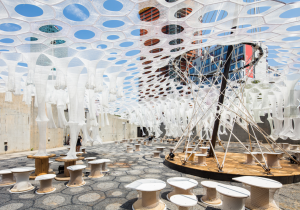
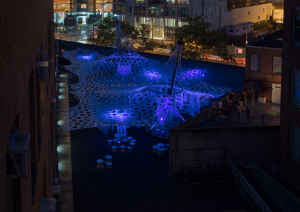
The project I chose to research was “Lumen” – a beautiful structure that stands in the intersection of architecture, design, biology, and engineering. This cutting-edge project was developed in 2018 by the Jenny Sabin Studio in Ithaca, NY in order to create an adaptive environment that provides physical comfort and physiological wonder at all times of the day. At night, the fabric provides and phosphorescent light, as it is woven with materials that can capture, collect, and release light.  Then, in the day, this same fabric structure protects its visitors from harsh sunlight and releases mist based on proximity to cool them down.

Lumen at night
Lumen in the daytime

This project was developed using mathematics simulations, which I do not know much about, and later used digital modeling programs (presumably AutoDesk) to more fully develop the environment. Originally, I was attracted to this project solely based on its stunning visuals; however, once I learned about the sheer amount of interdisciplinary work that went into this project, I was in awe. The combination of the STEM and creative fields is what I believe the future to be, as we cannot advance as a people without acknowledging both aspects of the human mind. This train of thought directly connects to the Jenny Sabin Studio, as they try to focus on the intersection of architecture and science. These two different perspectives can clearly be observed in looking at this final work.

The full Lumen project at night to show the scale of the work

Above: A Youtube video showing a VR  digital model of the Lumen Project.

Website: http://www.jennysabin.com/lumen

Dani Delgado Project-03 – Dynamic Drawing

sketch

/*Dani Delgado 
Section E
ddelgad1@andrew.cmu.edu
Project-03
*/

//background color variables
var bgB = (20, 100);
var bgG = (20, 100);

//line weight variables
var rectW = 40;
var rectX = rectW * 2;

//angles for rotation
var a1 = 0;

//moon growing variable
var moong = 100;
var speed = 3;
var direc = 1; 

//eye glow variables
var eyeLW = 0;
var eyeLH = 0;
var eyeRW = 0;
var eyeRH = 0;

function setup() {
    createCanvas(640, 480);
    ellipseMode(CORNER);  
}

function draw() {
	//color changing background; constrain the colors to make it appear darker
	bgR = mouseX;
	bgB = constrain(mouseX, 10, 100);
	bgG = constrain(mouseY, 20, 100);

	background (10, bgG, bgB);

	//draw the moon
	//the moon rotates based on the mouseY coordinate 
	fill(215, 211, 190);
	push();
	a1 = (mouseY / height) * 180;
	rotate(radians(a1));
	ellipse(20, 10, 225, 225);
	pop();
	a1 = a1 - 3;

	//draw the "trees" that are behind the primary animal
	fill (60, 34, 10);
	rect(rectX - 80, 0, rectW, height);
	rect(rectX * 2, 0 , rectW, height);
	rect(rectX * 4, 0, rectW, height);
	rect(rectX * 6, 0, rectW - 6, height);
	rect(rectX, 0, rectW - 14, height);

	//draw the yellow moving bird which moves on the -mouseX and -mouseY coordinates 
	//start with the bird body
	fill(255, 221, 51);
	ellipse(-mouseX + 640, -mouseY + 480, 40, 40);
	//make bird tail
	triangle(-mouseX + 655, -mouseY + 510, -mouseX + 700, -mouseY + 515, -mouseX + 705, -mouseY + 525);
	//make bird eye and beak
	fill(20);
	ellipse(-mouseX + 649, -mouseY + 488, 10, 10);
	fill(255, 140, 25);
	triangle(-mouseX + 635, -mouseY + 500, -mouseX + 640, -mouseY + 505, -mouseX + 640, -mouseY + 495);

	//draw the red moving bird which moves on the mouseX and mouseY coordinates
	//start with the bird body
	fill(255, 120, 51);
	ellipse(mouseX, mouseY, 40, 40);
	//make bird tail
	triangle(mouseX + 15, mouseY + 30, mouseX + 60, mouseY + 35, mouseX + 65, mouseY + 45);
	//make bird eye and beak
	fill(20);
	ellipse(mouseX + 9, mouseY + 8, 10, 10);
	fill(255, 140, 25);
	triangle(mouseX - 5, mouseY + 20, mouseX, mouseY + 25, mouseX , mouseY + 15);


	// draw the "trees" that are in front of the moving birds 
	noStroke();
	fill(60, 34, 10);
	rect(rectX * 3, 0, rectW, height);
	rect(rectX * 5, 0, rectW, height);
	rect(rectX * 7, 0, rectW - 2, height);
	rect(rectX, 0, rectW - 10, height);

	//draw the primary animal
	//draw the body of the primary animal
	fill(82, 48, 0);
	rect(width / 3.20, height / 1.5, 300, 200, 90, 90, 0, 0);
	//draw the belly fur highlight
	fill(130, 90, 10);
	rect(width / 2.28, height / 1.10, 150, 60, 90, 90, 0, 0);
	//draw primary animal's head
	//draw the basic head shape (circle)
    fill(102, 68, 0);
    ellipse(width / 2.5, height / 2.5, 200, 200);
    //draw the facial features (ears, snout, nose)
    arc(width / 2 - 70, height / 2.5 + 10, 60, 65, 2, 5.6, PI, OPEN);
	arc(width / 1.5 - 20, height / 2.5 + 10, 60, 65, 3.75, 8, PI + QUARTER_PI, OPEN);
	fill(150, 100, 10);
	arc(width / 2 - 60, height / 2.5 + 25, 28, 32, 2, 5.6, PI, OPEN);
	arc(width / 1.5 - 5, height / 2.5 + 25, 28, 32, 3.75, 7.5, PI, OPEN);

	ellipse(width / 2.5 + 50, height / 1.6, 100, 70);
	fill(60, 8, 0);
	ellipse(width / 2 + 16, height / 1.43, 40, 30);

	//draw the eyes
	//eyes will glow when you mouse over them 
	eyeLW = width / 2 - 25;
    eyeLH = height / 2 + 15;
    eyeRW = width / 2 + 60;
    eyeRH = height / 2 + 15;

    var eyedim = 35 
	if ((mouseX > eyeLW) & (mouseX < eyeLW + eyedim) &&
		(mouseY > eyeLH) && (mouseY < eyeLH + eyedim) ||
		(mouseX > eyeRW) & (mouseX < eyeRW + eyedim) &&
		(mouseY > eyeRH) && (mouseY < eyeRH + eyedim)) {
		fill(255, 238, 153);
	} else {
		fill(60, 8, 0);
	}
	ellipse(eyeLW, eyeLH, eyedim, eyedim);
	ellipse(eyeRW, eyeRH, eyedim, eyedim);
}

I started out this project in a very abstract way, only drawing moving ellipses and rectangles that followed the mouse at varying degrees of offset. However, when I woke up one day this week and my first thought was about an animal in the woods, I decided that exploring that concept would be a cute direction. And so, I drew this little scene.

Dani Delgado Variable Face

sketch

/*Dani Delgado
ddelgad1@andrew.cmu.edu
Section E
Project-02
*/

// eye variables
var eyeType = 1;
//face variables 
var faceWidth = 160;
var faceHeight = 220;
var faceColorR = 240;
var faceColorG = 230;
var faceColorB = 179;
//hair variables
var hairType = 1;
var hairColorR = 95;
var hairColorG = 23;
var hairColorB = 23;
//facial feature variables 
var noseN = 1;
var mouthNum = 1;
var detailNum = 1;


function setup() {
    createCanvas(640, 480);

}

function draw() {
    background(202, 255, 221);

    	//draw the hair
	var hair = int(hairType);
	if (hair == 1){
		//long hair
		noStroke();
		fill(hairColorR, hairColorG, hairColorB);
		rect(width/2, height/2+25, 230, 350, 95, 95, 10, 10);

	} if (hair == 2){
		//medium hair
		noStroke();
		fill(hairColorR, hairColorG, hairColorB);
		rect(width/2, height/2-20, 225, 250, 95, 95, 10, 10);

	} if (hair == 3){
		//bun
		noStroke();
		fill(hairColorR, hairColorG, hairColorB);
		ellipse(width/2, height/2-40, 225, 230);
		ellipse(width/2, height/3-70, 100, 100);
	}

    //draw the general face
	noStroke();
	fill(faceColorR, 220, faceColorB);
	rectMode(CENTER);
	rect (width/2, height/2, faceWidth, faceHeight, 90);

	//draw the eyes
	var eye = int(eyeType);
	if (eye == 1){
		fill(70, 40, 38);
		ellipse(width/2+40, height/2-20, 29, 29);
		ellipse(width/2-40, height/2-20, 29, 29);
		//pupils
		noStroke();
		fill(250, 250, 250)
		ellipse(width/2+36, height/2-24, 10, 10);
		ellipse(width/2-44, height/2-24, 10, 10);

	} if (eye == 2){
		fill(70, 40, 38);
		arc(width/2+40, height/2-15, 40, 25, 3.14, 0, PI, OPEN);
		arc(width/2-40, height/2-15, 40, 25, 3.14, 0, PI, OPEN);
	}

	//draw the eyebrows
	noFill();
	stroke(90, 60, 50);
	strokeWeight(6);
	arc(width/2+40, height/2-50, 40, 12, 3.24, 6, PI, OPEN);
	arc(width/2-40, height/2-50, 40, 12, 3.24, 6, PI, OPEN);

	//draw the bangs
	noStroke();
	fill(hairColorR, hairColorG, hairColorB);
	rect(width/2+50, height/3-23, 50, 50, 10, 90, 0, 0);
	rect(width/2.2, height/3-23, 100, 50, 90, 10, 0, 0);

	//draw the nose
	var nose = int(noseN);
	if (nose == 1){
		noStroke();
		fill(255, 160, 140);
		rect(width/2, height/1.85, 15, 40, 90, 90, 5, 5);

	} else if (nose == 2){
		noStroke();
		fill(255, 160, 140);
		ellipse(width/2, height/1.75, 25, 15);

	} else if (nose == 3){
		noStroke();
		fill(255, 160, 140);
		triangle(width/2, height/2+20, width/2-15, height/2+35, width/2+15, height/2+35);
	}

	//draw the mouth
	var mouth = int(mouthNum);
	if (mouth == 1){
		noStroke();
		fill(70, 40, 38);
		arc(width/2, height/1.6, 55, 50, 6.28, 3.14, PI, OPEN);
		fill(249,249,249);
		rect(width/2, height/1.6, 55, 8, 0, 0, 35, 35);

	} else if (mouth == 2){
		noFill();
		strokeWeight(8);
		stroke(60, 30, 30);
		arc(width/2, height/1.6, 50, 40, 6.28, 3.14, PI, OPEN);
	}
	
	//draw the details
	var detail = int(detailNum);
	if (detail == 1){
		//freckles
		noStroke();
		fill(163, 112, 10);
		ellipse(width/2.2, height/1.8, 7, 7);
		ellipse(width/2.34, height/1.8, 7, 7);
		ellipse(width/2.48, height/1.8, 7, 7);
		ellipse(width/2.27, height/1.9, 7, 7);
		ellipse(width/2.41, height/1.9, 7, 7);

		ellipse(width/1.84, height/1.8, 7, 7);
		ellipse(width/1.76, height/1.8, 7, 7);
		ellipse(width/1.68, height/1.8, 7, 7);
		ellipse(width/1.80, height/1.9, 7, 7);
		ellipse(width/1.72, height/1.9, 7, 7);

	} if (detail == 2){
		//blush
		noStroke();
		fill(255, 153, 153);
		ellipse(width/2.5, height/2+10, 30, 15);
		ellipse(width/1.67, height/2+10, 30, 15);

	} if (detail == 3){
		//peircings 
		noStroke();
		fill(100,100,100);
		ellipse(width/2+50, height/2-47, 7, 7);
		ellipse(width/2+54, height/2-62, 7, 7);
	}
}

function mousePressed() {
    //hair randomizing
    hairType = random(1, 4);
    hair = random(1,3);
    hairColorR = random(245, 255);
    hairColorG = random(153, 221);
    hairColorB = random(151, 153);

    // face randomizing
    faceWidth = random(155, 200);
    faceHeight = random(220, 250);
    eyeSize = random(10, 30);

    //facecolor randomizing
    faceColorR = random(235, 255);
    faceColorG = random(190, 240);
    faceColorB = random(180, 210);

    //mouth randomizing
    mouthNum = random(1, 3);
    mouth = random(1, 2);

    //nose randomizing
    noseN = random(1, 4);
    nose = random(1, 3);

    //eye randoming
    eyeType = random(1,3);
    eye = random(1,2);

    //detail randoming
    detailNum = random(1,4);
    detail = random(1,3);

}

This project was a great learning experience for me; at the beginning I struggled to wrap my mind around how to apply variables and what to name them. But, as I continued to push through, I found the assignment to become more and more enjoyable as the concepts we learned solidified in my head.
In my drawings, I wanted to keep all of the features within a specific, warm-toned color palette so that the background had a nice contrast. I also wanted to make all of the changing facial features fairly distinct and fun to look at.