Robert Oh Project-05-Wallpaper

version2

//Robert Oh
//Section C
//rhoh@andrew.cmu.edu
//Project-05-Wallpaper

//assigning variables
var x = 0;
var y = 0;

function tile(x, y) {
    //creating the top border of each tile
    strokeWeight(5);
    stroke(6, 54, 132);
    fill(0);
    rect(x*250, y*100 + 2, 250, 10);

    stroke(0);
    //this x + y % 2 alternates every tile 
    if ((x + y) % 2 == 0){
        //creates gap
        rect(x*250, y*100, 70, 20);
        
        //making pacman
        fill(235, 255, 58);
        arc(x*250 + 45, y*100 + 53, 50, 50, PI/4, -(PI/4));

        //making the smaller dots
        fill(255);
        ellipse(x*250 + 85, y*100 + 53, 12, 12);
        ellipse(x*250 + 125, y*100 + 53, 12, 12);
        ellipse(x*250 + 165, y*100 + 53, 12, 12);

        //making the larger "power-up" dot
        ellipse(x*250 + 205, y*100 + 53, 20, 20);
    }
    else {
        //creating the gap
        rect(x*250 + 175, y*100, 70, 20);

        //pacman
        fill(235, 255, 58);
        arc(x*250 + 205, y*100 + 53, 50, 50, PI+PI/4, PI-(PI/4));

        //creating the smaller dots
        fill(255);
        ellipse(x*250 + 85, y*100 + 53, 12, 12);
        ellipse(x*250 + 125, y*100 + 53, 12, 12);
        ellipse(x*250 + 165, y*100 + 53, 12, 12);

        //creating the power-up dot
        ellipse(x*250 + 45, y*100 + 53, 20, 20);
    }
}

function setup() {
    createCanvas(500, 500);
    background(0);
    //nested for loop to fill up my wallpaper with my pacman tiles
    for (y = 0; y < 5; y ++){
        for (x = 0; x < 2; x++){
            tile(x, y);
        }
    }

    //creating borders and middle line
    fill(0);
    strokeWeight(5);
    stroke(6, 54, 132);
    rect(245, 0, 10, 500);
    rect(0, 487, 500, 10);
    rect(0, 0, 10, 500);
    rect(488, 0, 10, 500);

    //creating a gap on the bottom
    stroke(0);
    rect(245, 417, 20, 65);

    noLoop();
}

function draw() {
    //nothing here because noLoop is called
}

When I started this project, I was brainstorming for ideas to create my tiles with. I am a huge video gamer, and so I thought a cute little Pacman “maze” would be cute to code. I designed the background and details to match those of the actual original game (with the blue walls, black background, white pellets and bigger “power-up pellets”. All in all, I love how it ended up looking!

Rjpark – Looking Outwards 05

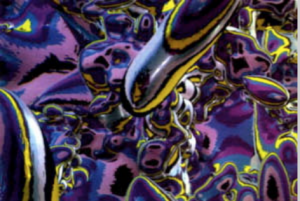
Image of Kawaguchi’s 3D Computer Graphic
The 3D computer graphics I chose were made by Yoichiro Kawaguchi, an international computer artist from Japan. He creates a lot of graphic art that has soft, fluid shapes and forms and he gains his inspiration from patterns in seashells and spiraling plants. You can see a lot of that in his art; each shape/object has a circular, spiral pattern within it. I admire the fact that although his work is random and chaotic – placement of shapes is random and shape sizes are different – in a sense, there’s consistency and similarity too, mainly due to the patterns within these shapes. It’s both hectic and peaceful to look at. In terms of the algorithm, he imitated growth patterns from seashells and plants using a function/technology called “metaballs”, which produces organic-looking n-dimensional objects.

Yoichiro Kawaguchi

Joanne Lee – Project 05

Project-05

// Joanne Lee
// Section C
// joannele@andrew.cmu.edu
// Project-05

function setup() {
  createCanvas(500,600);
  background (135,206,236);
  noLoop();
}

function draw() {
  var x = 0;
  var y = 0;
  var shiftX = width / 5;
  var shiftY = height / 4;

  // diamond repeating background (creating this using repeating X shapes)
  for (var a = 0; a < 4; a++) { // rows
    for (var b = 0; b < 5; b++) { // columns
      stroke(243,250,253);
      strokeWeight(3);
      line(x, y, x + shiftX, y + shiftY);
      line(x + shiftX, y, x, y + shiftY);
      x += shiftX;
    }
    y += shiftY;
    x = 0; // reset x
  }
  
  // variables for ryan's face
  var face = 50;
  var earSize = 15;
  var eyeSize = 2;
  var noseSize = 5;
  var stacheSize = 10;
  x = 0;
  y = shiftY * 0.5;

  // rybear in every other diamond, every other row
  for (var c = 0; c < 4; c++) { // rows
    for (var d = 0; d < 3; d++) { // columns
      // ears
      stroke(0);
      strokeWeight(2.5);
      fill(223,155,58);
      ellipse(x - 16, y - 17, earSize, 0.85*earSize); // left
      ellipse(x + 16, y - 17, earSize, 0.85*earSize); // right

      // face
      ellipse(x, y, face, 0.85*face);

      // eyebrows
      line(x + 6, y - 8, x + 14, y - 8); // left
      line(x - 14, y - 8, x - 6, y - 8); // right

      // eyes
      fill(0);
      ellipse(x - 9.1, y - 2, eyeSize, eyeSize); // left
      ellipse(x + 9.9, y - 2, eyeSize, eyeSize); // right

      // nose
      ellipse(x, y + 4, noseSize, noseSize);

      // mustache
      strokeWeight(0);
      fill(255);
      ellipse(x - 4.5, y + 8, stacheSize, 0.75 * stacheSize); // left
      ellipse(x + 4.5, y + 8, stacheSize, 0.75 * stacheSize); // right


      x += 2 * shiftX; // in order to put in every other diamond
    }

    y += shiftY; // put ryan in every other row

    // start ryan at different spots for different rows

    if (c % 2 == 0) {
        x = shiftX;
    }

    else if (c % 2 == 1) {
        x = 0;
    }
  }
}

For this week’s project, I revisited my favorite cartoon character / emoji. I created a repeating diamond background pattern and placed ryan in every other column / row. While creating this wallpaper, I had phone wallpapers in mind and tried to create a simple look because it may look cluttered with phone apps on the screen as well.

Hannah Cai—Project 05—Wallpaper

/* Hannah Cai
Section C
hycai@andrew.cmu.edu
Project-05-Wallpaper
*/

var x;
var y;
var x1;
var y1;
var x2;
var y2;
var x3;
var y3;
var x4;
var y4;

function setup() {
    createCanvas(480, 480);
    background(250);
}

function draw() {
    noLoop();
    smooth();
    angleMode(DEGREES);
    scale(1);
    translate(-90, 90);
    //dot grid
    for (x = 20; x < 1000; x += 50) {
        for (y = -99; y < 5000; y += 50) {
            stroke(0); 
            strokeWeight(1);
            point(x, y);
        }
    }

//yellow leaf
    for (x2 = 80; x2 < 2000; x2 += 320) {
        for (y2 = 70; y2 < 5000; y2 += 200) {
            //leaf
            fill(239, 211, 94);
            noStroke();
            push();
            translate(x2, y2 - 115);
            rotate(45);
            rect(0, 0, 55, 55, 15, 75, 0, 75);
            pop();
            //spot1
            stroke(192, 119, 50); 
            strokeWeight(5);
            point(x2 - 10, y2 - 85);
            //spot 2
            strokeWeight(2);
            point(x2 + 10, y2 - 73);
            //spot 3
            point(x2 - 12, y2 - 55);
            //stem
            strokeWeight(1);
            line(x2, y2 - 108, x2, y2 - 10);
        }
    }

//purple leaves
    for (x4 = 160; x4 < 1000; x4 += 320) {
        for (y4 = -90; y4 < 5000; y4 += 200) {
            //leaf 1
            noStroke();
            fill(149, 84, 90);
            ellipse(x4 + 0.5, y4 - 90, 12, 22); 
            //right leaves/branches
            for (i = 0; i < 3; i ++) {
                push();
                noStroke();
                translate(x4 + 9, y4 - (80 - 25 * i));
                rotate(45);
                ellipse(0, 0, 12, 22); 
                pop();
                stroke(89, 37, 37); 
                strokeWeight(1);
                line(x4, y4 - (72 - 25 * i), x4 + 15, y4 - (88 - 25 * i));
            }
            //left leaves/branches
            for (i = 0; i < 3; i ++) {
                push();
                noStroke();
                translate(x4 - 8, y4 - (80 - 25 * i));
                rotate(-45);
                ellipse(0, 0, 12, 22); 
                pop();
                line(x4, y4 - (72 - 25 * i), x4 - 15, y4 - (88 - 25 * i));
            }
            //stem
            line(x4, y4 - 100, x4, y4);
            //spot 1
            stroke(239, 211, 94); 
            strokeWeight(1);
            point(x4 + 13, y4 - 80);
            //spot 2
            point(x4 - 6, y4 - 33);
        }
    }

    //green leaves
    for (x1 = 250; x1 < 1000; x1 += 320) {
        for (y1 = -240; y1 < 5000; y1 += 200) {
            //leaf 1
            fill(159, 193, 64);
            noStroke();
            ellipse(x1, y1 - 75, 8, 52); 
            //leaf 2
            push();
            translate(x1 + 17, y1 - 60);
            rotate(208);
            ellipse(0, 0, 5, 35); 
            pop();
            //leaf 3
            push();
            translate(x1 - 18, y1 - 50);
            rotate(337);
            ellipse(0, 0, 4, 35); 
            pop();
            //branch for leaf 2
            stroke(104, 140, 27); 
            strokeWeight(1);
            line(x1, y1 - 30, x1 + 25, y1 - 75);
            //branch for leaf 3
            line(x1, y1 - 10, x1 - 25, y1 - 65);
            //stem
            line(x1, y1 - 100, x1, y1);
        }
    }

//purple flowers
    for (x3 = 330; x3 < 5000; x3 += 390) {
        for (y3 = -260; y3 < 5000; y3 += 200) {
            //stem
            stroke(159, 193, 64); 
            line(x3, y3 - 108, x3, y3);
            //flower 1
            fill(250, 204, 255);
            noStroke();
            ellipse(x3, y3 - 108, 5);
            ellipse(x3 - 2.5, y3 - 105.5, 5);
            ellipse(x3 + 2.5, y3 - 105.5, 5);
            ellipse(x3, y3 - 103, 5);
            //flower 1 center
            push();
            fill(149, 84, 90);
            rect(x3 - 0.5, y3 - 106, 1, 1);
            //flower 2
            x3 -= 2;
            y3 += 7;
            fill(250, 204, 255);
            ellipse(x3, y3 - 108, 5);
            ellipse(x3 - 2.5, y3 - 105.5, 5);
            ellipse(x3 + 2.5, y3 - 105.5, 5);
            ellipse(x3, y3 - 103, 5);
            //flower 2 center
            fill(149, 84, 90);
            rect(x3 - 0.5, y3 - 106, 1, 1);
            //flower 3
            x3 += 6;
            y3 += 7;
            fill(250, 204, 255);
            ellipse(x3, y3 - 108, 5);
            ellipse(x3 - 2.5, y3 - 105.5, 5);
            ellipse(x3 + 2.5, y3 - 105.5, 5);
            ellipse(x3, y3 - 103, 5);
            //flower 3 center
            fill(149, 84, 90);
            rect(x3 - 0.5, y3 - 106, 1, 1);
            //flower 4
            x3 -= 7;
            y3 += 5;
            fill(250, 204, 255);
            ellipse(x3, y3 - 108, 5);
            ellipse(x3 - 2.5, y3 - 105.5, 5);
            ellipse(x3 + 2.5, y3 - 105.5, 5);
            ellipse(x3, y3 - 103, 5);
            //flower 4 center
            fill(149, 84, 90);
            rect(x3 - 0.5, y3 - 106, 1, 1);
            //flower 5
            x3 += 8;
            y3 += 8;
            fill(250, 204, 255);
            ellipse(x3, y3 - 108, 5);
            ellipse(x3 - 2.5, y3 - 105.5, 5);
            ellipse(x3 + 2.5, y3 - 105.5, 5);
            ellipse(x3, y3 - 103, 5);
            //flower 5 center
            fill(149, 84, 90);
            rect(x3 - 0.5, y3 - 106, 1, 1);
            //flower 6
            x3 -= 8;
            y3 += 6;
            fill(250, 204, 255);
            ellipse(x3, y3 - 108, 5);
            ellipse(x3 - 2.5, y3 - 105.5, 5);
            ellipse(x3 + 2.5, y3 - 105.5, 5);
            ellipse(x3, y3 - 103, 5);
            //flower 6 center
            fill(149, 84, 90);
            rect(x3 - 0.5, y3 - 106, 1, 1);
            pop();
            //leaves
            fill(149, 84, 90);
            push();
            translate(x3 + 7, y3 - 90);
            rotate(-45);
            ellipse(0, 0, 10, 3);
            pop();
            push();
            fill(149, 84, 90);
            translate(x3, y3 - 90);
            rotate(45);
            ellipse(0, 0, 10, 3);
            pop();
        }
    }
    noLoop();
}


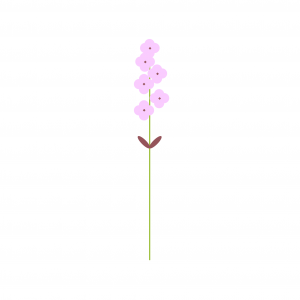
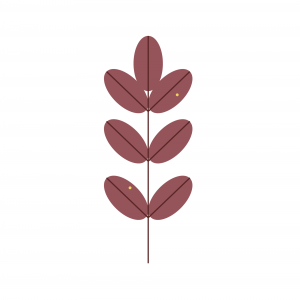
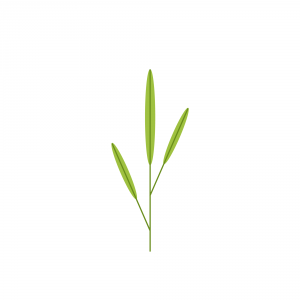
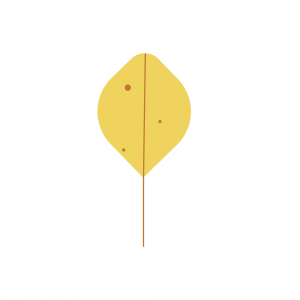
I knew I wanted to do something with plants for this project, so I made a few sketches in Illustrator:

plant #1
plant #2
plant #3
plant #4

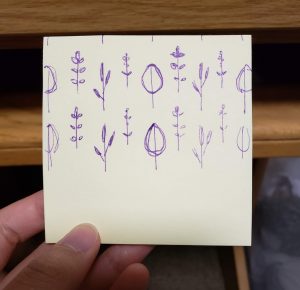
I then sketched how I generally wanted the different designs to piece together:

Figuring out how to orient everything on the canvas was the hardest and most time-consuming part, but I feel like it got me a lot more comfortable with for loops and spacing.

Project – 05 – Wallpaper

Retro Wallpaper

Sean McGadden

I was inspired by 1970’s themes and a retro color scheme. This project was fun to make as it built off past labs and I was easily able to manipulate the primitives to create a modernist feeling wallpaper design. However, the colors were somewhat odd to use so I had to experiment a little before arriving at a scheme I was happy with.

sketch

//Sean McGadden
//Section C @ 1:30
//smcgadde@andrew.cmu.edu
//Project-05

var r = (200);
var g = (200);
var sizeOfCircle = 15
    
    function setup(){
        createCanvas(600,400);
        noLoop();
    }
    
     function draw() {
        background(0);
         
        var numOfCirclesVertically = height / sizeOfCircle
        var numOfCirclesHorizontally = width / sizeOfCircle
//Creating for Loop Circles in Y Direction
        for(var y=0; y < numOfCirclesVertically; y += 1){
//Creating for Lopp Circlesin X Direction
          for(var x = 0; x < numOfCirclesHorizontally; x ++){
//Modulus to create layered shapes
            fill(r,g,0);
            if (x % 5 == 0 &
               y % 5 ==0) {
                
                rect(sizeOfCircle*x, sizeOfCircle * y, x + sizeOfCircle * 5, y + sizeOfCircle * 5);
          
            }
            ellipse(sizeOfCircle/2 + sizeOfCircle*x, sizeOfCircle/2 + sizeOfCircle*y, sizeOfCircle, sizeOfCircle);

              
            print("x is"+x);
            }
          }
//Creating the Sqaures
         for(var y=0; y < numOfCirclesVertically; y += 1){
//        r = 255/numOfCirclesVertically*y;
          for(var x = 0; x < numOfCirclesHorizontally; x ++){
               if (x % 5 == 0 &
               y % 5 ==0) {
                   fill(168, 255, 253);
//Creating Circles on top of Squares
                rect(sizeOfCircle*x + 10, sizeOfCircle * y + 10, sizeOfCircle * 5 - 20, sizeOfCircle * 5 - 20);
                   fill(255, 204, 100);
                 ellipse(sizeOfCircle/2 + sizeOfCircle*(x+2), sizeOfCircle/2 + sizeOfCircle*(y+2), sizeOfCircle*3, sizeOfCircle*3);
              }
          }
          }
     }


Alexandra Kaplan – Looking Outwards – 05

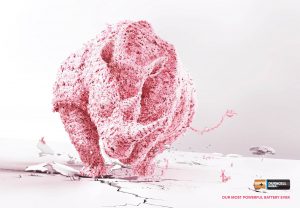
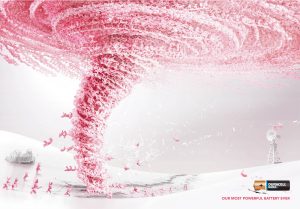
Image from Nicopicto’s Duracell Advertising Campaign

Nikopinto is a global 3d animation and illustration studio. One project of theirs that really stood out to me was their Duracell print advertising campaign. It is a series of 3d graphics of a bunch of Duracell bunnies creating different shapes such as a rhino or tornado. I think that it has some really cute aspects (all of the bunnies!) as well as having an overall eye-catching image. Looking at it from a coding standpoint, I am sure that the many layers of bunnies have some sort of algorithm to have some sort of structured randomness.

Connor McGaffin – Project 05 – Wallpaper

sketch

/*
Connor McGaffin
Section C
cmcgaffi@andrew.cmu.edu
Project-05
*/
var ang = 120;

function setup() {
    createCanvas(600, 400);
    background(80,50,0);
    noStroke();

    //olive
    for(x=0; x<width; x+=50){
        for(j=0; j<height; j+=50){
            fill(100,70,0);
            ellipse(x+25,j+25,50,50);
        }
    }
    //pits
    for(x=0; x< width+50; x+=50){
        for(y=0; y<height; y+=50){
            stroke(60,0,0);
            strokeWeight(2);
            fill(85,0,0);
            ellipse (x-35, y+15, 15,15);

        }
    }
    //skewers
    for(x=0; x< width; x+=50){
        for(y=0; y<height; y+=50){
            fill(100,0,0);
            stroke(50,0,0);
            strokeWeight(2);
            line(x-7,y-7,x+15,y+15);
        }
    }
    //glass
    for(x=0; x<width; x+=100){
        for(y=0; y<width; y+=100){

            noStroke();
            fill('rgba(250, 250, 250, 0.6)');
            triangle(x+10,y+10,x+80,y+10,x+45,y+35);
            rect(x+42.5,y+33,5,45);
            triangle(x+10,y+10,x+80,y+10,x+45,y+35);
            triangle(x+20,y+83,x+70,y+83,x+45,y+75);
        }
    }
}


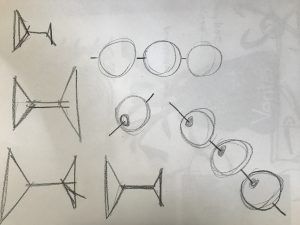
I created this pattern after being inspired by the art deco visuals of AMC’s “Mad Men”. I had fun finding a way to visualize the olives while still speaking to the visual aesthetic of the 1960’s era. Initially, I approached the olives in an projected view, but they were indistinguishable from everyday beads. When rotating the olives to a 3/4 view from above, an interesting sense of space is established. The choice to connect all of the olives on the same skewer creates a surreal atmosphere to the environment, which speaks to the inability to place where this pattern is located when viewed on a screen.

I would anticipate that this pattern could potentially be used in a restaurant. It’s fun but also a little gaudy, so it would likely go in there bathroom, rather than the front lobby.

Kevin Thies Looking Outwards 05

Da Vinci in color space
Da Vinci in hsb
Monet in color space
Monet in hsb

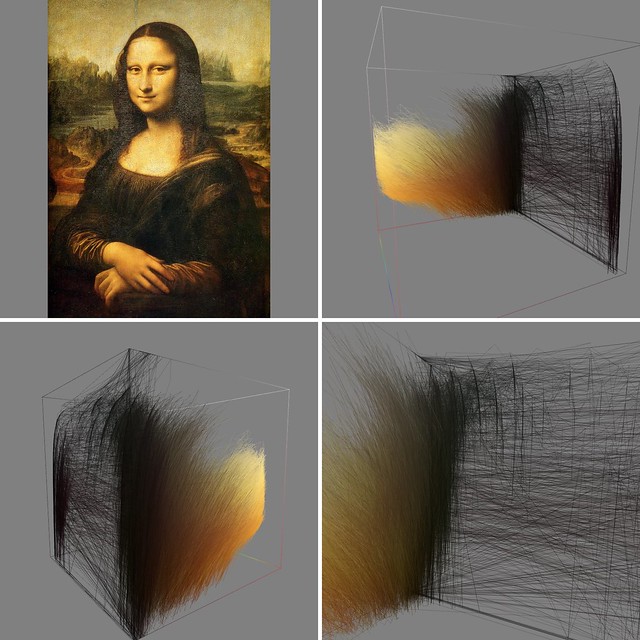
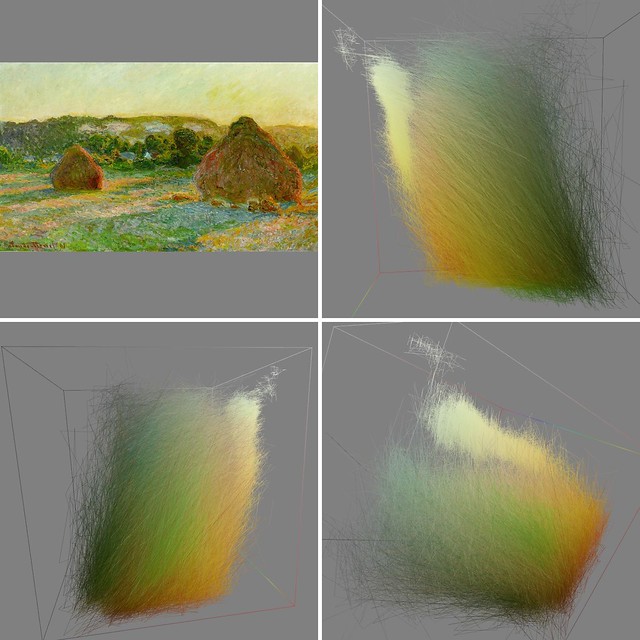
Walking in Color Space is a series of data visualizations by Leonardo Solaas produced in 2010. The data represented takes pixel rows and draws a line between the two points in HSB color space. More contrast means the resulting line will be longer, and more visible. It also highlights the colors the artists used. Images were generated using Processing, but unfortunately the blog describing the process has been taken down.
The models themselves become dynamic furry masses, and I appreciate that the artist took a new look at old pieces as well as newer ones. It’s the kind of data where you could take a guess and just figure it out by eye, but because the level of detail is so fine, it just makes it more interesting. By virtue of its digital nature, it could be possible to either move interaction with the pieces to a fully digital landscape, like being able to hold them in your hands in virtual reality, or they could theoretically be translated to the physical realm via 3 printing, although that would be one delicate print.

ChristineSeo-Project05-SectionC

sketch

// Christine Seo
// Section C
// mseo1@andrew.cmu.edu
// Project-05

var shapeSize;
var smallSize;

var r;

function setup() {
  createCanvas(500, 500);
  
   mouseClicked();
}

function mouseClicked(){
   background(255, 250, 220);

//first row set
push();
for(var x = 15; x <= width; x += 110){
  for(y = 30; y <= height; y += 110){
	shapeSize = random(15,25); //randomness of size of shapes with restriction
	smallSize = random(5,7);//randomness of size of shapes with smaller restriction
  
  r = random(255)
  
  noStroke();
	colorMode(HSB,200);//restrict colors
	var c = color(r,30,200);
	fill(c);
  ellipse(x + 5,y - 13,smallSize,shapeSize);//ears
  rect(x,y,shapeSize,shapeSize); //;legs
  ellipse(x,y,shapeSize,shapeSize);//eye
  ellipse(x + 25,y,shapeSize + 12,shapeSize + 12);//body
  fill(50);
  ellipse(x,y,shapeSize / 2,shapeSize / 2);//eye black
  fill(255);
  ellipse(x + 5,y - 3,shapeSize / 3,shapeSize / 3);//eye highlight
  	}
	}
pop();

//hearts pattern
push();
for(var x = 70; x <= width; x += 110){
  for(y = 80; y <= height; y += 115){
  r = random(255)

  noStroke();
  colorMode(HSB,200);
  var c = color(r,30,200);
  fill(c);
  triangle(x,y,x + 20,y + 20,x + 40,y);//bottom of heart
  triangle(x + 15,y,x + 30,y - 10,x + 40,y);//top right of heart
  triangle(x,y,x + 15,y - 10,x + 25,y);//top left of heart
    }
  }
pop();

noLoop() 
}

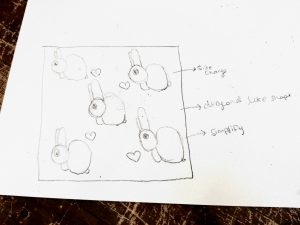
Ideas: Rough sketch

I was inspired by my baby cousin’s bunny wallpaper. I added hearts to give it a different pattern so it won’t be boring. I wanted to randomize the color and size of the shape of the bunny as well. I tried to stay in certain a color palette that resonates with soft colorful cotton candies. I also made sure the pattern visually stayed within the canvas. This project is something that I would actually use in real life and even in other classes if I need a unique background for other projects! I think the for loop function is very useful to redraw multiple things at once.


Kevin Thies -Project 5 – Wallpaper

sketch

// Kevin Thies
// kthies@andrew.cmu.edu
// Section C
// Project 05 - Sellout Wallpaper

// For reference, my 'brand' is Thies Arch, maybe Thies Art one day.
// my logo is a stylized TA. when TA is referenced in the code, it refers to
// the little TA logos, which can be thought of as a rectangle with corners
// and a center.

var d;              // physical spacing between TAs in pixels
var TAXSpacing;     // x distance from centers of TAs
var TAYSpacing;     // y distance from centers of TAs
var TAXSCALE;       // proportion of width to height
var TAYSCALE;       // 1, establish TA proportions
var SCALE;          // SCALE value, proportions are multiplied by this
var TAx;            // width of TA
var TAy;            // height of TA
var rotation = 0;   // rotates every other TA
var colR;           // R value of gradient
var colG;           // G value of gradient
var colB;           // B value of gradient
var toggle = 1;     // toggles between designs


function setup() {
    // basic style setup
    createCanvas(480,480);
    background(0);
    angleMode(DEGREES);
    strokeWeight(1.5);

    // establish proportions of TAs and spacing
    TAYSCALE = 1;
    TAXSCALE = 0.58;
    SCALE = 40;
    d = SCALE/5;

    // width/height is equal to width/height proportions * SCALE
    TAx = TAXSCALE * SCALE;
    TAy = TAYSCALE * SCALE;

    // spacing is equal to TA size * SCALE + d
    TAXSpacing = TAx + d;
    TAYSpacing = TAy + d;
}


function draw() {
    // set up a basic grid of proportioned TAs TAXSpacing
    // and TAYSpacing apart from each other
    // columns of grid
    for (var y = 0; y < height; y += TAYSpacing) {
    rotation ++;

        // each row should progress a gradient, top being gray, bottom being beige
        // these ensure an even transition
        colR = map(y, 60, height - 60, 135, 174);
        colG = map(y, 60, height - 60, 135, 166);
        colB = map(y, 60, height - 60, 135, 128);
        stroke(colR, colG, colB);

        // rows of grid
        for (var x = 0; x < width; x += TAXSpacing ) {
            rotation ++; // every other TA rotates 180 degrees

            // move origin to the top right corner of each TA
            push()
            translate(x, y);

            if(rotation % 2 === 0) {
                rotate(180);
                drawTA(-TAx, -TAy);
            } else {
                drawTA(0, 0);
            }
            print(rotation);
            pop();
        }
    }
    noLoop();
}


// given top left coords of TA, draw TA to scale and maintain proportions
function drawTA(x, y) {

    if(toggle % 2 === 0) {
        stroke(174,166,128);
    }
    // T - |
    line( x, y,
          x, y + TAy);
    // T - --
    line( x, y,
          x + (0.44 * SCALE), y);


    if(toggle % 2 === 0) {
        stroke(135);
    }

    // A - |
    line( x + TAx, y,
          x + TAx, y + TAy);
    // A - /
    line( x + TAx, y,
          x + (.12 * SCALE), y + TAy)
    // A - -
    line( x + (.35 * SCALE), y + (.75 * SCALE),
          x + (.47 * SCALE), y + (.75 * SCALE) );
}

// I  ended up doing some variations with fixed colors,
// so clicking on the canvas will toggle between designs
function mousePressed() {
    rotation = 0;
    background(0);
    toggle ++;
    redraw();
}

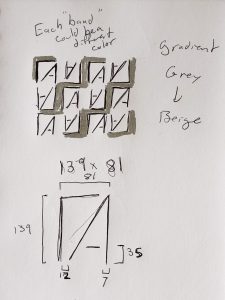
My early idea in a sketch

As of today, I’m a sellout to my own brand.
For context, I have a “brand” called ThiesArch, and I have a logo for it. Influenced a little by designer fabrics like Louis Vuitton and Gucci, and with a desire to spice up my portfolio website, I decided to go the route of a simple wallpaper made up of a tiled logo, so that at a distance it doesn’t look like much more than some lines and a gradient, but up close you could make out the logos. It’s all based off the proportions of the logo, so I could just change the scale value to make it look more or less legible. It would be cool to print fabric with this design, with the gradient accounting for the length, and make like a “branded company T-shirt” (it’d be just me).

It actually wasn’t as hard as I thought it would be to get the relative positions of the lines, since there are only five. It’s just tedious to make sure the proportions are correct.
Also if you click the sketch, I did one where the Ts and As form stripes, but that’s only legible on larger scales.

My “logo”, for reference