Rjpark – Looking Outwards 03

Photo of 3D printed sculpture of Obama’s speech

Gilles Azzaro’s 3D printed sound sculptures are works of art that honor the things he finds important in life like his friend’s baby’s first cry or Neil Armstrong speaking about walking on the moon. In this specific project, Azzaro created a sculpture of sound waves from Obama’s speech, The Next Industrial Revolution. In order to do this, it took 2 printers and 200+ hours as well as an installation of a green light that follows the sound waves as the speech is told. You can tell through the green light that the creator cared not only about the visual or auditory aspect of the project but also about the connection between the two. In fact, I admire that addition (green light) to the project the most. It’s already fascinating enough to try creating a visual representation of sound but it’s even more fascinating to connect an audience’s auditory and visual sense with something as simple as a green light running across the sculpture for the audience’s eyes to follow. I find the attention to this small but important detail really admirable and innovative. This 3D printing project serves not only as a piece of beautiful artwork but also as a testament to important historical and worldly events.

3D Printing Project

Gilles Azzaro

ChristineSeo-LookingOutwards-03-SectionC

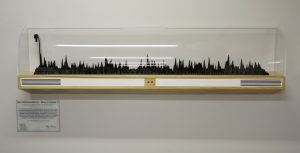
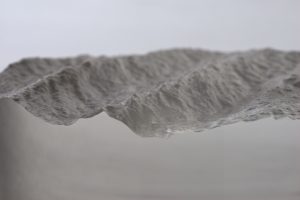
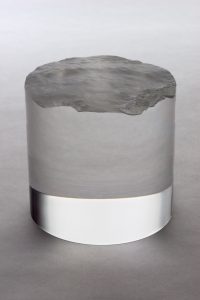
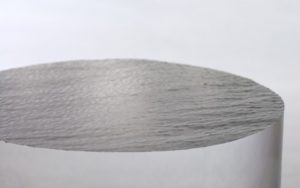
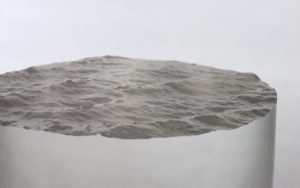
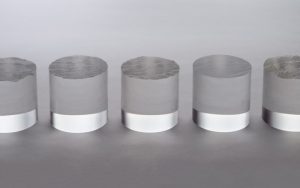
This work was created by David Bowen over a course of a few days which involved a drone running ArduPilot software; it hovered 30 meters above Lake Superior and captured still images of the water’s surface. The surface ripples changed every time the weather was different and Bowen captured these images and converted them into three-dimensional displacement maps. The information was carved with a CNC router into a series of transparent acrylic cylinders.

David Bowen was influenced by the relationship between natural and mechanical systems: he had other projects that related to this topic. His previous project, Underwater, was a large scale, real-time installation that captured the surface of waves through hundreds of servo-motors. I believe he was inspired by the topic and his previous works that made him continue his research and thus create another work. Through his projects, he wanted to “provide an immersive mechanical perspective of a natural, dynamic and ageless phenomenon.”

In my previous Looking Outwards assignments, I researched a couple that were similar to this topic. I am very fascinated by the idea of nature coming together with technology to create beautiful pieces. It was very intriguing that he used clear acrylic to cut this out because it displays the delicacy of the water through the material: it captures the beauty of nature in a man made work. However, he only made 5 of these cylinders and I wish he made a room filled with them to display the vast scale of a ocean/lake. Overall, I am very interested in CNC routers because I am an art student and I am working as a monitor to help out with students to use CMU’s CNC router in Doherty Hall. I’ve actually created works with the machine before and will keep working to create more meaningful art!

http://www.creativeapplications.net/objects/the-obverse-box-deru-fuses-sound-light-and-artifact/

Joanne Lee – Looking Outwards 03

The Spire Dress, part of the LYIS Collection, is completely 3-D printed with 400+ individual tiled pieces.

3-D printing has been making its way into fashion for the past several years. Designer Alexis Walsh unveiled The Spire Dress at New York Fashion Week in 2016. I think that 3-D printing brings an entirely new dimension to fashion design and the result is beautiful and intricately detailed collections. The Spire Dress is a result of more than 400 tiles printed on nylon plastic and were individually assembled by hand using metal ring connections. The dress took 6 months to design and put together, and it was inspired by cathedral spires.

Although the dress repeats the same spiral shape in various renditions, the result is something unique from the tiles that make it up. Walsh prototyped the dress on MakertBot 3-D bot printers before sending the final design to be laser cut. Personally, I believe that there is something very captivating about this dress. Perhaps it can be accredited to each tile of the dress being cut very precisely, creating a very clean and geometrical feel to the dress. As someone who attends CMU’s Lunar Gala every year, I hope to see some 3-D printed lines this year!

The repeated spiral shapes were inspired by cathedral spires.

Joanne Lee – Project 03

Joanne Lee – Project 03

// Joanne Lee
// Section C
// joannele@andrew.cmu.edu
// Project-03
var rainSpeed = 0

function setup() {
  createCanvas(480,640);
  textFont("Calibri");
  textAlign(CENTER,CENTER);
  textSize(40);
}

function draw() {
  var leftX = 150 - (mouseY * 0.5); // shifts left when mouse moves
  var rightX = 320 + (mouseY * 0.5); // shifts right when mouse moves

  // cloud colors, changes from gray to light blue with mouse
  var BGR = 104 + mouseY * 0.15;
  var BGG = 129 + mouseY * 0.15;
  var BGB = 141 + mouseY * 0.3;

  background(BGR,BGG,BGB);

  // sunshine, gets bigger with mouse
  var size = mouseY * 0.15;
  var sunG = 140 + mouseY * 0.15; // changes color from orange to yellow with mouse
  fill(255,sunG,0);
  ellipse(300,200,size,size);

  // sun rays, get bigger with mouse
  var ray = 0;
  var rayX1 = 30 + mouseY * 0.04;
  var rayY1 = 10 + mouseY * 0.04;
  var rayX2 = 30 + mouseY * 0.07;
  var rayY2 = 20 + mouseY * 0.07;
  var rayX3 = 40 + mouseY * 0.07;
  var rayY3 = 15 + mouseY * 0.07;
  var angle = 0;

  push();
  stroke(255,sunG,0);
  strokeWeight(3);
  translate(300,200);
  for (ray = 0; ray < 10; ray++, angle += 36) { // rotates to draw each ray
    push();
      rotate(radians(angle));
      triangle(rayX1, rayY1, rayX2, rayY2, rayX3, rayY3);
    pop();  
  }
  pop();

  // encouraging text, moves into place with mouse
  var textX1 = 850 - mouseY;
  var textY1 = 1150 - mouseY;
  var textX2 = 850 - mouseY;;
  var textY2 = 1190 - mouseY

  text("Have the day",textX1,textY1);
  text("you deserve!", textX2, textY2);


  // clouds
  strokeWeight(0);
  fill(201,221,243);
  ellipse(leftX,150,155,125); // left clouds
  ellipse(leftX+65,150,120,95);
  ellipse(leftX-65,150,120,95);
  ellipse(rightX,210,155,125); // right clouds
  ellipse(rightX+65,210,120,95);
  ellipse(rightX-65,210,120,95);

  // raindrops
  var i = 0;
  var a = 50 - (mouseY); // shift left with mouse
  var b = 100 - (mouseY); // shift left with mouse
  var c = 250 + (mouseY * 0.7); // shift right with mouse
  var d = 300 + (mouseY * 0.7); // shift right with mouse

  stroke(201,221,243);
  strokeWeight(0.75);

  for (i = 0; i < 2; a += 100, b += 100, i++) { // left raindrops
    line(a, 150 + rainSpeed, a, 170 + rainSpeed);
    line(b, 250 + rainSpeed, b, 270 + rainSpeed);
    line(a, 350 + rainSpeed, a, 370 + rainSpeed);
    line(b, 450 + rainSpeed, b, 470 + rainSpeed);
    line(a, 550 + rainSpeed, a, 570 + rainSpeed);
    if (rainSpeed > 100) {
      line(b, 50 + rainSpeed, b, 70 + rainSpeed);
    }
  }

  for (c = 250 + (mouseY * 0.7); d < 500; c += 100, d += 100) { // right raindrops
    line(c, 150 + rainSpeed, c, 170 + rainSpeed);
    line(d, 250 + rainSpeed, d, 270 + rainSpeed);
    line(c, 350 + rainSpeed, c, 370 + rainSpeed);
    line(d, 450 + rainSpeed, d, 470 + rainSpeed);
    line(c, 550 + rainSpeed, c, 570 + rainSpeed);
    if (rainSpeed > 100) {
      line(d, 50 + rainSpeed, d, 70 + rainSpeed);
    }
  }

  // rain loop
  if (rainSpeed == 200) {
    rainSpeed = 0;
  }
  rainSpeed += 5;
}

Pittsburgh has been having rainy days, so I wanted to create a project where I could make the rain go away whenever I wanted. I especially had fun making the raindrops loop and making the background color and sun color fade in / out from its initial color.

Rjpark – Project 03 – Dynamic Drawing

rjpark_dynamicdrawing

// create variables for randomizing color of circles
var r1 = 255;
var b1 = 0;
var g1 = 255;
var r2 = 0;
var b2 = 255;
var g2 = 255;
var r3 = 255;
var b3 = 255;
var g3 = 0;
var r4 = 170;
var b4 = 255;
var g4 = 170;
// create variables for direction change
var angle = 0;

function setup() {
    createCanvas(640, 480);
}

function draw() {
    background(0);
    // restrict mouseX to 0-640
    var x = max(min(mouseX, 640), 0);
    // create variable for size change of circles
    var size = x * 400 / 640;
    push();
    rotate(radians(angle));
    // pink circle
    fill(r1, b1, g1);
    ellipse(x, 0, size, size);
    // blue circle
    fill(r2, b2, g2);
    ellipse(640, x, size, size);
    // yellow cirlce
    fill(r3, b3, g3);
    ellipse(640 - x, 480, size, size);
    // green circle
    fill(r4, b4, g4);
    ellipse(0, 480 - x, size, size);
    pop();

    if (x < 250) {
        // colors change
        r1 = 0;
        b1 = 255;
        g1 = 255;
        r2 = 255;
        b2 = 255;
        g2 = 0;
        r3 = 170;
        b3 = 255;
        g3 = 170;
        r4 = 255;
        b4 = 0;
        g4 = 255;
        // direction changes
        angle = 0;
    }
    if (x > 250) {
        // colors change
        r1 = 255;
        b1 = 0;
        g1 = 255;
        r2 = 0;
        b2 = 255;
        g2 = 255;
        r3 = 255;
        b3 = 255;
        g3 = 0;
        r4 = 170;
        b4 = 255;
        g4 = 170;
        // direction changes
        angle += 5;
    }
}

The 4 things I changed about the circles according to the movement of the mouse across the screen (not up and down) were color, direction, size, and position. As the mouse moves towards the right, the colors change, the size of the circles increase and the circles start to rotate. In addition, the circle follows the mouse across the screen until rotation.

Sharon Yang Project 03 Dynamic Drawing

Project 03


function setup() {
    createCanvas(640,480);
}

function draw() {
    background(245,189,65);
    noStroke();
    fill(255);
    //arms
    var bodyWidth=280;
    var leftArmCenterX=mouseX;
    var leftArmCenterY=mouseY;
    leftArmCenterX=constrain(leftArmCenterX,20,160);
    var rightArmCenterX=mouseX;
    var rightArmCenterY=mouseY;
    rightArmCenterX=constrain(rightArmCenterX,480,620);
    //left arm
    push();
    translate(leftArmCenterX,leftArmCenterY);
    rotate(radians(135));
    fill(255);
    ellipse(0,0,80,80);
    pop();
    //right arm
    push();
    translate(rightArmCenterX,rightArmCenterY);
    rotate(radians(225));
    ellipse(0,0,80,80);
    pop();
    strokeWeight(60);
    stroke(255);
    line(leftArmCenterX,leftArmCenterY,width/2-(bodyWidth*0.35),280);
    line(rightArmCenterX,rightArmCenterY,width/2+(bodyWidth*0.35),280);
    //body
    noStroke();
    arc(width/2,420,bodyWidth,540,PI,2*PI);
    arc(width/2,420,bodyWidth,80,0,PI);
    //collar 
    var collarWidth=bodyWidth*0.7;
    fill(255,0,0);
    ellipse(width/2,220,collarWidth,100);
    fill(245,189,65);
    ellipse(width/2,270,40,40);
    //ears
    strokeWeight(1);
    fill(255);
    //left ear
    var earChangeY=mouseY/48;
    var earHeight=20+(earChangeY*1.5);
    var earChangeX=mouseX/64;
    var earLPos=(width/2)-110-(earChangeX*3);
    triangle(earLPos,earHeight,380,100,200,150);
    fill(255,0,0);
    triangle(earLPos+10,earHeight+15,370,100,210,150);
    //right ear
    fill(255);
    var earRPos=(width/2)+110+(earChangeX*3);
    triangle(earRPos,earHeight,260,100,440,150);
    fill(255,0,0);
    triangle(earRPos-10,earHeight+15,260,100,430,150);
    //head
    fill(255);
    ellipse(width/2,140,240,200);
    //face
    fill(0);
    //mouth
    fill(255);
    stroke(0);
    strokeWeight(3);
    var mouthMoveX=mouseX/64;
    var mouthMoveY=mouseY/32;
    var endMouthLeft=0.7*PI+(mouthMoveX/PI);
    var endMouthRight=2.3*PI-(mouthMoveY/PI);
    endMouthLeft=constrain(endMouthLeft,0.5*PI,1.2*PI);
    endMouthRight=constrain(endMouthRight,1.8*PI,2.5*PI);
    arc(width/2-15,170,30,30,0,endMouthLeft);
    arc(width/2+15,170,30,30,endMouthRight,PI);
    //nose
    fill(0);
    triangle(width/2,170,width/2-15,150,width/2+15,150);
    //eyes
    var strokeD=((mouseX/64)+(mouseY/48)/2);
    strokeD=constrain(strokeD,3,5);
    var eyeD=strokeWeight(strokeD);
    //left eye
    noFill();
    arc((width/2)-50,130,40,30,PI*1.1,2*PI);
    //right eye
    arc((width/2)+50,130,40,30,PI,1.9*PI);
    //whiskers
    var whiskerMoveX=mouseX/64;
    var whiskerMoveY=mouseY/32;
    var whiskerLeftX=width-width/1.7+whiskerMoveX-20;
    var whiskerY=135+whiskerMoveY;
    var whiskerRightX=width-whiskerLeftX;
    stroke(0);
    strokeWeight(3);
    line(whiskerLeftX,whiskerY,280,145);
    line(whiskerLeftX,whiskerY+30,280,165);
    line(360,145,whiskerRightX,whiskerY);
    line(360,165,whiskerRightX,whiskerY+30);
    //feet
    fill(255);
    var footPos=430;
    stroke(0);
    arc(width/2.7,footPos,70,90,1.05*PI,2.05*PI);
    arc(width-(width/2.7),footPos,70,90,0.95*PI,1.95*PI);

}

Through the project, I understood better setting the variables as well as the motion using push and pop function. I found changing the position and size of objects using mouseX and mouseY is interesting highly applicable.

Sharon Yang Looking Outwards – 03

The project ‘Cloud Village’ has been developed by Philip F. Yuan and his team with digital fabrication technology. It is an outdoor pavilion was put together with a purpose to develop the rural areas in China without harming the nature and the people there. I admire not only the high elaborateness of the building but also the fact that it is made of recycled plastic material. As it is a severe environmental crisis in China especially in the countryside, it offers a highly sustainable solution to the issues in the Chinese rural areas.

In order for the pavilion to best suit its purpose of providing a public resting space for the residents in rural regions as well as obtaining a creative and an aesthetic presence, the form and the structure has been optimized by a use of topological optimization algorithm. Such a technological innovation allows for an architecturally innovative approach such as having a waved geometry as the roof. In the process of digital fabrication, the geometry of the pavilion is pixelated into various components to use a crystalized printing tool-path for each of them. The project therefore demonstrates the ideal incorporation of the computational generation to the design as well as the fabrication of art.

Catherine Coyle – Looking Outwards 03

The project I found inspiration in this week was from the generative design studio ‘Nervous System.’ Specifically, I was interested in their Floraform project. I found this studio from the linked reading, and I find it very interesting.

An example of one of these ‘Floraform’ designs

This project was started in 2014. Essentially, the studio took inspiration from the natural growth and development of blooming flowers in nature. This ‘digital garden’ can even be 3D printed and worn as accessories. According to their website, Floraform is a garden where ‘instead of growing plants, we’re cultivating algorithms.’

A lot of research into how plants divide and grow naturally must’ve gone into making this project come to life in such a natural way. I think it is exciting because the idea of simulating cell growth and development in a 3D plane could lead to some very interesting science and procedurally developed ‘organisms.’ On  top of that, it all just looks very cool!

Feel free to read more about the project on the studio’s website here.

Sophie Chen – Project 03 – Dynamic Drawing

sketch

var barR = 255;
var barG = 255;
var barB = 255;
var eX = 510;
var eY = 435;
var TVon = 1;
var ellipseA = 5;
var r = 200;
var g = 200;
var b = 200;
var limit = 150;


function setup() {
    createCanvas(640, 480);
}

function draw() {
	background(0, 0, 0, 70);
	// when TV is on, fill TV screen with dark blue & planet content
	if (TVon === 1) {
		fill(0, 0, 150, 70);
		noStroke();
		rectMode(CENTER);
		rect(width / 2, height / 2, width, height);

    	// planet size, varied by moving mouseX (move left = smaller, move right = larger)
    	push();
    	stroke(0, g, b);
   		strokeWeight(mouseX / 3);
    	fill(0, g, 255, 60);
    	ellipse(CENTER);
    	ellipse(width / 2, height / 2, limit, limit);
    	pop();

    	// core, smaller than planet by 1/3, also varied by moving mouseX
    	push();
    	noStroke(); 
    	stroke(0, g, 255, 70);
    	strokeWeight(limit);
    	fill(r, g, 255, 60);
    	ellipse(CENTER);
    	ellipse(width / 2, height / 2, limit / 3, limit / 3); // this ellipse will be smaller than the planet
    	pop();

   		// ring
    	push();
    	stroke(255, 100, b, 95);
    	strokeWeight(15);
    	noFill();
    	ellipse(CENTER);
    	ellipse(width / 2, height / 2, mouseY + 300, mouseX / 2);
    	pop();

    	// particles (sizes vary by sliding mouse)

    	//particle
    	fill(255, 255, b); 
    	noStroke();
    	push();
    	translate(width / 2, height / 2);
    	rotate(radians(mouseX));
    	ellipse(width / 10, height / 10, ellipseA, ellipseA);
    	pop();

    	// particle1
    	fill(g, r, b); 
    	noStroke();
    	push();
    	translate(mouseX, mouseX);
    	ellipse(width / 2, height / 2, mouseX / 3, mouseX / 3);
    	pop();

    	// particle2
    	fill(r, g, 255); 
    	noStroke();
    	push();
    	translate(mouseY, mouseY);
    	ellipseMode(CENTER);
    	ellipse(width / 2, height / 2, mouseX / 3, mouseX / 3); 
    	pop();

    	// particle3
    	fill(r, 255, 205); 
   		noStroke();
    	push();
    	translate(mouseX * 2, mouseY);
    	rotate(50);
    	ellipseMode(CENTER);
   		ellipse(width / 2, height / 2, mouseX / 10, mouseX / 10); 
    	pop();

    	// particle4
    	fill(255, g, 205); 
    	noStroke();
   		push();
    	translate(mouseX / 5, mouseY);
    	rotate(50);
    	ellipseMode(CENTER);
    	ellipse(width / 2, height / 2, mouseX / 7, mouseX / 7);
    	pop();

    	// particle5
    	fill(255, 235, b); 
    	noStroke();
    	push();
    	translate(mouseX / 5, mouseY);
    	rotate(100);
    	ellipseMode(CENTER);
    	ellipse(width / 2, height / 2, mouseX / 5, mouseX / 5);
    	pop();

    	//static bars that are triggered when mouse gets near on/off button
		fill(0, barG, 255, mouseY - 150); // opacity of static increases as mouse gets closer to the bottom frame
		noStroke();
		rectMode(CENTER);
		var center = height / 2
		rect(width / 2, center, width, mouseY);

		fill(0, barG, 0, mouseY - 150);
		noStroke();
		rectMode(CENTER);
		rect(width / 2, center - 60, width, mouseY / 3);

		fill(255, 0, barB, mouseY - 150);
		noStroke();
		rectMode(CENTER);
		rect(width / 2, center - 110, width, mouseY / 3)

		fill(barR, 0, 0, mouseY - 150);
		noStroke();
		rectMode(CENTER);
		rect(width / 2, center + 40, width, mouseY / 3);

		fill(0, 0, barB, mouseY - 150);
		noStroke();
		rectMode(CENTER);
		rect(width / 2, center + 80, width, mouseY / 3); 


		// constant top TV border
		fill(0, 0, 0)
		noStroke();
		rectMode(CENTER);
		rect(width / 2, 30, width, 60);

		// constant bottom TV border
		fill(0, 0, 0)
		noStroke();
		rectMode(CENTER);
		rect(width / 2, 440, width, 80);

	}
		// on/off button
		fill(225, 0, 0);
		noStroke();
		ellipse(eX, eY, 40, 40);
	// static bar variables
	barR = mouseY 
	barG = mouseY
	barB = mouseY

	// planet variables
	ellipseA = mouseX / 3
	r = mouseY - 100 
	g = mouseX - 150
	b = mouseY - 100
	limit = constrain(mouseX, 100, 150) // limit the size of planet
}

// turning TV on/off
function mouseClicked(){
	if (dist(mouseX, mouseY, eX, eY) <= 20) { // when mouse is clicking within radius of button, turn TV on/off
		TVon = -TVon;
    }	
}

I found keeping everything organized to be the hardest part of this project, I had a hard time finding a starting point but once I had a good base it was a lot more manageable. I wanted to recreate turning an old TV on/off and the static that goes with it, which worked nicely with the dynamic aspect of this project.

Justin Yook – Project 03 – Dynamic Drawing

dynamic_drawing

//Justin Yook
//Section C
//jyook@andrew.cmu.edu
//Project 03

var angle = 0; //angle for outer ellipses
var angle2 = 0; // angle for inner ellipses

var elColor = 220; //color value for ellipse
var baColor = 128; //background color value

var osize = 30; //outer ellipse size
var isize = 15; //inner ellipse size

function setup() {
    createCanvas(640, 480);
}

function draw() {
    scale(.96);
    background(baColor);

    //draw center outer ellipses in radial pattern
    fill(elColor);
    noStroke();
    push();
    translate(width/2, height/2);
    rotate(radians(angle));
    ellipse(150, 0, osize, osize);
    ellipse(-150, 0, osize, osize);
    ellipse(0, 150, osize, osize);
    ellipse(0, -150, osize, osize);
    ellipse(100, 100, osize, osize);
    ellipse(-100, 100, osize, osize);
    ellipse(-100, -100, osize, osize);
    ellipse(100, -100, osize, osize);
    pop();

    //draw center inner ellipses in radial pattern
    push();
    translate(width/2, height/2);
    rotate(radians(angle2));
    ellipse(70, 0, isize, isize);
    ellipse(-70, 0, isize, isize);
    ellipse(0, 70, isize, isize);
    ellipse(0, -70, isize, isize);
    ellipse(45, 45, isize, isize);
    ellipse(-45, 45, isize, isize);
    ellipse(45, -45, isize, isize);
    ellipse(-45, -45, isize, isize);    
    pop();

    //draw left top corner outer ellipses in radial pattern
    push();
    translate(0, 0);
    rotate(radians(angle));
    ellipse(150, 0, osize, osize);
    ellipse(-150, 0, osize, osize);
    ellipse(0, 150, osize, osize);
    ellipse(0, -150, osize, osize);
    ellipse(100, 100, osize, osize);
    ellipse(-100, 100, osize, osize);
    ellipse(-100, -100, osize, osize);
    ellipse(100, -100, osize, osize);
    pop();

    //draw left bottom corner outer ellipses in radial pattern
    push();
    translate(0, 480);
    rotate(radians(angle));
    ellipse(150, 0, osize, osize);
    ellipse(-150, 0, osize, osize);
    ellipse(0, 150, osize, osize);
    ellipse(0, -150, osize, osize);
    ellipse(100, 100, osize, osize);
    ellipse(-100, 100, osize, osize);
    ellipse(-100, -100, osize, osize);
    ellipse(100, -100, osize, osize);   
    pop();

    //draw right top corner outer ellipses in radial pattern
    push();
    translate(640, 0);
    rotate(radians(angle));
    ellipse(150, 0, osize, osize);
    ellipse(-150, 0, osize, osize);
    ellipse(0, 150, osize, osize);
    ellipse(0, -150, osize, osize);
    ellipse(100, 100, osize, osize);
    ellipse(-100, 100, osize, osize);
    ellipse(-100, -100, osize, osize);
    ellipse(100, -100, osize, osize);  
    pop();

    //draw right bottom corner outer ellipses in raidal pattern
    push();
    translate(640, 480);
    rotate(radians(angle));
    ellipse(150, 0, osize, osize);
    ellipse(-150, 0, osize, osize);
    ellipse(0, 150, osize, osize);
    ellipse(0, -150, osize, osize);
    ellipse(100, 100, osize, osize);
    ellipse(-100, 100, osize, osize);
    ellipse(-100, -100, osize, osize);
    ellipse(100, -100, osize, osize);    
    pop();

    //draw left top corner inner ellipses in radial pattern
    push();
    translate(0, 0);
    rotate(radians(angle2));
    ellipse(70, 0, isize, isize);
    ellipse(-70, 0, isize, isize);
    ellipse(0, 70, isize, isize);
    ellipse(0, -70, isize, isize);
    ellipse(45, 45, isize, isize);
    ellipse(-45, 45, isize, isize);
    ellipse(45, -45, isize, isize);
    ellipse(-45, -45, isize, isize);    
    pop();

    //draw left bottom corner inner ellipses in radial pattern
    push();
    translate(0, 480);
    rotate(radians(angle2));
    ellipse(70, 0, isize, isize);
    ellipse(-70, 0, isize, isize);
    ellipse(0, 70, isize, isize);
    ellipse(0, -70, isize, isize);
    ellipse(45, 45, isize, isize);
    ellipse(-45, 45, isize, isize);
    ellipse(45, -45, isize, isize);
    ellipse(-45, -45, isize, isize);    
    pop();

    //draw right top corner inner ellipses in radial pattern
    push();
    translate(640, 0);
    rotate(radians(angle2));
    ellipse(70, 0, isize, isize);
    ellipse(-70, 0, isize, isize);
    ellipse(0, 70, isize, isize);
    ellipse(0, -70, isize, isize);
    ellipse(45, 45, isize, isize);
    ellipse(-45, 45, isize, isize);
    ellipse(45, -45, isize, isize);
    ellipse(-45, -45, isize, isize);    
    pop();

    //draw right bottom corner inner ellipses in raidal pattern
    push();
    translate(640, 480);
    rotate(radians(angle2));
    ellipse(70, 0, isize, isize);
    ellipse(-70, 0, isize, isize);
    ellipse(0, 70, isize, isize);
    ellipse(0, -70, isize, isize);
    ellipse(45, 45, isize, isize);
    ellipse(-45, 45, isize, isize);
    ellipse(45, -45, isize, isize);
    ellipse(-45, -45, isize, isize);    
    pop();

    //outer and inner ellipses rotate opposite directions, change size, and change to white when mouse is to the right side
    if (mouseX > width/2) {
        angle += 2;
        angle2 -= 6;
        elColor = 255;
        baColor = 0;
        osize += .5;
        isize += .3;
    }

    //limit on max size of outer ellipse when mouse is on right side
    if (osize >= 60) {
        osize = 60;
    }

    //limit on max size of inner ellipse when mouse is on right side
    if (isize >= 35) {
        isize = 35;
    }

    //outer and inner ellipses rotate opposite directions, change size, and change to black when mouse is to the left side 
    if (mouseX < width/2) {
        angle -= 6;
        angle2 += 8;
        elColor = 0;
        baColor = 255;
        osize -= .5;
        isize -= .3;
    }

    //limit on max size of outer ellipse when mouse is on left side
    if (osize <= -60) {
        osize = -60;
    }

    //limit on max size of inner ellipse when mouse is on left side
    if (isize <= -35) {
        isize = -35;
    }
}

The four aspects of this project are: size, angle, velocity, and color. Depending on the location of the mouse (right or left side), four aspects of the ellipses change. I was inspired by Mac laptop screen savers, and thought I would try to make a design that was very dynamic, but made of simple circles.