liz m proj 4
//Elizabeth Maday
//emaday@andrew.cmu.edu
//Section A
//Project 04
//big purple variables
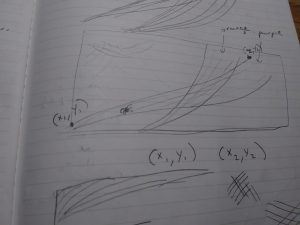
var x1;
var y1;
var x2;
var y2;
//orange variables
var a1;
var b1;
var a2;
var b2;
// corner a variables
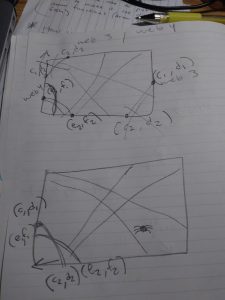
var c1;
var d1;
var c2;
var d2;
//corner b variables
var e1;
var f1;
var e2;
var f2;
//click variables
var jump;
var eyeSize;
function setup() {
createCanvas(400, 300);
}
function draw() {
background(0);
strokeWeight(0.75);
//big purple variables
var x1 = 25;
var y1 = height + 5;
var x2 = 380;
var y2 = 0;
//big purple web
for(i = 0; i < 25; i += .6) {
x1 += 5;
y1 -= 5;
x2 -= 4;
y2 += 0;
stroke('purple');
line(x1, y1, x2, y2);
}
//orange variables
var a1 = 50
var b1 = -40;
var a2 = width - 200;
var b2 = height + 20;
//orange web
for (i = 0; i < 37; i += .6) {
a1 -= 3;
b1 += 2;
a2 += 5;
b2 -= 0.5;
stroke(255, 85, 0);
line(a1, b1, a2, b2);
}
//corner a variables
c1 = 0;
d1 = height - 120;
c2 = 70;
d2 = height;
//corner a web
for (i = 0; i < 30; i += .5) {
c1 = 0
d1 = height - 120;
c2 -= 2;
d2 += 8;
strokeWeight(0.65);
stroke(0, 93, 68);
line(c1, d1, c2, d2);
}
//corner b variables
e1 = -40;
f1 = height - 90;
e2 = 105;
f2 = height;
//corner b web
for (i = 0; i < 30; i += .5) {
e1 += 1;
f1 += 2;
e2 = 105;
f2 += 5;
strokeWeight(0.65);
stroke(0, 93, 35);
line(e1, f1, e2, f2);
}
//jump variable
var jump = 0;
var eyeSize = 2.5;
if (mouseIsPressed) {
//stars
for (i = 0; i < 100; i++) {
fill('white');
textSize(5);
text('*', random(400), random(300));
}
//stars
for (i = 0; i < 100; i++) {
fill('purple');
textSize(12);
text('*', random(400), random(300));
}
var jump = 20;
var eyeSize = 4;
}
//spider variables
var spiderX = 242 + (jump * 1.5);
var spiderY = 235 + jump;
var bodyWidth = 24;
var bodyHeight = 20;
//spider legs left
noFill();
stroke(255);
arc(spiderX - bodyWidth/2, spiderY, bodyWidth * 0.75, bodyHeight * 0.75, PI, 0);
arc(spiderX - bodyWidth/2, spiderY + 4, bodyWidth * 0.75, bodyHeight * 0.75, PI, 0);
arc(spiderX - bodyWidth/2, spiderY + 9, bodyWidth * 0.75, bodyHeight * 0.75, PI, 0);
arc(spiderX - bodyWidth/2.5, spiderY + 10, bodyWidth * 0.5, bodyHeight * 0.5, PI - QUARTER_PI, 0 - QUARTER_PI);
//spider legs right
noFill();
stroke(255);
arc(spiderX + bodyWidth/2, spiderY, bodyWidth * 0.75, bodyHeight * 0.75, PI, 0);
arc(spiderX + bodyWidth/2, spiderY + 4, bodyWidth * 0.75, bodyHeight * 0.75, PI, 0);
arc(spiderX + bodyWidth/2, spiderY + 9, bodyWidth * 0.75, bodyHeight * 0.75, PI, 0);
arc(spiderX + bodyWidth/2.5, spiderY + 10, bodyWidth * 0.5, bodyHeight * 0.5, PI + QUARTER_PI, 0 + QUARTER_PI);
//spider body
stroke(0);
fill(0);
ellipse(spiderX, spiderY, bodyWidth, bodyHeight);
//spider eyes
strokeWeight(eyeSize);
stroke(255);
point(spiderX - bodyWidth/4, spiderY);
point(spiderX + bodyWidth/4, spiderY);
//spider mouth
strokeWeight(1);
stroke(255);
line(spiderX - bodyWidth/6, spiderY + 3, spiderX + bodyWidth/6, spiderY + 3);
}
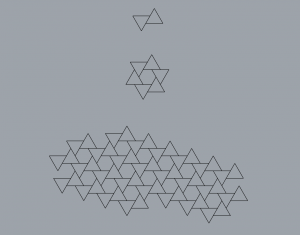
When I started looking at examples of string art, I immediately thought of a spider web. I liked that I got to integrate a Halloween theme into this project. Make sure to click the image!
![[OLD FALL 2018] 15-104 • Introduction to Computing for Creative Practice](../../../../wp-content/uploads/2020/08/stop-banner.png)