Jina Lee – Looking Outwards – 04


This video helps showcase the fabric keyboard. 


One project that I thought was extremely interesting is “FabricKeyboard.” I believe that it is a good example of a design that works with both sound and coding. In addition, there is a twist because this design is made out of stretchable fabric that works as a musical instrument. This device was created by the Responsive Environments Team at the MIT Media Lab.

I thought it was a fun and cool device as it is able to use stretchable fabric “sensate media” as an instrument. They were able to create this device by using textile sensors, stretchable fabrics and digital music instruments.

This is a person exampling how to use this computational fabric instrument.

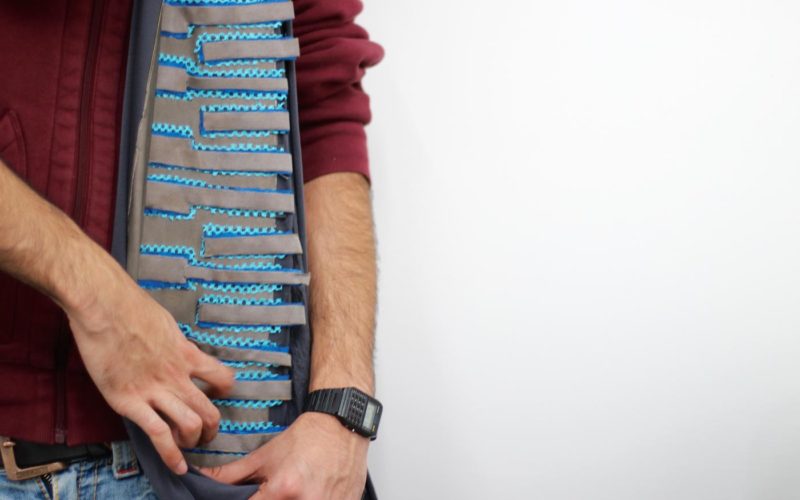
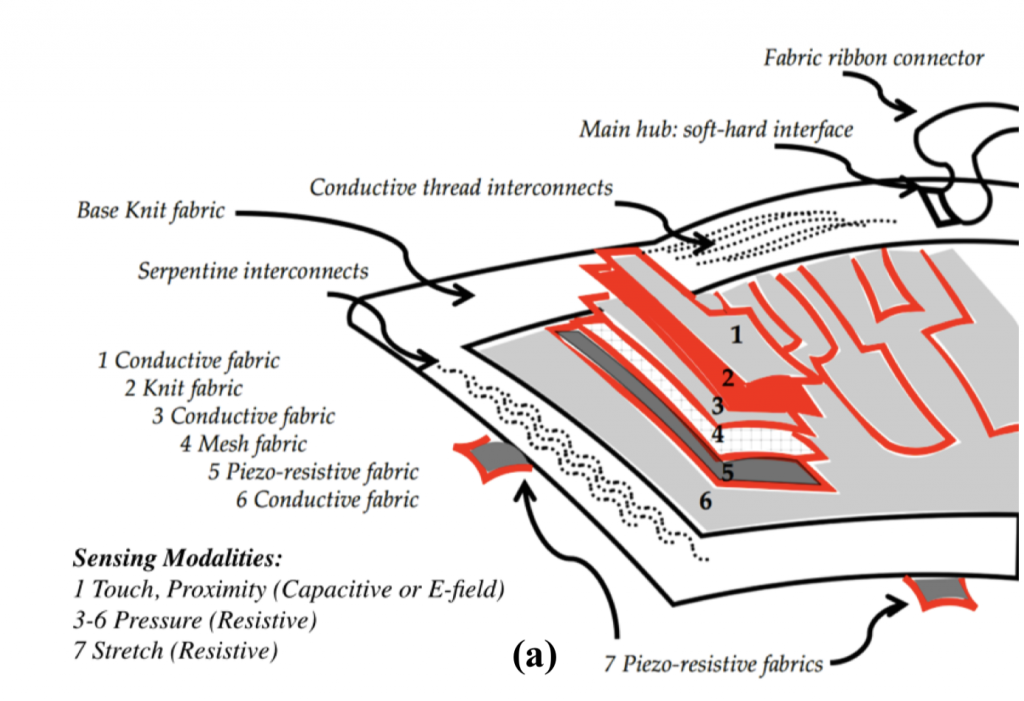
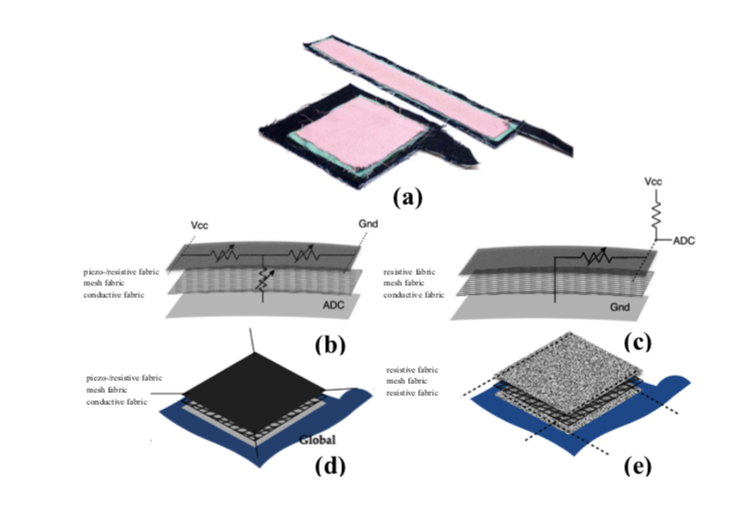
In order to create this design, the team had to research textile sensors and integrations of system-on-textile to better understand how to compute sound with it. To make the fabric give off an instrument vibe, they sewed multi-layer fabric sensors in a keyboard pattern. The fabrics used were knit fabrics, conductive fabrics, piezo-resistive fabrics. All the fabrics were sewn with conductive thread. The design uses MIDI and OSC. MIDI was used to plug in to audio workstations while OSC allows for wireless.

This is a diagram of the layers of fabric that is used for this interactive instrument.

I thought that this project was interesting because you are able to manipulate your feeling sense and hearing sense with fabric. I believe that it was a good idea to reference a key board, because pianos are extremely well known. If they used a different design that is not similar to an actual instrument that most people know, it will be harder for the user to understand how to use because they have never seen anything like that. In addition, this product can be used by young children to start learning about instruments, because it seems like every year, the number of children being able to play an instrument depletes every year.

I am unsure of how the product was algorithmically created. But, I think that they used certain hardwares which connect to a computer. Once someone pressed or stretches the fabric, it sends a message to the computer which allows the code to function by making a sound when it is triggered.

This is another diagram that shows the fabric trackpad and ribbon-controller.

Overall, I think this project is extremely complicated and cool and would like to be able to better understand how it was produced once I have a better understanding of how to code. I think that if I truly understand how this project works, I would need to research different types of fabric and how they work with hardware.

https://www.creativeapplications.net/objects/fabrickeyboard-stretchable-fabric-sensate-media-as-a-musical-instrument/

Mihika Bansal – Project 04 – String Art

sketch

//Mihika Bansal 
//mbansal@andrew.cmu.edu 
//Section E 
//Project 4

var x1Step = 5; 
var y1Step = 5; 

function setup() {
    createCanvas(400, 300);
   
  }

function draw() {

    background (255); 
    fill(0); 
    rect(50, 0, 300, 300); 

    stroke(255, 251, 217); 
    for(var j = 1; j <= 30; j++){
        line(50, 0 + y1Step * j, width / 2 - x1Step * j, 0); 
    } // curve with flats on left and top in the top left curving downwards 
    for(var j = 1; j <= 30; j++){
        line(50, height - y1Step * j, width / 2 - x1Step * j, height); 
    } // curve with flat on left and bottom, bottom left, curving upwards 
    for(var j = 1; j <= 30; j++){
        line(width - 50, height / 2 - y1Step * j, width - 50 - x1Step * j, 0); 
    } // curve with flat on top and right, top right, curving downwards 
    for(var j = 1; j <= 30; j++){
        line(width - 50, height / 2 + y1Step * j, width - 50 - x1Step * j, height); 
    } // curve with flat on right and bottom, bottom right, curving upwards

    stroke("white"); 
    for(var i = 1; i <= 30; i++){
        line(width / 2, 0 + y1Step * i, width / 2 + x1Step * i, height / 2); 
    } //curve starting in middle on top right, curving upwards, flat side is in middle of canvas
    for(var x = 1; x <= 30; x++){
        line(width / 2, height - y1Step * x, width / 2 + x1Step * x, height / 2); 
    } // curve starting in the middle on bottom right, curving downwards, flat sides are on the middle of canvas 
    for(var x = 1; x <= 30; x++){
        line(50 + x1Step * x, 0, width / 2, 0 + y1Step * x); 
    } //curve on top left , with flat part on top and middle, curving downwards
    for(var x = 1; x <= 30; x++){
        line(50 + x1Step * x, height, width / 2, height - y1Step * x); 
    } // curve on bottom left, with flat on bottom and middle, curving downwards

    stroke (194, 237, 231)
    for(var j = 1; j <= 30; j++){
        line(width / 2, 0 + y1Step * j, width / 2 - x1Step * j, height / 2); 
    } // curve in top left, with flat part in middle on both sides, curving upwards
    for(var j = 1; j <= 30; j++){
        line(width / 2, height / 2 + y1Step * j, width / 2 + x1Step * j, height); 
    } // curve  in bottom left, with flat in middle, curving downwards 
    for(var j = 1; j <= 30; j++){
        line(50 + x1Step * j, height / 2, width / 2, height / 2 + y1Step * j); 
    } // curve with flat in the middle and bottom, in the bottom right, curve upwards
    for(var j = 1; j <= 30; j++){
        line(width / 2 + x1Step * j, 0, width / 2, height / 2 - y1Step * j); 
    } // curve with flats on the top and the middle, in the top right, curve downwards 

    stroke(252, 204, 212); 
    for(var j = 1; j <= 30; j++){
        line(50, height / 2 - y1Step * j, width / 2 - x1Step * j, height / 2); 
    } // flat on the left side and the middle, curve upwards, in the top left 
    for(var j = 1; j <= 30; j++){
        line(50, height - y1Step * j, 50 + x1Step * j, height / 2); 
    } // flat on the left and the middle, in the bottom left, curve downwards
    for(var j = 1; j <= 30; j++){
        line(width - 50, height / 2 - y1Step * j, width / 2 + x1Step * j, height / 2); 
    } // flat on the middle and middle, in the top right, curving upwards
    for(var j = 1; j <= 30; j++){
        line(width - 50, height - y1Step * j, width - 50 - x1Step * j, height / 2); 
    } // flat on the right and the middle, in the bottom right, curbing downwards 
 
}

I really enjoyed this project. I have made string art before by hand using the actual string and nails and wood, so it was interesting making it through the computer this time.

Alice Cai Project 4

sketch

//Alice Cai
//alcai
//project#4
//Section E

//global variables
var x;
var y;
var aY;
var aX;

function setup() {
    createCanvas(480, 240);
    strokeWeight(3);
}

function draw() {
//background
    background(200) ;
    strokeWeight(1);

//defining variables 
    aX = mouseX
    aY = mouseY
    x = x * aY
    y = y * aX

//orange lines

    stroke('orange');
    for (var y = 100; y < 10000; y += 5) {
    line(y, aY, width - aX, y);
    line(y, aY, height - aY, y);

    }
//pink lines
    stroke('pink');
    for (var x = 100; x < height; x += 5) {
    line(x, aX, x, aY);
    line(aY, x, x, aX);

    }
//blue lines
    stroke('blue');
    for (var y = 100; y < width; y += 5) {
    line(aX, x, y, aY);
    line(aX, x - y - x, y, aY);

    }
//color changing
    stroke(mouseX,mouseY,mouseY);
    for (var y = 100; y < width; y += 5) {
    line(aX, x - aX, x, aY);
    line(aX, y - aX, y, aY);
    line(aY, y - aX, y, aX);
    }

}

This is my string art. At first, all my curves looked the same because I only used an i variable. After I added more the drawing became more dynamic. Each curve is drawn by a series of lines that are slightly shifted using a for loop and small increments that tilt the line and form a curve.

Sammie Kim – Project 04 – String Art


sketch

//Sammie Kim
//sammiek@andrew.cmu.edu
//Section D
//Project 4

function setup() {
    createCanvas(400, 300);
    //Variables to modify the coordinates of line sets
    //pink lines set a
    aY1Gap = 50;
    aY2Gap = 0.9;
    //light blue lines set b
    bY2Gap = 0.5;
    //Purple lines set c
    cY1Gap = 300;
    cX2Gap = 100;
    cY2Gap = 0.8;
    //Green lines set d
    dY1Gap = 200;
    dY2Gap = 0.75;
}

function draw() {
    background("black");
    //for loop to create series of lines with increments of 10
    for (var i = 0; i < 400; i += 10) {
        //Red line sets a
        stroke(255, 112, 112);
        line(i, mouseY / 2 - aY1Gap, width, i * aY2Gap);
        //light blue lines sets b
        stroke(181,255,221);
        line(i, mouseY, 0, i * bY2Gap);
        //Purple lines sets c
        stroke(122, 114, 240);
        line(i, -mouseY + cY1Gap, width / 3 + cX2Gap, i * cY2Gap);
        //Green lines set d
        stroke(28, 151, 45);
        line(i, -mouseY + dY1Gap, width, i * dY2Gap);
    }
  }

This project was challenging as I had to visualize the lines coordinates to create the curves. Sketching the picture first really helped me, since I got to picture the starting and ending points. By utilizing the “for function” to repeatedly create the line sets, I realized once more how much more convenient it is rather than writing a ton of line codes. 

Carly Sacco – Project 04 – String Art

sketch

//Carly Sacco
//Section C
//csacco@andrew.cmu.edu
//Project 4

var x1 = 5;
var x2 = 9;
var y1 = 5;


function setup() {
	createCanvas(400, 300);
}

function draw() {
	background(0);
	
	for (var i = x1; i < 400; i += y1){
		
	  //blue curves
	  stroke(95, 158, 176); 
	  line(i + 200, 300, i * x2 + mouseX, i); 
	  line(i + 200, 300, -i * x2 + -mouseX, i);
	  
	 //green
	  stroke(109, 199, 111);
	  line(i, 0, x1 * 80, i);
	  
	 //orange
	  stroke(214, 56, 39); 
	  //line(i + 400, 0,  -x2 * 10, i * 5); 
	  line(i, 300,  0, i);
	 
	  //purple
	  stroke(173, 142, 212);
	  line(i * x1, y1, 500, i * 10);
	  
	} 
}


Once I had made the blue curves that work oppositely of each other they reminded me of wings of a bird. I then decided to make the other curves mimic the shape of a peacock’s feather and chose the colors accordingly.

Janet Peng-LookingOutwards-04

Video showing the project Sorting by Ren Yuan

The project Sorting by Ren Yuan provides an innovative intersection between sound, visualization, and algorithmic thinking. The project represents different sorting algorithms using both visuals and sounds. These pair well together to increase the appeal of the sorting algorithm. As well, it makes sorting seem very technical and complicated. I really like this project because it uses sound in a way I never expected. Sorting seems very far detached from the world of “Art and Music” so I found it surprising that this project merged the two. I believe there are three animations representing the sorting in progress. As well, I believe the sounds represent different parts in the sorting process. For example, the short beep-y sounds probably represent a comparison between two numbers being made the long swooping sound probably represents that the sorting has been completed. Using the sorting algorithm of choice, these visuals and sounds are probably mapped to different steps as the computer loops through the algorithm. It’s clear that the creator is from a more technical field because of the way the visuals and sounds end up being represented. I believe they do not represent sorting in a way that can be understood by someone without prior exposure. Therefore, the creator might have designed this with a specific audience in mind.

Janet Peng Project 04 – String Art

jjpeng project 4

function setup() {
    createCanvas(400, 300);
}

function draw() {
	// outer curves
	drawCurve(0, 0, 0, 200, 12, 6, 40, 'upRight', monochromeColor());
	drawCurve(width, 0, width, 200, 10, 5, 60, 'upLeft', monochromeColor());
	drawCurve(width, 100, width, height, 8, 4, 60, 'downLeft', monochromeColor());
	drawCurve(0, 100, 0, height, 6, 3, 80, 'downRight', monochromeColor());

	// inner curves
	drawCurve(80, 80,
			  80, height / 2,
			  10, 6, 13, 'upRight', monochromeColor());
	drawCurve(width - 80, 80,
			  width - 80, height / 2,
			  8, 5, 15, 'upLeft', monochromeColor());
	drawCurve(width - 80, height / 2,
			  width - 80, height - 80,
			  6, 4, 19, 'downLeft', monochromeColor());
	drawCurve(80, height / 2, 80,
			  height - 80, 5,
			  3, 24, 'downRight', monochromeColor());

	// curves in the middle
	drawCurve(width / 2, 0, width / 2, height, 20, 10, 40, 'upRight', monochromeColor());
	drawCurve(width / 2, 0, width / 2, height, 20, 10, 40, 'upLeft', monochromeColor());
	drawCurve(width / 2, 0, width / 2, height, 20, 10, 40, 'downLeft', monochromeColor());
	drawCurve(width / 2, 0, width / 2, height, 20, 10, 40, 'downRight', monochromeColor());

	noLoop();
}

function monochromeColor(){
	return color(255, random(120, 200), random(120, 200))
}

// larger xstep = larger width
// larger ystep = larger height
function drawCurve(x1, y1, x2, y2, xstep, ystep, numOfLines, direction, color){
	var i = 0
	for (i = 0; i < numOfLines; i ++){
		stroke(color);
		line(x1, y1, x2, y2);

		if (direction === 'downRight'){
			// x1 stays the same, y1 increases
			// y2 stays the same, x2 increases
			y1 += ystep;
			x2 += xstep;
		} else if (direction === 'upRight'){
			y2 -= ystep;
			x1 += xstep;
		} else if (direction === 'downLeft'){
			y1 += ystep;
			x2 -= xstep;
		} else if (direction === 'upLeft'){
			y2 -= ystep
			x1 -= xstep
		}
	}
}

I started by experimenting with curves and how controlling what and how much I added and subtracted from affected the curve (its direction, density, width, height, etc.). This led me to writing a function to draw a curve given different parameters (x1, y1, x2, y2, xstep, ystep, number of lines, direction, color). Finally, I sketched out some curve designs and recreated it using the function I wrote.

Bo Yang-Project-04-String-Art

sketch

/*
    Bo Yang
    byang2@andrew.cmu.edu
    SectionA
    Project-04
*/

var y = 0;
var x = 0;
var angle = 0;
var angle1 = 0;
function setup() {
    createCanvas(300, 300);
}

function draw() {
    background(0);

    push();
    translate(width / 2, height / 2);
    rotate(radians(angle));
    fill(255, 255, 0);
    ellipse(mouseX, 0, 8, 8);
    pop();
    angle = angle + 30;

    push();
    translate(width / 2, height / 2);
    rotate(radians(angle1));
    ellipse(mouseX, 0, 8, 8);
    pop();
    angle1 = angle1 + 15;


    for (var i = 0; i < width; i += 15){
        stroke(255);
        strokeWeight(0.5);
        line(i, 0, i + mouseX, 300);
        line(i + mouseX, 0, i, 300);
    }

    for(var i = 0; i < width; i += 8){
        stroke(0, 153, 153);
        line(i, 300, 0, i - mouseX);
        line(300, i, i - mouseX, 0);
    }
}

In this program, I use the line drawing a background. When you move your mouse, it can open and close. And also, I’m draw the line like an eye. That is why, I also draw two ellipses, making it looks more like an eye.

Sarah Kang – Looking Outwards – 04

Deguster L’augmente by Erika Marthins

For her recent graduate design project, a collaborative with ECAL (Bachelor Media & Interaction Design), Swedish designer Erika Marthins explored the ways to elevate the every day aspect of food by adding another of dimension of sensory effect. The initial picture of a slab of chocolate on a record player seems like just an artsy edit, but to imagine that the chocolate actually functions as a record was amazing to me. The chocolate record player is one of three desserts explored; Marthins embeds poetry into a lollipop and creates edible robotics.

Déguster l'augmenté ECAL/Erika Marthins from ECAL on Vimeo.

The chocolate record performs the same way as a typical vinyl record. The sounds produced by the chocolate round are made by grooves on its surface and when the record needle comes into contact with the moving surface, one can hear a high-pitched, wavering sound playing. Erika Marthin’s explorations as a designer is manifested through this successful project; she manages to create a poetic experience by achieving her goal to enable the diner to not only hear the sound of the chocolate, but to taste it.

http://erikamarthins.com/

Sewon Park – PO – 04

sketch

// Sewon Park
// sewonp@andrew.cmu.edu
// Section B
// sewonp-po-04

function setup() {
    createCanvas(400, 300);
}

function draw() {
    background(200)
     
      for (var a = 0; a <= 100; a+=5) {
        stroke(255, 255, 255);
        line(a,0,0,height); // White Lines from bottom left corner
        line(0,a,400,0); // White Lines from top right corner
      }


      for (var b = 300; b <= 400; b+=5) {
        stroke(255,255,255);
        line(b,300,400,0); // Black Lines from top right corner
      }
 
      for (var c = 200; c <= 300; c +=5) {
        stroke(255,255,255);
        line(400,c,0,300); // Black Lines from bottom left corner
      }

      for (var d = 0; d <= 400; d+=5) {
        stroke(255,0,0);
        line(0, height-d, d, 0); //top left
        line(d,300,400,height - d/1.7); //bottom right
        line(0, d*0.75, d, 300); //bottom left
        line(d, 0, 400, d*0.75); //top right
        //Curves in the four corners

        stroke (0,0,0);
        line(0,d,400,height-d); 
        line(d,300,width-d,0); //Red Lines meeting at center
      }  

      
      }


For the string art project, I tried to recreate the Sharingan (a special type of eye-technique) in an abstract fashion. The original Sharingan also possesses the three colors of black, red, and white.

Image result for sharingan