dnoh-sectionD-project6-abstractclock

sketch

//Daniel Noh
//Section D
//dnoh@andrew.cmu.edu
//Project-06

var r = 40;
var g = 40;
var b = 80;

function setup() {
  createCanvas(400,400);
}

function draw() {
  var h = hour();
  var m = minute();
  var s = second();
  //Variable maps hours to triangle width and colors
  var Hx = map(h,0,24,0,400);
  var HcolorRG = map(h,0,24,0,40);
  var HcolorB = map(h,0,24,0,80);
  //Variable maps seconds to strokeWeight and ellipseSize
  var Sstroke = map(s,0,60,0,10);
  var Ssize = map(s,0,60,0,400);
  //Variable maps minutes to degrees
  var Mend = map(m,0,60,0,360);
  angleMode(DEGREES);

  background(20,20,50);

  //hour triangle - gets fatter as hour passes and fades into background
  fill(60-HcolorRG,60-HcolorRG,130-HcolorB);
  noStroke();
  triangle(200,0,Hx,400,400-Hx,400);
  //minute arc - timer within second circle that ticks to show minutes.
  fill(255);
  arc(200,200,Ssize,Ssize,Mend-90,270);
  //second circle - the circle gets bigger every second as well as the stroke
  noFill();
  strokeWeight(Sstroke);
  stroke(255);
  ellipse(200,200,Ssize,Ssize);
}

I wanted to create an abstract clock using simple shapes. I thought the hour should change very subtly, as hours pass by slowly, so I made the triangle in the background slowly fade into the background as well as get wider. It was also a part of my design that the minute and second “hands” were integrated within each other because of how quick each is relative to hours. The minutes are shown simply as a timer. However, the circle slowly fills up the page every second, practically screaming when it approaches the end of a minute.

dnoh-sectionD-lookingoutwards-06

Randomness

Title: Symmetrical
Artist: David Kim

This video was created by a friend who is currently majoring in motion graphics at OTIS College of Art and Design in California. Although the artist himself did not program or randomize the project, through specific parameters and plugins, he created fairly complex “random” sequences that made shapes and lines fly around.

Although I do not know if this video was created through random variables or algorithms, I do understand that it was created with definite random factors such as the directions of the motions of the shapes.

I find it interesting how such complex and random motions could be created through parameters, rather than actual handmade shapes. Controlled randomness, albeit very different from actual randomness, can be applied so easily to artworks such as this to form creations based on the artists’ creativity.

dnoh-sectionD-project5-wallpaper

sketch

function setup() {
  createCanvas(480, 480);
  background(220);
}

function draw() {
  for (x = 0; x <= 480;x += 120) {
    for (y = 0; y <= 480; y += 120) {
    //branches thicc
      stroke(105,72,31);
      strokeWeight(2);
      line(x+35,y+0,x+35,y+17);
      line(x+35,y+17,x+58,y+16);
      line(x+58,y+16,x+58,y+75);
      line(x+58,y+75,x+35,y+75);
      line(x+35,y+75,x+35,y+98);
      line(x+35,y+98,x+25,y+98);
      line(x+25,y+98,x+25,y+112);
      line(x+25,y+112,x+35,y+112);
      line(x+35,y+112,x+35,y+120);
      line(x+97,y+0,x+97,y+10);
      line(x+96,y+10,x+83,y+10);
      line(x+83,y+10,x+83,y+28);
      line(x+83,y+28,x+58,y+28);
      line(x+58,y+59,x+84,y+59);
      line(x+84,y+59,x+84,y+96);
      line(x+84,y+96,x+97,y+96);
      line(x+97,y+96,x+97,y+120);
    //branches thin left
      strokeWeight(1);
      line(x+0,y+68,x+13,y+68);
      line(x+13,y+68,x+13,y+78);
      line(x+13,y+78,x+27,y+78);
      line(x+27,y+78,x+27,y+67);
      line(x+27,y+67,x+31,y+67);
      line(x+31,y+67,x+31,y+54);
      line(x+31,y+54,x+58,y+54);
    //branches thin right
      line(x+97,y+10,x+107,y+10);
      line(x+107,y+10,x+107,y+60);
      line(x+107,y+60,x+100,y+60);
      line(x+100,y+60,x+100,y+67);
      line(x+100,y+67,x+120,y+67);
    //leaf top
      stroke(26,175,75);
      strokeWeight(2);
      line(x+7,y+0,x+5,y+2);
      line(x+5,y+2,x+21,y+1);
      line(x+21,y+1,x+22,y+0);
    //leaf 2nd to top
      line(x+35,y+16,x+37,y+26);
      line(x+37,y+26,x+26,y+37);
      line(x+26,y+37,x+25,y+22);
      line(x+25,y+22,x+35,y+16);
    //leaf 3rd to top
      line(x+83,y+28,x+83,y+35);
      line(x+83,y+35,x+101,y+42);
      line(x+101,y+42,x+95,y+28);
      line(x+95,y+28,x+83,y+28);
    //leaf 4th to top
      line(x+84,y+86,x+95,y+77);
      line(x+95,y+77,x+111,y+73);
      line(x+111,y+73,x+101,y+87);
      line(x+101,y+87,x+84,y+86);
    //leaf bottom
      line(x+7,y+120,x+19,y+109);
      line(x+19,y+109,x+25,y+112);
      line(x+25,y+112,x+22,y+120);
    //rose
      stroke(237,71,51);
      line(x+54,y+90,x+40,y+102);
      line(x+40,y+102,x+35,y+112);
      line(x+35,y+112,x+45,y+115);
      line(x+45,y+115,x+58,y+113);
      line(x+58,y+113,x+57,y+97);

      line(x+50,y+94,x+48,y+102);
      line(x+48,y+102,x+51,y+108);
      line(x+51,y+108,x+58,y+113);
      line(x+35,y+112,x+48,y+102);

      noStroke();
      fill(237,71,51);
      triangle(x+53,y+96,x+51,y+102,x+53,y+102);
      triangle(x+51,y+102,x+55,y+101,x+54,y+107);
    }
  }
}

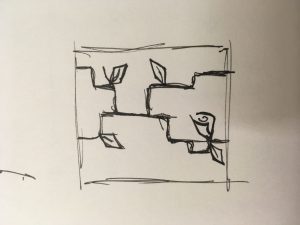
I started with an idea to have geometric natural figures. I started with various sketches, but decided to go with the one posted above. All the branches connect to each other to create a cohesive wallpaper. The sketch was remade in illustrator so I could find the exact pixels/locations of the lines. All in all, this was a fairly tedious project because I had to simply create lines for everything, thus having to check the pixels for everything.

dnoh-sectionD-lookingoutwards-05

Artist: beeple
Project(s?): everydays
Brief Description: Beeple create[d] new 3D computer graphics everyday and posted it to his website for over 3800 days.

For this post’s specific purpose, I will highlight a fairly recent piece he created, as well as another video of his process in creating a piece.

Above is a process video of a piece he created. As you can see from the video, Beeple uses Cinema 4D with various plugins to create most of his pieces. Although I didn’t really see any significant algorithmic or code-able things within these pieces, I found it utterly fascinating how detailed and beautiful these 3D renderings of make-believe images are. Through the video, we can see that he turned a screenshot of a topographic image and used a plugin to turn it into 3D, which probably used an algorithm to see the depth of the ground through tonal values. It is also visible that he created the structure itself by hand, detail by detail.

This is another piece I admire by Beeple. Although I don’t quite know the process of this piece, I found it amazing that this all was created in 3D space, detail by detail, just to be rendered into this, albeit amazing, 2D image.


dnoh-sectionD-project4-stringart

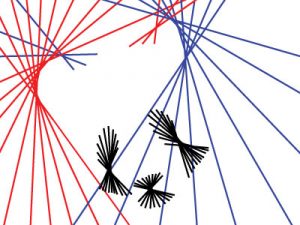
I attempted to create a panda using lines. I first created a sketch on Adobe Illustrator to map out the locations of the lines. I will be honest… I did not expect this to be so difficult. I used if statements to confine lines and move them around, so everything is “animated”.

Above, is the sketch I attempted to recreate on p5js.
As you can see… it didn’t turn out as expected.

sketch

/*
Daniel Noh
Section D
dnoh@andrew.cmu.edu
Project-04-String-Art
*/

var x1 = 172;
var y1 = 300;
var x2 = -50;
var y2 = 0;

var x3 = 100;
var y3 = 92;
var x4 = 0;
var y4 = -30;

var x5 = 95;
var y5 = 300;
var x6 = 300;
var y6 = 0;

var x7 = 172;
var y7 = 62;
var x8 = 260;
var y8 = 0;

var x9 = 130;
var y9 = 250;
var x10 = 160;
var y10 = 200;

var x11 = 251;
var y11 = 237;
var x12 = 229;
var y12 = 160;

var x13 = 268;
var y13 = 213;
var x14 = 190;
var y14 = 145;

var x15 = 182;
var y15 = 276;
var x16 = 218;
var y16 = 235;

function setup() {
    createCanvas(400, 300);
    background(255);
}

function draw() {
//red left ear

  stroke(255,0,0);
  strokeWeight(2);
  line(x1,y1,x2,y2);

  if (x1 > -150) {
    x1 = x1 - 50;
  }

  if (x2 < 240) {
    x2 = x2 + 50;
  }

  if (y1 > 180) {
    y1 = y1 - 20;
  }

  //blue left ear

  stroke(0,0,255);
  line(x3,y3,x4,y4);

  if (x3 >= 100 & x3 <= 129) {
    x3 += 15;
    y3 -= 10;
  }
  if (y4 <= 30 & y4 <= 100) {
    x4 -= 50;
    y4 += 50;
  }

  //blue right ear

  stroke(0,0,255);
  line(x5,y5,x6,y6);

  if (x5 >= 95 & x5 <= 400) {
    x5 = x5 + 55;
  }
  if (x6 <= 300 & x6 >= 130) {
    x6 = x6 / 1.04;
  }
  if (x5 > 400) {
    y5 = y5 - 100;
  }

  //red right ear
  stroke(255,0,0);
  line(x7,y7,x8,y8);

  if (x7 <= 205) {
    x7 = x7 + 17;
    y7 = y7 - 3;
  }
  if (x8 >= 210) {
    x8 = x8 - 26;
  }

  //left eye
  stroke(0);
  line(x9,y9,x10,y10);

  if (x9 <= 175) {
    x9 = x9 + 5;
    y9 = y9 + 1;
  }
  if (x10 >= 143) {
    x10 = x10 - 5;
    y10 = y10 - 9;
  }
  if (x10 >= 129 & x10 <= 142) {
    y10 = y10 + 13;
    x10 = x10 - 4;
  }

  //right eye top
  line(x11,y11,x12,y12);

  if (x11 <= 265) {
    x11 = x11 + 5;
    y11 = y11 - 5;
  }
  if (x12 >= 200) {
    x12 = x12 - 7;
    y12 = y12 - 5;
  }

  //right eye bottom
  line(x13,y13,x14,y14);

  if (x13 <= 278) {
    x13 = x13 + 3;
    y13 = y13 - 3;
  }
  if (x14 <= 215) {
    x14 = x14 + 4;
    y14 = y14 + 6;
  }

  //mouth
  line(x15,y15,x16,y16);

  if (x15 <= 205) {
    x15 = x15 * 1.03;
    y15 = y15 * 1.01;
  }
  if (x15 >= 206 & x15 <= 232) {
    x15 = x15 * 1.03;
    y15 = y15 / 1.02 ;
  }
  if (x16 >= 213) {
    x16 = x16 - 4;
    y16 = y16 - 5;
  }
  if (x16 >= 176 & x16 <= 212) {
    x16 = x16 / 1.03;
    y16 = y16 * 1.01;
  }
}

dnoh-sectionD-lookingoutwards-04

Project: Computer Replicating Voices

Video:

Key times: 9:30 -> 11:48

Artist (?): Cary Huang

Year: 2017

Although this “project” is from a content creator on Youtube, I thought it was fascinating how a programmer could create a specific algorithm to teach a computer to learn a specific voice. This was all done through the program, ARSS, or The Analysis & Resynthesis Sound Spectograph, Python, and another program called HyperGAN. The ARSS transfer sounds into images which is also modified through Python, then the HyperGAN software uses Convolutional and Deconvolutional neural networks to generate new images in the same style. The ARSS then transfer the images back into audio to become audible.

I find it amazing how not only can we start to teach computers to slowly learn through parameters, but also that such complex process and discovery was put into a YouTube video as if it were “just something cool”. Technology has come far enough to dismiss this amazing demonstration as “a cool video” that is shared around.

This video didn’t highlight an “artist”, rather it showed how complex computers can develop its neural networks. This creator also showed how AI could learn to play Jazz or Baroque music through hours of “training”, which brings another question… is a completely computer generated (through human made parameters) art? I think the thought and artistry behind the codes and programs behind such acts allow AI creation to be artworks.

dnoh-sectionD-lookingoutwards-03

title: ICD + ITKE Research Pavilion 2011
location: Germany
date: 2011
architects (teams): Institute for Computational Design and Institute of Building Structures and Structural Design

I believe that this pavilion was created with a main framework and overlaid with hexagonal shapes. The algorithm found constantly optimizes data to set the geometries into an ideal form.

I find this structure so fascinating because of the beauty in the joinery and details of the hexagons. It’s interesting how the algorithm created such a biological overall form out of geometric shapes that were created with programs.

The initial design was based around the notion of a sand dollar. This notion is clearly seen through the interior holes popped out of the wooden hexagons. The shape is clearly a manifestation of the biological motif.

dnoh-sectionD-project3-dynamicdrawing

sketch

// red = 205, 63, 63
// green = 63, 205, 63

var liney = 20;
var redX = -15;
var redX2 = 655;
var blueY = -15;
var blueY2 = 495;
var lineT = 0;
var lineB = 480;
var lineL = 0;
var lineR = 640;
var whiteFill = 255;
var lineStrokeR = 63;
var lineStrokeG = 205;
var lineStrokeB = 63;

function setup() {
  createCanvas(640,480);
  background(39,48,47);
}

function draw() {
  background(39,48,47);
//refreshing background

//blinking effect in background
  stroke(39,64,47);
  line(0,liney,width,liney);
  line(0,liney+40,width,liney+40);
  line(0,liney+80,width,liney+80);
  line(0,liney+120,width,liney+120);
  line(0,liney+160,width,liney+160);
  line(0,liney+200,width,liney+200);
  line(0,liney+240,width,liney+240);
  line(0,liney+280,width,liney+280);
  line(0,liney+320,width,liney+320);
  line(0,liney+360,width,liney+360);
  line(0,liney+400,width,liney+400);
  line(0,liney+440,width,liney+440);
  line(0,liney+480,width,liney+480);
  line(0,liney+520,width,liney+520);
  line(0,liney+560,width,liney+560);
  line(0,liney+600,width,liney+600);
  line(0,liney+640,width,liney+640);
  liney = liney + 80;

  if (liney > height) {
    liney = 0;
  }
//reset green lines to make it blink

//color blocks that shoot out
  noStroke();
  rectMode(CENTER);
  fill(0,255,255); //c
  rect(redX,mouseY,20,20);
  redX = redX - 25;
  fill(255,0,255); //m
  rect(redX2,mouseY,20,20);
  redX2 = redX2 + 25;
  fill(255,255,0); //y
  rect(mouseX,blueY,20,20);
  blueY = blueY - 25;
  fill(0); //k
  rect(mouseX,blueY2,20,20);
  blueY2 = blueY2 + 25;

//green crooshair
  stroke(lineStrokeR,lineStrokeG,lineStrokeB);
  strokeWeight(2);
  line(mouseX,lineB,mouseX,lineT);
  line(lineL,mouseY,lineR,mouseY);

  var rectX = 20;
//white box in crosshair
  fill(whiteFill);
  rect(mouseX,mouseY,rectX,rectX);

//white box enlarges when pressed, white box becomes gray, green becomes red
  if (mouseIsPressed) {
    lineM1 = mouseX-50;
    lineV1 = mouseY-50;
    lineM2 = mouseX+50;
    lineV2 = mouseY+50;
    lineM3 = mouseX+50;
    lineV3 = mouseY-50;
    lineM4 = mouseX-50;
    lineV4 = mouseY+50;
    line(lineM1,lineV1,lineM2,lineV2);
    line(lineM3,lineV3,lineM4,lineV4);

    ellipse(mouseX,mouseY,70,70);
    lineStrokeR = 255;
    lineStrokeG = 63;
    lineStrokeB = 63;
    whiteFill = 80;
  } else {
    whiteFill = 255;
    lineStrokeR = 63;
    lineStrokeG = 205;
    lineStrokeB = 63;
  }
  print(mouseIsPressed);
}


function mouseClicked() { //when mouse is clicked, the color squares jump to mouse and start moving again
  redX = mouseX;
  redX2 = mouseX;
  blueY = mouseY;
  blueY2 = mouseY;
}

The background lines are constantly blinking to add an effect of constant movement. The mouse is followed by a vertical and horizontal line that changes colors from green to red when clicked. When clicked, the square in the center changes colors and shapes. Finally, four color blocks jump out of the crosshair when clicked.

Initially I wanted to create a code that would print a square wherever I clicked and the four blocks would collide into that square. However, I could not figure out a code that would let me keep the square after I clicked it.

dnoh-sectionD-project02-variableface

sketch

/*
Daniel Noh
Section D
dnoh@andrew.cmu.edu
Project-02
*/

var yolkSize = 230;
var eggX = 0;
var eggY = 0;
var eggA = 0;
var eggB = 0;
var rEye = 20;
var lEye = 20;
var r = -15;
var g = -15;
var b = 15;
var bubbleSize = 30;

function setup() {
  createCanvas(640, 480);
  background(255);
}

function draw() {
//fryingpanback
  stroke(0);
  strokeWeight(7);
  fill(40);
  ellipse(320, 480, 1000, 1000);
  noStroke();
  fill(60);
  ellipse(320, 480, 850, 850)

//egg white shape
  fill(240+b, 240+b, 240+b);
  stroke(0);
  strokeWeight(7);

  beginShape();
  curveVertex(100+eggX, 540+eggY);
  curveVertex(100+eggX, 540+eggY);
  curveVertex(80+eggX, 400+eggY);
  curveVertex(110+eggA, 300+eggB);
  curveVertex(200+eggB, 250+eggX);
  curveVertex(320+eggX, 150+eggA);
  curveVertex(440+eggB, 250+eggY);
  curveVertex(530+eggY, 300+eggB);
  curveVertex(560+eggX, 400+eggA);
  curveVertex(540+eggA, 540+eggB);
  curveVertex(540+eggA, 540+eggB);
  endShape();

//yolk face
  fill(255+r, 255+g, 0+b);
  stroke(0);
  strokeWeight(7);
  ellipse(320, 450, yolkSize, yolkSize);

//eyes
  fill(0);
  noStroke();
//uppereye
  ellipse(270+r, 460+r, bubbleSize+r+10, bubbleSize+r+10);
//lowereye
  ellipse(320+g, 400+r, bubbleSize, bubbleSize);

//mouth
  stroke(0);
  ellipse(340, 480, bubbleSize+20+eggA, bubbleSize+40+b);
}

function mousePressed() {
  eggX = random(-25, 25);
  eggY = random(-25, 25);
  eggA = random(-25, 25);
  eggB = random(-25, 25);
  r = random(-15, 0);
  g = random(-25, 0);
  b = random(0, 25);
  yolkSize = random(200, 230);
  bubbleSize = random(20, 25);
  clear();
}

I honestly went directly to coding only knowing that I wanted to create a dynamic egg face, so at first I was slightly confused. I plotted points down relative to the overall canvas and went from there. I reused several randomized variables for different things, which made my code a bit unorganized. However, I am content with my final product.

dnoh-sectionD-lookingoutwards-02

artist: ralf baecker
website: www.rlfbckr.org
title: random access memory
2016

Turmite algorithm (based on a two dimensional operating system)

Random Access Memory is based on a binary system where the robot tries to fill up the system with as many “1”s as possible without overloading the system (1, being stone). These sand grains are placed in algorithmic placements as to create a sense of controlled randomness. It interests me to see the joining of simplicity and complexity through this project. The sand placement system is a fairly simple algorithm, however the result of the simple function is a complex grouping of grains spread out neatly in a disc formation that is ever-changing.

The artist, Ralf Baecker, is an artist that works to connect and intersect art, science, and technology. Through his works we are able to see both a technological aspect that shows the advancement of humanity, as well as traditional notions that keep us in touch with our history. In Random Access Memory, there is a mix of the two timelines which, I believe, brings us to ponder about how we should we advancing as people.