mmirho – Looking Outwards 4

France Cadet – Spina Family: Hunting Tophies, Robotic Sculpture 2008

This project is simple in design and simple in action.

Each little “Tail” on the mount moves to music on its own independent basis, but when each of them moves together, or in a pattern, the result is beautiful to watch.

I admire the simplicity of this project, and I think the computation behind it isn’t very serious. If a certain frequency of sound is played, a certain tail reacts, and this creates a wonderfully mesmerizing effect. I especially respect projects that focus on being creative with simplicity, instead of trying hard to be really complicated. The value is in the creativity, not the computational difficulty.

I believe the artist’s purpose and goal with this piece were to potentially make a statement on hunting and mounting, but also to show the power of small independent movements together as one.

mmirho – Project 4 – Line Art

After constructing a loop template for myself, the rest of the process was simple figuring out how each end of the line moves: Left, right, up or down.

When it came to the curves inside the middle box, I had to change the structure a little, but it was still relatively the same.

It was interesting trying to find a balance between the number of loop iterations and the distance the lines move each iteration, it creates different densities.

sketch

function setup() {
  createCanvas(400, 300);
}

function draw() {
    background(200);

    //Top Left
    x1 = 0;
    y1 = height/2;
    //These two set up the location of the first coordinate
    //of the line

    x2 = 0;
    y2 = 0;
    //These two set up the second coordinate
    //And by setting the coordinates as variables, I can
    //manipulate them in the loop to move the line

    fill(0);

    for (loop = 0 ; loop < 12 ; loop += 1) {
        //This loop moves a simple variable loop
        //along a series of steps, and then the actual
        //changing line-effecting variables change
        //within the loop

        line(x1, y1, x2, y2);
        //The actual line, composed of variables

        x1 += 0;
        y1 -= height/20;
        //Controls the movement of the first coordinate

        x2 += width/20;
        y2 -= 0;
        //Controls the movement of the second

        //These coordinate movement controls vary depending
        //on the corner the curve is created in, because each
        //coordinate needs to move a different direction
    }
    noLoop();
    //Cuts off the loop

    //This formula is used over and over again
    //for all four outside curves and the two inside curves


    //Top Right
    x1 = width;
    y1 = height/2;
    x2 = width;
    y2 = 0;

    for (loop = 0 ; loop < 12 ; loop += 1) {
        line(x1, y1, x2, y2);
        x1 += 0;
        y1 -= height/20;
        x2 -= width/20;
        y2 -= 0;
    }
    noLoop();


    //Bottom Left
    x1 = 0;
    y1 = height/2;
    x2 = 0;
    y2 = height;

    for (loop = 0 ; loop < 12 ; loop += 1) {
        line(x1, y1, x2, y2);
        x1 += 0;
        y1 += height/20;
        x2 += width/20;
        y2 -= 0;
    }
    noLoop();


    //Bottom Right
    x1 = width;
    y1 = height/2;
    x2 = width;
    y2 = height;

    for (loop = 0 ; loop < 12 ; loop += 1) {
        line(x1, y1, x2, y2);
        x1 += 0;
        y1 += height/20;
        x2 -= width/20;
        y2 -= 0;
    }
    noLoop();
    
    rectMode(CENTER);
    rect(width/2, height/2, height/2, height/2);
    stroke(200);

    //Middle Box top left
    x1 = width/2 - height/4;
    y1 = 3*height/4;
    x2 = width/2 - height/4;
    y2 = height/4;

    for (loop = 0 ; loop < 21 ; loop += 1) {
        line(x1, y1, x2, y2);
        x1 += 0;
        y1 -= height/40;
        x2 += height/40;
        y2 -= 0;
    }
    noLoop();


    //Middle Box bottom right
    x1 = width/2 + height/4;
    y1 = height/4;
    x2 = width/2 + height/4;
    y2 = 3*height/4;

    for (loop = 0 ; loop < 21 ; loop += 1) {
        line(x1, y1, x2, y2);
        x1 += 0;
        y1 += height/40;
        x2 -= height/40;
        y2 -= 0;
    }
    noLoop();
    
    noStroke();
    fill(255,235,0);
    ellipse(width/2, height/2, height/7, height/7);
    //I tried to make a creepy-ish eye here
}

mjnewman Project-04, Section A

sketch

//Meredith Newman
//Section A
//mjnewman@andrew.cmu.edu
//Project-04-LineArt

function setup() {
    createCanvas(400, 300);
    background(135, 12, 3);
}

function draw() {
	//variables used to vary spacing inbetween lines
	//for lines going from the top of canvas to right
	var x1StepSize = 10;
	var y1StepSize = 15;

	//for lines going from the right of the canvas to the bottom
	var x2StepSize = 24;
	var y2StepSize = 16;

	//for lines going from the bottom to the left of the canvas
	var x3StepSize = 22;
	var y3StepSize = 12;

	//for lines going from the left to the top
	var x4StepSize = 11;
	var y4StepSize = 12;

	for (var spacing = 0; spacing < 30; spacing ++) {
		//as mouse moves across width of canvas, grayscale changes
		stroke(map(mouseX, 0, width, 0, 255));

		//equation for lines that go from top to right of canvas
		line(x1StepSize * spacing, 0, width, y1StepSize * spacing);

		//equation for lines that go from right to the bottom
		line(width, y2StepSize * spacing, (x1StepSize * -spacing) + width / 2, height);

		//equation for lines that go from bottom to the left
		line(x3StepSize * spacing, height, 0, y3StepSize * spacing);

		//equation for lines that go from left to the top
		line(0, (y4StepSize * spacing) + width / 2, (x4StepSize * -spacing) + width, 0);
	};
}

After creating three of the “curves,” my code started to remind me of the opening credits by Saul Bass for Vertigo. So, I tried to place the fourth set of lines so that the curve echoed the eye that is synonymous with the Vertigo opening sequence. In addition, I set the background a darker red that also echoes the opening sequence. The sequence is embedded below:


mmiller5-Project-04

sketch

//Michael Miller
//mmiller5
//Section A
function setup() {
    createCanvas(400, 300);
}

function draw() {
    var centerDist =
	min(dist(mouseX, mouseY, width / 2, height / 2), 100);
    var inverseCenterDist =
	min(100 / dist(mouseX, mouseY, width / 2, height / 2), 100);
    /* gradient circle background, use loop to make many progressivley smaller
       circles that are slightly different color */
    for(var count = 0; count < 255; count++) {
	noStroke();
	var countPerc = (1 - count / 255) //percentage of the way through loop
	fill(255 - count);
	ellipse(width / 2, height / 2,
		1.4 * width * countPerc, 1.4 * height * countPerc);
    }
    
    /*Outside curves, as the mouse approaches the center, less iterations occur
      because iteration count is tied to mouse distance from the center*/
    stroke(0);
    strokeWeight(1);
    //top left curve
    curves(0, 0, 0, height / 2, 0, 0,
	   0, -height / 2 / centerDist, width / 2 / centerDist, 0,
	   centerDist, 0);
    //bottom left
    curves(0, 0, 0, height / 2, 0, height,
	   0, height / 2 / centerDist, width / 2 / centerDist, 0,
	   centerDist, 0);
    //top right
    curves(width, height, 0, height / 2, 0, height,
	   0, height / 2 / centerDist, width / 2 / centerDist, 0,
	   centerDist, 180);
    //bottom right
    curves(width, height, 0, height / 2, 0, 0,
	   0, -height / 2 / centerDist, width / 2 / centerDist, 0,
	   centerDist, 180);
    
    //Inside curves, as mouse approaches center, more iterations occur
    stroke(255);
    //bottom right middle curve
    curves(width / 2, height / 2, 0, height / 2, 0, 0,
	   0, -height / 2 / inverseCenterDist, width / 2 / inverseCenterDist, 0,
	   inverseCenterDist, 0);
    //top right middle
    curves(width / 2, -height / 2, 0, height / 2, 0, height,
	   0, height / 2 / inverseCenterDist, width / 2 / inverseCenterDist, 0,
	   inverseCenterDist, 0);
    //bottom left
    curves(width / 2, 3 * height / 2, 0, height / 2, 0, height,
	   0, height / 2 / inverseCenterDist, width / 2 / inverseCenterDist, 0,
	   inverseCenterDist, 180);
    //top left
    curves(width / 2, height / 2, 0, height / 2, 0, 0,
	   0, -height / 2 / inverseCenterDist, width / 2 / inverseCenterDist, 0,
	   inverseCenterDist, 180);
}
/*Generic curve function, x and y are the coordinates of translation, x1 and y1
are coordinates of one line endpoint, x2 and y2 are for the other endpoint, the
x and y steps are how much the coordinates shift after each iteration, limit is
how many iterations will be done, angle is the rotation of the curve*/
function curves(x, y, x1, y1, x2, y2,
		x1Step, y1Step, x2Step, y2Step,
		limit, angle) {
    for (var count = 0; count < limit; count++) {
	push();
	translate(x, y);
	rotate(radians(angle));
	line (x1 + x1Step * count, y1 + y1Step * count,
	      x2 + x2Step * count, y2 + y2Step * count);
	pop();
    }
}
	

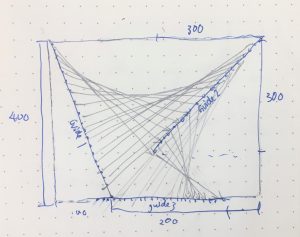
I think this turned out pretty well.  Creating a general function for curves made the project much easier and cut down on the coding significantly.  I also wanted to make a gradient in the background, and I was able to use for loops to make that happen which I thought was pretty neat.  I also wanted it to be dynamic, so I had the inner and outer curves have different iteration counts depending on where the mouse was on the screen.

sntong-Project-04-String-Art

sketch

//scarlet Tong
//sntong@andrew.cmu.edu
//Section A
//Project-04-String-Art


//variables for y compment of guiding lines
var aLineX1 = 200;
var aLineX2 = 400;
var aLineY = 0;
// variable for x component of guiding lines
var bLineX = 100;
var bLineY1 = 0;
var bLineY2 = 350;

//color variables
var R = 255;
var G = 200;
var B =200;

function setup() {
    createCanvas(400, 300);
    background(0);

}

function draw() {
  //create invisible guiding lines that determines where the points are generated
  //each guiding line creatres 20 points
  for (var i = 0; i <= 1; i+= .05) {
    //guiding line 1
    var x1 = lerp(bLineY1,bLineX,i);
    var y1 = lerp(bLineY1,bLineY2,i);
    //guiding line 2
    var x2 = lerp(aLineX1,aLineX2,i);
    var y2 = lerp(aLineX1,aLineY,i+.01);
    //guiding line 3
    var x3 = lerp(bLineY2,bLineY1,i);
    var y3 = lerp(aLineX2,bLineY2,i);
    //first web has the color pink
    stroke(R,G,B);
    strokeWeight(.85);
    line(x1,y1,x2,y2);
    //second web is colored white
    stroke(B,R,G);
    strokeWeight(.5);
    line(x2,y2,x3,y3);
    }

    //add changing colors with respect for mouse location for fun 
    if (mouseX < width) {
      R = mouseX;
      G = mouseY;
      B = R-G;
    }
}

I explored using the lerp() function to help me generate “guiding” lines that will govern the shape of resulting “web”. Using for loop, I was able to generate 2 webs with 3 guiding lines for this composition. The color of the lines relate to the location of the mouse on the canvas (so the drawing appears and disappears as you interact with it with the mouse), and I struggled working out the location of the guiding lines and using variables to sort out the sequences of points when working on this project

mjnewman LookOutwards-04, Section A

ambient synthesis from Amanda Ghassaei on Vimeo.

Amanda Ghassaei’s Ambient Synthesis is a physical product that reacts to sunlight with sound. The result is a surreal ringing sound that produces symmetrical Rorschach like light patterns in a bright space. What I admire most about this project is the attention to form giving this machine has. It is taking natural input, the sun, through technology and sensors, and outputting an aesthetically pleasing light pattern all encompassed in a obelisk-like box. I also think her approach to sound is interesting in that she is taking all these simple frequency sounds but when you put them together its complex, otherwise called additive synthesis.

In terms of software and hardware, Ghassaei’s Ambient Sound runs a MaxMSP FM Synthesis patch called straw in order for the light to be properly converted into corresponding sounds. Ghassaei’s intention was to create a piece that could incorporate the evolving landscape to create a wide range of “timbres and textures.”

Her website

jknip-SectionA-LookingOutwards-04

“Sonic Pendulum” by Yuri Suzuki Design Studio in collaboration with QOSMO (2017)

Sonic Pendulum is a sound installation that utilizes artificial intelligence to create an endless soundscape. Inspired by the client’s new Audi A5 line, the installation is made up of 30 pendulums, which simulates sound through speakers and crowd movement. Networked camera and computer vision systems set up around the installation provides an understanding of the crowd size and movement, which directly correlates with the music volume, soundtrack, etc. I really admire how the artist wanted to create a form of conversation through movement and sound, where the installation is almost ‘activated’ by the visitors’ movement, and in turn responds with the most original sound that never repeats itself.

The AI algorithms used to create Sonic Pendulum was trained by a team to create an infinite composition, which reacted to movement in live space, creating moment-to-moment experiences. An application called MAXMSP was used to further train the algorithm, delivering compositions that matched the sound intensity of the space.

In terms of artistic sensibilities, not only did the studio require a working algorithm, they also had to consider space, scale, composition and rendering of installation, and also how the Audi cars aligned with the arrangement. What resulted were multiple triangular forms that encouraged interaction with passerby.

http://www.creativeapplications.net/maxmsp/sonic-pendulum-ai-soundspace-of-tranquility/

https://vimeo.com/214206048

http://yurisuzuki.com/design-studio/sonic-pendulum

hannahk2-LookingOutwards-04

“Soft Sound” is a research pioneered by EJTECH (Esteban de la Torre and Judit Eszter Kárpáti) that brings together textiles and sound, and explores possibilities of enhancing multi-sensory experiences. I admire this project because it achieves its goal of using textile as an audio emitting surface. The artists created soft speakers and embedded it into fabric in order for it to emanate sonic vibrations, allowing viewers to perceive the audio through both hearing and touch. The viewers can perceive the audio through touch because due to the pulsating nature of the sound, the host textile will throb. By creating shapes of flat copper and silver coils, vinyl cutting and applying them onto different textile surfaces, and then running an alternating current through them, the artists created the speakers. They are connected to amplifiers and a permanent magnet in order to force the coil back and forth, allowing the textile attached to move back and forth and create enhanced sound waves. The artists’ sensibilities are clearly manifest in the final form, seeing the way the simple, crisp and geometric printed shapes on fabric resemble the visual language present in their other works. This project is extremely admirable to me because it displays a non physical entity as something tangible and physical, and seeing a small piece of cloth moving and creating sound is just really amazing to me.


Soft Sound for TechTextil – Sounding Textile series from ejtech on Vimeo.

link:http://www.creativeapplications.net/sound/soft-sound-textiles-as-electroacoustic-transducers/

Looking Outward 4


658 prepared dc-motors, cotton balls, cardboard boxes 70x70x70cm, Zimoun 2017

What is so fascinated about this artwork by Zimoun is that it looks really neat and simple at first. The form and the scale of this art attracts my attention. Withe the huge amount of boxes piled up and tons of sensors and cotton balls, audience are amazed by the scale. His idea is really surprising as well because the he wants the audience to focus more on the sound effect with such simple and accessible material. The use of daily life materials, like cotton balls and cardboard boxes, connects people more with the artwork itself. The cotton balls are connected to mottors that create the sound. Although the motors that connect to the balls are low-tech, the deep, pounding sound that is produced by them resonates throughout the exhibition space.

“As you walk through the labyrinth of boxes, the constant humming and vibrating builds, and can be felt both behind and inside you”.

This artwork tries to encourage people to pay more attention to the beauty of sound. Sound can also be appreciated as art, which is the main idea of Zimoun’s art.

“The purpose of keeping the visual aspect of the art basic and subtle is to allow the person to take in all the auditory effects and be free from distractions”.

Sound Art at Beall

http://www.zimoun.net/2017-658.html


sntong-LookingOutwards-04-Sound-Art

Table d’Harmonie is created by Pascal Broccolichi and using black corindon powder and speakers. When resonance is reached between the sound and the powder, the powder amasses into small mounts of circular craters around the speakers. The theory of “granular synthesis” is applied to help program the sound to create desired shapes. The project is interesting when trying to visualize sound in a physical form and translating something that has no visual cues into something physical through the medium of different materials.