Sarah Yae Project 05 Section B

sketch

//Sarah Yae
//Section B
//smyae@andrew.cmu.edu
//Project-05

//variables for arc 
var uparc_x;
var uparc_y;
var arc_w = 100;
var arc_h = 50;

//variables for dots 
var px;
var py;
var yx;
var yy; 


function setup() {
    createCanvas(500, 500);
    background(213,196,161);
}

function draw() {

//upper green arc
for (var uparc_y = 50; uparc_y < 500; uparc_y += 100) {
    for (var uparc_x = 50; uparc_x < 500; uparc_x += 100) {
            noFill ();
           stroke (177,194,122);
            strokeWeight (3);
            arc(uparc_x, uparc_y, arc_w, arc_h, PI, TWO_PI);
        }
    }

//upper blue arc
for (var uparc_y = 100; uparc_y < 600; uparc_y += 100) {
    for (var uparc_x = 50; uparc_x < 500; uparc_x += 100) {
            noFill ();
            stroke (180,216,231);
            strokeWeight (3);
            arc(uparc_x, uparc_y, arc_w, arc_h, PI, TWO_PI);
        }
    }

//pink dots
for (var py = 25; py < 500; py += 50) {
    for (var px = 50; px < 500; px += 200) {
            fill(255,195,194);
            noStroke();
            ellipse(px,py,10,10);
        }
    }

//yellow dots
for (var yy = 25; yy < 500; yy += 50) {
    for (var yx = 150; yx < 500; yx += 200) {
            fill(253,253,150);
            noStroke();
            ellipse(yx,yy,10,10);
        }
    }

noLoop();

}

I was originally planning on doing a wallpaper that resembles string lights:

Sketch: green strings and yellow lights on a beige background

However, I realized that as I was creating the wallpaper, it was more aesthetically pleasing to do different patterns and colors, rather than just string lights. I used a lot of pastel colors, to evoke a soft feeling.

Erin Fuller – Wallpaper

//Erin Fuller
//SectionA
//efuller@andrew.cmu.edu
//Project 05 - WallPaper


function setup() {
    createCanvas(600, 400);
    noLoop();
}

function draw() {
    background(255, 206, 233);
    for (var i = -1; i < 6; i++) { //for loop to make grid of "tiles"
        for (var j = -1; j < 4; j++) { 
        rX = i * 100; // tile spacing
        rY = j * 100;// tile spacing
        tile(); //runs "tile" function where all my actual components are
        }
    }
}

function tile() {
    squiggle(); //runs two arc functions to make "squiggle"
    triangles(); //draws 2 triangles offset
    circles(); //draws 2 circles offset
}

function squiggle() {
    strokeWeight(6);
    stroke(0);
    noFill();
    arc(rX + 30, rY, 30, 30, PI, 3 * HALF_PI); // upper curve
    arc(rX + 30, rY + 70, -30, 30, 0, 3 * HALF_PI); // lower curve
}

function triangles() {
    noStroke();
    fill(0); // background triangle always black
    triangle(rX + 80, rY + 5, rX + 35, rY + 55, rX + 80, rY + 55);

    fill(random(255), random(255), random(255)); // makes front triangle fun colors!
    triangle(rX + 85, rY + 10, rX + 40, rY + 60, rX + 85, rY + 60);
}

function circles() {
    noStroke();
    fill(0); //background circle always black
    ellipse(rX + 30, rY + 25, 15, 15);

    fill(random(255), random(255), random(255)); //makes front circle fun colors!
    ellipse(rX + 25, rY + 20, 15, 15);
}


My inspiration was that I wanted my wallpaper to look like a fun 90s pattern. I made the objects in separate functions and tiled them using a for-loop. A neat thing is the triangle and circles are random fills so everytime you refresh it is a color!

Sarah Yae Looking Outwards 5 Section B


I admire this project, ‘Morning Fog’ because the artist was able to render a realistic, yet 3D cartoon characters in a picturesque setting. It almost feels as if the characters could move in any moment. The shadowing used in this 3D generated work makes the artwork more realistic.  The realistic background and the decorations used make the background more alive. However, the cartoon aspect of this work is shown from the physical appearance of human characters. In order to create this artwork, I suppose she used applications like Photoshop, Maya or ZBrush to create this artwork.

Morning Fog  was created by Leticia Gillet in 2015. Link to the work is: https://leticiarg.artstation.com/projects/Bv5or

Morning Fog by Gillet


Rjpark – Project 05 – Wallpaper

rjpark_wallpaper

var z = 150; // "zooming" the lines
var sw = z/20; // stroke weight of lines
var swl = z/100; // stroke weight of leaves
var l = z/10; // leaves placement on lines
var ls = z/5; // leaves size

function setup() {
    createCanvas(600, 600);
   	background(190, 175, 155);
    noLoop();
}

function draw() {
	// set 1 of vertical lines (in even numbered columns)
   	// vx1 = variable for x coordinate movement
   	// vy1 = variable for y coordinate movement
   	for (var vx1 = 0; vx1 < width/10; vx1 ++) {
   		for (var vy1 = 0; vy1 < width/10; vy1 ++) {
   			stroke(90, 70, 60);
   			strokeWeight(sw);
   			line((z/2)+z*vx1, z*vy1, (z/2)+z*vx1, (z/2)+z*vy1);
   		}
   	}
	// set 2 of vertical lines (in odd numbered columns)
   	// vx2 = variable for x coordinate movement
   	// vy2 = variable for y coordinate movement
   	for (var vx2 = 0; vx2 < width/10; vx2 ++) {
   		for (var vy2 = 0; vy2 < width/10; vy2 ++) {
   			stroke(120, 50, 20);
   			strokeWeight(sw);
   			line(z*vx2, (z/2)+z*vy2, z*vx2, z+z*vy2);
   		}
   	}
	// set 1 of horizontal lines (in even numbered columns)
   	// hx1 = variable for x coordinate movement
   	// hy1 = variable for y coordinate movement
   	for (var hx1 = 0; hx1 < height/10; hx1 ++) {
   		for (var hy1 = 0; hy1 < height/10; hy1 ++) {
   			stroke(120, 50, 20);
   			strokeWeight(sw);
   			line((z/2)+z*hx1, (z/2)+z*hy1, z+z*hx1, (z/2)+z*hy1);
   		}
   	}
	// set 2 of horizontal lines (in odd numbered columns)
   	// hx2 = variable for x coordinate movement
   	// hy2 = variable for y coordinate movement
   	for (var hx2 = 0; hx2 < height/10; hx2 ++) {
   		for (var hy2 = 0; hy2 < height/10; hy2 ++) {
   			stroke(90, 70, 60);
   			strokeWeight(sw);
   			line(z*hx2, z*hy2, (z/2)+z*hx2, z*hy2);
   		}
   	}
   	// set 1 of leaves on first xy coordinate of vertical lines (set 1)
   	for (var vx1 = 0; vx1 < width/10; vx1 ++) {
   		for (var vy1 = 0; vy1 < width/10; vy1 ++) {
   			fill(80, 110, 75);
   			noStroke();
   			ellipse((z/2)+z*vx1+l, z*vy1, ls, ls); // leaf body
   			triangle((z/2)+z*vx1+l, z*vy1-(ls/2), (z/2)+z*vx1+l+(ls/2), z*vy1, (z/2)+z*vx1+l+(ls/2), z*vy1-(ls/2)); // leaf tip

   			stroke(0);
   			strokeWeight(swl);
   			line((z/2)+z*vx1+(ls/5), z*vy1+(ls/3), (z/2)+z*vx1+l, z*vy1); // leaf veins

   	   		fill(130, 140, 90);
   	   		noStroke();
   	   		ellipse((z/2)+z*vx1, z*vy1-l, ls, ls); // leaf body
   			triangle((z/2)+z*vx1, z*vy1-l-(ls/2), (z/2)+z*vx1+(ls/2), z*vy1-l, (z/2)+z*vx1+(ls/2), z*vy1-l-(ls/2)); // leaf tip

   			stroke(0);
   			strokeWeight(swl);
   			line((z/2)+z*vx1-(ls/3), z*vy1-(ls/5), (z/2)+z*vx1, z*vy1-l); // leaf veins
   		}
   	}
   	// set 2 of leaves on first xy coordinate of horizontal lines (set 1)
   	for (var hx1 = 0; hx1 < width/10; hx1 ++) {
   		for (var hy1 = 0; hy1 < width/10; hy1 ++) {
   			fill(205, 185, 90);
   			noStroke();
   			ellipse((z/2)+z*hx1-l, (z/2)+z*hy1, ls, ls); // leaf body
   			triangle((z/2)+z*hx1-l-(ls/2), (z/2)+z*hy1, (z/2)+z*hx1-l, (z/2)+z*hy1+(ls/2), (z/2)+z*hx1-l-(ls/2), (z/2)+z*hy1+(ls/2)); // leaf tip

   			stroke(0);
   			strokeWeight(swl);
   			line((z/2)+z*hx1-(ls/5), (z/2)+z*hy1-(ls/3), (z/2)+z*hx1-l, (z/2)+z*hy1); // leaf veins

   			fill(250, 240, 190);
   	   		noStroke();
   	   		ellipse((z/2)+z*hx1, (z/2)+z*hy1+l, ls, ls); // leaf body
   	   		triangle((z/2)+z*hx1-(ls/2), (z/2)+z*hy1+l, (z/2)+z*hx1, (z/2)+z*hy1+l+(ls/2), (z/2)+z*hx1-(ls/2), (z/2)+z*hy1+l+(ls/2)); // leaf tip

   	   		stroke(0);
   			strokeWeight(swl);
   			line((z/2)+z*hx1+(ls/3), (z/2)+z*hy1+(ls/5), (z/2)+z*hx1, (z/2)+z*hy1+l); // leaf veins
   		}
   	}
   	// set 3 of leaves on first xy coordinate of vertical lines (set 2)
   	for (var vx2 = 0; vx2 < width/10; vx2 ++) {
   		for (var vy2 = 0; vy2 < width/10; vy2 ++) {
   			fill(80, 110, 75);
   			noStroke();
   			ellipse(z*vx2+l, (z/2)+z*vy2, ls, ls); // leaf body
   			triangle(z*vx2+l, (z/2)+z*vy2-(ls/2), z*vx2+l+(ls/2), (z/2)+z*vy2, z*vx2+l+(ls/2), (z/2)+z*vy2-(ls/2)); // leaf tip

   			stroke(0);
   			strokeWeight(swl);
   			line(z*vx2+(ls/5), (z/2)+z*vy2+(ls/3), z*vx2+l, (z/2)+z*vy2); // leaf veins

   	   		fill(130, 140, 90);
   	   		noStroke();
   			ellipse(z*vx2, (z/2)+z*vy2-l, ls, ls); // leaf body
   			triangle(z*vx2, (z/2)+z*vy2-l-(ls/2), z*vx2+(ls/2), (z/2)+z*vy2-l, z*vx2+(ls/2), (z/2)+z*vy2-l-(ls/2)); // leaf tip

   			stroke(0);
   			strokeWeight(swl);
   			line(z*vx2-(ls/3), (z/2)+z*vy2-(ls/5), z*vx2, (z/2)+z*vy2-l); // leaf veins
   		}
   	}
   	// set 4 of leaves on first xy coordinate of horizonal lines (set 2)
   	// replaces leaves on second xy coordinate of vertical lines (set 2) because first coordinate of first row of horizontal lines need leaves
   	for (var hx2 = 0; hx2 < height/10; hx2 ++) {
   		for (var hy2 = 0; hy2 < height/10; hy2 ++) {
   			fill(205, 185, 90);
   			noStroke();
   			ellipse(z*hx2-l, z*hy2, ls, ls); // leaf body
   			triangle(z*hx2-l-(ls/2), z*hy2, z*hx2-l, z*hy2+(ls/2), z*hx2-l-(ls/2), z*hy2+(ls/2)); // leaf tip

   			stroke(0);
   			strokeWeight(swl);
   			line(z*hx2-(ls/5), z*hy2-(ls/3), z*hx2-l, z*hy2); // leaf veins

   	   		fill(250, 240, 190);
   	   		noStroke();
   	   		ellipse(z*hx2, z*hy2+l, ls, ls); // leaf body
   	   		triangle(z*hx2-(ls/2), z*hy2+l, z*hx2, z*hy2+l+(ls/2), z*hx2-(ls/2), z*hy2+l+(ls/2)); // leaf tip

   	   		stroke(0);
   			strokeWeight(swl);
   			line(z*hx2+(ls/3), z*hy2+(ls/5), z*hx2, z*hy2+l); // leaf veins
   		}
   	}

}

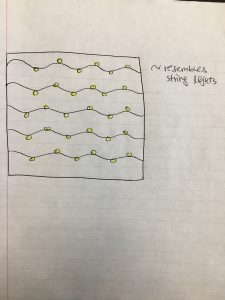
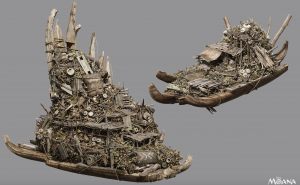
I knew from the start that I wanted to implement nature and earth tones into my wallpaper. So, I created a simple, stair-shaped pattern for vines and pairs of leaves at each intersection of the stair-shaped lines.


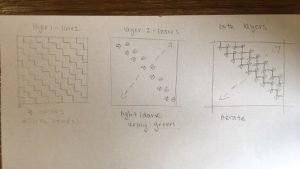
Although this looks like an easy pattern to code, there were a lot of different parts to consider. I had to iterate the vertical and horizontal lines both across and down; I had to make 4 double for-loops to make this happen. So, there are 2 sets of vertical and horizontal lines each. You can see the 2 sets by color (red-ish brown and dark brown). I also had to iterate the pairs of leaves at one end of each vertical and horizontal line (2 sets for each), so, I also had to make 4 double for-loops to make this happen.

Lastly, I created global variables that make it easier for the user to change the dimensions of the shapes in the wallpaper. Of those global variables, only one has to be changed because the others are dependent on that one global variable, z. If the user changes z, the entire wallpaper will either “zoom” in or out.

Project 5: Wallpaper

sketch

/* Jaclyn Saik 
Section E
jsaik@andrew.cmu.edu
Project-05-Wallpaper
Eyeballs
*/

function setup() {
    createCanvas(600, 600);
    background("CadetBlue");
    var xs = 70; //x spacing
    var ys = 50 //y spacing
    var yo = 30; //y offset
    var xo = 30; //x offset

    
    for (var y = 0; y < 20; y++) {
        for (var x = 0; x < 20; x++)  {
            if (x % 2 > 0) { //odd-numbered rows are offset by 1.5 times the y position 
                yo = 30 * 1.5;
                //sleepy eye
                strokeWeight(4);
                stroke("DarkSlateGray"); 
                line(px-3, py-3, px-20, py-15);
                line(px-4, py-3, px-25, py-10);
                line(px-5, py, px-28, py-3);
                strokeWeight(2);
                line(px+20, py+2, px+10, py+10);
                fill("Burlywood");
                arc(px, py, 40, 40, PI, 0);
                fill("PeachPuff");
                arc(px, py, 40, 20, PI, 0);
                arc(px, py, 40, 12, 0, PI);
                fill("DarkSlateGray");
                ellipse(px, py-5, 10, 10);

                //accent dots, which are connected to the odd-numbered rows, so sleepy eyeball
                strokeWeight(0);
                fill("Yellow");
                ellipse(px-35, py-35, 2, 4);
                fill("gold");
                ellipse(px-12, py-30, 3, 3);
                fill("Orange");
                ellipse(px+45, py-15, 4, 3);
                fill("Khaki");
                ellipse(px+30, py-20, 3, 3);

            } else if (x % 2 == 0) { //even numbered rows stick to original variable values
                yo = 30;
                //wide awake eye 
                strokeWeight(2);
                line(px-4, py-3, px-28, py-7);
                line(px-5, py, px-35, py-3);
                fill("PeachPuff");
                arc(px, py, 40, 40, PI, 0);
                fill("AliceBlue");
                arc(px, py, 40, 30, PI, 0);
                arc(px, py, 40, 20, 0, PI);
                fill("Sienna");
                ellipse(px, py-3, 17, 17)
                fill("DarkSlateGray");
                ellipse(px, py-3, 7, 7);

                //some fun text! 
                textSize(7);
                strokeWeight(1);
                text("z z . . ", px+12, py-27);

            }
            var py = yo + y * ys; //position y is y offset plus y multplied by spacing
            var px = xo + x * xs; //position x is x offset plus x multplied by spacing
            

        }

    }
    noLoop(); //so that it is static
}


This project was really fun to do, probably because it’s exciting to see what a design looks like when the visual elements repeatedly interact with themselves across a page. I was inspired by wallpapers that were loud and intrusive, since I felt like the broke the classic look of something appealing and ornamental, and would be something I would be more likely to put in my own home. I found an image online from an artist who creates odd, curious designs.

Inked eyeball wallpaper design

I wanted to see if I could create something on the same subject matter, but with a different, more computed aesthetic. I played a lot with stoke weights and colors to achieve the final look that I wanted, and got to experiment using text as an ornamental feature. I had to be careful with the text and make sure it didn’t say anything that would be irritating if repeated often. I used what I learned Assignment 05-B about offsetting grids in order to alternate the spacing between rows, which I think makes the wallpaper flow better when looking at it from far away.  Here are some of my initial sketches for decided what type of eyes to include.

My crude sketches

Looking Outwards 5 – 3D Computer Graphics

Star Wars: Rogue One, the second of the recent Star Wars spin offs, was a great success in the box office. This movie, unlike the other recent Star Wars remake, had a more difficult chronological placement. As a result, the writers of the film brought back many characters from a movie that was made in 1977. Due to the large span of time that has passed, one of the supporting actors, Peter Cushing, had passed away in the meantime. Instead of writing his character out of the new movie, the writers decided to ambitiously include the character Cushing played by recreating him through computer generation. Motion Capture Technology is a method of computer animation that involves using a real life actor whose motion in a role is recorded with intricate detail and then mapped to a CGI model that perfectly mimics the actor. The computer generated model of Cushing was rendered based on a plaster cast of his face that had been made in the 80s. The mapping onto this rendering was created by the actor wearing a mask with dots which move with his facial expressions and then replicating these same dot’s movements on the computer model. The effect is a flawlessly animated replication of a dead actor, the first time such a stunt has been pulled off.

Sophie Chen – Looking Outwards – 05

TedX Sydney 2018 – Rich Nosworthy

Still from the final video (TEDx Sydney Love Is Love)

Rich Nosworthy is a 3D motion designer located in Auckland, New Zealand. TedX Sydney 2018, directed by Scott Geerson, explores the theme of humankind and takes the audience through museum galleries where the past, present and future collides. At first glance, I had no idea that the entire video was created through 3D motion graphics with Cinema4D. Seeing sculptures that are traditionally still and in museums be animated and put in an entirely new setting successfully conveyed the theme of evaluating our current place within humanity’s short timeline. I think Nosworthy not only did a beautiful job with the motion graphics, but also used it in a meaningful way in that he created something that combined computer graphics with something that we associate with history and the past, mixing classical art with modern subjects.

Process of one of the clips created for TEDx Sydney 2018.


Jamie Dorst Project 05 Wallpaper

sketch

/*
Jamie Dorst
jdorst@andrew.cmu.edu
Section A
Project-05
*/

var xPosition = -25;
var yPosition = -10;
var r = 133;
var g = 198;
var b = 199;

function setup() {
    createCanvas(600, 400);
    background(255);
}

function concentricCircle() {
    // draw concentric circles with diameter 50
    var diam = 50;
    // draw circles inside the previous circle until 0
    for(var i = 50; i > 0; i -= 10) {
        fill(r, g, b);
        ellipseMode(CENTER);
        ellipse(xPosition, yPosition, diam, diam);
        diam -= 10;
    }
}

function draw() {
    // make an offset grid of concentric circles
    for(var j = 0; j < 625; j += 50) {
        xPosition += 25;
        r += 5;
        g -= 2;
        for(var k = 0; k < 825; k += 50){
            concentricCircle()
            yPosition += 25;
            b -= 1;
        }
        yPosition = -10;
    }
}

This project was pretty cool once I started going. I drew inspiration from this picture, and the scale-like texture it has.

I had trouble figuring out how to get the for loops to work at first, but once I figured that out it went pretty smoothly. I took the concept from the lab this week of making a color gradient, and then also tried defining my own variable to actually make the concentric circles. Overall I’m happy with how it turned out, and I think I learned from this.

Emily Zhou –– Wallpaper

sun & pyramid

var sideL = 80; // side length of each square tile

function setup() {
    createCanvas(400, 480);
}

function draw() {
    // blue background
    background(142, 154, 175);
    // green triangles
    for (var y = 0; y <= height; y += sideL) {
        for (var x = sideL; x <= width; x += sideL) {
             fill(174, 181, 171);
             noStroke();
             triangle(x, y, x - sideL, y + sideL, x, y + sideL);
        }
    }
    // tan triangles
    for (var y = sideL / 2; y <= height; y += sideL) {
        for (var x = sideL / 2; x <= width; x += sideL) {
             fill(229, 211, 197);
             noStroke();
             triangle(x, y, x - sideL / 2, y + sideL / 2, x, y + sideL / 2);
        }
    }
    // orange triangles
    for (var y = sideL / 2; y <= height; y += sideL) {
        for (var x = sideL / 2; x <= width; x += sideL) {
             fill(229, 162, 126);
             noStroke();
             triangle(x, y, x, y + sideL / 2, x + sideL / 2, y + sideL / 2);
        }
    }
    // 3/4 circle
    for (var y = sideL / 2; y <= height; y += sideL) {
        for (var x = sideL / 2; x <= width; x += sideL) {
             fill(237, 238, 192);
             noStroke();
             arc(x, y, sideL / 2, sideL / 2, 3/4 * PI, 1/4 * PI);
        }
    }
    noLoop();
}

My wallpaper is meant to be an abstract representation of the sun rising behind a pyramid. I vaguely remember seeing a wallpaper at a museum that represented the Pyramid of Giza using two like-toned triangles. Starting with that idea, I played around with layers of overlapping shapes and colours.

In the process, I found it much easier to control the shapes’ position after setting a tile length variable. I am happy with the way it turned out using just triangles and one circle per tile. Even though I like the abstraction and simplicity, I’d like to explore more organic forms in future projects.

Jessica Timczyk – Looking Outwards 05

The above image is a still from the Disney movie Moana, showing the large rendered boats that the artist worked on in the background.

Pedro Conti is a Brazilian 3D computer graphics artist, with one of his recent and most interesting project being a 3D graphics artist on Disney’s Moana movie in 2016. He utilized 3D computer graphics to create many backgrounds, landscapes and characters in the movie. Specifically looking at the Kakamora barges he helped to create in one of the scenes of the movie, the project is so impressive due to the shear number of objects that cover the structure and how many shots (140) were needed for the sequence.

The image shows a close up shot of the rendered boats prior to being placed in the scene.

The artist utilized the program XGen, which is a geometry instancer, to populate the boat with all of the objects on it. While the artist had to follow the artistic direction of the movie, the artist’s vision is manifested in how and where different items are  placed on the boat.