Sharon Yang Looking Outward 05 – 3D Art

Sergi Caballer is a 3D character modeler working at Walt Disney Animation Studios. He is the creator of 3D characters in various movies, some of the very well-known ones including Zootopia and The Pirate!. The 3D art project that I especially admire and so looked further into was Crocodile character from the film ‘Justin and the Knights of Valour’. As the film targeted towards quite young kids, the character is made to look both witty and friendly though crocodiles are typically described to be terrifying and vicious. Yet, the features of a crocodile in the character are mostly present and are quite realistic. As Caballer elaborates on this art work, it consisted of character modeling, facial shapes modeling and UV´s, which are all intricate processes, and it has taken two years (from 2009 to 2010) for completion. The work was done through using Softimage and uvLayout. He has fully adjusted the main facial structures as well as the additional corrective shapes, allowing for the character’s greater facial movements, once again, appropriate for the film’s audience.

Sergi Caballer’s Crocodile in the film ‘Justin and the Knights of Valour’ 2009-2010


Audrey Zheng-Looking Outwards-05

Peachy Character by Anneka Tran
Girl Head
Girl Head
Mr. Radish
Mr. Raddish


I’m in love with Anneka Tran’s whimsical, simple 3D characters. They’re beautiful, charming and captivating. Something draws me into these low poly designs: they have a cute quality that the high rendered characters in first person shooter video games (say Overwatch or Fortnite) don’t have. I like Anneka’s style because it is unique, and the cartoonish quality gives her characters more life than semi realistic to hyper realistic 3D models. Anneka uses Maya, and having using Maya before, I know how time-consuming it is to model anything complex. I also admire the low poly style for how time efficient it is. She adds the texture in Photoshop. I think adding complicated texturing such as fur or grain would actually take away from the cuteness. She also doesn’t use any shaders. In the above examples, she only used Ambient Occlusion.

See more of Anneka Tran’s work here.

Sharon Yang Project 05 Wallpaper

Project

/*Sharon Yang
Section C
junginny
Project-05
*/


function setup() {
    createCanvas(500,600);
    background(253,254,210);
    noStroke();
    //6 rows of donuts
    for (var y = 0; y < 6; y++) {
        if (y % 2 == 0) { //hexagonal formation
            for (var x = 0; x < 6; x++) { 
                fill(225,182,128);
                noStroke();
                ellipse(30+x*110, 20+y*110, 75, 75); //base of donut
                if (x % 2 == 0) {
                    fill(246,166,199); //strawberry glaze
                }
                else {
                    fill(95,42,22); //chocolate glaze
                }
                noStroke();
                ellipse(30+x*110, 20+y*110, 65, 65);
                fill(253,254,210);
                noStroke();
                ellipse(30+x*110, 20+y*110, 30, 30); //donut hole
                //sprinkles!
                if (x % 2 == 0) {
                    strokeWeight(3); //chocolate sprinkles
                    stroke(95,42,22);
                    line(5+x*110,y*110,12+x*110,3+y*110); //top left sprinkle
                    line(x*110+35,y*110+38,x*110+40,y*110+45); //bottom right sprinkle
                    line(x*110+56,y*110+5,x*110+50,y*110+15); //top right sprinkle
                    line(2+x*110,30+y*110,8+x*110,27+y*110); //bottom left sprinkle
                }
                else {
                    strokeWeight(3); //colorful sprinkles
                    stroke(185,85,130);
                    line(5+x*110,y*110,12+x*110,3+y*110); //top left sprinkle
                    stroke(255);
                    line(x*110+35,y*110+38,x*110+40,y*110+45); //bottom right sprinkle
                    stroke(239,245,174);
                    line(x*110+56,y*110+5,x*110+50,y*110+15); //top right sprinkle
                    stroke(62,170,230);
                    line(2+x*110,30+y*110,8+x*110,27+y*110); //bottom left sprinkle
                }
            }
        }
        else { 
            for (var x = 0; x < 4; x++) {
                fill(225,182,128);
                noStroke();
                ellipse(90+x*110, 20+y*110, 75, 75);
                if (x % 2 == 1) {
                    fill(246,166,199);
                }
                else {
                    fill(95,42,22);
                }
                noStroke();                
                ellipse(90+x*110, 20+y*110, 65, 65);
                fill(253,254,210);
                noStroke();
                ellipse(90+x*110, 20+y*110, 30, 30);
                //sprinkles!
                if (x % 2 == 1) {
                    strokeWeight(3); //chocolate sprinkles
                    stroke(95,42,22);
                    line(65+x*110,y*110,72+x*110,3+y*110); //top left sprinkle
                    line(x*110+95,y*110+38,x*110+100,y*110+45); //bottom right sprinkle
                    line(x*110+116,y*110+5,x*110+110,y*110+15); //top right sprinkle
                    line(62+x*110,30+y*110,68+x*110,27+y*110); //bottom left sprinkle
                }
                else {
                    strokeWeight(3); //colorful sprinkles
                    stroke(185,85,130);
                    line(65+x*110,y*110,72+x*110,3+y*110); //top left sprinkle
                    stroke(255);
                    line(x*110+95,y*110+38,x*110+100,y*110+45); //bottom right sprinkle
                    stroke(239,245,174);
                    line(x*110+116,y*110+5,x*110+110,y*110+15); //top right sprinkle
                    stroke(62,170,230);
                    line(62+x*110,30+y*110,68+x*110,27+y*110); //bottom left sprinkle
                }
            }
        }
    }
    noLoop();
}

While the project was very straightforward and quite easy, it was also a lot of fun and I could understand better the use of for loops and nested for loops. I feel more comfortable declaring the variables I need within the for loops and adjusting the increments.

I have been inspired by the google image attached.

Lingfan Jiang- Looking Outwards 05

This project is done by four students from the University of Hertfordshire in 2016. I am always a big fan of 3d animation. Being an architecture student myself, I also do a lot of photorealistic renderings, and I understand how hard they are and how long they take to make perfect light and shadow. For animations, it is definitely even harder to do. I am always amazed by the smooth and realistic movement from the main character. The details of these characters are just incredible.

Also, animations are also very good ways to present ideas that sometimes cannot be accomplished in normal films. For example, different from other videos that calling on protecting the planet, the artists uses an alien background and hides the theme to the very end which really surprises me in the end. The authors really presented their idea well within three minutes.

Furthermore, it is also very surprising to to know that the project was done by four university students with some help from others, because the quality of the whole video and the idea behind it are both fascinating.

Lingfan Jiang – Project 05 – Wallpaper

lingfanj-project05

//Lingfan Jiang
//Section B
//lingfanj@andrew.cmu.edu
//Project-05

var tx; //triangle positions
var tw = 60; //triangle width

function setup() {
    createCanvas(600, 600);
}

function draw(){
    background(229, 249, 224);
    translate(-150, -200); //make sure the pattern fills canvas

    for (var tx = 0; tx < 800; tx += (1.25 * tw)){ //make sure the distance between the triangles stays 1.25 in x axis
        for (var j = 0; j < 20; j++){ //make the pattern repeats in the y axis

            fill(163, 247, 181);
            stroke(229, 249, 224);
            strokeWeight(10); //create a different visual effect where one group of triangles has lineweight and the other don't
            //calculating the positions of each points using tw and tx
            //basically all the triangles are based on the first triangle created in the left up corner
            triangle(tx + (j * tw / 4), (sqrt(3) * tx / 5) + (j * 3 * sqrt(3) / 4 * tw),
                    tx + tw + (j * tw / 4), (sqrt(3) * tx / 5) + (j * 3 * sqrt(3) / 4 * tw),
                    tx + tw / 2 + (j * tw / 4), (sqrt(3) * tx / 5) + (sqrt(3) * tw / 2) + (j * 3 * sqrt(3) / 4 * tw));


            fill(64, 201, 162);
            noStroke();
            //calculating the other group of triangles using tw and tx
            triangle(tx + 0.75 * tw + (j * tw / 4), (sqrt(3) * tx / 5) + (sqrt(3) * tw) / 4 + (j * 3 * sqrt(3) / 4 * tw), 
                    tx + 1.75 * tw + (j * tw / 4), (sqrt(3) * tx / 5) + (sqrt(3) * tw) / 4 + (j * 3 * sqrt(3) / 4 * tw), 
                    tx + 1.25 * tw + (j * tw / 4), (sqrt(3) * tx / 5) - (sqrt(3) * tw) / 4 + (j * 3 * sqrt(3) / 4 * tw));
        }
    }
}

This is the starting idea of my wallpaper, and I really liked how triangles form the hexagon in the middle. However, when I get into the codes, I realized the difficulties to code triangles. In order to form the triangles, I have to calculate the positions of each point and the distance with other ones so that they could form the hexagon perfectly. It is also hard to lay out those triangles since they do not array in the x or y-axis directly. Instead, they move diagonally. Therefore, it is harder to use the nested loop. In the end, I played a little bit with line weights and color to make it look nicer and more interesting.

Kyle Leve-Project-05-Wallpaper

sketch

// Kyle Leve
// kleve@andrew.cmu.edu
// Section A
// Project-05-Wallpaper

var x = 0;
var y = 10;
var spacing = 20;
var spacing2 = 440;
var spacing3 = 50;
var cirX = 15;
var cirY = 10;
var cirX2 = 240;
var cirY2 = 10;
var cirX3 = 50;
var cirY3 = 50;
var curveX = 240;
var curveY = 240;

function setup() {
    createCanvas(480, 480);
    background(0, 100, 200);
    noLoop();
}

function draw() {
	for (y = 0; y <= height; y += spacing) { // Creates repeated purple horizontal lines
		stroke('purple');
		strokeWeight(3);
		line(x, y, width, y);
	}

	for (cirX = 0; cirX < (0.5 * width); cirX += spacing) { // Creates light blue repeated circles
		for (cirY = 0; cirY < height; cirY += spacing) {
		    fill('skyblue');
		    stroke('blue');
		    strokeWeight(2);
		    ellipse(cirX + 10, cirY + 10, 15, 15);
		}
	}

	for (cirX2 = 240; cirX2 <= width; cirX2 += spacing) { // Creates light green repeated circles
		for (cirY2 = 0; cirY2 < height; cirY2 += spacing) {
		    fill('lightgreen');
		    stroke('green');
		    strokeWeight(2);
		    ellipse(cirX2 + 10, cirY2 + 10, 15, 15);
		}
	}

	for (cirX3 = 0; cirX3 <= 480; cirX3 += spacing2) { // Creates the four silver circles in the corners
		for (cirY3 = 0; cirY3 <= 480; cirY3 += spacing2) {
			fill('silver');
			stroke(0);
			ellipse(cirX3 + 20, cirY3 + 20, 15, 15);
		}
	}
    // Creates the purple and orange patterns in the center
	fill('violet');
	stroke('purple')
	strokeWeight(5);
	curve(curveX, height, curveX, height, curveX, 0.75 * height, 800, 280);
	
	fill('orange');
	stroke('red')
	strokeWeight(5);
	curve(curveY, height, curveY, height, curveY, 0.75 * height, -320, 280);
	
	fill('violet');
	stroke('purple')
	strokeWeight(5);
	curve(curveX, 0.75 * height, curveX, 0.75 * height, curveX, 0.5 * height, 800, 140);
    
    fill('orange');
	stroke('red')
	strokeWeight(5);
	curve(curveY, 0.75 * height, curveY, 0.75 * height, curveY, 0.5 * height, -320, 140);
	
	fill('violet');
	stroke('purple')
	strokeWeight(5);
	curve(curveX, 0.5 * height, curveX, 0.5 * height, curveX, 0.25 * height, 800, 0);
    
    fill('orange');
	stroke('red')
	strokeWeight(5);
	curve(curveY, 0.5 * height, curveY, 0.5 * height, curveY, 0.25 * height, -320, 0);
    
    fill('violet');
	stroke('purple')
	strokeWeight(5);
	curve(curveX, 0.25 * height, curveX, 0.25 * height, curveX, 0, 800, -100);
	
	fill('orange');
	stroke('red')
	strokeWeight(5);
	curve(curveY, 0.25 * height, curveY, 0.25 * height, curveY, 0, -320, -100);
}

Starting this project I knew I wanted to experiment with different sides of the canvas. I decided to make the center of the canvas a divider where I would have the same thing on both sides, however different colors. I experimented with the curve function to create the centerpiece rather than doing the circles that I had intended. Overall, I enjoyed this project because my ideas were able to develop and evolve after the initial draw phase.

Kyle Leve-LO-Week 05-Section A

One of the first projects that made me notice graphics was the movie Avatar. Created by James Cameron, after years of waiting for technology to advance enough to capture the movie, the movie finally debuted in 2009. I remember watching the movie and being amazed at the depth the movie had. I felt as though I was on Pandora experiencing all the lights and sounds around me. Weta Digital was the leading visual effects company throughout the project, and they used about 4,000 Hewlett-Packard servers and 35,000 processor cores to create and store all the visual elements of the movie. Even though there were real human characters in the movie, most of the characters and the entire setting had to be computer generated. What made this project so special however, was the amount of detail put into every aspect of the setting. The setting was captured in a way that had never been done before. Even though it was computer-generated, it looked so real and even now looking back at the movie, I still get the same feelings as I did nine years ago.

For more info: https://en.wikipedia.org/wiki/Avatar_(2009_film)#Visual_effects

Kevin Riordan Looking Outwards-05-Section C

Troglodita Demonstration Video

For this week’s Looking Outwards, I chose to look at a 3D modeling work done by Sergi Caballer. This project was done in 2012 for The Spa Studios, and was made entirely in Python and Maya. I admire how much control over the character the user has, as shown in the demonstration, and how much change there can be in the facial structure. The character’s body and face can be changed to any expression by playing around with the program, which I also admire. The facial rig was created with a joint-based system over a coordinate plane, which is how so many different details can be moved around. Below are some individual elements and closeups of the rig, showing how much movement is possible in the body.

Arm and Leg of Troglodita
Arm movement of Troglodita

Looking Outwards 05

I was very excited to see that this weeks topic was 3D generated graphics because I have always been very interested in fractals. In concept, fractals are rather simple to wrap your head around, but they can quickly become extremely intricate and complicated. Thus there are many programs on the web to generate them and I have perused for years.

Ok so my favorite one overall because it has some really cool GPU accelerated advanced ray tracing pretty picture features is Mandelbulber. This one has stuff like volumetric fog and advanced reflections as well as some really cool volumetric lighting.

Another really good one, which I think has a much better preview mode (and therefore is better for laptops) is Mandelbulb3d. This one has some really cool features like the ability to slice fractals (which allows them to be reconstructed into 3d models. It also has a powerful hybrid engine which allows for fractal combinations.

Mandelbulb Accretions of Fungal matter

I really like Mandelbulb in particular just because it introduces the concept of fractal generation in a very simple to use software so virtually anyone can create 3D fractals and artwork.

Kevin Riordan Project-05-Wallpaper-Section C

kzr wallpaper

/*Kevin Riordan
Section C
kzr@andrew.cmu.edu
project_05*/
function setup() {
    createCanvas(600,400);
    background(139,210,247);
    var yStart=50;
    var xStart=50;
    var height=Math.sqrt(3)/2; //making hexagon shaped grid
    for (var rows=-1; rows<7; rows++) {
        if(rows%2==0) { //for even numbered rows
            for (var columns=0; columns<10; columns++) {
                var yPos=yStart+rows*80*height;
                var xPos=xStart+columns*80;
                //bunny
                //left ear
                noStroke();
                fill(255);
                arc(xPos-15,yPos,10,80,PI,2*PI);
                fill(233,138,159);
                arc(xPos-15,yPos,6,65,PI,2*PI);
                //right ear
                fill(255);
                arc(xPos+15,yPos,10,80,PI,2*PI);
                fill(233,138,159);
                arc(xPos+15,yPos,6,65,PI,2*PI);
                //head
                fill(255);
                ellipse(xPos,yPos,50,40);
                //nose
                fill(0);
                arc(xPos,yPos,8,8,0,PI);
                fill(233,138,159);
                triangle(xPos-3,yPos,xPos+3,yPos,xPos,yPos+4);
                //mouth
                stroke(0);
                line(xPos,yPos+4,xPos,yPos+8);
                line(xPos-3,yPos+11,xPos,yPos+8);
                line(xPos,yPos+8,xPos+3,yPos+11);
                //left eye
                noStroke();
                fill(0);
                ellipse(xPos-15,yPos-5,4,4);
                //right eye
                ellipse(xPos+15,yPos-5,4,4);
                //carrot
                //green parts
                fill(54,116,54);
                triangle(xPos-40,yPos+5,xPos-49,yPos-35,xPos-38,yPos-29);
                triangle(xPos-40,yPos+5,xPos-35,yPos-31,xPos-39,yPos-26);
                fill(89,169,61);
                triangle(xPos-40,yPos+5,xPos-48,yPos-20,xPos-38,yPos-15);
                triangle(xPos-40,yPos+5,xPos-34,yPos-21,xPos-39,yPos-14);
                //orange part
                fill(229,120,56);
                arc(xPos-40,yPos+5,20,4,PI,2*PI);
                triangle(xPos-30,yPos+5,xPos-50,yPos+5,xPos-40,yPos+40);
            }
        }
        else { //for odd numbered rows
            for (var columns=-1; columns<11; columns++) {
                var yPos=yStart+rows*80*height;
                var xPos=xStart+40+columns*80;
                //bunny
                //left ear
                noStroke();
                fill(255);
                arc(xPos-15,yPos,10,80,PI,2*PI);
                fill(233,138,159);
                arc(xPos-15,yPos,6,65,PI,2*PI);
                //right ear
                fill(255);
                arc(xPos+15,yPos,10,80,PI,2*PI);
                fill(233,138,159);
                arc(xPos+15,yPos,6,65,PI,2*PI);
                //head
                fill(255);
                ellipse(xPos,yPos,50,40);
                //nose
                fill(0);
                arc(xPos,yPos,8,8,0,PI);
                fill(233,138,159);
                triangle(xPos-3,yPos,xPos+3,yPos,xPos,yPos+4);
                //mouth
                stroke(0);
                line(xPos,yPos+4,xPos,yPos+8);
                line(xPos-3,yPos+11,xPos,yPos+8);
                line(xPos,yPos+8,xPos+3,yPos+11);
                //left eye
                noStroke();
                fill(0);
                ellipse(xPos-15,yPos-5,4,4);
                //right eye
                ellipse(xPos+15,yPos-5,4,4);
                //carrot
                //green parts
                fill(54,116,54);
                triangle(xPos-40,yPos+5,xPos-49,yPos-35,xPos-38,yPos-29);
                triangle(xPos-40,yPos+5,xPos-35,yPos-31,xPos-39,yPos-26);
                fill(89,169,61);
                triangle(xPos-40,yPos+5,xPos-48,yPos-20,xPos-38,yPos-15);
                triangle(xPos-40,yPos+5,xPos-34,yPos-21,xPos-39,yPos-14);
                //orange part
                fill(229,120,56);
                arc(xPos-40,yPos+5,20,4,PI,2*PI);
                triangle(xPos-30,yPos+5,xPos-50,yPos+5,xPos-40,yPos+40);
            }
        }
    }
    noLoop();
}
function draw() {
}

I started by sketching out my idea of doing alternating bunnies and carrots.

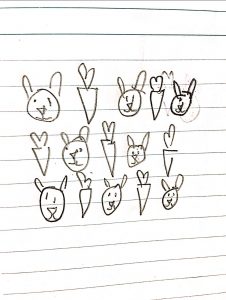
To make this project I started with the hexagonal grid template, and then made one bunny and one carrot, and then played around with the variables to put them into the right spot so that they would be translated the right way. This project made me more comfortable with nested for loops, and how to make copies of pictures on varying grids.