Project 5 Liz Maday

final wallpaper

function setup() {
	createCanvas(600, 600);
	strokeWeight(0.5);
}

function draw() {
	background(247, 140, 142);
	//center banana line starting left
	for (i = 0; i < 13; i += 1) {
		var startX = 25;
		var startY = 25;
		var bananaX = (startX * i * 2);
		var bananaY = (startY * i * 2);	
		banana(bananaX, bananaY);
		banana2(bananaX, bananaY);
	}
	//banana line below center line, starting left
    for (i = 0; i < 7; i += 1) {
    	var startX3 = 25;
    	var startY3 = 25;
    	var bananaX3 = startX3 * i * 2;
    	var bananaY3 = (startY3 * i * 2) + 200;
		banana(bananaX3, bananaY3);
		banana2(bananaX3, bananaY3);    	
    }
   	//2nd banana line below center line, starting left
    for (i = 0; i < 5; i += 1) {
    	var startX4 = 25;
    	var startY4 = 25;
    	var bananaX4 = startX4 * i * 2;
    	var bananaY4 = (startY4 * i * 2) + 400;
		banana(bananaX4, bananaY4);
		banana2(bananaX4, bananaY4);    	
    }
    //banana line above center line, starting left
    for (i = 0; i < 7; i += 1) {
    	var startX5 = 25;
    	var startY5 = 25;
    	var bananaX5 = (startX5 * i * 2) + 200;
    	var bananaY5 = (startY5 * i * 2);
		banana(bananaX5, bananaY5);
		banana2(bananaX5, bananaY5);    	
    }   
    //2nd banana line above center line, starting left
    for (i = 0; i < 3; i += 1) {
    	var startX6 = 25;
    	var startY6 = 25;
    	var bananaX6 = (startX6 * i * 2) + 400;
    	var bananaY6 = (startY6 * i * 2);
		banana(bananaX6, bananaY6);
		banana2(bananaX6, bananaY6);    	
    }  
	//center banana line starting right
	for (i = 0; i < 12; i += 1) {
		var startX2 = width - 100;
		var startY2 = 25;
		var bananaX2 = startX2 - (i * 25 * 2);
		var bananaY2 = startY2 * i * 2;	
		banana(bananaX2, bananaY2);
		banana2(bananaX2, bananaY2);
	}
	//banana line below center line, starting right
	for (i = 0; i < 9; i += 1) {
		var startX7 = width - 100;
		var startY7 = 25;
		var bananaX7 = (startX7 - (i * 25 * 2)) + 100;
		var bananaY7 = (startY7 * i * 2) + 100;	
		banana(bananaX7, bananaY7);
		banana2(bananaX7, bananaY7);
	}	
	//2nd banana line below center line, starting right
	for (i = 0; i < 9; i += 1) {
		var startX8 = width - 100;
		var startY8 = 25;
		var bananaX8 = (startX8 - (i * 25 * 2)) + 200;
		var bananaY8 = (startY8 * i * 2) + 200;	
		banana(bananaX8, bananaY8);
		banana2(bananaX8, bananaY8);
	}
	//banana line above center line, starting right
	for (i = 0; i < 11; i += 1) {
		var startX9 = width - 100;
		var startY9 = 25;
		var bananaX9 = (startX9 - (i * 25 * 2)) - 100;
		var bananaY9 = (startY9 * i * 2) - 100;	
		banana(bananaX9, bananaY9);
		banana2(bananaX9, bananaY9);
	}		
	//2nd banana line above center line, starting right
	for (i = 0; i < 11; i += 1) {
		var startXa = width - 100;
		var startYa = 25;
		var bananaXa = (startXa - (i * 25 * 2)) - 300;
		var bananaYa = (startYa * i * 2) - 100;	
		banana(bananaXa, bananaYa);
		banana2(bananaXa, bananaYa);
	}
	//kiwi loop
	for (x = 0; x < 7; x += 1) {
		for (y = 0; y < 8; y += 1) {
			var indent = 0;
			if (y % 2 === 0) {
                indent = 100;
			} else {
				indent = 0;
			}
			kiwi((x * 200) + indent, y * 100);
		}
	}
    //additional bananas
	banana(-50, -50);
	banana2(-50, -50);
	banana(width - 50, -50);
	banana2(width - 50, -50);
}
//banana part 1
function banana(x, y) {
    strokeWeight(0.5);
    push();
    translate(x, y);
    beginShape();
    fill(247, 190, 0);
    strokeWeight(.5);
	vertex(30, 20);
	bezierVertex(80, 20, 80, 75, 30, 75); //outer curve
	bezierVertex(50, 80, 60, 25, 30, 20); //inner curve
	endShape();
	fill(99, 66, 29);
	ellipse(30, 20, 10, 10); //banana tip
	noFill();
	strokeWeight(1);
	stroke(99, 66, 29);
	bezier(30, 20, 70, 25, 70, 65, 36, 75);//banana line
	pop();
}

//banana part 2
function banana2(x, y) { 
	push();
	translate(x, y);
	beginShape();
	fill(235, 150, 70);
	vertex(30, 20);
	bezierVertex(80, 20, 80, 75, 30, 75); //outer curve
	bezierVertex(70, 70, 70, 25, 30, 20); //inner curve
	endShape();
	pop();
}

//kiwi
function kiwi(x, y) {
	push();
	translate(x, y);
	fill(124, 83, 36);
	bezier(101 - 100, 25 - 39.5, 71 - 100, 25 - 39.5, 71 - 100, 60 - 39.5, 101 - 100, 54.5 - 39.5); //brown

	fill(120, 210, 0); 
	ellipse(0, 0, 26.5, 29.5); //green

	fill(0);
	ellipse(0, 0, 17, 14); // black

	fill(255, 228, 148); 
	ellipse(1, 0, 15, 10); //beige
	pop();
}


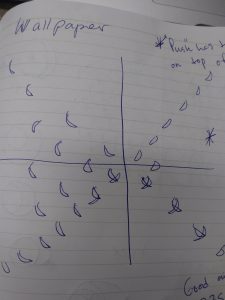
I really enjoyed doing this project because of the simple premise, but how rewarding it was to see the iteration of a simple design. I experimented more than I had in the past with making shapes look three dimensional (using different colors to indicate shadow for the bananas, using bezier to make the partial profile of the kiwi). I also enjoyed finding the colors that matched what I was seeing in my head. I was glad to have had a basic understanding of how modulus works in creating this project.


Project 05 – Min Lee

sketch

function setup() {
    createCanvas(600, 600);
    background(169, 209, 226);
}

function draw() {
	// milk boxes 
	var xPosition = 0;
	var yPosition = 0;
	translate(0, -50);
	fill(255);

	for (var y = 1; y < 12; y++) {
		for (var x = 0; x < 10; x++) {
			if (y % 2 == 0) {
				var spaceX = 90;
				var spaceY = 60;
				//milk face
				quad(xPosition + spaceX * x, yPosition + spaceY * y,
				xPosition + 50 + spaceX * x, yPosition + spaceY * y, 
				xPosition + 50 + spaceX * x, yPosition + 70 + spaceY * y, 
				xPosition + spaceX * x, yPosition + 70 + spaceY * y);
				//milk side
				quad(xPosition + 50 + spaceX * x, yPosition + spaceY * y, 
				xPosition + 50 + 15 + spaceX * x, yPosition - 12 + spaceY * y, 
				xPosition + 50 + 15 + spaceX * x, yPosition + 58 + spaceY * y, 
				xPosition + 50 + spaceX * x, yPosition + 70 + spaceY * y);
				//milk middle
				quad(xPosition + spaceX * x, yPosition + spaceY * y, 
				xPosition + 50 + spaceX * x, yPosition + spaceY * y, 
				xPosition + 50 + 7 + spaceX * x, yPosition - 22 + spaceY * y, 
				xPosition + 10 + spaceX * x, yPosition - 22 + spaceY * y);
				//milk top
				quad(xPosition + 10 + spaceX * x, yPosition - 22 + spaceY * y, 
				xPosition + 50 + 7 + spaceX * x, yPosition - 22 + spaceY * y, 
				xPosition + 50 + 7 + spaceX * x, yPosition - 22 - 3 + spaceY * y, 
				xPosition + 10 + spaceX * x, yPosition - 22 - 3 + spaceY * y)
				//milk triangle
				triangle(xPosition + 50 + spaceX * x, yPosition + spaceY * y, 
				xPosition + 50 + 7 + spaceX * x, yPosition - 22 + spaceY * y, 
				xPosition + 50 + 15 + spaceX * x, yPosition - 12 + spaceY * y);
				//box crease
				line(xPosition + 50 + 6 + spaceX * x, yPosition - 22 + spaceY * y, 
				xPosition + 50 + 7 + spaceX * x, yPosition - 7 + spaceY * y)
				//milk eyes
				push();
				fill(0);
				ellipse(xPosition + 16 + spaceX * x, yPosition + spaceY * y + 20, 3, 3);
				ellipse(xPosition + 32 + spaceX * x, yPosition + spaceY * y + 20, 3, 3);
				curve(xPosition + 16 + spaceX * x, yPosition + spaceY * y + 20, 
					xPosition + 20 + spaceX * x, yPosition + spaceY * y + 20 + 6,
					xPosition + 32 + spaceX * x - 2, yPosition + spaceY * y + 20 + 6,
					xPosition + 32 + spaceX * x, yPosition + spaceY * y + 20)
				pop();

			} else {
				var spaceX = 75;
				var spaceY = 60;
				//milk face
				quad(xPosition + spaceX * x + 18 * x + spaceX / 8, yPosition + spaceY * y,
				xPosition + 50 + spaceX * x + 18 * x + spaceX / 8, yPosition + spaceY * y, 
				xPosition + 50 + spaceX * x + 18 * x + spaceX / 8, yPosition + 70 + spaceY * y, 
				xPosition + spaceX * x + 18 * x + spaceX / 8, yPosition + 70 + spaceY * y);
				//milk side
				quad(xPosition + 50 + spaceX * x + 18 * x + spaceX / 8, yPosition + spaceY * y, 
				xPosition + 50 + 15 + spaceX * x + 18 * x + spaceX / 8, yPosition - 12 + spaceY * y, 
				xPosition + 50 + 15 + spaceX * x + 18 * x + spaceX / 8, yPosition + 58 + spaceY * y, 
				xPosition + 50 + spaceX * x + 18 * x + spaceX / 8, yPosition + 70 + spaceY * y);
				//milk middle
				quad(xPosition + spaceX * x + 18 * x + spaceX / 8, yPosition + spaceY * y, 
				xPosition + 50 + spaceX * x + 18 * x + spaceX / 8, yPosition + spaceY * y, 
				xPosition + 50 + 7 + spaceX * x + 18 * x + spaceX / 8, yPosition - 22 + spaceY * y, 
				xPosition + 10 + spaceX * x + 18 * x + spaceX / 8, yPosition - 22 + spaceY * y);
				//milk top
				quad(xPosition + 10 + spaceX * x + 18 * x + spaceX / 8, yPosition - 22 + spaceY * y, 
				xPosition + 50 + 7 + spaceX * x + 18 * x + spaceX / 8, yPosition - 22 + spaceY * y, 
				xPosition + 50 + 7 + spaceX * x + 18 * x + spaceX / 8, yPosition - 22 - 3 + spaceY * y, 
				xPosition + 10 + spaceX * x + 18 * x + spaceX / 8, yPosition - 22 - 3 + spaceY * y)
				//milk triangle
				triangle(xPosition + 50 + spaceX * x + 18 * x + spaceX / 8, yPosition + spaceY * y, 
				xPosition + 50 + 7 + spaceX * x + 18 * x + spaceX / 8, yPosition - 22 + spaceY * y, 
				xPosition + 50 + 15 + spaceX * x + 18 * x + spaceX / 8, yPosition - 12 + spaceY * y);
				//box crease
				line(xPosition + 50 + 6 + spaceX * x + 18 * x + spaceX / 8, yPosition - 22 + spaceY * y, 
				xPosition + 50 + 7 + spaceX * x + 18 * x + spaceX / 8, yPosition - 7 + spaceY * y)
				//milk eyes
			};
		};
	};
}

For this project I wanted to create a wallpaper full of cute milk boxes with different faces, but I came across a problem trying to create the second face, so it’s not as cute. I’d still drink it.

Katherine Hua – Project-05 – Wallpaper

sketch

/* Katherine Hua
Section A
khua@andrew.cmu.edu
Project-05 */

function setup() {
    createCanvas(600, 600);
    background(213, 233, 233);
    noLoop();
}


function draw() {
	var potatoOX = 70; // original x point of potato
    var potatoOY = 80; // original y point of potato
    var potatoW = 80; // width of potato
    var potatoH = 100; // height of potato
    var tw = 90;
    var th = 110;

	for (var y = 0; y < 5; y++) {
		for (var x = 0; x < 6; x++) {
			//POTATO
    		var potatoX = potatoOX + x * tw; // x position of following potatoes
    		var potatoY = potatoOY + y * th; // y position of following potatoes

   			//body
    		strokeWeight(1);
    		stroke(109, 90, 61);
    		fill(231, 193, 144); 
		 	ellipse(potatoX, potatoY, potatoW, potatoH);

		 	//eyes
		 	strokeWeight(4);
		 	point(potatoX - 25, potatoY - 7);
		 	point(potatoX + 2, potatoY - 7);

		 	//right arm
		 	strokeWeight(1);
		 	beginShape();
		 	curveVertex(potatoX + 2, potatoY + 10);
		 	curveVertex(potatoX + 2, potatoY + 10);
		 	curveVertex(potatoX - 5, potatoY + 11);
		 	curveVertex(potatoX - 10, potatoY + 15);
		 	curveVertex(potatoX - 7, potatoY + 20);
		 	curveVertex(potatoX + 5, potatoY + 20);
		 	curveVertex(potatoX + 5, potatoY + 20);
			endShape();

			//left arm
			beginShape();
		 	curveVertex(potatoX - 5, potatoY + 10);
		 	curveVertex(potatoX - 25, potatoY + 10);
		 	curveVertex(potatoX - 18, potatoY + 11);
		 	curveVertex(potatoX - 13, potatoY + 15);
		 	curveVertex(potatoX - 16, potatoY + 20);
		 	curveVertex(potatoX - 24, potatoY + 20);
		 	curveVertex(potatoX - 24, potatoY + 20);
		 	endShape();

			//left foot
			beginShape();
		 	curveVertex(potatoX - 20, potatoY + 30);
		 	curveVertex(potatoX - 20, potatoY + 30);
		 	curveVertex(potatoX - 27, potatoY + 31);
		 	curveVertex(potatoX - 32, potatoY + 35);
		 	curveVertex(potatoX - 29, potatoY + 40);
		 	curveVertex(potatoX - 17, potatoY + 40);
		 	curveVertex(potatoX - 17, potatoY + 40);
		 	endShape();

			//right foot
			beginShape();
		 	curveVertex(potatoX + 10, potatoY + 30);
		 	curveVertex(potatoX + 10, potatoY + 30);
		 	curveVertex(potatoX + 3, potatoY + 31);
		 	curveVertex(potatoX - 2, potatoY + 35);
		 	curveVertex(potatoX + 1, potatoY + 40);
		 	curveVertex(potatoX + 13, potatoY + 40);
		 	curveVertex(potatoX + 13, potatoY + 40);
		 	endShape();

			//mouth
			fill(246, 232, 226);
			ellipse(potatoX - 12, potatoY - 3, 12, 6);
			
		
		}
	}
}


I wanted to recreate one of my stuffed animals. It is so cute. I wish I could have given him a friend in my design, but I ran out of time. Through this project, I familiarized myself more with how to use curveVertex functions to create shapes such as the arms and the legs. Although they are small parts of the character I created, it took a while to get the curves and coordinates right. I can see this design being on phone cases, pencil pouches, stickers, digital backgrounds, etc. Below is a sketch of what I based my wallpaper’s character off of.

Project 5 rrandell

sketch

/* Rani Randell
rrandell@andrew.cmu.edu
Section A
Project 5 */


function setup() {
    createCanvas(400, 400);
    noLoop(); 
}
 
function draw() {
    background(205, 100, 230);

for (var y = 0; y < 450; y += 50) {
        for (var x = 0; x < 450; x += 50)
            //fill(100, 230, 240); for some reason I cant get this to change
            ellipse(x, y, 50, 50);
        }
    for (var i = 10; i < 600; i += 15) {
    	strokeWeight(3);
        line(i, 400, i, 0);
    }
}


For this project I wanted to think about classic lines and simple shapes, I really like when colors contrast on wallpaper so I tried to stay true to a contrasting and also retro vibe.

Anthony Ra – Looking Outwards 05

Coco – Behind the scenes

Coco cover page

Pixar Animation Studio is recognized as one of the leading producers in animation films and design computer graphics. One of their most recent projects I want to look at is “Coco”. Coco goes beyond just the CG animation in their work and instead used VFX (visual effects).

Within this movie, one of the clips of the behind the scenes I found is the computer graphics of the movement of cloth in skeletons. Using a series of meshes, graphic artists simulate those clothing on the skeletal characters.

concept art of clothes on characters

However, the designers issued that the problem is that skeletons are made up of really tiny bones, and because the control points have to match for the clothes and bones, the movement would make some of the bones see through from the clothes. This basically looks like clothes sinking into the cracks of the bones like something falling in quicksand.

concept art of clothes on characters

Their solution is a concept called continuous collision detection, where meshes detect all the collisions of selected objects. This works even if the object is moving really fast, which is prevalent is any characters in animation movies.

Yingyang Zhou-Project-05-Wallpaper

Wallpaper

//Yingyang Zhou
//yingyanz
//Assignment-05-b

function setup() {
    createCanvas(600, 600);
    background(98, 140, 178);


    for (var y = 0; y <= 600; y+=60) {
        for (var x = 0; x <= 600; x+=60) {
          var n = x/60 % 2;
          if (n == 1){
            noStroke();
            fill(255, 179, 5);
            bezier(
            x-15, y,
            x, y-25,
            x+20, y+30,
            x-15, y);
          }
          else {
            for(i = 10; i < 180; i +=10){
              noFill();
              stroke(255, 75, 27);
              strokeWeight(0.5);
              ellipse(x, y, i, i);
            }
          }
          stroke(0, 0, 255);
          bezier(x-60, y-60, x, y-60, x, y, x+60, y);
        }
    }
    noLoop();
}


function draw() {
    // draw is not called due to noLoop() in setup()
}

This wall paper are consist of small ’tiles’ and it could be a tile of a larger part, The elements are repeat not only horizontally and vertically but also diagonally.

Yingyang Zhou-LookingOutwards-5

This is a the work of  Imaginary Forces NY, the short clip for  HBO, combining all the feature TV series.

The process started with a great edit, and figuring out which 2d clips would breakdown nicely into 3d “pixelized” scenes, figuring out how to move on them, how to tie scenes together, light and render them. Another challenge was pulling off a deep dive into HBO’s iconic ‘static’ id, going through the static and into the promo content.   The idea is to show the audience the 3D world that has always lived within the famous white noise  and ” We hope this new version gives you the same feels you got when hearing the opening growing up!” according to Imaginary Forces NY website.

I like consistance of the same sophisticated idea through the whole clip, and the transition is very good, it let audience stays in ‘3D’ world instead transit to ‘2D’ world several times in between different clips.

Looking Outwards 5 -rrandell

https://www.artstation.com/vikiyeo

This is a link to some of the other works that this artist, Viki Yeo, has made previously.

I am really amazed at this piece, due to the sheer detail that the artist was able to depict. This piece interests me because looks so real and so close to a real life portrait but was actually rendered using 3D computer graphics. The artist’s name is Viki Yeo and she used the software Adobe Photoshop, Zbrush, and 3ds max. The artist is a freelance 3D character artist and it is incredibly interesting to see how the artists choices manifest in this final form. On her website, it says that she is also a 3D texture artist. I found this interesting because texture is such a specific part of the artistic process that it seemed so limiting to have that be her only job but after seeing Viki Yeo’s work, the texture is so integral to her work that it now makes sense.

Curran Zhang- Project 05- Wallpaper

sketch

/*Curran Zhang 
curranz
Project 5
Section A
*/

function setup() {
    createCanvas(600, 600);   
}

function draw() {
    background(128);
    var rectl = 100;
    var rectw = 100;
    var oy = rectw/2;
    var ox = rectl/2;
    var ml = 50;
    var mw = 5;

//Applying the gradient on shapes that are fixed
    for (var x = 0; x < width; x+=rectl) {
        for (var y  = 0; y <height; y+= rectw){
            var R = map(x,0,width,100,300);
            var B = map(y,0,height,100,200);
            var R1 = map(x,0,width,300,100);
            var B1 = map(y,0,height,200,100);

            fill(R,200,B);
            stroke(275);
            strokeWeight(.4);
            rect(x,y,rectl,rectw);

            fill(R1,200,B1);
            noStroke();
            ellipse(x+rectl/2+6,y+rectw/2+4,50,50);  
        }
    }
//Creating variations in color based using the grid
    for (var x = 0; x < 6; x++) {
        for (var y = 0; y < 6; y++) {
            var py = oy + y * rectl;
            var px = ox + x * rectw;
        
            fill('red');
            if (y % 2 == 0) 
                {if (x % 2 == 0){fill('green')}
                };
            if (y % 2 != 0) 
                {if (x % 2 != 0){fill('purple')}
                };
            noStroke();
            ellipse(px,py-1.5,50,50);

            fill(220);
            noStroke();
            arc(px,py,50.8,50.8,0,PI);

            fill(0);
            ellipse(px,py+.5,17,17);
            rect(px-ml/2, py-mw/2+1,ml,mw);

            fill(275)
            stroke(0);
            strokeWeight(1);
            ellipse(px,py,12,12);
            ellipse(px,py,7,7);
        }
    }
}

With the topic of wallpaper, my childhood self use to want my room to be filled with things from the Pokemon games. Thus for the project I decided to create a wallpaper that related to Pokemon. With the usage of PokeBalls, they vary in colors and design. Through for loops and if statements, i was able to vary the different colors within the array.

Looking Outwards 5 – Sara Frankel


caption: CGI is used throughout the entire movie of The Hobbit.

The movie, The Hobbit, uses CGI, or computer generated imagery, to help develop the feeling of a different world. Every aspect of this movie is produced with CGI. Everywhere from the size of the characters (to distinguish the difference between a hobbit and not), the scenery (the differences between castles, caves, rolling hills, different villages), to building legitimate characters (the dragon, Gollum, and a lot of the little furry friends). I admire this process as by applying CGI to almost every aspect of the movie truly helps to fully develop the quality and almost the legitimacy of the reality of the movie. This movie inspires me with my major in the sense that just applying CGI, or in my case my phrasing, to one’s art will raise the quality and the coherency of the product.