Jonathan Liang – Project 5 – Wallpaper

sketch

//Jonathan Liang
//jliang2
//Section A


x1 = 90;
y1 = 60;
x2 = 30;
y2 = 120;


function setup() {
    createCanvas(480, 400);
    noStroke();
    
}

function draw() {
	background(102, 179, 255);
	for (var x1 = 90; x1 < width; x1 += 200) {
		for (var y1 = 60; y1 < height; y1 += 120) {
			cloud1(x1, y1);
		}
	}
	
	for (var x2 = 30; x2 < width; x2 += 175) {
		for (var y2 = 120; y2 < height; y2 += 120) {
			cloud2(x2, y2);
		}
	}
	man();
	noLoop();
}

function cloud1(x1,y1) {
	noStroke();
	fill('white');
	rect(x1, y1, 85, 10, 20);
	ellipse(x1 + 30, y1 - 5, 25, 20);
	ellipse(x1 + 55, y1 - 10, 45, 35);
	ellipse(x1 + 45, y1 - 25, 40, 40);

}

function cloud2(x2,y2) {
	noStroke();
	fill('white');
	rect(x2, y2, 50, 8, 20);
	ellipse(x2 + 20, y2 - 5, 18, 15);
	ellipse(x2 + 35, y2 - 10, 25, 25);

}

function man() {
	push();
	noFill();
	strokeWeight(5);
	stroke('red');
	rotate(radians(30));
	ellipse(250, 250, 100, 90); //head
	strokeWeight(3);
	ellipse(250, 250, 30, 20); //nose
	arc(225, 250, 20, 20, 0, HALF_PI + QUARTER_PI); //cheek
	arc(275, 250, 20, 20, 0, PI + QUARTER_PI); //cheek
	ellipse(240, 230, 10, 15); //left eye
	ellipse(260, 230, 10, 15); //right eye
	arc(250, 260, 50, 30, 0, PI); //mouth
	pop();

}

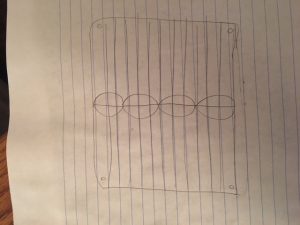
When I was young I loved drawing on walls, so no matter what the wallpaper was I would draw something on it. My favorite wallpaper when I was younger was Andy’s wallpaper in Toy Story. So this wallpaper pattern with clouds is something that has resonated with me since childhood. Nevertheless, I would have still doodled on the walls anyway.

Project 5 – Wallpaper Sara Frankel

Project 5

// Sara Frankel
// sfrankel
// Project 5
// section A

function setup() {
    createCanvas(600, 600);
    background('lightgreen');

    stroke('green');
    strokeWeight(2);
    for (var xback = 10; xback < width; xback += 20) { //green stripes placed in setup so that they are not redrawn everytime it is called
    	line(xback, 0, xback, height);
    }
    noLoop();
}

function draw() {
	stroke(0);
	strokeWeight(1);
	var diameter = 120;
	for (var xcircle = 0; xcircle < width + diameter/2; xcircle += 155) { // positions and redraws the lemons and limes along the x axis
		for (var ycircle = 0; ycircle < height + diameter/2; ycircle += 155){ // positions and redraws the lemons and limes along the y axis
			fill('orange');
			ellipse(xcircle, ycircle, diameter, diameter);
			fill(243,185,80);
			ellipse(xcircle, ycircle, diameter/2 + 40, diameter/2 + 40);
			
			if(ycircle % 2 === 0) { //makes every odd line, every lemon, the color yellow
				fill(255,255,153);
				ellipse(xcircle, ycircle, diameter, diameter);
				fill('yellow');
				ellipse(xcircle, ycircle, diameter/2 + 40, diameter/2 + 40);
			} 
			
			for (var i = 0; i < 6; i++) { //forms the slices of the citrus fruit
				var angle = i * radians(60);
				line(xcircle, ycircle, (diameter/3) * cos(angle) + xcircle , 
					ycircle + (diameter/3) * sin(angle));
			}	
		
		}
	}
}

For this project, I decided to make it citrus/summer theme. I made the backdrop watermelon inspired (with the green stripes) and made each row of citrus fruit alternate between oranges and lemons. As the weather gets colder, its sometimes nice to think of the beloved themes of summer.  Below is my sketch, please excuse my artistic ability but I came into the idea thinking about summer and warm beaches (and what is lovely to drink/eat by the ocean).

Ean Grady-Looking Outwards-05

http://niessnerlab.org/projects/thies2016face.html

Title: Face2Face
Creators: Justus Thies, Michael Zollhofer, Marc Stamminger, Christian Theobalt, Matthias Niebner
2016

TUM Visual Computing has created technology that allows “real-time face facial reenactment of a monocular target video sequence (e.g., Youtube video). Which essentially means that if a person is in front of their commodity webcam and have a video playing of another person talking, this webcam can allow the person’s facial expressions to replace the person in the video’s, in real-time. The project creators track facial expressions of the source and target individuals using a ‘dense photometric consistency measure’. Reenactment of the source’s facial expressions on the target is achieved through fast and efficient ‘deformation transfer’ between the source and target.

I find this work more interesting than inspiring, not to say it isn’t inspiring. It is especially interesting how fluid and realistic the facial reenactments look on the target (video example linked below). Obviously, this was made in 2016 and so the technology now is most likely better than what is shown, however, it is great that such technology exists. A more advanced version of this technology could bring a plethora of possibilities to many different fields, including drastically revolutionizing entertainment or even as a potential means of creating holograms.

Video below is a demonstration of the real-time reenactment.

Anthony Ra – Project 05 – Wallpaper

sketch

/* Anthony Ra
Section-A
ahra@andrew.cmu.edu
project-05 */

function setup() {
    createCanvas(640, 400);
    background(235, 205, 255);
    var varWidth = 100;
    var varHeight = 60;
    var starty = 0;
    var startx = 0;

    for (var y = 0; y < 10; y++) {
        for (var x = 0; x < 18; x++) {
            var py = starty + y * varHeight;
            var px = startx + x * varWidth;
      /* moving cube to just the right */
            if (y%2 == 0) {
              px = (startx - 25) + x * varWidth;
            }
            else {
              px = startx + x * varWidth;
            }
            noStroke();
          /* top of the cube */
            fill(255, 205, 235);
            quad(px, py, px + 25, py - 15, px + 50, py, px + 25, py + 15);
            fill(255, 230, 255);
            quad(px + 5, py, px + 25, py - 12, px + 45, py, px + 25, py + 12);
          /* left side of the cube */
            fill(255, 170, 200);
            quad(px, py, px + 25, py + 15, px + 25, py + 60, px, py + 45);
            fill(255, 200, 225);
            quad(px + 5, py + 8, px + 20, py + 18, px + 20, py + 52, px + 5, py + 43);
          /* right side of the cube */
            fill(255, 145, 180);
            quad(px + 25, py + 15, px + 50, py, px + 50, py + 45, px + 25, py + 60);
            fill(255, 160, 205);
            quad(px + 30, py + 18, px + 45, py + 8, px + 45, py + 43, px + 30, py + 52);
        }
    }
    noLoop();
}

I brought over the color theory from last week’s project and utilized it to make a series of repeating cubes. The inspiration of this popular pattern came from a bus ride back from a haircut I got at Bloomfield. I did a basic sketch on how the variables would be separated and implemented it in code to make a simple pattern that is stress-relieving to the eye.

sketch

Audrey Zheng-Project 05

sketch

//Audrey Zheng
//Section A
//audreyz@andrew.cmu.edu
//Project 5

var pawSize = 76
var startx = 95
var starty = 173


function setup() {
    createCanvas(600, 600);
    noLoop();
}

function draw() {
	background(170,170,247);
	//paw(-50,-70);

	for (var space = -60; space <width; space+=110){
		for (var yspace = -130; yspace <height; yspace +=140) {
			paw(space, yspace);
			

		}

	}

}

function paw(x,y) {
	push();
	translate(x,y);
	rotate(PI/9.0);
	noStroke();

	//claws
	fill(220);
	triangle(77.63,166.01, 91,181,110,172);
	triangle(112,154,116,136,125,152);
	triangle(145,155,156,137,160,160);
	triangle(170,174,187,167,180,183);

	fill(19,19,29);


	rect(95, 173, pawSize, pawSize, 33);

	ellipseMode(CORNER);
	//the paw
	ellipse(83,162,34,35);
	ellipse(105,145,34,35);
	ellipse(132, 145,34,35);
	ellipse(149,162,34,35);

	//toe beans
	fill(251,168,179);
	ellipse(91,170,18,18);
	ellipse(112,153,18,18);
	ellipse(140,153,18,18);
	ellipse(157,169,18,18);
	ellipse(107,188,34,25);
	ellipse(120,178,28,25);
	ellipse(127,187,34,25);

	//highlights
	fill(255);
	ellipse(97,173,6,4);
	ellipse(117,155,6,4);
	ellipse(146,155,6,4);
	ellipse(164,172,6,4);
	ellipse(126,182,6,4);
	pop();

}

LO – 05 – Alexander Chen

In the 2009 James Cameron movie, Avatar, there was the issue of creating an alien species that was going to be realistic and relatable on an emotional point of view. Cameron stated that he wanted to not do the traditional way of make up and spot treatment. Instead he went on a route that used a lot of 3D computer graphics. He set up a rig that would have sensors all around (which is pretty ordinary). However, he ended up actually attaching a camera on a carbon fiber rod right in front of the actor’s face. What made this movie’s computer graphic rendering so much better and different from other movies at the time is that the character’s facial features would be very, very accurate and human-like, thus making them very relatable. One thing I really appreciate and admire from this project is that after viewing a info video about how they made the movie, it reminded me a lot of the facial recognition features and “animojis” that Apple recently featured in their iPhone X and the brand new iPhone XS. However, this was implemented on a larger scale in a fast-paced action movie 8 years prior. That is incredibly impressive.

A featurette of Avatar’s 3d computer graphics

PO5 – Alexander Chen

sketch

//Alexander Chen
//Section A 
//alchen1@andrew.cmu.edu
//Project05

function setup() {
    createCanvas(400, 480);
    background (32, 29, 46);
}

function draw() {
    drawGrid();
    noLoop(); 
}
function drawGrid() {

//Red lines on the navy background to create effect of alternating red and blue lined background
	for (var i = 0; i < 40; i+=2) {
		fill (64, 18, 26);
		noStroke();
		rect (i * 15, 0, 15, height);
	}

//SHIELDS//
	for (var y = 40; y < height - 10; y+=55) {
		for (var x = 27; x < width - 10; x+=55) {
            //Shield 
            stroke(255);
            fill(34, 51, 74);
            triangle (x, y, x + 20, y, x + 10, y + 20);
          
            //line detail inside shield
            line(x + 4, y + 7, x + 15, y + 7);
           
           	//red tip of shield
            stroke(255);
            fill (147, 26, 28);
            triangle (x + 4, y + 7, x + 16, y + 7, x + 10, y + 20);


        }
	}
}

This wallpaper was largely inspired by classic Americana/Ivy League fashion. A lot of inspiration was drawn from vintage Ralph Lauren, Tommy Hilfiger, and modern American microbrand Arnold Steiner. Additionally, I found myself reminiscing my home city of Philadelphia and thinking about the colors of the crest of UPenn. This kind of preppy and classic colorway found its way into the three main colors of my wallpaper. I wanted create something that represented old traditional families and what better way to represent that in a simple and minimal but still classic crest.

You can see in the pictures displayed below some inspiration that I drew from:


Shield of the University of Pennsylvania


2013 Tommy Hilfiger Campaign


Arnold Steiner Instagram post from August 2018 @arnoldsteiner

Curran Zhang- LookingOutwards-5

In today’s era, the line between 3D and 2D has long been erased. With the help of digital tools, 2D and 3D is practically the same thing. The work of Matteo Zamagni is proof of such occurrence. In his film, “Horror Vacui”, he dives into the dimensions of the earth. Through the help of software like PhotoScan, Google Earth, Houdini, Cinema 4D, and more, Zamagni strives to blur the distinction between reality and digital perceptions. These technologies have allowed the Zamagni to create terrains that also begin to distinguish between nature and man.

Example of 2D drawings created from various softwares

As an architecture student, the idea of blending 2D and 3D is always within our works. The additional steps of mapping out nature and man gives it another push into what architecture students should aim to contribute or change. The idea of mapping out terrains can be stretched out into different fields of work. Through the idea of mapping, concepts of actions and non-tangible things can be produced into 2D works. This would open up many pathways of the representation in all fields.

Factors, like the sea, that change the Earth are also mapped
Mapping of human interaction with the nature is a major component within the project


Source:

Horror Vacui – Exploring Earth’s (un)real geological formations

Audrey Zheng-Looking Outwards-05

Peachy Character by Anneka Tran
Girl Head
Girl Head
Mr. Radish
Mr. Raddish


I’m in love with Anneka Tran’s whimsical, simple 3D characters. They’re beautiful, charming and captivating. Something draws me into these low poly designs: they have a cute quality that the high rendered characters in first person shooter video games (say Overwatch or Fortnite) don’t have. I like Anneka’s style because it is unique, and the cartoonish quality gives her characters more life than semi realistic to hyper realistic 3D models. Anneka uses Maya, and having using Maya before, I know how time-consuming it is to model anything complex. I also admire the low poly style for how time efficient it is. She adds the texture in Photoshop. I think adding complicated texturing such as fur or grain would actually take away from the cuteness. She also doesn’t use any shaders. In the above examples, she only used Ambient Occlusion.

See more of Anneka Tran’s work here.

Kyle Leve-Project-05-Wallpaper

sketch

// Kyle Leve
// kleve@andrew.cmu.edu
// Section A
// Project-05-Wallpaper

var x = 0;
var y = 10;
var spacing = 20;
var spacing2 = 440;
var spacing3 = 50;
var cirX = 15;
var cirY = 10;
var cirX2 = 240;
var cirY2 = 10;
var cirX3 = 50;
var cirY3 = 50;
var curveX = 240;
var curveY = 240;

function setup() {
    createCanvas(480, 480);
    background(0, 100, 200);
    noLoop();
}

function draw() {
	for (y = 0; y <= height; y += spacing) { // Creates repeated purple horizontal lines
		stroke('purple');
		strokeWeight(3);
		line(x, y, width, y);
	}

	for (cirX = 0; cirX < (0.5 * width); cirX += spacing) { // Creates light blue repeated circles
		for (cirY = 0; cirY < height; cirY += spacing) {
		    fill('skyblue');
		    stroke('blue');
		    strokeWeight(2);
		    ellipse(cirX + 10, cirY + 10, 15, 15);
		}
	}

	for (cirX2 = 240; cirX2 <= width; cirX2 += spacing) { // Creates light green repeated circles
		for (cirY2 = 0; cirY2 < height; cirY2 += spacing) {
		    fill('lightgreen');
		    stroke('green');
		    strokeWeight(2);
		    ellipse(cirX2 + 10, cirY2 + 10, 15, 15);
		}
	}

	for (cirX3 = 0; cirX3 <= 480; cirX3 += spacing2) { // Creates the four silver circles in the corners
		for (cirY3 = 0; cirY3 <= 480; cirY3 += spacing2) {
			fill('silver');
			stroke(0);
			ellipse(cirX3 + 20, cirY3 + 20, 15, 15);
		}
	}
    // Creates the purple and orange patterns in the center
	fill('violet');
	stroke('purple')
	strokeWeight(5);
	curve(curveX, height, curveX, height, curveX, 0.75 * height, 800, 280);
	
	fill('orange');
	stroke('red')
	strokeWeight(5);
	curve(curveY, height, curveY, height, curveY, 0.75 * height, -320, 280);
	
	fill('violet');
	stroke('purple')
	strokeWeight(5);
	curve(curveX, 0.75 * height, curveX, 0.75 * height, curveX, 0.5 * height, 800, 140);
    
    fill('orange');
	stroke('red')
	strokeWeight(5);
	curve(curveY, 0.75 * height, curveY, 0.75 * height, curveY, 0.5 * height, -320, 140);
	
	fill('violet');
	stroke('purple')
	strokeWeight(5);
	curve(curveX, 0.5 * height, curveX, 0.5 * height, curveX, 0.25 * height, 800, 0);
    
    fill('orange');
	stroke('red')
	strokeWeight(5);
	curve(curveY, 0.5 * height, curveY, 0.5 * height, curveY, 0.25 * height, -320, 0);
    
    fill('violet');
	stroke('purple')
	strokeWeight(5);
	curve(curveX, 0.25 * height, curveX, 0.25 * height, curveX, 0, 800, -100);
	
	fill('orange');
	stroke('red')
	strokeWeight(5);
	curve(curveY, 0.25 * height, curveY, 0.25 * height, curveY, 0, -320, -100);
}

Starting this project I knew I wanted to experiment with different sides of the canvas. I decided to make the center of the canvas a divider where I would have the same thing on both sides, however different colors. I experimented with the curve function to create the centerpiece rather than doing the circles that I had intended. Overall, I enjoyed this project because my ideas were able to develop and evolve after the initial draw phase.