![[OLD FALL 2019] 15-104 • Introduction to Computing for Creative Practice](../../../../wp-content/uploads/2020/08/stop-banner.png)
I decided to write about the project cited in Katrina Hu’s Looking Outwards-04, called the Weather Thingy. Created by Adrien Kaeser, the Weather Thingy is a real-time climate sound controller that essentially converts climactic data into instrument-friendly midi data. One aspect that I found particularly interesting was that the creator put a special focus on being able to listen to the real-time impact of the weather on a piece. I think this project captures a little piece of a moment in a very unique way, and I thought it was interesting how it was similar in concept (and presumably execution) to Pierry Jacquillard’s Prélude in ACGT, which I wrote about in one of my previous blog posts. It just goes to show that the modern conception of art is very different from the traditional paint-on-canvas ideas– the versatility of code even allows us to create art out of seemingly mundane data.
Category: SectionB
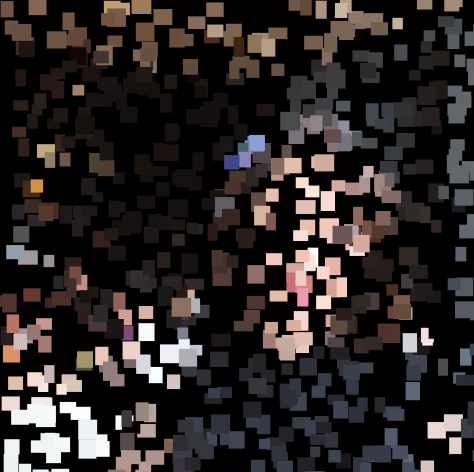
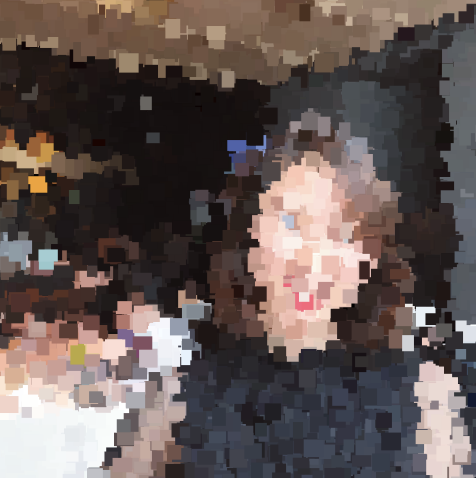
Claire Lee – Project 09 – Computational Portrait
/*
Claire Lee
15-104 Section B
Project-09
*/

var portraitImage;

function preload() {
    var portraitImageURL = "https://i.imgur.com/yxlQW1j.jpg"
    portraitImage = loadImage(portraitImageURL);

}

function setup() {
    createCanvas(600, 800);
    background(0);
    portraitImage.loadPixels();
    frameRate(100);
}

function draw() {
    var px1 = random(width);
    var py1 = random(height);
    var px2 = px1 + random(-20, 20);
    var py2 = py1 + random(-20, 20);
    var px3 = px1 + random(-20, 20);
    var py3 = py1 + random(-20, 20);
    var px4 = px1 + random(-20, 20);
    var py4 = py1 + random(-20, 20);
    var ix = constrain(floor(px1), 0, width - 1);
    var iy = constrain(floor(py1), 0, height - 1);
    var colorAtXY = portraitImage.get(ix, iy);

    noStroke();
    fill(colorAtXY);
    quad(px1, py1, px2, py2, px3, py3, px4, py4);

}
This portrait project was really interesting because we got to work with inserting and manipulating images from external sources. It took me a while to understand what each piece of code was meant to do, but it turned out to be fairly straightforward. I tried experimenting with different degrees of randomness for the shapes. Orignally, I was trying to go for a clean-cut geometric look, but I ended up liking the look of multi-layered small shapes better because the smaller shapes kind of resemble rough brushstrokes.
Sewon Park – LO – 9
As an inspirational project that my peers have assessed, I chose Karl Sims Flow. I completely agree with Sarah Choi’s assessment that the piece is most notable for its use of nature’s existing motion such as gravity and flow of water. However, one important aspect to note is some of the other motions inspired by works of other painters such as Van Gogh. Through using Gogh’s classic bush stroke, Sims recreates the Starry Night in a modern fashion
One other notable thing is that although the motion itself captures nature, the color orientation of the rippling effects are quite uncommon. Just as Sarah said, the co-existing randomness and configured motion is interesting. I also think the co-existence of the natural motion and artificial colors are also notable. This piece represents the variables of nature and randomness governed by the movement of human beings. That concept lying behind the implementation of the art is that different factors of the peice is all being controlled by the audience to create a truly mesmerizing motion depicted with natural motion and artificial colors.
Link to post: https://courses.ideate.cmu.edu/15-104/f2019/2019/09/06/sarah-choi-looking-outwards-02/
Link to original work: http://www.karlsims.com/flow.html
Sydney Salamy: Looking Outwards-09
I chose to do my blog on the 6th Looking Outwards post of Jenny Lee. The project she did was an installation called “eCloud” built by Aaron Koblin, Nik Hafermaas, and Dan Goods in 2010.
On first glance of the image on Jenny’s post of the installation from below, I decided I already liked it. The way the squares were placed were already pretty on their own. The technological aspect only made it better. I like the concept of incorporating live changes into an art piece. Having these changes be changes in weather, and having the sculpture look like a cloud were really cool ideas. One of my LO posts had a similar idea of incorporating live weather changes, but with music, so I was already inclined towards liking the piece. The squares turning opaque was visually interesting as well. I’m used to seeing stuff change color, but changing clarity was different and I’m very curious to know how it works.
There isn’t much to really disagree with within her post. Most of the things she states are just factual information. The one thing I would critique is the explanation about what the pattern is displaying. She states the piece “transforms the patterns of the tiles to create the “cloud” in the accurate shape of one in particular time zone.” However, what I got from the video was that the patterns weren’t changing so much to emulate the shape but more the weather. So if it was raining hard, the tiles changed in a way that made the piece look like rain, like little squares falling to the ground. It seemed like the speed of the “falling” would also change speed based on how hard it was storming.
Maybe a way to improve the report would be to mention specifically how the piece changes in response to the different types of weather. In the picture I posted, it seemed like the cloud also changed color as well, since some parts are blue, which isn’t shown in the video. She might want to dive into how things like temperature, wind speeds, precipitation, snow, rain, etc… affect opaqueness, what squares are being changed, what speed they’re being changed at, what color the squares are, what areas of the piece is colored or not, etc…

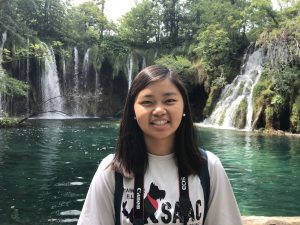
Chelsea Fan-Project-09-Computational Portrait
I chose a portrait of my friend Katrina. I spent a long time deciding how to create the portrait and I eventually decided on drawing squares in a continuous and slightly randomized line.
/* Chelsea Fan
Section 1B
chelseaf@andrew.cmu.edu
Project-09
*/
//important variables
var hiddenImage;
var xCoord = 200;
var yCoord = 200;
//Speed variables
var xOff = 5;
var yOff = 5;

function preload() {
    //preload image
    var myImage = "https://i.imgur.com/mBLofJe.png"
    hiddenImage = loadImage(myImage);
}

function setup() {
    createCanvas(319, 360); //set canvas to image size
    pixelDensity(1);
    background(0); //black background
    hiddenImage.loadPixels(); //load image
    frameRate(50);
}

function draw() {
    //get image coloring
    var ix = constrain(floor(xCoord), 0, width);
    var iy = constrain(floor(yCoord), 0, height);
    var imageColor = hiddenImage.get(ix, iy);

    //Bounce off right side
    if (xCoord>=width || xCoord<=0){
        xOff = -xOff;
        yOff = random(-5, 5);
    }

    //Bounce off top and bottom
    if (yCoord>=height || yCoord<=0){
        yOff = -yOff;
        xOff = random(-5, 5);
    }

    //Rectangle move
    xCoord = xCoord + xOff;
    yCoord = yCoord + yOff;

    //Rectangle color
    noStroke(); //no outline of rectangles
    fill(imageColor); //fill based on hiddenImage coloring
    rect(xCoord, yCoord, 5, 5); //draw rectangles
}
Emma NM-Project-09(Custom Pixels)
/*
Emma Nicklas-Morris
Section B
enicklas
Project-09
Custom Pixels
*/

var portraitImg;

function preload() {
    var myImageURL = "https://i.imgur.com/Zfspsky.jpg";
    portraitImg = loadImage(myImageURL);
}

function setup() {
    // canvas proportional to image size
    createCanvas(portraitImg.width / 6, portraitImg.height / 6);
    background(255);
    portraitImg.loadPixels();
    frameRate(150);

}

function draw() {
    // get pixel color at that random location in image
    var ix = floor(random(portraitImg.width));
    var iy = floor(random(portraitImg.height));
    var colorLoc = portraitImg.get(ix, iy);

    noStroke();
    fill(colorLoc);

    // scale it to canvas size
    x = map(ix, 0, portraitImg.width, 0, width);
    y = map(iy, 0, portraitImg.height, 0, height);

    // creates a spiral like look
    var d = dist(width / 2, height / 2, x, y);
    d = d % 10;

    // draws the hexagons
    polygon(x, y, d, 6);


}

// https://p5js.org/examples/form-regular-polygon.html
function polygon(x, y, radius, npoints) {
  let angle = TWO_PI / npoints;
  beginShape();
  for (let a = 0; a < TWO_PI; a += angle) {
    let sx = x + cos(a) * radius;
    let sy = y + sin(a) * radius;
    vertex(sx, sy);
  }
  endShape(CLOSE);
}
I really enjoyed this project. It was fun to see it come about. I wanted to make my generative pixel image to be a bit more interesting by adding a circular/spiral like look and use hexagons instead of circles or rectangles.
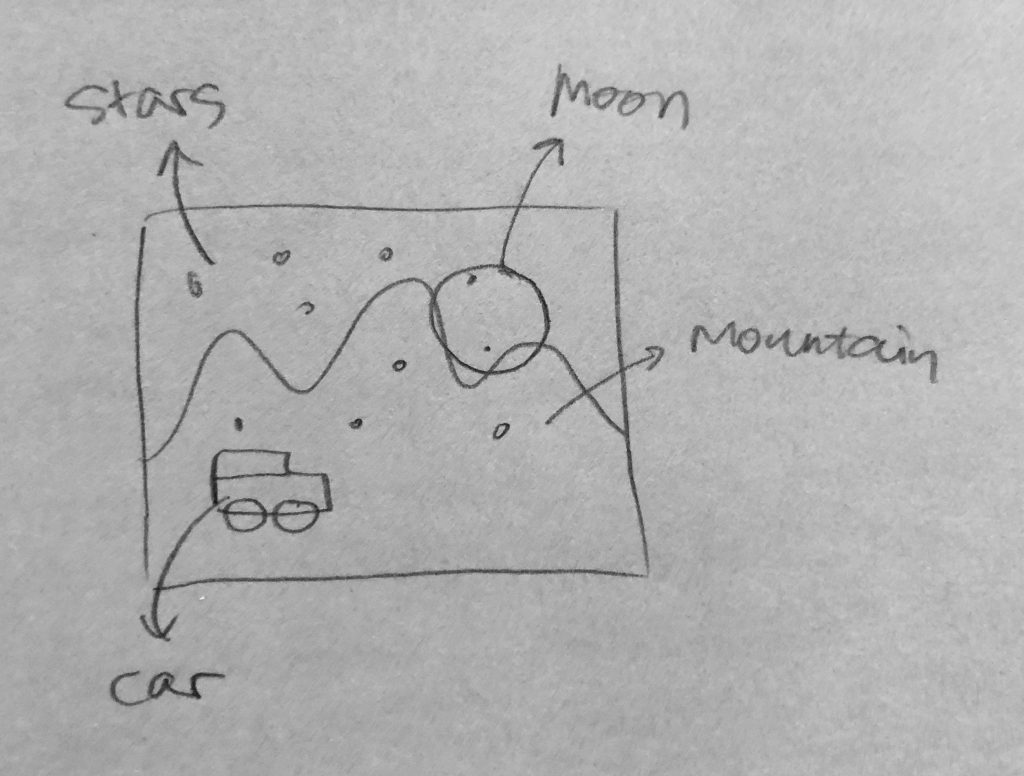
Siwei Xie- Project 11 – Landscape
//Siwei Xie
//Section B
//sxie1@andrew.cmu.edu
//project-10-landscape

var terrainSpeed = 0.0002;//speed of terrian moving
var terrainDetail = 0.015;//smoothness of terrian
var star = [];

function setup() {
    createCanvas(480, 480);
    frameRate(20);//speed of refreshing frames (stars changing)
}

function draw() {
    background("black");

    makeMountain();
    makeMoon();
    makeStar();
    makeCar();
}

//moving terrian
function makeMountain(){
    noStroke();
    fill("blue");
    beginShape();

    for (var x = 0; x < width; x++) {
      var t = (x * terrainDetail) + (millis() * terrainSpeed);//shape & moving speed of terrian
      var y = map(noise(t), 0, 1.8, height/8, height);//y-coordinate of terrian
      vertex(x, y);//draw terrian continuously
    }

    vertex(width, height);//constrain range of terrian
    vertex(0, height);//terrian restarts at left side of canvas
    endShape();
}

function makeMoon(){
    noStroke();
    fill(252, 242, 166);
    ellipse(2 * width / 3, height / 4, 120, 120);//outer layer
    fill(239, 207, 104);
    ellipse(2 * width / 3, height / 4, 80, 80);//inner layer
}

function makeStar(){
    fill(270);
    for (var i = 0; i < 30; i++) {
      var starX = random(width); //random stars on upper canvas
      var starY = random(0, 200);
      ellipse(starX, starY, 3, 3);
    }
}

function makeCar(){
    fill("yellow");
    rect(100, random(375, 380), 100, 30);//lower body of shaking car
    rect(100, 350, 70, 30);//uppper body of shaking car

    fill("green");
    stroke("black");
    circle(120, random(410, 415), 30, 30);//left wheel
    circle(170, random(410, 415), 30, 30);//right wheel
}
I had fun creating this project. Moving the background (terrain) implies the moving of the main object (car). The process of generating mountain in the back was fascinating, because I learned how to randomize height and width in order to indicate moving scenes. Creating mountains creates a very peaceful and relaxing scene, which is something I desperately want.
I also utilize randomly-positioned stars in the background to make it a starry night. For the car, I used randomized y-coordinates in order to show it is driving on a bumpy road. Overall, I think I achieved my goal of giving the viewer a sense of wonderment.
Chelsea Fan-Looking Outward-09
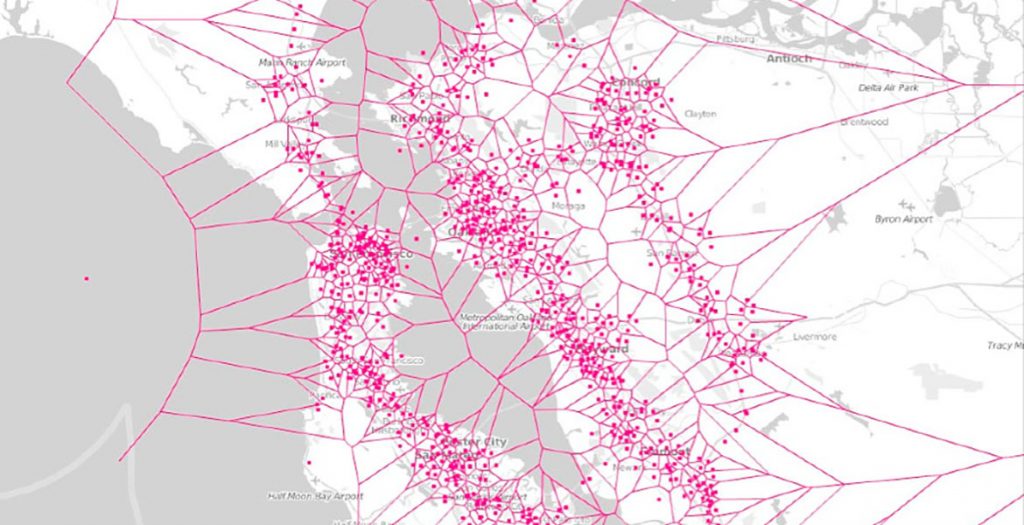
I looked at Claire Lee’s Looking Outward 07. It covers Stamen Design’s Cell Phone Coverage in the bay area. I agree with Claire in a lot of aspects of the work. The design is extremely interesting to look at and agree that the piece takes a mundane idea and turns it into something unique and artistic. I do wish that there was more explanation on how the piece is interactive. The post discusses that the piece covers 4 major cellular networks in the bay area, but it doesn’t mention which 4. I think this would also be good information to know. In addition, I wish there was some way to see what sections of the design correspond to which cellular network and maybe an image of all the carriers together on one map.
Although the original work is not linked, here is the link to Claire’s Looking Outward 07 Post: https://courses.ideate.cmu.edu/15-104/f2019/author/seoyounlandrew-cmu-edu/
Siwei Xie – Looking Outwards 11
Ayah Bdeir is an entrepreneur, inventor, and interactive artist. She is the founder and CEO of littleBits. Bdeir earned a Masters of Science degree from the MIT Media Lab. littleBits joined the 2016 Disney Accelerator program. It has also partnered with Pearson, one of the leading curriculum companies in the world to co-create curriculum to support their Science and Engineering program.
EE is an interactive installation that examines people’s interaction with Lebanese electricity, an infamously broken infrastructure that they have learnt to live without, or in spite of. I admire it because over the past 25 years, electricity shortages in Lebanon have reached 20 hours a day, creating a sinister imaginary persona that commands life across social, financial and political lines, and seems to constantly play hard to get.
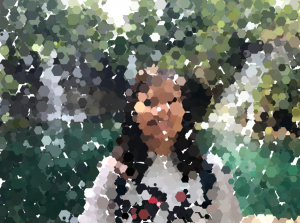
Siwei Xie – Project 09 – Computational Portrait
//Siwei Xie
//Section B
//sxie1@andrew.cmu.edu
//Project-09-Computational Portrait

var photo;

//load my portrait from imgur
function preload() {
    var myImageURL = "https://i.imgur.com/4dPRyTE.png";
    photo = loadImage(myImageURL);
}

function setup() {
    createCanvas(480, 480);
    background(0);
    photo.loadPixels();
    frameRate(999999); //speed of generating image
}

function draw() {
    var px = random(width); //random x location for new rect
    var py = random(height); //random y location for new rect
    var ix = constrain(floor(px), 0, width-1); //contrain rect within canvas width
    var iy = constrain(floor(py), 0, height-1);//contrain rect within canvas height
    var theColorAtLocationXY = photo.get(ix, iy);//match rect colors with original photo

    noStroke();
    fill(theColorAtLocationXY);//retrieve color
    rect(px, py, random(10, 20), random(10, 20));//fill canvas with random-sized rect

}
It was fun creating animated portrait using my own photo. The matching process between colors and sizes of random rectangles, and the original image was a fascinating process.