Xiaoyu Kang – Project 03 – Dynamic Drawing

sketch

//Xiaoyu Kang
//xkang@andrew.cmu.edu
//Section B
//Project-03

var cir = 20;
var angle = 0;

function setup() {
    createCanvas(480, 640);
}

function draw() {
//background color change as mouse moves down
background(400-mouseY,245,255);
//sun
    //sun shows when the mouse moves to the top of the canvas
     fill("yellow");
    if (mouseY<=200) {
        fill(255,242,122);
        ellipse(50,20,200,200); 
        triangle(10,100,50,100,30,200);
        triangle(40,60,100,30,150,200);
        triangle(60,70,30,0,230,60);
        triangle(50,20,0,0,200,0);
    }
    //sun disappears
    if (mouseY>200) {
        fill(400-mouseY,245,255); 
    }
//bubbles
    fill("white");
    //bubble gets bigger as they move up
    ellipse(50,640-mouseY-30,cir+0.1*mouseY,cir+0.1*mouseY);
    ellipse(100,640-mouseY+230,cir+0.1*mouseY,cir+0.1*mouseY);
    ellipse(150,640-mouseY+70,cir+0.1*mouseY,cir+0.1*mouseY);
    ellipse(270,640-mouseY+150,cir+0.1*mouseY,cir+0.1*mouseY);
    ellipse(360,640-mouseY,cir+0.1*mouseY,cir+0.1*mouseY);
    ellipse(300,640-mouseY+370,cir+0.1*mouseY,cir+0.1*mouseY);
    ellipse(470,640-mouseY+270,cir+0.1*mouseY,cir+0.1*mouseY);
    ellipse(160,640-mouseY+490,cir+0.1*mouseY,cir+0.1*mouseY);
    ellipse(530,640-mouseY+520,cir+0.1*mouseY,cir+0.1*mouseY);
//jelly fish body
    noStroke();
    //color change on body
    fill(190,900-mouseY,900-mouseY);
    //moves vertically
    ellipse(240,mouseY,180,140);
    ellipse(180,mouseY+60,70,50);
    ellipse(240,mouseY+70,70,50);
    ellipse(300,mouseY+60,70,50);
//jelly fiish eyes
    noStroke();
    fill("white");
    ellipse(190,mouseY,30,30);
    ellipse(290,mouseY,30,30);
    fill("grey");
    ellipse(190,mouseY,20,20);
    ellipse(290,mouseY,20,20);
//jelly fish blush
    fill(224,196,218);
    ellipse(190,mouseY+25,40,10);
    ellipse(290,mouseY+25,40,10);
    
}

da

For this project, I was inspired by how the color of sea water changes from light to dark as it gets deeper. So I tried to create an image of a sea creature swimming in the ocean following the movement of the mouse. When the mouse moves down, the background color gets darker and some bubbles appears. When the mouse moves up the sun appears.

Sydney Salamy: Looking Outwards-03

The project Wanderers from 2014 is a collaboration between Christoph Bader, Neri Oxman and the Mediated Matter Group. The first part is a video demonstrating a computational growth process they designed. The video shows a series of computational objects that transform in very interesting ways as time goes on. They then used this growth process to create a sort of “clothing”. This clothing looks almost like glass sculptures except they seem almost organic and are made for wearing.


  • I enjoy a lot about this project. First off, the pieces look very beautiful. The designs are varied and interesting, and look like glass sculptures found in museums. The experimentation with organic things like intestines gave the pieces a very unique look. Some of them, especially “Otaared”, looked like an exotic plant or creature found creeping along the darker parts of the ocean. The colors were also very aesthetically pleasing, with a tendency towards bright colors and pretty gradients as well. The mix of clear and opaque material also added something nice to the pieces. I admire this because I like art, so seeing how much effort was put into their looks makes me enjoy them even more, especially considering the looks were unnecessary. I say unnecessary because apparently the aim of the pieces was to have organic matter embedded into them in order to help sustain humans. They could have just been for practical use and not look pretty, but the creators still decided to put effort into the artistic side of the project. It’s also smart since it will cause people to want to buy them more. Their goal was very interesting to me. I liked the little descriptions for each of the four pieces, how each one was for a different planet or for the moon, and then how the pieces were made to fit the specific environments of those places. Most clothing doesn’t have a greater purpose like that. The idea of creations where the environment interacts beneficially with humans is also one I think is great. Whenever there is talk about humans and the environment, it always seems negative, like a one versus the other relationship. So the idea of having organic matter like algae live in clothing to help humans breath is a nice change.
  • I haven’t seen the algorithm that generated the work. However, I do know it was meant to imitate natural growth behavior. I assume it is a pretty advanced algorithm considering the results it created, especially since the results vary greatly in their looks.
  • The artistic sensibilities of the artist are pretty much all mentioned above in the “what I admire about it” section. Their interest in organic forms can be seen in the final products. Instead of following the colors of these organic forms, they brightened up the pieces with varied color use and use of gradient.
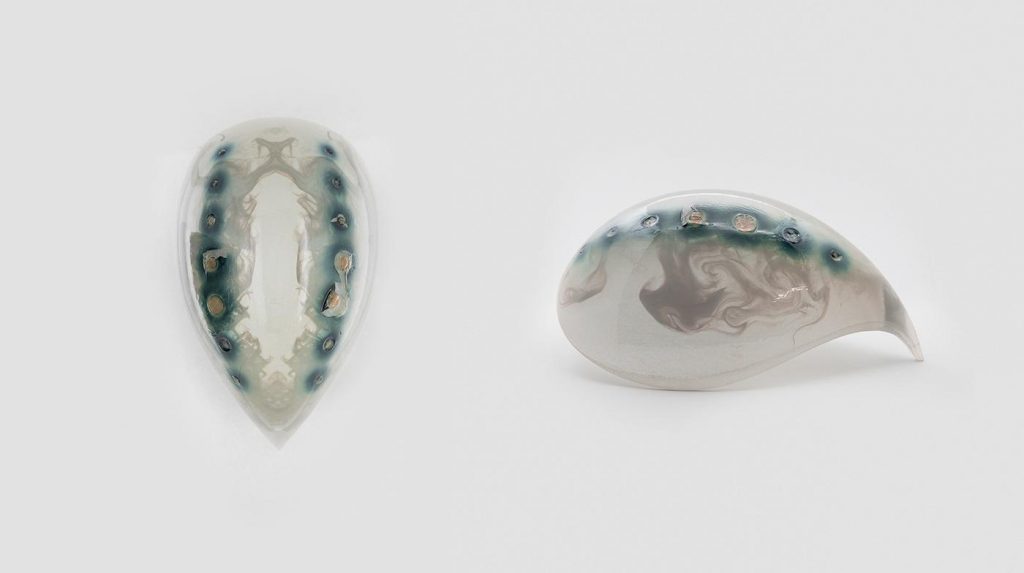
One of the pieces from "Wanderer" called "Otaared"
One of the pieces from “Wanderer” called “Otaared”

Julia Nishizaki – Looking Outwards – 03

The project I chose to look at is a part of the Vespers series, a collection of 3D-printed death masks created by Neri Oxman and her Mediated Matter Group at MIT.

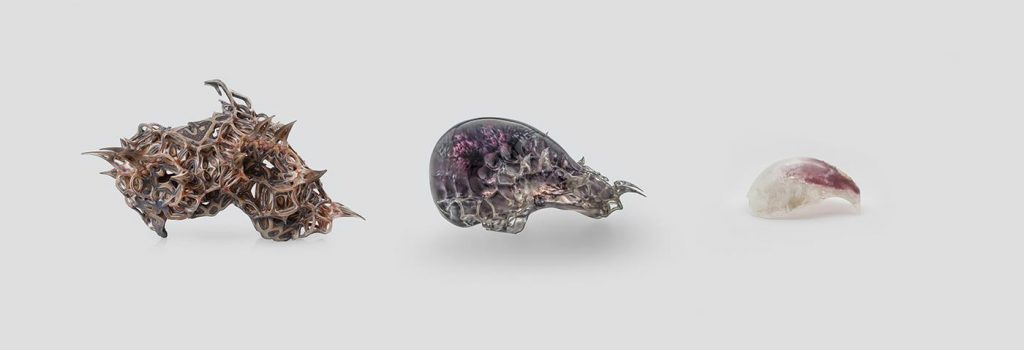
Three masks from the Vespers collection, the left most is from the first series (Past, the Natural World), the middle is from the second series (Present, the Digital World), and the right most is from the third and final series (Future, the Biological World)

The three series within the Vespers collection represents the past, the present, and the future, as the first series explores traditional death masks, and the concept of containing the wearer’s last breath, the second series is the metamorphosis or transition between death masks as an ancient relic and a more contemporary interpretation, and the third series creates an environment that guides and informs gene expression, in the sense that microorganisms inside the mask can produce chemicals that can help their users.  In order to meld the masks from all three series together, the team used spatial mapping algorithms to transform the different geometries and colorations from the first series to the second and the second to the third.

I found the third series, “Future, the Biological World” particularly interesting, as not only are the five 3D-printed masks, or “biological urns” beautiful and elegant, but they capture the balance between life and death both visually and physically, through their functions. Using bioactive materials that they then 3D-printed using a Stratasys Objet500 Connex3 multi-material 3D printer, the Mediated Matter Group synthetically engineered microorganisms to produce specific pigments or chemical substances like antibiotics or vitamins. The masks are not only tailored to the physical features, but also to an individuals genetic makeup and their environment, opening up the possibilities for wearable interfaces and skins in the future.

Minjae Jeong – LO – 03

I found a project done by The Computational Fabrication Group at MIT called Knitting Skeletons: Computer-Aided Design Tool For Shaping and Patterning of Knitted Garments inspiring in a way that it is a great example of how computational fabrication can change our daily lifestyle.

http://cfg.mit.edu/content/knitting-skeletons-computer-aided-design-tool-shaping-and-patterning-knitted-garments

This work aims to allow anyone to design a simple knitted garment with much freedom. This work was very interesting that until now, I thought manufacturing garments did not have much connection with computer programming. But with such technique, it allows the designers to create their pieces with more flexibility and creativity.

Ghalya Alsanea – LO-03 – ArboSkin

“Thermoformable sheets of bioplastics will represent a resource-efficient alternative [to oil-based plastics, glass, or metal] in the future, as they combine the high malleability and recyclability of plastics with the environmental benefits of materials consisting primarily of renewable resources.” explained the project team.

The Project Team

Overview

Stuttgart University’s ITKE Institute has designed and built the ArboSkin pavilion out of 388 bioplastic pyramids. A 140-square foot digitally fabricated mock-up composed of recyclable components that can be freely shaped and manufactured as 3D façade elements, the project was created within the Institute’s Bioplastic Façade Research Program to demonstrate the aesthetic and structural potentials of bioplastics.

Full Mock Up – Photograph by Roland Halbe

About the Creators

ITKE is the Institute of Building Structures and Structural Design in Stuttgart, Germany. Bioplastics are plastics made from renewable biomass sources such as starches, cellulose or other biopolymers, that offer sustainable alternatives to plastics derived from fossil fuels. The bioplastic used in the ArboSkin project is called Arboblend and is produced by German firm, Tecnaro, by combining different biopolymers such as lignin – a by-product of the wood pulping process – with natural reinforcing fibres.

Collaborating materials scientists, architects, product designers, manufacturing technicians, and environmental experts were able to develop a new material for facade cladding which is thermoformable and made primarily (>90%) from renewable resources. I admire the interdisciplinary approach to this project.

Process and Project Details

The blueprint of the shell structure is based on a network of triangular shapes of different sizes. The double curved skin is made of 3.5 mm thick bioplastic pyramids that are mechanically assembled to create the free form surface. The bioplastic sheets can be freely shaped and adapted to fit any requirement for building exteriors.

Personally, what really inspired me is the fact that waste produced during the CNC milling process can be regranulated and reused to create more of these façade elements in 3D format.

concept sketch. source: ITKE

The double-curved skin is formed by linking the pyramids together, with bracing rings and joists helping to create load-bearing walls. CNC-milling was used to remove sections from some of the modules, creating apertures in the facade, which I believe can be really cool if it is done based on sun data allowing for shading/sunlight during certain times of the day.

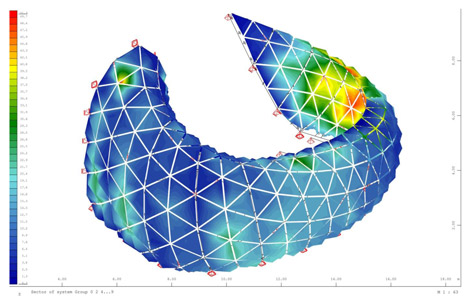
FE-Model Wind and snow loads. This shows how they used weather data to figure out where to put apertures and how to structurally reinforce it. Source: ITKE


Notes:

Duration of the project:  December 20, 2011 – October 31, 2013

Mock-Up: The bioplastics facade mock-up was created within the framework of the Bioplastic Facade Research Project, a project supported by EFRE (Europäischer Fonds für Regionale Entwicklung / European Fund for Regional Development). It demonstrates one of the possible architectural and constructional applications of bioplastic materials developed during the course of the project. The blueprint is based on a triangular net composed by mesh elements of varying sizes.

Links:

ITKE Constructs New ArboSkin Pavilion with 388 Recyclable Bioplastic Pyramids

ArboSkin pavilion made from bioplastic by ITKE

ArboSkin: Durable and Recyclable Bioplastics Facade Mock-Up

Alec Albright – Looking Outwards 04

Dave Young’s exhibition of Radius Music in 2010.

Dave Young’s “Radius Music”, released in 2010, is an audiovisual device that reads the ultrasonic distance from those that are in the room to the device itself, conducting additive synthesis to create audio and placing light beams on the floor in response to that distance. This project is admirable because of its ability to conduct complicated audio synthesis techniques on the fly, based on feedback it may have never dealt with before. I would imagine that the algorithm maps distance to pitch in some way, but I’m not sure what affects timbre, tempo, or anything else for that matter. Regardless, it seems super cool!

Alec Albright – Project 03 – Dynamic Drawing

sketch

// Alec Albright
// Section B
// Project 3

var margin = 150;
var radius = 30;
var r = 0;
var g = 0;
var b = 0;
var rotation = 0;

function setup(){
    createCanvas(640, 480);
    angleMode(DEGREES);
}

function draw(){
    background("white");
    fill(r, g, b);

    // mapping angle of rotation to mouseY
    // as mouse moves up and down, shapes rotate
    rotation = map(mouseY, 0, height, 0, 360);

    // drawing hexagons with specified margin and rotation
    // center
    push();
    translate(width / 2, height / 2);
    rotate(rotation);
    hexagon(0, 0, radius);
    pop();
    // circle around center hexagon
    for(let i = 0; i < nvertex; i +=1){
        // finding exactly where the hexagon at hand is located
        // sin tells us where the y coordinate is
        var centerY = sin(angle) * margin;
        // cos tells us where the x coordinate is
        var centerX = cos(angle) * margin;
        // now draw the vertex at hand
        // setting up rotation for each individual hexagon
        push();
        translate(width / 2 + centerX, height / 2 + centerY);
        rotate(rotation);
        hexagon(centerX, centerY, radius);
        pop();
        // add the next portion of the angle
        angle = angle + (360 / 6)
    }
    
    // scaling mouseX to use the whole screen for size
    // as mouse moves right, shapes get bigger
    radius = map(mouseX, 0, width, 20, 70);
    
    // scaling color using whole screen
    // as mouse moves right, more red
    r = map(mouseX, 0, width, 0, 255);
    // as mouse moves down, more blue
    b = map(mouseY, 0, height, 0, 255);
    // as mouse moves left, more green
    g = 255 - map(mouseX, 0, width, 0, 255);

    // margin depends on mouseX, keeping same distance throughout
    margin = map(mouseX, 0, width, 50, 150);
}

// 6 vertices, as a hexagon has
var nvertex = 6;
// angle we're working at (when we get to TWO_PI, we're done)
var angle = 0;

function hexagon(x, y, radius){
    // draw a hexagon at (x, y) using beginShape()
    beginShape();
    // find each vertex's specific location
    for(let i = 0; i < nvertex; i += 1){
        // finding exactly where the vertex at hand is located
        // sin tells us where the y coordinate is
        var vertexY = y + sin(angle) * radius;
        // cos tells us where the x coordinate is
        var vertexX = x + cos(angle) * radius;
        // now draw the vertex at hand
        vertex(vertexX, vertexY)
        // add the next portion of the angle
        angle += (360 / 6)
    }
    // connect beginning and end points
    endShape(CLOSE)
}

My process for creating this visualization was most difficult in implementing a rotational element. The colors were fairly easily scaled, the size and distance were a bit more difficult, but adding the rotation was a long experiment that I eventually figured out, resulting in this very cool kaleidoscope effect!

Xu Xu – Project 03 – Dynamic Drawing

sketch

var cable = 640;
var finger = 480;
var fingercolour1 = 350;
var fingercolour2 = 380;
var light1 = 0;
var light2 = 0;
var light3 = 0;
var light4 = 0;
var light5 = 0;
var light6 = 0;
var ow = 0;

function setup() {
    createCanvas(480, 640);
}

function draw() {    
    background(50);
//light
    noStroke();
    fill(255,267,13,light1);
    ellipse(width/2, height/3, 80,80);
    fill(255,267,13,light2);
    ellipse(width/2, height/3, 155, 155);
    fill(255, 267, 13,light3);
    ellipse(width/2, height/3, 250, 250);
    fill(255, 267, 13,light4);
    ellipse(width/2, height/3, 370, 370);
    fill(255, 267, 13,light5);
    ellipse(width/2, height/3, 600, 600);
    fill(255, 267, 13, light6);
    ellipse(width/2, height/3, 800, 800);
//Finger
    strokeWeight(3);
    fill(227,mouseX-fingercolour1,mouseX-fingercolour2);
    ellipse(finger, 200, 40, 20);
    circle(finger + 50, 220, 50);
    noStroke();
    rect(finger, 190, 50, 20);
    rect(finger + 50, 190, 300, 40);
    fill(208, 156, 158);
    ellipse(finger-10, 198, 15, 10);
//cable
    stroke("black");
    fill("gray");
    beginShape();
    vertex(220, cable);
    vertex(230, cable - 30);
    vertex(250, cable - 30);
    vertex(260, cable);
    endShape();
    line(237,cable-30, 232, cable);
    line(243, cable - 30, 247, cable);
    rect(220,cable,40,55);
    fill("yellow");
    rect(199, cable + 55, 80, 20);
    rect(210, cable + 75, 60, 30);
    strokeWeight(15);
    rect(235, cable + 111, 10, 100);
//lightbulb
    strokeWeight(5);
    noFill();
    arc(width/2, height/3, 200,200, 300,0);
    arc(width/2, height/3, 200,200, 180,150);
    strokeWeight(5);
    stroke("black");
    line(140,height/3, 190,350);
    line(340,height/3, 290,350);
    fill("black");
    rect(170,350,138,10);
    strokeWeight(15);
    line(290, 375, 190, 385);
    line(290, 400, 190, 410);
    line(290, 425, 190, 435);
    fill("black");
    rect(220, 440, 40, 30);
//lightbulb interior
    strokeWeight(3);
    noFill();
    beginShape();
    vertex(220, 350);
    vertex(180, 220);
    vertex(195, 205);
    vertex(210, 220);
    vertex(225, 205);
    vertex(240, 220);
    vertex(255, 205);
    vertex(270, 220);
    vertex(285, 205);
    endShape();
    if (mouseY > 420){
    	cable = mouseY + 50;
	}	
    if (cable < 490 & cable > 370){
		light1 = 100;
		light2 = 75;
		light3 = 55;
		light4 = 35;
		light5 = 15;
		light6 = 5;
	}
    else{
		light1 = 0;
		light2 = 0;
		light3 = 0;
		light4 = 0;
		light5 = 0;
		light6 = 0;
	}
    if (mouseX > 355){
		finger = mouseX;
	}
    if(finger < 365 & cable<490 & cable > 370){
		textSize(20);
		textFont("old english");
		fill("white");
		text("OW!",420, 50);
	}
}

I wanted to create dynamic drawing that incorporates the change of mouseX and mouseY, so I created a lightbulb that will be turned on when the cable is plugged in, and the finger is able to reach the lightbulb. If the finger touches the bulb while it’s on, the person will scream “ow”.

Emma NM-Project-03(Dynamic Drawing)


Emma’s dynamic drawing

I knew I wanted to create a dynamic drawing with circles so I started there and then moved into changing size, position, translation, and rotation based on mouse position. I added one more feature of if you click the screen you can change between circles and squares.

/* 
Emma Nicklas-Morris
Section B
enicklas@andrew.cmu.edu
Dynamic Drawing
*/

var b = 255;
var r = 200;
var cir = true;

function setup() {
    createCanvas(640, 480);
    
    
}

function draw() {
    background("black");
    b = mouseX/3;
    r = mouseY/2;

    // Changes dot color as you move your mouse
    // Red color is controlled by mouseY and Blue is controlled by mouseX position
    fill(r, 50, b);
    noStroke();

    // Dots increase if mouse moves right or up. 
    // Dot position depends on mouse position from the width or height
    if (cir) {
        ellipse(width-mouseX/2, height-mouseY/2, mouseX/2, mouseX/2); 
        ellipse(width-mouseX, height-mouseY, mouseY/2, mouseY/2);
    }
    else {
        rect(width-mouseX/2, height-mouseY/2, mouseX/2, mouseX/2); 
        rect(width-mouseX, height-mouseY, mouseY/2, mouseY/2);
    }
    
    // Create smaller dots to the left and up on the grid. Follows same principles as above
    push();
    translate(-width/3, -height/3);
    if (cir) {
        ellipse(width-mouseX/2, height-mouseY/2, mouseX/3, mouseX/3);
        ellipse(width-mouseX, height-mouseY, mouseY/3, mouseY/3);
    }
    else {
        rect(width-mouseX/2, height-mouseY/2, mouseX/3, mouseX/3);
        rect(width-mouseX, height-mouseY, mouseY/3, mouseY/3);
    }
    pop();

    // Rotates grid based on mouseX position and follows principles above. Dots are smaller than above
    push();
    translate(-width/3, -height/3);
    rotate(radians(mouseX/3));
    if (cir) {
        ellipse(width-mouseX/2, height-mouseY/2, mouseX/4, mouseX/4);
        ellipse(width-mouseX, height-mouseY, mouseY/4, mouseY/4);
    }
    else {
        rect(width-mouseX/2, height-mouseY/2, mouseX/4, mouseX/4);
        rect(width-mouseX, height-mouseY, mouseY/4, mouseY/4);
    }
    pop();

    // Rotates grid based on mouseY position. Follows same principles as above
    push();
    translate(width/3, 0);
    rotate(radians(mouseY/4));
    if (cir) {
        ellipse(width-mouseX/2, height-mouseY/2, mouseX/4, mouseX/4);
        ellipse(width-mouseX, height-mouseY, mouseY/4, mouseY/4);
    }
    else {
        rect(width-mouseX/2, height-mouseY/2, mouseX/4, mouseX/4);
        rect(width-mouseX, height-mouseY, mouseY/4, mouseY/4);
    }
    pop();


}

// By clicking the mouse you switch back and forth between circles and squares
function mousePressed() {
    if (cir == true) {
        cir = false;
    }

    else {
        cir = true;
    }
	
}

Ghalya Alsanea – Project 03

Align the flowers and be mesmerized!

sketch

//Ghalya Alsanea
//Section B
//galsanea@andrew.cmu.edu
//Project-03

var diameter;   //circle diameter
var diameteri;  //diameter of the inversed circle
var xx;         //mouse X location
var yy;         //mouse y location
var xi;         //inverse of mouxe x loxation
var yi;         //inverse of mouse y location
var angle = 0;  //the angle in which the flower roates
var strokeG;    //what G value the inversed flower color is
var dx;         //distance between x and it's inverse
var dy;         //distance between y and it's inverse

function setup() {
  createCanvas(480, 640);

}
function draw() {
  background(0);

  //if the two flowers are aligned in the center within
  //a tolerance, changed the color of the inversed flower
  dx = xx - xi;
  dy = yy - yi;

  if (dx < 30 & dx > -30 && dy < 30 && dy > -30){
    strokeG = 0
  } else{
    strokeG = 255
  }
  
  //set the variables to depend on the mouse
  xx = mouseX;
  xi = width - mouseX;   //the inverse X location
  yy = mouseY;
  yi = height - mouseY;  //the inverse Y location


  //find diameter that increases as mouseX increases
  diameter = mouseX / 2;

  //find inverse diameter that decreases with mouseX
  diameteri = width / 2 - mouseX / 2;

  //animate the angle to rotate the flower
  angle = angle + 1

  noFill();
  stroke(255);

  //draw simple torus flower
  circle(xx, yy, diameter);
  push();
  translate(xx, yy);
  circle(diameter / 2, 0, diameter);
  rotate(radians(60));
  circle(diameter / 2, 0, diameter);
  rotate(radians(60));
  circle(diameter / 2, 0, diameter);
  rotate(radians(60));
  circle(diameter / 2, 0, diameter);
  rotate(radians(60));
  circle(diameter / 2, 0, diameter);
  rotate(radians(60));
  circle(diameter / 2, 0, diameter);
  pop();

  //if mouse is in the second third of the vertical
  //canvas double the torus flower 

  if(mouseY > height / 3){
    fill(255, 50);
    push();
    translate(xx, yy);
    //animate it to rotate clockwise
    rotate(radians(30 + angle));
    circle(diameter / 2, 0, diameter);
    rotate(radians(60));
    circle(diameter / 2, 0, diameter);
    rotate(radians(60));
    circle(diameter / 2, 0, diameter);
    rotate(radians(60));
    circle(diameter / 2, 0, diameter);
    rotate(radians(60));
    circle(diameter / 2, 0, diameter);
    rotate(radians(60));
    circle(diameter / 2, 0, diameter);
    pop();
  }
  
  //if mouse is in the bottom third of the vertical
  //canvas double the already doubled flower
  if(mouseY > 2 * height / 3){
    fill(255, 50);
    push();
    translate(xx, yy);
    //amimate it to rotate counterclockwise
    rotate(radians(15 - angle));
    circle(diameter / 2, 0, diameter);
    rotate(radians(30));
    circle(diameter / 2, 0, diameter);
    rotate(radians(30));
    circle(diameter / 2, 0, diameter);
    rotate(radians(30));
    circle(diameter / 2, 0, diameter);
    rotate(radians(30));
    circle(diameter / 2, 0, diameter);
    rotate(radians(30));
    circle(diameter / 2, 0, diameter);
    rotate(radians(30));
    circle(diameter / 2, 0, diameter);
    rotate(radians(30));
    circle(diameter / 2, 0, diameter);
    rotate(radians(30));
    circle(diameter / 2, 0, diameter);
    rotate(radians(30));
    circle(diameter / 2, 0, diameter);
    rotate(radians(30));
    circle(diameter / 2, 0, diameter);
    pop();

  }


  //draw it's mirrored version

  noFill();
  stroke(255, strokeG, 0);

  //draw simple torus flower
  circle(xi, yi, diameteri);
  push();
  translate(xi, yi);
  circle(diameteri / 2, 0, diameteri);
  rotate(radians(60));
  circle(diameteri / 2, 0, diameteri);
  rotate(radians(60));
  circle(diameteri / 2, 0, diameteri);
  rotate(radians(60));
  circle(diameteri / 2, 0, diameteri);
  rotate(radians(60));
  circle(diameteri / 2, 0, diameteri);
  rotate(radians(60));
  circle(diameteri / 2, 0, diameteri);
  pop();

  //if mouse is in the second third of the vertical
  //canvas double the torus flower 

  if(mouseY > height / 3){
    fill(255, strokeG, 0, 50);
    push();
    translate(xi, yi);
    //animate it to rotate counterclockwise
    rotate(radians(30 - angle));
    circle(diameteri / 2, 0, diameteri);
    rotate(radians(60));
    circle(diameteri / 2, 0, diameteri);
    rotate(radians(60));
    circle(diameteri / 2, 0, diameteri);
    rotate(radians(60));
    circle(diameteri / 2, 0, diameteri);
    rotate(radians(60));
    circle(diameteri / 2, 0, diameteri);
    rotate(radians(60));
    circle(diameteri / 2, 0, diameteri);
    pop();
  }
  
  //if mouse is in the bottom third of the vertical
  //canvas double the already doubled flower
  if(mouseY > 2 * height / 3){
    fill(255, strokeG, 0, 50);
    push();
    translate(xi, yi);
    //amimate it to rotate clockwise
    rotate(radians(15 + angle));
    circle(diameteri / 2, 0, diameteri);
    rotate(radians(30));
    circle(diameteri / 2, 0, diameteri);
    rotate(radians(30));
    circle(diameteri / 2, 0, diameteri);
    rotate(radians(30));
    circle(diameteri / 2, 0, diameteri);
    rotate(radians(30));
    circle(diameteri / 2, 0, diameteri);
    rotate(radians(30));
    circle(diameteri / 2, 0, diameteri);
    rotate(radians(30));
    circle(diameteri / 2, 0, diameteri);
    rotate(radians(30));
    circle(diameteri / 2, 0, diameteri);
    rotate(radians(30));
    circle(diameteri / 2, 0, diameteri);
    rotate(radians(30));
    circle(diameteri / 2, 0, diameteri);
    rotate(radians(30));
    circle(diameteri / 2, 0, diameteri);
    pop();

  }


}

For my dynamic drawing, I was inspired by the torus flower of life (shown below), which is a base for a lot of Arabic art and architecture geometry. I wanted it to be interactive in the sense that when the two flowers are centered together, the flower changed colors. I also thought adding animation to the flower petals as you move up to down would look cool, and it changes in size f you move left to right as well.