Yoshi Torralva-Project-02-Variable-Face

sketch

//Yoshi Torralva
//Section E
//yrt@andrew.cmu.edu
//Project 02 Variable Face
    var eyeSize = 100;
    var eyemvmnt = 50;
    var faceWidth = 400;
    var faceHeight = 600;
    var hatbottom = 320;
    var hatbottomvmt = 320;
    var Qhat = 160;
    var Qhatx1y1x2y2 = 160;
    var windw = 400;
    var windh = 80;
     
    function setup() {
        createCanvas(640, 480);
    }
    function draw() {
        background(232, 253, 255);
        //wind movements 
        fill(181, 246, 255);
        noStroke();
        rect(windh, windw/4, windw, windh);
        rect(windh * 2, windw/2, windw *2, windh/2);
        rect(windh - windh, windw, windw, windh);
        rect(windh * 5, windw/3.5, windw * 3, windh/2.5);
        //face
        fill(255, 199, 15);
        ellipse(faceWidth * 0.8, faceHeight, faceWidth,  faceHeight);
        //two parts of the hat. The base and top.
        fill(5, 59, 66);
        rect(hatbottom/2, hatbottom/1.1, hatbottomvmt, hatbottom/4);
        quad(Qhatx1y1x2y2, Qhatx1y1x2y2/4, Qhatx1y1x2y2 * 3, Qhatx1y1x2y2/4, Qhat * 2.6, Qhat * 2, Qhat * 1.3, Qhat * 2);
        //variables for eyes
        var eyeL = width / 2 - faceWidth * 0.20;
        var eyeR = width / 2 + faceWidth * 0.20;
        //eye
        fill(255);
        ellipse(eyeL, eyeSize * 4.5, eyeSize, eyeSize);
        fill(255);
        ellipse(eyeR, eyeSize * 4.5, eyeSize, eyeSize);
       //pupil
        fill(0);
        ellipse(eyeL, eyeSize * 4.6, eyemvmnt,eyemvmnt);
        ellipse(eyeR, eyeSize * 4.6, eyemvmnt,eyemvmnt);
    }
     
    function mousePressed() {
        faceWidth = random(370, 450);
        //only used to animate the width of the hat for perspective 
        //only changes the first two quadrants of the top hat to keep the parts connected
        Qhatx1y1x2y2 = random(200,330);
        eyemvmnt = random(40,60);
        hatbottomvmt = random(350,400);
        windh = random(20,100);
        windw = random(200, 1000);
    }

With this project, I focused on using random() to create movement and slight perspective shifts within the piece. With the face, only certain variables were animated to create a similar perspective shift to the hat. Rectangles in the background add depth and additional visual cues of wind as the hat jolts to the right side of the screen.

Margot Gersing-Looking Outwards-02

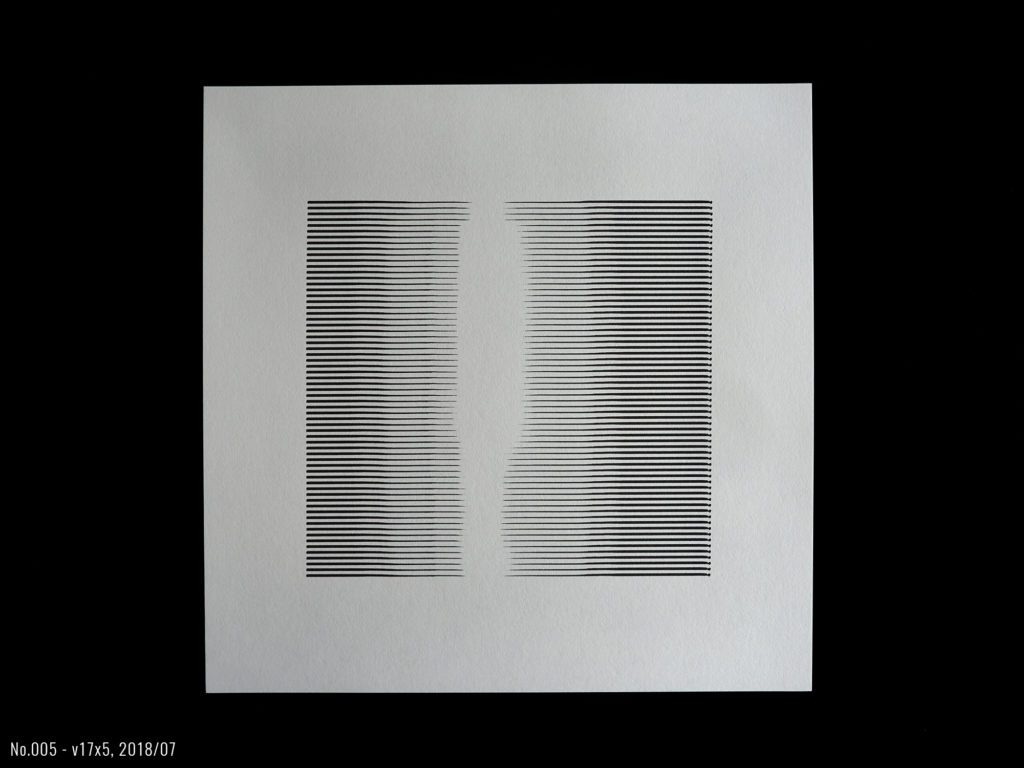
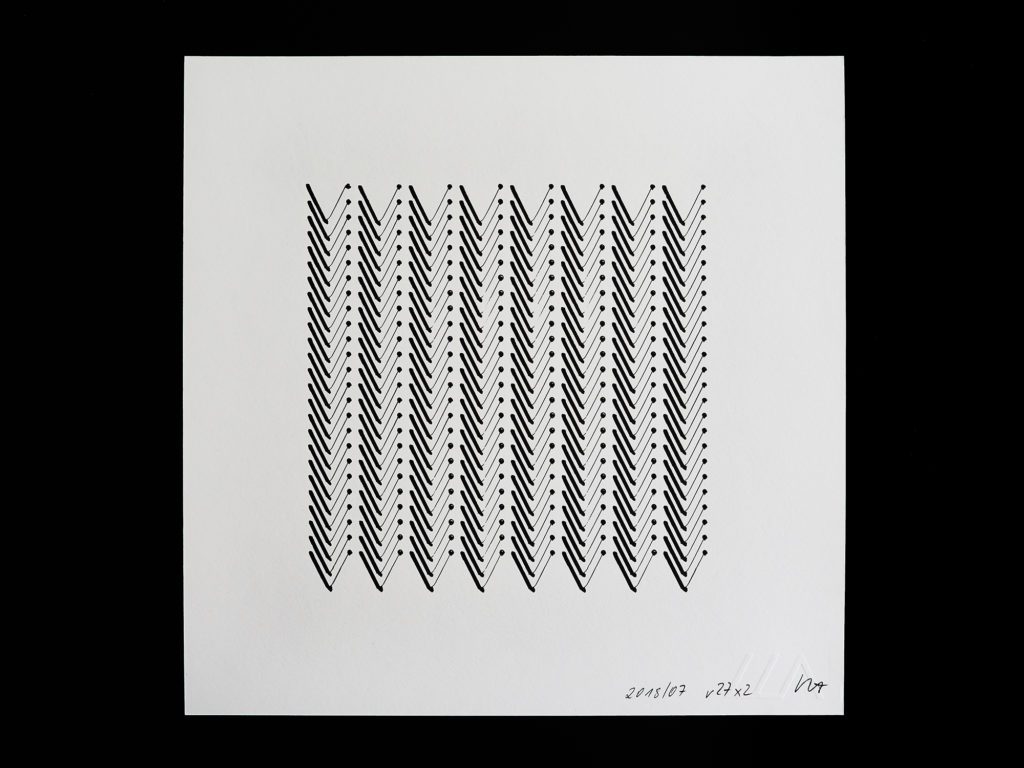
The generative artist I was inspired by was Austrian artist LIA. I was most interested in her Mechanical Plotter Drawings. What I really like about this project is that she incorporates code, mechanical machinery and traditional mediums (mark makers) to create these generative pieces. I am really inspired by the intersection of mediums and platforms LIA utilizes to make really unique art.

No. 005- Indian ink on Hahnemühle paper 30cm x 30cm, printed area: ~18cm x ~18cm
No. 042 – Indian ink on Hahnemühle paper, 30cm x 30cm, printed area: ~20cm x ~20cm
No. 041- Indian ink on Hahnemühle paper, 30cm x 30cm, printed area: ~20cm x ~20cm

The project’s simple code is written in processing. Each piece uses the same code and then she changes the variable x each time just a bit to create the variation. She then uses the axiDraw plotter to manifest the code. To make the pieces even more variable she draws with different tools. Some use paint brushes and india ink and others use various pens and markers to which all have varying line weights and textures.

Video of the code running and a piece being made.

LIA’s website

Jina Lee – Looking Outwards 02


Robert Hodgin is an interactive director and co-founder of Rare Volumes. His project “Taxi, Taxi!” shows NYC Open Data taxi against routes created with Open Street Map. This digital installation is shown through a 3D model of New York City. This project was shown in Samsung 837 which is a three story display. He used Cinder C++.

This photo shows the digital installation that is shown in Samsung 837.

I admire how inclusive this project is. Everyone can relate to looking on their smartphone to find the fastest and shortest way to get to their destination. This digital installation can help people understand the main routes for taxis so they can decide whether it is a good idea or not to take it. In addition, because it is 3D it makes it easier to understand the map. I feel like sometimes when I am on on the Apple Maps it is difficult to read because it is flat and I can not comprehend the map as well. I understand that right now the design is only an installation, but I feel like in the future they could create for smartphones so that everyone can use. I think I have slight knowledge about the algorithm that was used to generate this work. In high school, I took Geospatial Analysis, so we would create various routes depending on the prompt with Open Street Maps. In order to do so, we had to collect data points so that it was easier to create on the software. Through that program you could create buffers, paths, and other ways of identifying data points on a map. I really enjoyed how clean and simple the design was. Usually, it feels like maps are so overwhelming with so much information, but this one didn’t.

People looking at the map.

Website Link

Mihika Bansal-Project 02-Variable Face

sketch

/*
Mihika Bansal 
Section E 
mbansal@andrew.cmu.edu
Project-01
*/

var faceWidth=120; 
var faceHeight=150; 
var faceColorR=234; 
var faceColorG=213; 
var faceColorB=200; 
var hairLength=200; 
var neckLength=100; 
var neckWidth= 75; 
var noseY= 220;
var eyeWidth=15; 
var mouthX=20; 
var mouthY=10; 
var earWidth= 15; 
var earHeight= 17; 
var colorR= 230; 
var colorG=211; 
var colorB=152; 

function setup() {
    createCanvas(640, 480);
  }

function draw() {
    background(231, 231, 253); 
  
    //neck
    fill(faceColorR, faceColorG, faceColorB); 
    rectMode(CENTER); 
    rect(width/2, (height / 2 - 50)+(0.5*faceHeight)+0.2*neckLength, neckWidth, neckLength);
    
    //hair 
    fill("black");
    arc(width/2+0.68*(0.5*faceWidth), height/2-20, 100, hairLength, 3*PI/2, PI/2);
    arc(width/2-0.68*(0.5*faceWidth), height/2-20, 100, hairLength, PI/2, 3*PI/2);
    
     //face +ears 
    fill(faceColorR, faceColorG, faceColorB);
    ellipse(width / 2, height / 2 - 50, faceWidth,  faceHeight);
    arc(width/2+(0.5*faceWidth), height/2-0.20*faceHeight, earWidth, earHeight, 3*PI/2, PI/2);
    arc(width/2-(0.5*faceWidth), height/2-0.20*faceHeight, earWidth, earHeight, PI/2, 3*PI/2);
    //hair 
    fill("black");
    arc(width/2, height/2-65, faceWidth*1.3, faceHeight, PI-0.40, QUARTER_PI-0.45 , PIE);
    //nose 
    fill(faceColorR, faceColorG, faceColorB);
    triangle(width/2, noseY, width/2-5, noseY*0.97, width/2+5, noseY*0.97);

    //eyes 
    fill("white"); 
    ellipse(width/2-20, height/2-40, eyeWidth, eyeWidth*0.65);
    ellipse(width/2+20, height/2-40, eyeWidth, eyeWidth*0.65);
    fill("black"); 
    ellipse(width/2-18, height/2-42, eyeWidth*0.45, eyeWidth*0.45);
    ellipse(width/2+22, height/2-42, eyeWidth*0.45, eyeWidth*0.45);

    //mouth
    fill(123, 30, 30); 
    arc(width/2, height/2+faceHeight*0.04, mouthX, mouthY, 0, PI,OPEN);

    //earrings 
    fill(colorR, colorG, colorB); 
    ellipse(width/2+(0.52*faceWidth), height/2-0.18*faceHeight, 5, 5);
    ellipse(width/2-(0.52*faceWidth), height/2-0.18*faceHeight, 5, 5);
    fill(colorR*1.2, colorB*1.2, colorG*1.2);
    rect(width/2+(0.52*faceWidth), height/2+0.04*faceHeight, 5, hairLength*0.2);
    rect(width/2-(0.52*faceWidth), height/2+0.04*faceHeight, 5, hairLength*0.2);
     
}

function mousePressed() {
    faceWidth = random(100, 150);
    faceHeight = random(140, 180);
    eyeWidth = random(10, 25);
    faceColorR= random(150, 250);
    faceColorG= random(102, 245);
    faceColorB= random(55, 236);
    hairLength= random(100, 250);
    neckLength= random(85, 150); 
    neckWidth= random(50, 120);
    noseY=random(215, 230);
    mouthY=random(5,20); 
    mouthX=random(15, 30);
    earWidth=random(10, 25);
    earHeight=random(13, 30);
    colorR=random(0,255); 
    colorG=random(0,255);
    colorB=random(0,255);

}

For this project, I worked with the same style of my self portrait to create faces that changed multiple facets. I changed the eye size, skin color, face width and height, neck size and length, hair length, earring size and color, etc, to create unique faces with a distinct style. It was interesting to see faces that were made that I typically would not have made, but still worked visually.

Mihika Bansal-Looking Outwards-02

One of the things that I am passionate about is climate change. So seeing artists that focus on these prevalent issues as the focus of their work is inspiring for me. An artist that I am particularly interested in is Mitchell Whitelaw. He has multiple pieces in which the recent climate crisis is his inspiration.

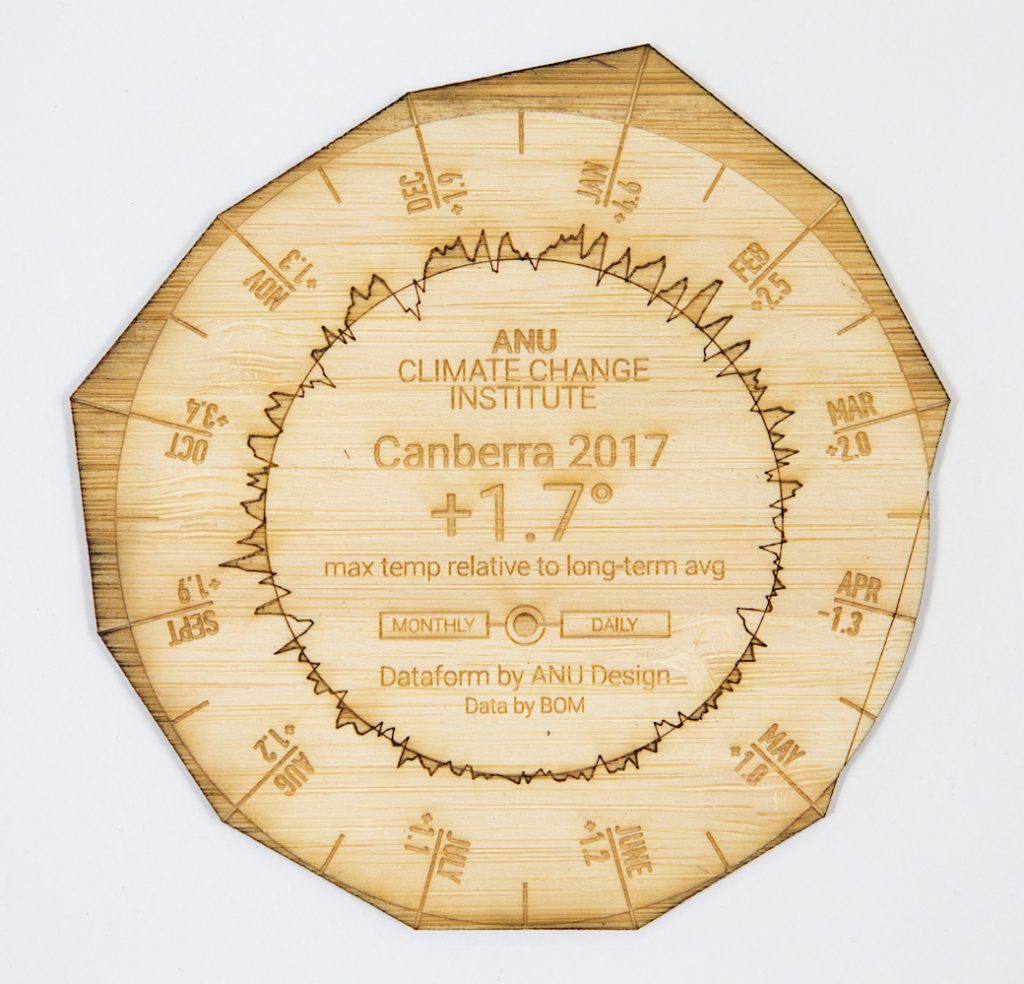
One piece that I find to be particularly interesting is his climate coasters. These coasters take data from the ANU climate change institute, and will change based on location and time in order to create a new coaster that represents that new data. The app also uses data that ranges from 1991 to 2017, which shows how much it has changed and grown. This project is also an interesting example of data visualization, another field that I am really interested in pursuing.

Mitchell was the primary artist of this work and it was completed in May of 2018.

Link to work: https://gravitron.com.au/climatecoaster/

Climate change coasters created by the ANU School of Art and Design.

Alice Cai LookingOutwards 02

Holger Lippman is a generative artist with a traditional visual art background. He was inspired by the motive to make art the same way that music was made. However, he wanted to stick with his painting roots but compares his creations to compositions and harmonies. ow, he paints with generative code.

Corrosive Landscape II is a project by Holger Lippmann. It is a continuation of his project Corrosive Landscape. The generative work is based on landscape photography in Berlin. He used code to read color maps and image structures and the algorithm generated endless ellipses that overlap with each other to create horizontal patterns. The ellipses vary in opacity, thus creating a fading gradient around every central ellipse. The gradient also allows for color blending even though each shape is essentially its own color (no mixing gradients). I really like this work because from afar it doesn’t look like coded art and takes on an impressionist or abstract style. but up close you can see the ellipses and the more digital aspect of it. The colors in each piece are gorgeous and create a beautiful color palette. Although pieces are all very abstract, the ellipses and horizontal lines create the essence of a landscape. 

Published on July 11, 2012 10:22 am.

Corrosive Landscape II is a project by Holger Lippmann. It is a continuation of his project Corrosive Landscape. The generative work is based on landscape photography in Berlin. He used code to read color maps and image structures and the algorithm generated endless ellipses that overlap with each other to create horizontal patterns. The ellipses vary in opacity, thus creating a fading gradient around every central ellipse. The gradient also allows for color blending even though each shape is essentially its own color (no mixing gradients). I really like this work because from afar it doesn’t look like coded art and takes on an impressionist or abstract style. but up close you can see the ellipses and the more digital aspect of it. The colors in each piece are gorgeous and create a beautiful color palette. Although pieces are all very abstract, the ellipses and horizontal lines create the essence of a landscape. 

Caroline Song – Project 02 – Variable Face

sketch

/*  Caroline Song
    Section E
    chsong@andrew.cmu.edu
    Assignment-02 */


var eyeSize = 25
var faceWidth = 50
var faceHeight = 50
var pupilSize = 20
var noseSize = 50
var mouth = 30
var bodyHeight = 250
var bodyWidth = 250

function setup (){
    createCanvas(640, 480);
}

function draw(){
    background(134, 227, 219);

    //face shape
    noStroke(0); 
    fill(254, 217, 255);
    ellipse(width/2, height/2, faceWidth*4, faceHeight*5);

    //eyes
    fill(250);
    var eyeLX = width/2 - faceWidth*0.75;
    var eyeRX = width/2 + faceWidth*0.75;
    ellipse(eyeLX, height/2, eyeSize*3, eyeSize*3);
    ellipse(eyeRX, height/2, eyeSize*3, eyeSize*3);

    //pupils
    fill(0);
    var pupilLX = width/2 - faceWidth*0.75;
    var pupilRX = width/2 + faceWidth*0.75;
    ellipse(pupilLX, height/2, pupilSize, pupilSize);
    ellipse(pupilRX, height/2, pupilSize, pupilSize);

    //nose
    fill(214, 0, 0);
    ellipse(width/2, height/2 + faceHeight*0.65, noseSize, noseSize);

    //mouth
    fill(245, 135, 170);
    arc(width/2, height/2 + faceHeight*1.5, mouth*2, mouth, 0, PI);

    //body
    fill(255, 243, 168);
    var faceH = faceHeight*5
    ellipse(width/2, height/2 + faceH/2 + bodyHeight/2, bodyWidth, bodyHeight);
}

    function mousePressed() {
    eyeSize = random(25, 50);
    faceWidth = random(50, 75);
    faceHeight = random(50, 75);
    mouth = random(60, 85);
    bodyHeight = random(250, 400);
    bodyWidth = random(250, 400);
}

This project was interesting in terms of using variables and math to find the coordinates to my shapes, as opposed to using Illustrator and/or Photoshop to do it for me. At first, I found this project to be challenging, but as I kept adding more objects to the face, I started to understand and familiarize myself with the process of creating this variable face.

Jamie Park – Project – 02

sketch

//Jamie Park           jiminp@andrew.cmu.edu
//15-104        Section E         Project #2

var bodySize = 130;
var tail = 150;
var eyes = 25;
var pupil = 10;
var faceWidth = 110;
var faceHeight = 150;
var mouth = 70;
var cheeks = 20;
var noseLength = 250

function setup(){
    createCanvas(640,480);
}

function draw(){
    background(128, 124, 115);

    strokeWeight(40);
    stroke(217, 180, 98);
    noFill();
    beginShape();
    curveVertex(width / 2 + 50, 640); //tail
    curveVertex(width / 2 - 80, 460);
    curveVertex(width / 2 - 130, 300);
    curveVertex(tail, 200);
    endShape();

    noStroke();
    fill (242, 205, 121);
    ellipse (width / 2, height / 2 + 150, bodySize, 250); //body

    fill (255, 233, 184);
    ellipse (width / 2, height / 2, faceWidth, faceHeight); //face
    var eyeLeft = width / 2 - faceWidth * 0.35;
    var eyeRight = width / 2 + faceWidth * 0.35;

    fill(255, 200, 176);
    ellipse (eyeLeft - 3, height / 1.80, cheeks, cheeks); //cheeks
    ellipse (eyeRight + 3, height / 1.80, cheeks, cheeks);

    fill(250);
    ellipse (eyeLeft, height / 2, eyes, eyes); //eyes
    ellipse (eyeRight, height / 2, eyes, eyes);

    fill(74, 72, 65);
    ellipse (eyeLeft, height / 2, pupil, pupil); //pupil
    ellipse (eyeRight, height / 2, pupil, pupil);

    fill(242,111,63);
    arc(width / 2, height / 1.80, mouth, mouth, TWO_PI, PI); //mouth

    strokeWeight(2);
    stroke (170, 156, 112);
    line (width / 2, noseLength, width / 2, height /2 + 3); //nose

    fill("pink");
    noStroke();
    triangle(eyeLeft - 10, height / 2 - 100, eyeLeft - 10, //horn
      height / 2 - 27, eyeLeft + 10, height / 2 - 32);
    triangle(eyeRight + 10, height / 2 - 100, eyeRight - 10,
      height / 2 - 32, eyeRight + 10, height / 2 - 27);
}

function mousePressed(){
    bodySize = random (110, 200);
    faceWidth = random(90, 170);
    faceHeight = random(130, 165);
    eyes = random(15, 28);
    mouth = random(50, 80);
    tail = random (0, 160);
    pupil = random(10, 15);
    cheeks = random(10, 20);
    noseLength = random (245, 260);
}

At first, I was skeptical with my ability to code this project. But once I started, I had a lot of fun altering the features that would fit into my creature! I am still struggling with effectively using curve vertex, but hopefully it will naturally come as I code more things.

Jamie Park – Looking Outwards – 02

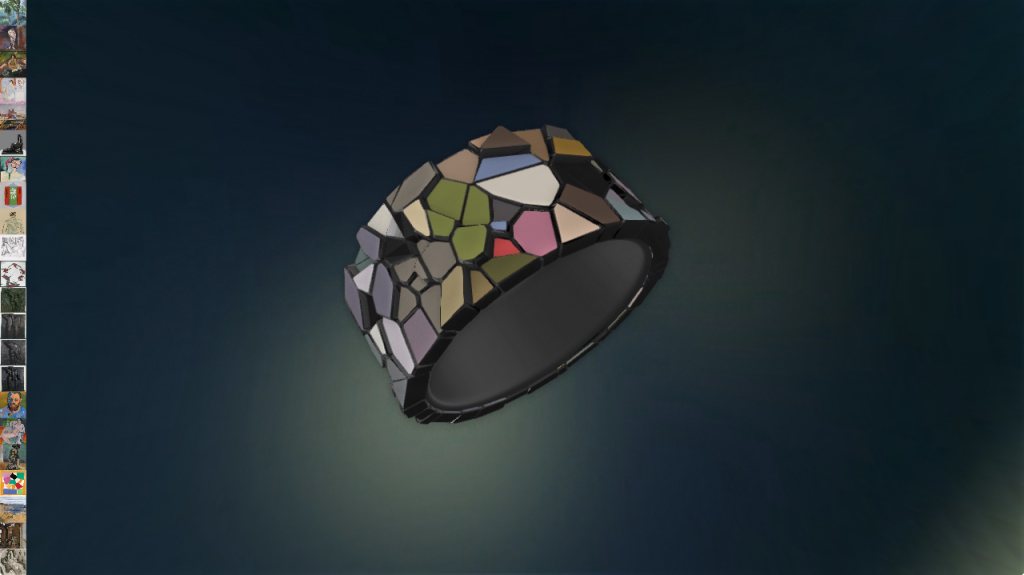
Marcin Ignac’s Tatelet, 2014, a 3D printed bracelet based on the customer’s selection of art works

I am inspired by Marcin Ignac’s Tatelt, a generative artifact that uses data from Tate Modern museum. The 3D printable bracelet is very unique to the user, as the person can choose the artwork that wants to be part of the bracelet. Based on the selection, an algorithm using Javascript that has been designed to analyze the complexity and color palettes of the artworks orders the 3D printer to print a bracelet with a specific pattern.

The fact that the artist decided to create an artifact to represent the data really impresses me. Likewise, this project is very similar to datavis (data visualization) in design. I like this artwork in particular because it is a different way of approaching data and visualizing it, as the work combines technology and creativity to create something special. I wish I would be able to combine technology into my design career and be able to create something meaningful.

You can see more of his works here: http://marcinignac.com/projects/

Joseph Zhang – Project – 02

sketch

// JOSEPH ZHANG
// SECTION E
// HAOZHEZ@ANDREW.CMU.EDU
// PROJECT-02

// GLOBAL VARS
var eyeSize = 20;
var faceWidth = 100;
var faceHeight = 150;
var mouthX = 18;
var mouthY = 32;
var mouthPosY = 192;
var bodyW = 150;
var browWeight = 5;
var browHeight = 5;

// CANVAS
function setup() {
    createCanvas(640, 480);
}
 

function draw() {
    background('#B4A4D0');
    var eyeLX = width / 2 - faceWidth * 0.25;
    var eyeRX = width / 2 + faceWidth * 0.25;

    // BODY
    noStroke();
    fill('#EFB616');
    ellipse(width/2,height/2 + 170,bodyW,265)

    // FACE
    fill('#FFD100');
        noStroke();
        ellipse(width / 2, height / 2, faceWidth,  faceHeight);
        ellipse(width / 2, height / 2 + 40, faceWidth * 1.2,  faceHeight / 1.4);

    // EYES
    fill('black')
    ellipse(eyeLX, height / 2, eyeSize, eyeSize);
    ellipse(eyeRX, height / 2, eyeSize, eyeSize);


    // INNER EYE
    noStroke();
    fill('white')
        ellipse(eyeLX, height / 2, eyeSize / 2, eyeSize / 2);
        ellipse(eyeRX, height / 2, eyeSize / 2, eyeSize / 2);

    // MOUTH
    stroke('#871200');
    strokeWeight(2);
    fill('#FF7D62');
    ellipse(width / 2,mouthPosY + 90, mouthX, mouthY);

    // BROWS
    strokeWeight(browWeight);
        // Left Brow
        line(eyeLX - 10, height / 2 - 20 + browHeight, eyeLX + 10 , height / 2 - 7);

        // Right Brow
        line(eyeRX - 7, height / 2 - 10, eyeRX + 10 , height / 2 - 20 + browHeight);
    
}
 
function mousePressed() {
    
    // FACE WIDTH + HEIGHT
    faceWidth = random(75,150);
    faceHeight = random(100,150);

    //EYE SIZE
    eyeSize = random(10,30);

    // MOUTH RATIOS
    mouthX = random(22,42);
    mouthY = random(22,42);

    // BODY WIDTH
    bodyW = random(50,180)
    
    //BROW WIDTH + HEIGHT
    browWeight = random(3,6);
    browHeight = random(-5,5);
}

Varying Faces

To built this project, I experimented a lot with the manipulation of shapes and how to combine them with others to create more interesting forms; the variables I chose to manipulate included, the eye size, eyebrow form, head shape, body width, and mouth. To begin the process, I mocked up what I wanted to make in Adobe Illustrator and from there, adapted to what actually could and couldn’t be done. Unfortunately, I don’t have the Illustrator file anymore so I can’t attach a screenshot. But I did use the surprised Pikachu meme as initial inspiration!

Image result for pikachu meme