LO: Computational Fabrication

The work generates a beautiful, intricate arrangements using continuous pattern and motion.

John Edmark’s “Blooms” is a 3D printed kinetic objects that uses mathematical formulas and concepts to create animation effect like spiral patterns. The work uses progressive rotations of the golden ratio, phi (ϕ), to generate interesting designs such as a sunflower or pinecone-like appearances. I really admire how it not only creates a special pattern each time under a strobe light, but also the synchronized “blooming” form under a constant rotational speed is really satisfying to watch. According to Edmark, the generated artwork increases our cognizance of the fine, delicate relationship between reality and consciousness. I found it absolutely fascinating that every time the bloom turns 137.5º, which is the angular version of phi, the sculpture seems to be illuminated. In the final form, Edmark manifests the simplest paramedic systems, but creates a vibrant visual property using pattern, movement, and light exposure.

Reference: http://www.johnedmark.com/phifib/2016/4/28/blooms-strobe-animated-phi-based-sculptures

Looking Outwards 03: Computational Fabrication


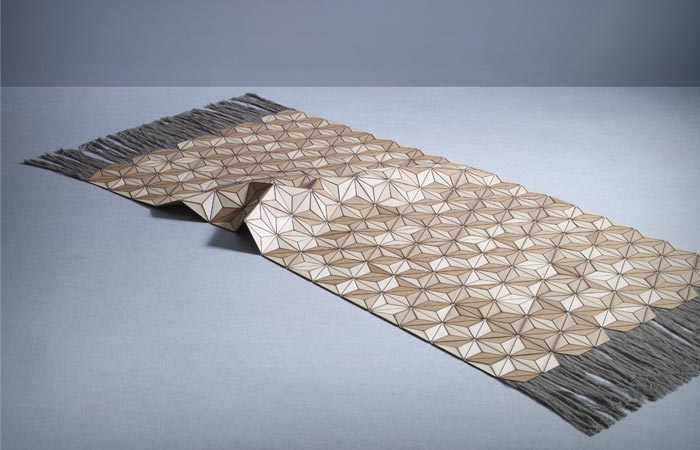
Project Title: Wooden Carpet

Year of Creation: 2009

Artists: Elisa Strozyk

The wood pieces are just substantial enough such that the flexible carpet is able to prop itself up.

The project is a wooden textile carpet. I admire how the veneer pieces are assorted in color (light to medium brown) because this adds to the rendering’s depth, and makes the artwork look especially fascinating when contorted and crinkled. I also admire how it combines two of the most common floor coverings as this has me questioning other familiar materials and imagining how these can be hybridized with each other. A critique might be that the artwork would be even more interesting to observe if the pieces used on a single carpet were varying shapes instead of all triangles. The geometric shapes were generated by an algorithm unknown to myself, and then realized in wood-veneer through laser cutter machinery. The creator then bonded the pieces onto fabric. Strozyk’s artistic sensibilities include viewing substances in different ways than they are normally viewed and the “possibility of surprising elements.” The final form transforms wood to appear and be malleable as it can bend and maintain a unique shape unlike a typical carpet rug or wood floor, encouraging the audience to rethink our assumptions about the resources we use and expand our creative bounds.

Project 3: Dynamic Drawing

aysha-dynamic

var x = 1
var y = .75

function setup() {
    createCanvas(450, 600);
}

function draw() {
    background(200, 100, 0); // orange background
    fill(mouseX);
    rectMode(CORNER);
    rect(0, 0, mouseX*x, mouseY*y); // top left rect
    rectMode(CORNERS);
    fill(mouseY);
    rect(450, 600, mouseX*x, mouseY*y); // bottom right rect
    fill(200, 75, 75);
    triangle(mouseX, mouseY*y, mouseX*1.25, mouseY+30,
        mouseX*.75, mouseY+30); // cursor triangle
}

It was interesting trying to find variables to incorporate other than mouseX and mouseY. I ultimately decided to go with something simple just because the layers of drawing looked cleaner.

Dynamic Drawing

sketch

var angle = 80;

function setup() {
    createCanvas(600,450);
    background(220);
    text("p5.js vers 0.9.0 test.", 10, 15);
}

function draw() {
	background(mouseX,mouseY, 155);

	//leaves
	/*This part of the code draws two ellipses of grass green color. I used push() and pop()
	commans to remember new positions of two ellipses due to translation and rotation*/
	if(mouseX>300) {
		push();
	    noStroke();
	    fill(124, 252, 0);
	    translate(300, 300); //chnages a (0, 0) point to (300, 300)
	    rotate(radians(50)); //rotates an ellipse 50 degrees in radians clockwise
	    ellipse(66, 20, 30, 70);
	    rotate(radians(-83)); //rotates an ellipse 80 degrees in radians counterclockwise
	    ellipse(-30, 20, 25, 50);
	    pop();
    }

	//This part of the code draws dark green stem of a flower
	noStroke();
	fill(0, 100, 0);
	rect(298, 230, 5, mouseX);
    
    //This part of the code restricts mouseX to 0-115
	var m = max(min(mouseX, 115), 0);
    var size = m * 350.0 / 400.0;

    /*I used push() and pop() commands to remember new positions of petals becuase I used 
    translation and rotation. I drew 9 petals of a flower by rotating them 40 degrees in radians
    from previous petal's location*/
    push();
    stroke(255);
    strokeWeight(1);
    fill(55, mouseX, mouseY, 150); /*This changes the color of petals in regards with (x,y)
    location and it has 150 transparency*/
    translate(300, 225); //changes a (0, 0) point to (300, 225)
    rotate(radians(40));
    ellipse(0 + m * 190.0 / 400.0, 0, 100, 35); 
    rotate(radians(40));
    ellipse(0 + m * 190.0 / 400.0, 0, 100, 35);
    rotate(radians(40));
    ellipse(0 + m * 190.0 / 400.0, 0, 100, 35);
    rotate(radians(40));
    ellipse(0 + m * 190.0 / 400.0, 0, 100, 35);
    rotate(radians(40));
    ellipse(0 + m * 190.0 / 400.0, 0, 100, 35);
    rotate(radians(40));
    ellipse(0 + m * 190.0 / 400.0, 0, 100, 35);
    rotate(radians(40));
    ellipse(0 + m * 190.0 / 400.0, 0, 100, 35);
    rotate(radians(40));
    ellipse(0 + m * 190.0 / 400.0, 0, 100, 35);
    rotate(radians(40));
    ellipse(0 + m * 190.0 / 400.0, 0, 100, 35);
    pop();
    
    //This part of the code draws a stigma of a flower
    noStroke();
    fill(150, mouseX, mouseY); /*This changes the color of stigma in regards with (x,y)
    location*/
    circle(300, 225, 15);	

    //This part of the code draws 3 cluds that are moving with regards of mouseX
    noStroke();
    fill(max(mouseX, mouseY)); /*This changes clouds' color by choosing the greater value from
    mouseX and mouseY locations*/
    ellipse(mouseX, 50, 70, 35);
    ellipse(mouseX+25, 40, 50, 20);
    ellipse(mouseX-25, 60, 50, 20);
  
    ellipse(mouseX+120, 80, 70, 35);
    ellipse(mouseX+145, 70, 50, 20);
    ellipse(mouseX+95, 90, 50, 20);

    ellipse(mouseX+240, 25, 70, 35);
    ellipse(mouseX+265, 15, 50, 20);
    ellipse(mouseX+215, 35, 50, 20);
   
    //This part of the code draws grass
    fill(55, 143, 80); 
    noStroke(); 
    //first moving part of grass in regards with mouseX
    triangle(mouseX-540, 450, mouseX-530, 400, mouseX-520, 450);
    triangle(mouseX-520, 450, mouseX-510, 400, mouseX-500, 450);
    triangle(mouseX-500, 450, mouseX-490, 400, mouseX-480, 450);
    triangle(mouseX-480, 450, mouseX-470, 400, mouseX-460, 450);
    triangle(mouseX-460, 450, mouseX-450, 400, mouseX-440, 450);
    triangle(mouseX-440, 450, mouseX-430, 400, mouseX-420, 450);
    triangle(mouseX-420, 450, mouseX-410, 400, mouseX-400, 450);
    triangle(mouseX-400, 450, mouseX-390, 400, mouseX-380, 450);
    triangle(mouseX-380, 450, mouseX-370, 400, mouseX-360, 450);
    triangle(mouseX-360, 450, mouseX-350, 400, mouseX-340, 450);
    triangle(mouseX-340, 450, mouseX-330, 400, mouseX-320, 450);
  
    //constant part of grass
    triangle(200, 450, 210, 400, 220, 450);
    triangle(220, 450, 230, 400, 240, 450);
    triangle(240, 450, 250, 400, 260, 450);
    triangle(260, 450, 270, 400, 280, 450);
    triangle(280, 450, 290, 400, 300, 450);
    triangle(300, 450, 310, 400, 320, 450);
    triangle(320, 450, 330, 400, 340, 450);
    triangle(340, 450, 350, 400, 360, 450);
    triangle(360, 450, 370, 400, 380, 450);
    triangle(380, 450, 390, 400, 400, 450);

    //second moving part of grass in regards with mouseX
    triangle(mouseX-930, 450, mouseX-920, 400, mouseX-910, 450);
    triangle(mouseX-910, 450, mouseX-900, 400, mouseX-890, 450);
    triangle(mouseX-890, 450, mouseX-880, 400, mouseX-870, 450);
    triangle(mouseX-870, 450, mouseX-860, 400, mouseX-850, 450);
    triangle(mouseX-850, 450, mouseX-840, 400, mouseX-830, 450);
    triangle(mouseX-830, 450, mouseX-820, 400, mouseX-810, 450);
    triangle(mouseX-810, 450, mouseX-800, 400, mouseX-790, 450);
    triangle(mouseX-790, 450, mouseX-780, 400, mouseX-770, 450);
    triangle(mouseX-770, 450, mouseX-760, 400, mouseX-750, 450);
    triangle(mouseX-750, 450, mouseX-740, 400, mouseX-730, 450);

    
    if(mouseX>width/2){ //checks if mouseX is on the right side of a screen
    	translate(500, 100); //changes a (0, 0) point to (500, 100)

    	var mapX = map(mouseX, 100, 300, 250, 250); //remaping a mouseX from one range to another.
        var mapY = map(mouseY, 100, 0, 100, 200); //remaping a mouseY from one range to another.
        
        //This part of the code draws sunrays that will follow mouseX and mouseY
        strokeWeight(5);
        stroke(255,165,0); //orange
        line(0, 0, mapX, mapY);
        line(0, 0, mapX-20, mapY-20);
        line(0, 0, mapX-80, mapY-80);
        line(0, 0, mapX-140, mapY-140);
        line(0, 0, mapX-200, mapY-200);

        stroke(218,165,32); //golden rod
        line(0, 0, mapX, mapY);
        line(0, 0, mapX+20, mapY-20);
        line(0, 0, mapX+80, mapY+80);
        line(0, 0, map-140, mapY+140);
        line(0, 0, mapX+200, mapY+200);

        stroke(255,215,0); //gold
        line(0, 0, mapX*1, mapY*1);
        line(0, 0,  mapX*1.5, mapY*1.5);
        line(0, 0,  mapX*2, mapY*2);
        line(0, 0,  mapX*0.5, mapY*0.5);
        line(0, 0,  mapX, mapY*1.5);
        line(0, 0, mapX*1.5, mapY);

        stroke(255,69,0); //orange red
        line(0, 0, mapX-50, mapY+20);
        line(0, 0, mapX+200, mapY);
        line(0, 0, mapX-30, mapY+55);
        line(0, 0, mapX*0.2, mapY+100);
        line(0, 0, mapX-20, mapY+130);
        line(0, 0, mapX*1.4, mapY/1.2);

        //This part of the code draws a sun
    	strokeWeight(3);
    	stroke(255);
    	fill(249, 215, 28);
    	circle(0, 0, 70);  
    }    
} 


During the process of my work, I thought of things that change their position or their colors all the time in real world and I came up with a small drawings of a flower, clouds, grass, sun and sky. I followed the idea that flowers grow and clouds move which made it easier to follow the procedures.

LO3

Link of the work:http://www.madlab.cc/reverberating-across-the-divide/
Link of the video: https://vimeo.com/75886159

REVERBERATING ACROSS THE DIVIDE is a project by CMU doctorate student Madeline Gannon, 2014. I admire the technology Reverb has that can design ready-to-print wearables around the body: Reverb uses techniques such as computer vision, digital design, and digital fabrication, which translates hand gestures into intricate geometry that can be immediately printed and worn on the body. I admire how delicate and beautiful the end-product is. The creator’s work is divided into 3D scanning, 3D modeling, and 3D printing. I think that the creator’s artistic sensibilities are presented the most in the 3D modeling process. The 3D modeling process is where real design takes place, it is more about how to transform a scanned 3D image into something that suits the customer the best and looking great aesthetically at the same time. The other components I believe, on the other hand, are mainly about the technology where the computing parts take place.

Project 03: Dynamic Drawing

sketch
//Julianna Bolivar
//jbolivar
//section d
var x = 305; //center petal
var y = 225;
var y1 = 140; //petals
var py1 = 0; //petal velocities
var y2 = 180;
var py2 = 0;
var y3 = 180;
var py3 = 0;
var y4 = 270;
var py4 = 0;
var y5 = 270;
var py5 = 0;

function setup() {
    createCanvas(600, 450);
    py1 = 0; //petal velocitiess
    py2 = 0;
    py3 = 0;
    py4 = 0;
    py5 = 0;
}

function draw() {
    if (mouseX > width/2){     
        background(0, 51, 102); //mouseX in right is midnight blue
    }
    else {
        background(173, 216, 230); //mouse X in left in sky blue
    } 
    
    push();
    rotate(frameCount / 50.0);
    star(100, 100, 80, 100, 20); //sun 
    pop();
    
    fill(154, 205, 50);
    noStroke();
    rect(290, 250, 30, 400); //stem
    fill(255, 105, 180);
    circle(305, y1, 100); //top petal
    circle(380, y2, 100); //upper right petal
    circle(230, y3, 100); //upper left petal
    circle(245, y4, 100); //lower left petal
    circle(370, y5, 100); //lower right petal
    y1 += py1; 
    y2 += py2; 
    y3 += py3; 
    y4 += py4; 
    y5 += py5; 
    fill(255, 215, 0);
    circle(x, y, (100 + mouseY/3)); //center gets bigger with mouseY
} 

function mousePressed() { //petals fall on click
    py1 = 10;
    py2 = 9;
    py3 = 5;
    py4 = 10;
    py5 = 6;
}

function star(x, y, radius1, radius2, npoints) { //star spin
  let angle = TWO_PI / npoints;
  let halfAngle = angle / 2.0;
  beginShape();
  for (let a = 0; a < TWO_PI; a += angle) {
    let sx = x + cos(a) * radius2;
    let sy = y + sin(a) * radius2;
    vertex(sx, sy);
    sx = x + cos(a + halfAngle) * radius1;
    sy = y + sin(a + halfAngle) * radius1;
    vertex(sx, sy);
  }
    endShape(CLOSE);
}

This was so difficult. Because my idea was very simple at first it ended up looking all over the place as I added elements. Some things I never figured out, like how I wanted the petals to change as they fall.

Project03-Dynamic Drawing

sketchDownload
var R=255;
var G=153;
var B=203;
var x=380;
var y=280;

function setup(){
    createCanvas(600, 450);
    background(0);
}

function draw() {
    background(0);
    stroke(0);
    line(600,0,mouseX,mouseY);
   //change angle
    var angle=mouseX;
    push();
    //change origin
    if(mouseY>225){
        translate(200,225);
    }
    else{translate(400,225);
    }
    rotate(radians(angle));
    fill(R,G,B);
    var x=mouseX;
    var y=mouseY;
    circle(x,y,200);
    circle(x+30,y-160,50);
    circle(x-160,y+30,70);
    circle(x-140,y+50,30);
    //change color
    if(mouseY<150){
        R=0,
        G=255;
        B=255;
    }
    else if(mouseY>300){
        R=255;
        G=255;
        B=102;
    }
    else{
        R=255;
        G=153;
        B=203;
    }
    //change scale
    if(mouseX<200){
        scale(0.6);
        fill(R,G,B);
        circle(x,y,300);
        circle(x+30,y-160,50);
        circle(x-160,y+30,70);
        circle(x-140,y+50,30);
    }
    else if(mouseX>400){
        scale(0.4);
        fill(R,G,B);
        circle(x,y,300);
        circle(x+30,y-160,50);
        circle(x-160,y+30,70);
        circle(x-140,y+50,30);
    }
    else{
        scale(0.2);
        fill(R,G,B);
        circle(x,y,300);
        circle(x+30,y-160,50);
        circle(x-160,y+30,70);
        circle(x-140,y+50,30);
    }
    pop();

}

When I first started this dynamic drawing, I have no idea what to do. Therefore, I simply drew 4 circles, and then changed their color, rotating position, scaling size, and rotating angle. I encountered several difficulties on making my drawing move by my logic, because I didn’t fully understand how certain function work in computer logic. As I look at detailed instructions on these function, I made it work eventually, and I had a more comprehensive understanding of these functions.

Project 3- Dynamic Drawing

I really like the text in my project

sketch
function setup() {
    createCanvas(600, 450);
    background(230, 230, 250);
    text("p5.js vers 0.9.0 test.", 10, 15);
    rectMode(CENTER)
}
var xa = 300 //coordinates for rectangles a, b, and c
var ya = 225
var xb = 215
var yb = 140
var xc = 500
var yc = 425

function draw() {
    background(230, 230, 250);
    var m = max(min(mouseX, 600), 0); //constrain mouseX in canvas
    var size = dist(xa,ya,mouseX,mouseY) //size changes with distance between mouse and center
    var fillR = (dist(300,225,mouseX,mouseY)*0.3) //color changes with distance between mouse and center
    var fillG = (dist(300,225,mouseX,mouseY)*0.4)
    var fillB = (dist(300,225,mouseX,mouseY)*0.6)
    fill(fillR, fillG, fillB) //paint sqaure
    strokeWeight(5) 
    stroke(25, 25, 112)
    rect(xa,ya,size/1.5,size/1.5) //draws the rectangles
    rect(xb,yb,size/3,size/3) 
    rect(xc,yc,size/0.75,size/0.75) 

    push();
    translate(300,225) //move origin to center
    rotate(radians(mouseX)) //rotate according to position of mouseX
    ellipse(50,50,30,30) //draws the ellipses
    ellipse(-50,-50,30,30)
    ellipse(50,-50,30,30)
    ellipse(-50,50,30,30)
    ellipse(100,100,30,30)
    ellipse(-100,-100,30,30)
    ellipse(100,-100,30,30)
    ellipse(-100,100,30,30)
    ellipse(100,0,30,30)
    ellipse(-100,0,30,30)
    ellipse(0,100,30,30)
    ellipse(0,-100,30,30)
    ellipse(150,150,30,30)
    ellipse(-150,-150,30,30)
    ellipse(150,-150,30,30)
    ellipse(-150,150,30,30)
    ellipse(150,0,30,30)
    ellipse(-150,0,30,30)
    ellipse(0,150,30,30)
    ellipse(0,-150,30,30)
    pop();

    fill(255) //writes the text in black
    text("): This project is so hard  :( SOS", mouseX, mouseY)

}

Project 3- Dynamic Drawing

sketch
var x;
var y;
var strokeValue;
var mx;
var my;
var dragging 

function setup() {
    createCanvas(600, 450);
    background(0);
    text("p5.js vers 0.9.0 test.", 10, 15);
}

function draw() {
    //center point variables
    let x = width/2;
    let y = height/2;
    //stroke color variable
    let strokeValue = 255;
    //map of black screen ellipse
    let mx= map(mouseX, 0, width, 0, 600);
    //allows for ellipse to drag (which I just realized
    //is pointless for this code)
    if(dragging == true) {
        x=mouseX;
        y=mouseY;
    }
    //redraws ellipse with no background
    if (mouseIsPressed) {
    stroke(strokeValue);
    noFill();
    ellipse(x, y, (mouseX), (mouseY));
    fill(0);
    //draws two ellipses on black screen, one is mapped
    } else {
        background(0)
        stroke(mouseX,0,mouseY);
        noFill();
        ellipse(mouseX, mouseY, mouseX, mouseY);
        ellipse(mx, y, mouseX, mouseY);
        text('press :)', mouseX, mouseY);
    }
}
//changes background value to current value of mouseX,mouseY
function mousePressed() {
    background(mouseX,0,mouseY);
    dragging = true;
}
//changes dragging to false
function mouseReleased() {
    dragging = false;
}


Originally, I wanted to do something really cool with infinitely generating circles. That idea morphed into this fun, interactive circle drawing. You can click anywhere on the canvas to generate a new background color based on the location of your mouse, and draw cool circles!

I’ll admit I struggled a lot with this project, but overall I am happy with what I came up with. I know it’s maybe not as complex as what we’re aiming for, however I learned a lot by creating it.

Looking Outwards 03

For this blog post on computational fabrication, I’m interested in talking about fashion designer Iris Van Herpen’s work. As a designer, she is consistently pushing the boundaries of textile materials and silhouettes, blending together nature and technology to create intricate pieces. The inspiration for her SS18 collection Ludi Naturae was the natural and manmade landscapes of our world from a bird’s-eye view, surveying the intricate aerial photography by Thierry Bornier, Andy Yeung, etc. Through the collection process film, it seems that a computer program was used to analyze the natural landscape’s curves and create an organic pattern that the designers could then refine. A 3D printer was also used to create individual physical pieces that are then hand-sewn together for the final garment. I was fascinated by the array of patterns and silhouettes Herpen created for this collection and how the organic forms flow together. While some of the designs were most organic, others were composed of simple geometric shapes arranged in different patterns and groups. Every dress was made up of many small pieces of 3D printed material so great attention to detail was placed on how they came together as a whole fabric to create an illusion of movement. 

Process film for Ludi Naturae