Digital Fabrication – LO3

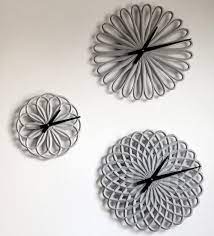
In the realm of digital fabrication there are many big cutting edge projects. However, many wonder how it can be helpful to everyday life. This is why I chose Para Clocks as the highlight of my blog post.

The clocks (shown in photo) are branded as “Para Clocks” and the creators are LeeLABS. The campaign started around 2012.

They are digital fabricated clocks made out of concrete that are created using parametric software. It seems that because they used a program to make their clocks, they were able to make these intricate patterns that are mathematically perfect. I think it’s very interesting how you can use coding to make artwork and everyday objects have a pattern that is mathematically correct. 

You can tell the creator is using symmetry and circular patterns to make these complex but simple clock designs. Its beauty is based off its intricacy and minimalism, which is why I really enjoy these clocks. 

I think they also really reflect nature because often nature is complex, but also made in a way that there is mathematical order and symmetry, thus making these clocks so attractive because nature is always beautiful to humans. 

Link:https://www.kickstarter.com/projects/224392735/para-clocks-project

Looking Outwards 3

The Free Universal Construction Kit

by F.A.T. Lab and Sy-Lab

The Free Universal Construction Kit is a set of 3D printable blocks that enable compatibility between ten different popular children’s construction toys. These blocks are not necessarily algorithmically generated, but I think that they are a particularly exciting example of computational fabrication. I think the way that they hijack existing toy systems is brilliant. With a fairly simple set of models this project activates a nearly endless set of new hybrid formal possibilities generated by a network of children at play. I also think it is really interesting how this piece subverts the strictly protected intellectual property of these toy systems. It is super playful, but also opens up an interesting conversation about how intellectual property laws can actually exclude possibilities for creativity rather than supporting it. It also speaks to a radical vision of the future where a robust open source commons combined with publicly accessible digital fabrication technology can provide an alternative means of production to corporate control.

video describing the project

http://fffff.at/free-universal-construction-kit/

Project 3: Dynamic Drawing

For this project I wanted to mess around with 3D geometries. I used the mouse position to change the size, and color of various objects as well as the color and the position of a point light source.

sketch 3

//Tim Nelson-Pyne
//Section C

var diameterA = 5;
var diameterB = 0;

function setup() {
    createCanvas(450, 600, WEBGL);
}

function draw() {
    noStroke();

    //sets the background color and changes it based on mouse position
    background((mouseY/width)*255, 0, 255-(mouseX/width)*255);

    //sets the material for all 3d objects and allows the color to be changed based on mouse position
    specularMaterial(255-(mouseX/width)*255, (mouseY/width)*255, (mouseX/width)*255); 
    ambientLight(255);
    //creates a point light and moves it and changes its color based on mouse position
    pointLight((mouseY/width)*255, 0, 255-(mouseX/width)*255, mouseX, mouseY, mouseY);
    shininess(0);


    //changes the size of the spheres based on mouseX position
    diameterA = 100 * sin(PI *mouseX/450);

    //changes the size of the boxes based on mouseX position
    //also changes the diameter of the torus
    diameterB = 100 * cos(PI *mouseY/600);


    //draws top right sphere and box
    push();
    translate(width/4, height/4);
    sphere(diameterA);
    box(diameterB);
    pop();


    //draws bottom right sphere and box
    push();
    translate(width/4, -height/4);
    sphere(diameterA);
    box(diameterB);
    pop();

    //draws top left sphere and box
    push();
    translate(-width/4, height/4);
    sphere(diameterA);
    box(diameterB);
    pop();

    //draws bottom left sphere and box
    push();
    translate(-width/4, -height/4);
    sphere(diameterA);
    box(diameterB);    
    pop();

    //draws middle sphere and torus
    sphere(diameterA);
    specularMaterial(0,0,(mouseX/width)*255);
    torus(2*diameterB, mouseY/4);


}


function mousePressed() {
    

}

Project 3 – Dynamic Drawing

Orbits

//changing RGB colors
var R = 0;
var G = 0;
var B = 0;

//assigned in mousePressed to print and save color to rect
var tempR = 255;
var tempG = 255;
var tempB = 255;

function setup() {
    createCanvas(450, 640);
    background(255);
}

function mousePressed() {
    print('------------------')
    print('R: ' + R.toString())
    print('G: ' + G.toString())
    print('B: ' + B.toString())

    //stores current RGB untill mousePressed again
    tempR = R;
    tempG = G;
    tempB = B;

}
function draw() {

    var lim = 140; //map(mouseX, 0, width, 0, 255);
    var diff = 255-lim;
    var index = 0;

    background(R, G, B);

    //color save
    noStroke();
    fill(tempR, tempG, tempB);
    square(10, 10, 100);

    //color fader
    if (mouseY < height/6) {
        index = map(mouseY, 0, height/6, lim, 255)
        R = 255;
        G = lim;
        B = index;
    } else if ((mouseY >= height/6) & (mouseY < 2*height/6)) {
        index = map(mouseY, height/6, 2*height/6, 0, diff)
        R = 255 - index;
        G = lim;
        B = 255;
    } else if ((mouseY >= 2*height/6) & (mouseY < 3*height/6)) {
        index = map(mouseY, 2*height/6, 3*height/6, lim, 255)
        R = lim;
        G = index;
        B = 255;
    } else if ((mouseY >= 3*height/6) & (mouseY < 4*height/6)) {
        index = map(mouseY, 3*height/6, 4*height/6, 0, diff)
        R = lim;
        G = 255;
        B = 255 - index;
    } else if ((mouseY >= 4*height/6) & (mouseY < 5*height/6)) {
        index = map(mouseY, 4*height/6, 5*height/6, lim, 255)
        R = index;
        G = 255;
        B = lim;
    } else {
        index = map(mouseY, 5*height/6, 6*height/6, 0, diff)
        R = 255;
        G = 255-index;
        B = lim;
    }

    //orbits
    var deg = map(mouseY, 0, width, 0, 360);
    var cirSize = 10;
    var cirX = mouseX/2 //x dist from mouse
    var cirY = mouseY/2 //y dist from mouse

    var sunY = map(mouseY, 0, height, -0.4*height, 1.4*height);
    fill(255, 113, 124);
    ellipse(width/2, sunY, 700);

    fill(255-R, 255-G, 255-B);
    translate(mouseX, mouseY);
    ellipse(cirX, cirY, cirSize);
    rotate(radians(deg));
    ellipse(cirX, cirY, cirSize);
    rotate(radians(deg));
    ellipse(cirX, cirY, cirSize);
    rotate(radians(deg));
    ellipse(cirX, cirY, cirSize);
    rotate(radians(deg));
    ellipse(cirX, cirY, cirSize);
    rotate(radians(deg));
    ellipse(cirX, cirY, cirSize);

    scale(mouseY/height);
    ellipse(cirX, cirY, cirSize);
    rotate(radians(deg));
    ellipse(cirX, cirY, cirSize);
    rotate(radians(deg));
    ellipse(cirX, cirY, cirSize);
    rotate(radians(deg));
    ellipse(cirX, cirY, cirSize);
    rotate(radians(deg));
    ellipse(cirX, cirY, cirSize);
    rotate(radians(deg));
    ellipse(cirX, cirY, cirSize);

}

LO3 – Computational Fabrication

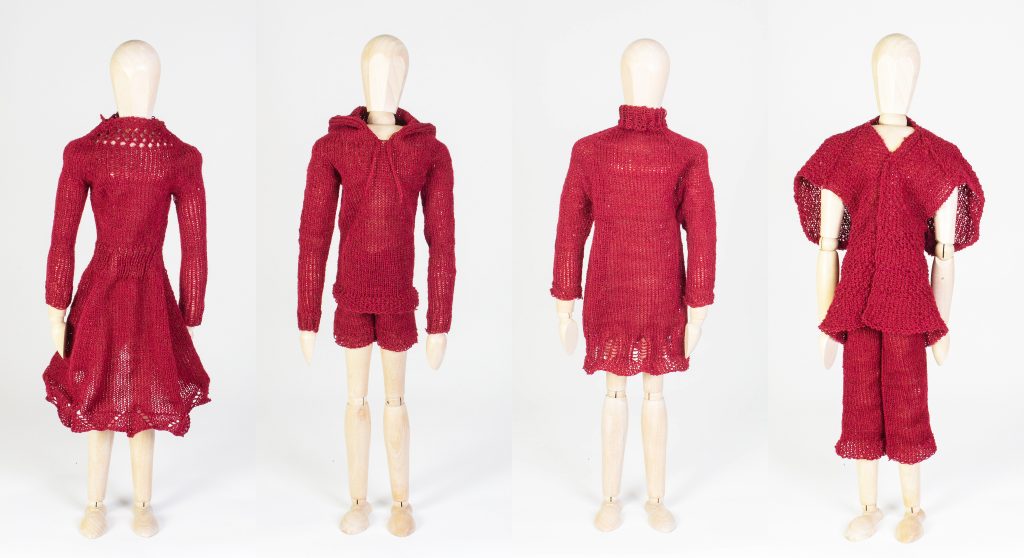
For this week’s looking outwards blog post, I decided to look into a project from MIT CSAIL on Machine-Knit Garments. The project contributes designed a workflow that allows a user to design a template, then turn that template into a time function such that a knitting machine can turn it into a garment. This approach doesn’t require a user to design complex 3D objects, as the algorithm turns 2D templates into machine code. According to the project team, this is meant to allow for interactive editing of the shape of the garment. I was particularly drawn to this project because I had never heard of CNC knitting machines. I’ve worked with routers and 3D printers before, but computer-controlled knitting machines open up a whole other world of computational fabrication. Additionally, the software the users built allows for user interaction with the design, which I think also has the potential of turning into very interesting pieces of art.

Knit Sketching

Looking Outwardss-03

One of the things I’ve found very interesting is the use of AI in generative art,
whether in the 2D or 3D sense. I recently came across DALL-E a neural network
that was programmed to be able to generate images from user-provided text
captions. These captions could be as arbitrary as possible, used to create 2D or
even 3D images.

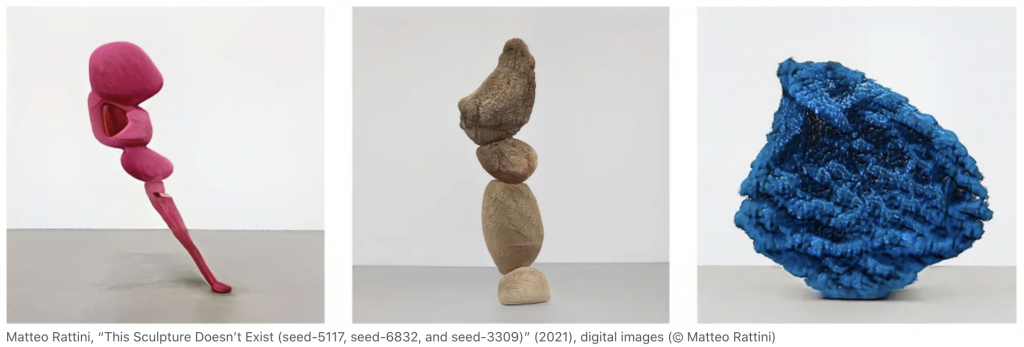
Following my curiosity in similar computational programs, I found artist Matteo Rattini, who similarly trained a neural network to create images of contemporary sculptures based on the Instagram algorithm. The sculptures themselves were all very interesting, taking on forms that seemed organic or close to those seen in nature.

One of the most intriguing points of this program was how it related to
current society’s behavioral patterns and trends. Because sculptures were generated based on a user’s Instagram algorithm, what Rattini found was that while Instagram suggestions would initially be wide and diverse they would always eventually reduce down to a very narrow range of things, causing later sculptures to eventually all look the same. In many ways, I find this interesting, in that while creating sculptures the neural network is also subliminally reflecting the ways users interact with social media as well as patterns in current trends.

More about Rattini’s work: https://hyperallergic.com/667011/art-of-ai-matteo-rattini-eerily-real-computer-generated-sculptures/

Project 3: Dynamic Drawing

sketchDownload
var r = 161;
var g = 242;
var b = 228;
var eyesX = 5;
var eyesY =7;
s
function setup() {
    createCanvas(600, 450);
    background(r, g, b);
    fill(255);
    text("ribbit", 550, 430);
    
}

function draw() {
//setup for color of the water
    background(r, g, b, 100);
    noFill();
    stroke(255);
    strokeWeight(0.5);
    ellipse(mouseX, mouseY, 50, 50);
    if(mouseX<200){
        background(17, 38, 92, 100);
    } else if (mouseX<400){
        background(26, 147, 139, 100);
    }

//this draws water ripples
noFill();
stroke(255);
//left most ripple
ellipse(5, height/2, 200*mouseX*0.01, 200*mouseX*0.01);
ellipse(5, height/2, 200*mouseX*0.004, 200*mouseX*0.004);
//bottom ripple
ellipse(300, 360, 200*mouseX*0.01, 200*mouseX*0.01);
ellipse(300, 360, 200*mouseX*0.004, 200*mouseX*0.004);

//right ripple
ellipse(580, 160, 200*mouseX*0.01, 200*mouseX*0.01);
ellipse(580, 160, 200*mouseX*0.004, 200*mouseX*0.004);


//draws lilypads above the water
    noStroke();
    fill(112, 221, 85, 255);
    if(mouseX<200){
        fill(21, 57, 42, 255);
    } else if (mouseX<400) {
        fill(25, 131, 36, 255);
    }
    ellipse(70, 90, 150, 95);
    ellipse(190, 50, 190, 110);
    ellipse(300, 280, 165, 110);
    ellipse(80, 400, 170, 140);
    ellipse(550, 90, 230, 120);
    ellipse(430, 135, 160, 95);
    ellipse(530, 430, 220, 130);


//draws shadow of lilypads
    fill(112, 221, 85, 70);
    if(mouseX<200){
        fill(21, 57, 42, 70);
    } else if (mouseX<400) {
        fill(25, 131, 36, 70);
    }
    ellipse(60, 90, 130, 95);
    ellipse(180, 50, 190, 110);
    ellipse(290, 280, 165, 110);
    ellipse(70, 400, 170, 140);
    ellipse(540, 90, 230, 120);
    ellipse(420, 135, 160, 95);
    ellipse(520, 430, 220, 130);

//draws frog figure
    fill(63, 190, 31, 255);
    if(mouseX<200){
        fill(11, 129, 80);
    } else if(mouseX<400){
        fill(9, 101, 18);
    }
    rect(40, 60, 50, 50);
    rect(40, 50, 20, 20);
    rect(70, 50, 20, 20);
    rect(77, 89, 21, 21);
    rect(30, 89, 21, 21);
//frog tummy
    fill(119, 202, 137);
    rect(51, 85, 28, 25);
//frog eyes
    fill(255);
    rect(45, 52, 10, 10);
    rect(75, 52, 10, 10);

//frog pupils
    fill(0);
    rect(47, 55, eyesX, eyesY);
    rect(77, 55, eyesX, eyesY);
    rect(50, 70, 29, 2);
    rect(39, 96, 1, 14);
    rect(89, 96, 1, 14);

//draws frog under water
fill(63, 190, 31, 255);
    if(mouseX<200){
        fill(11, 129, 80);
    } else if(mouseX<400){
        fill(9, 101, 18);
    }
    rect(40+mouseX*0.5, 190, 60, 20);
    rect(40+mouseX*0.5, 180, 20, 20);
    rect(80+mouseX*0.5, 180, 20, 20);

//frog eyes
fill(255);
rect(45+mouseX*0.5, 182, 10, 10);
rect(85+mouseX*0.5, 182, 10, 10);

//frog pupils
fill(0);
rect(47+mouseX*0.5, 185, eyesX, eyesY);
rect(87+mouseX*0.5, 185, eyesX, eyesY);
rect(55+mouseX*0.5, 200, 29, 2);
}

Project-03: Dynamic Drawing

My Project

//sets up RGB values for color change;
var colorR = 236;
var colorG = 47;
var colorB = 19;
var colorR2 = 22;
var colorG2 = 167;
var colorB2 = 233;
//sets up angle variable that moves center rectangle;
var angle = 1;
//sets up direction variable that determines which direction said rectangle rotates;
var dir = 1;

function setup() {
    createCanvas(650, 400);
    background(220);
    //text("p5.js vers 0.9.0 test.", 10, 15);
}

function draw() {
    //creates a background that changes color dependant on which;
    //side of the canvas the mouse is on;
    background(colorR, colorG, colorB);
    //makes the rectangles based on the center of themselves; 
    rectMode(CENTER);
    //allows the rectangles to change color dependant on which;
    //side of the cnavas the mouse is on;
    fill(colorR2, colorG2, colorB2);
    //creates the 2 rectangles nearer to the perimeter of the canvas;
    //they are opposite each other in direction and location;
    //they increase in size when the mouse is on the right side and decrease when on the left;
    rect(constrain(mouseX, 50, 600), 50, max(50, min(mouseX, 300)), max(50, min(mouseX, 300)));
    rect(max(600 - mouseX, 50), 350, max(50, min(mouseX, 300)), max(50, min(mouseX, 300)));
    //I used existing RGB values to make the center rectangle have dynamic color change as well;
    fill(colorR, colorG2, colorB);
    //allows for the center rectangle to rotate;
    push();
    translate(325, 200);
    rotate(radians(angle));
    rect(0, 0, max(250-mouseX, 50), max(250-mouseX, 50));
    pop();
    angle = angle + (dir*1);
    //changes the color between color depending on which side the mouse is on;
    if ( ((colorR != 22) & (colorG != 167) 
        && (colorB != 233)) && mouseX > 325 ){
        colorR -= 1; 
        colorG += 1; 
        colorB += 1;
    }
    else if ( ((colorR != 236) & (colorG != 47) 
        && (colorB != 19)) && mouseX < 325 ){
        colorR += 1;
        colorG -= 1;
        colorB -= 1;
    }
    if ( ((colorR2 != 22) & (colorG2 != 167) 
        && (colorB2 != 233)) && mouseX < 325 ){
        colorR2 -= 1; 
        colorG2 += 1; 
        colorB2 += 1;
    }
    else if ( ((colorR2 != 236) & (colorG2 != 47) 
        && (colorB2 != 19)) && mouseX > 325 ){
        colorR2 += 1;
        colorG2 -= 1;
        colorB2 -= 1;
    }
    //changes the dir variable and thereby the direction of the center rectangle;
    //dependant on which side of the canvas the mouse is on;
    if (mouseX < 325){
        dir = -1;
    }
    else{
        dir = 1;
    }

}


I originally had something more complex but I changed it to something simpler. And I like how it is now.

LO3: Computational Fabrication

Daniel Widrig’s Instances (2019)

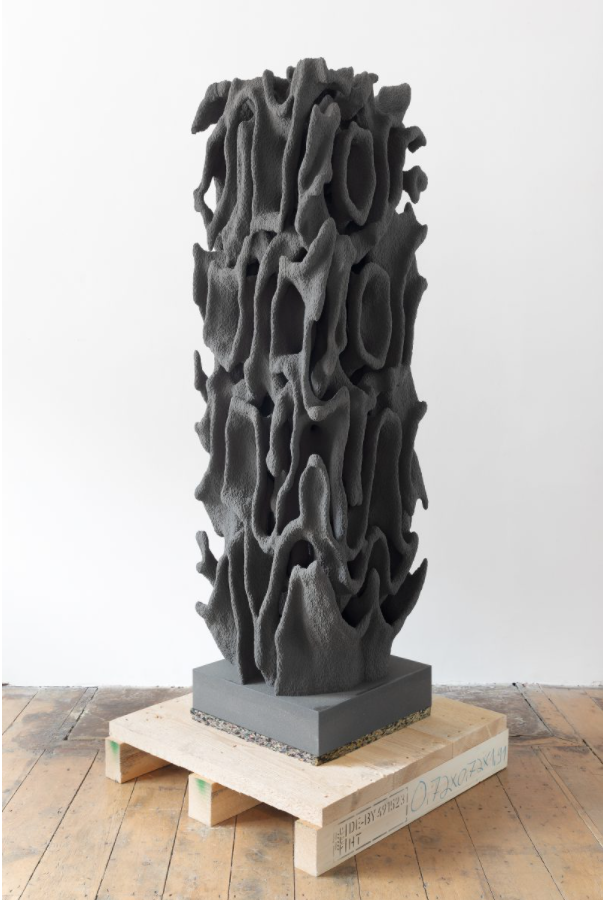
For this week’s LO, I will talk about Daniel Widrig’s Instances (2019) – pictured above.


Daniel Widrig is a London based Architect and Designer who uses Digital Outlets to create. He has his own Studio and has designed many Buildings with Architect Zaha Hadid. He has also won many awards for design.


As for Widrig’s Instances, what I like about it is how it looks. The Sculpture/Artwork gives off a very futuristic and almost alien like vibe. However, from what I have seen of Computational Fabrication, that is a common feature.


That is not to say I would not have it in my house. I would.


I guess I admire its compactness and what seems to be the fact that it can be remade quickly? But also, uniqueness in that there should only be one of it.


I have no idea of the algorithms of which the Widrig used to create this work, but my guess is one that is complex but has constraints in the x, y, and z directions.


As for Widrig’s sensibilities, the Sculpture shows off how far into the future his work is.


To end, I like the Sculpture and its practicality. I would like to know how it was made.


Links to Daniel Widrig, this specific work, and his other works (Instances is labeled 158-156).

Project 3: Dynamic Drawing

sketch-beansDownload
//Yeon Lee, Section C
//Project-03: Dynamic Drawing

var s = 100;
var starY = 0;

function setup() {
    createCanvas(600, 450);
}

function draw() {
    //background
    let s = map(mouseX, 0, width/2, 50, 100); 
    background(s, 100, 140); //use mouseX to change the background color and change the size of the moon/sun
  
    //moon + sun (could be either - moon on blue background and sun on pink background)
    fill(255, 250, 198); 
    ellipse(s, s, s);
  
    //stars
    s = 450 - mouseY; //use mouseY to scroll stars up and down (stars are up at night and they go down when it becomes the sun)
    fill(255, 250, 198, 200);
    circle(30, 30 + starY, 5);
    circle(40, 200 + starY, 5);
    circle(50, 100 + starY, 5);
    circle(70, 50 + starY, 5);
    circle(90, 100 + starY, 5);    
    circle(120, 130 + starY, 5);
    circle(150, 200 + starY, 5);
    circle(170, 40 + starY, 5);
    circle(200, 150 + starY, 5);
    circle(240, 100 + starY, 5);    
    circle(260, 240 + starY, 5);
    circle(290, 150 + starY, 5);
    circle(310, 40 + starY, 5);
    circle(330, 150 + starY, 5);
    circle(360, 30 + starY, 5);
    circle(380, 200 + starY, 5);
    circle(410, 50 + starY, 5);
    circle(440, 100 + starY, 5);    
    circle(470, 260 + starY, 5);
    circle(490, 150 + starY, 5);
    circle(510, 40 + starY, 5);
    circle(530, 150 + starY, 5);
    circle(550, 100 + starY, 5);  
    circle(570, 200 + starY, 5);
    circle(580, 150 + starY, 5);
    circle(590, 40 + starY, 5);
    starY = mouseY;

    //clouds
    fill(255, 255, 255, 100);
    rect(mouseX - 60, 30, 50, 25, 20); //use mouseX to move clouds left and right
    rect(mouseX, 30, 150, 25, 20);
    rect(mouseX - 20, 65, 120, 25, 20);
    rect(mouseX + 180, 130, 100, 25, 20);  
    rect(mouseX + 160, 150, 80, 25, 20);
    rect(mouseX + 290, 55, 35, 25, 20);
    rect(mouseX + 335, 55, 110, 25, 20);
    rect(mouseX + 365, 35, 130, 25, 20);
    noStroke();
   
    //desert
    fill(199, 141, 110); //third layer: light brown
    rect(0, 340, 600);
    rect(-100, 310, 330, 300, 20);    
    rect(0, 300, 130, 300, 20);
    ellipse(100, 345, 300, 50);
    ellipse(400, 360, 450, 60);
    rect(330, 320, 330, 400, 20);
    rect(420, 300, 330, 400, 20);
    rect(480, 290, 330, 400, 20);
    rect(540, 260, 330, 400, 20);
    fill(186, 85, 73); //second layer: red brown
    rect(0, 380, 600);
    rect(-20, 340, 140, 60, 300);
    rect(-50, 360, 260, 60, 300);
    ellipse(200, 390, 200, 40);  
    ellipse(400, 380, 500, 60); 
    fill(92, 21, 13); //first layer: dark brown
    rect(mouseX, 410, 600); //use mouseX to move the foreground left and right 
    ellipse(mouseX + 100, 410, 500, 20);
    ellipse(mouseX + 250, 405, 500, 30);
    rect(mouseX + 300, 360, 400, 300, 20);
    rect(mouseX + 340, 320, 400, 300, 20);
    rect(mouseX - 1000, 370, 500, 300, 20);
    rect(mouseX - 900, 350, 300, 300, 20);
    rect(mouseX - 2000, 400, 3000, 300);
 
    //cactus1
    fill(39, 7, 4);
    rect(mouseX - 420, 250, 25, 170, 5);
    ellipse(mouseX - 407.5, 251, 25, 28);
    rect(mouseX - 460, 330, 60, 20, 10);
    rect(mouseX - 460, 290, 20, 60, 20);

    //cactus2
    rect(mouseX + 130, 250, 25, 170, 5);
    ellipse(mouseX + 142.5, 251, 25, 28);
    rect(mouseX + 130, 280, 60, 15, 10);
    rect(mouseX + 175, 250, 15, 40, 10);
    rect(mouseX + 90, 330, 60, 20, 10);
    rect(mouseX + 90, 290, 20, 60, 20);
}

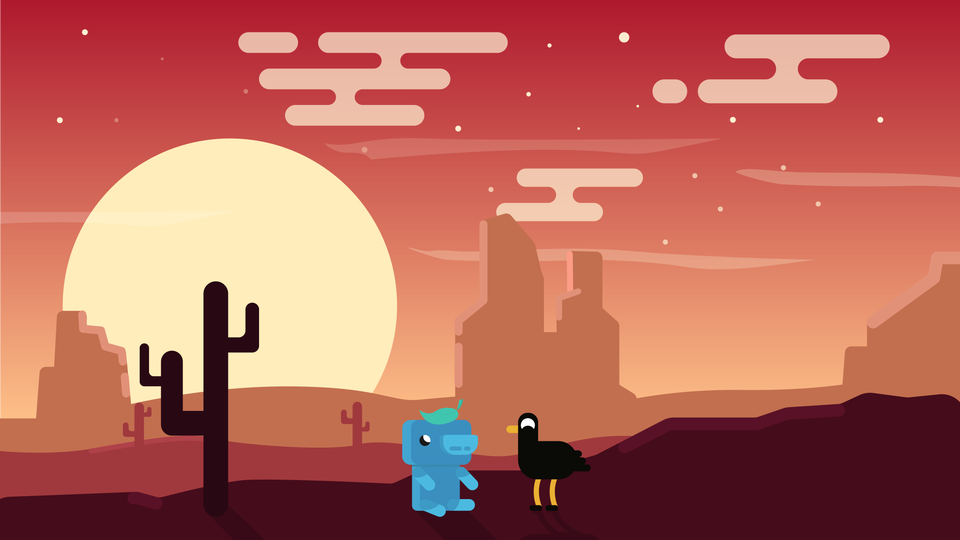
I was inspired by an artwork I found online and decided I would love to animate this illustration. I changed the background color from blue (representing night) to pink (representing sunrise). As user moves from left to right, the moon expands in size, depicting like a sun, and the cloud moves accordingly as well. Simultaneously, as user moves up and down, the stars shine at night. This project was really fun to play with mouseX and mouseY motions as well as use dynamic shapes to create a beautiful scenery.