Manuelr – Looking Outwards 03 – Gramazio & Kohler_Flying architecture

This week I am going to discuss this innovative breathtaking project done by Gramazio & Kohler, global referents at robotic fabrication.

They have done a lot of research with industrial robots, which is an emergent market and many universities are introducing them into their research areas. Here at CMU, we have 2 ABB robots living in dFAB, SoA.

However, Gramazio and Kohler went a step further in what robotic fabrication means. Using drones, they assembled a whole structural towers with no analog means. Everything, from the first brick to the last one, was laid by drones.

Moment at which a drone is holding a brick.

Flight Assembled Architecture is the first architectural installation assembled by flying robots, free from the touch of human hands. The work consists of over 1500 modules which are placed by a multitude of drones, collaborating according to mathematical algorithms that translate digital design data to the behaviour of the flying machines.

Close up of the drone. The motion capture system can be seen looking at the grey balls.

This system acts as a living architectural machines, completing the composition from their dynamic formation of movement and building performance.

Tower almost completed

Link to the project and video below:

Drones can “collaborate to build architectural structures”


BrandonHyun-LookingOutwards-03


The Wanderers designed a computational growth process which is capable of producing a wide variety of growing structures. Inspired by natural growth behaviour, the computational process creates shapes that adapt to their environment. Starting with a seed, the process simulates growth by continuously expanding and refining its shape.
A lot of reference comes from organic matters and Prof. Neri Oxman try to reinvent that computationally.

The project by the Wanderers intrigued me to look more in to their work because the 3d shapes that they created look very complex. I am interested how they were able to reproduce organic shapes computationally and how these shapes grow out continuously. It is also interesting to see how these forms are translated to apparels. It is also interesting how gross looking they are because it has a glossy texture to them.

For this project, I wished there was a video or gif that would continuously draw these forms that I can stare in to.

jiaxinw-section B-LookingOutwards-03

Generative 3D Printed Masks

In 2013, DO THE MUTATION, an Italian two-person generative design lab developed the COLLAGENE mask editor to form customized masks for three different people. The three masks are produced by CRP GROUP with their WINDFORM materials. I like the personality of this generative 3D printing art a lot. Artists can create personal masks that fit people’s faces perfectly with the calculation of programming, as we can see from the picture, the mask fits personal face so well that it looks like sticking to the face.  This project shows the possibility of combining detailed sensor and customized arts. DO THE MUTATION created a software application COLLAGENE which was written in processing and used the Toxiclibs libraries to generate the isosurface. The artists controlled the appearance of the mask by drawing shapes and lines on the software, and the software helped to fix the position of the shapes and lines to match the specific face. After that, the 3D printer can print out the masks. Therefore, COLLAGENE combined the creation of arts and the precise data together.

For more information, please click here https://dothemutation.wordpress.com/2013/01/29/venezia-02-13-la-mutazione/ 


jiaxinw-section B-Project 03-Dynamic Drawing

sketch

var rectSize = 20;
var dir = -1;

//the distance between corner circles and the center
var distCorner;
//the distance between up, bottom, left and right circle and the center
var dist1;
//color

//thin rectangle Y position 
var rectY = 5;

//thin rectangle height
var rectH = 5

function setup() {


    createCanvas(480, 640);
    distCorner = sqrt(11250);
    dist1 = 150;  

}

function draw() {			

	//if mouse is outside the canvas, then the movements stop
	if(mouseX > 480){
		mouseX = 480;
	}

	if(mouseX < 0){
		mouseX = 480;
	}

	background(40);
	noStroke();
	rectMode(CENTER);
	fill(255, 70);	
	
	//the center rectangles 
	push();
	fill(255, 90);
	//change color when mouse is hovering on the rect
	if( dist(mouseX, mouseY, width/2, height/2) < Math.abs(rectSize/2)) {
		fill(230,97,71);
	};
	//when mouse move, the rectangles rotate
	rectMode(CENTER);
	translate(width/2, height/2);
	rotate(mouseX*0.01)	
	//central big rect
	rect(0, 0, rectSize, rectSize);
	//four small rectangles on the center
	fill(255,40);
	rect(-10, 10, rectSize/2, rectSize/2);
	rect(10,-10, rectSize/2, rectSize/2);
	rect(10, 10, rectSize/2, rectSize/2);
	rect(-10,-10, rectSize/2, rectSize/2);
	pop();

	//the left rect
	push();
	//change color when mouse is hovering on the rect
	if( dist(mouseX, mouseY, width/2-100, height/2) < Math.abs(rectSize/2) ){
		fill(125,201,198,90);
	};
	rectMode(CENTER);
	translate(width/2-100, height/2);
	rotate(mouseX*0.01)	
	rect(0, 0, rectSize, rectSize);
	pop();

	//the up rect 
	push();
	if( dist(mouseX, mouseY, width/2, height/2-100) < Math.abs(rectSize/2)) {
		fill(125,201,198,90);
	};
	rectMode(CENTER);
	translate(width/2, height/2-100);
	rotate(mouseX*0.01)	
	rect(0, 0, rectSize, rectSize);
	pop();

	//the right rect
	push();
	if( dist(mouseX, mouseY, width/2+100, height/2) < Math.abs(rectSize/2)) {
		fill(125,201,198,90);
	};
	rectMode(CENTER);
	translate(width/2+100, height/2);
	rotate(mouseX*0.01)	
	rect(0, 0, rectSize, rectSize);
	pop();

	//the bottom rect
	push();
	if( dist(mouseX, mouseY, width/2, height/2+100) < Math.abs(rectSize/2)) {
		fill(125,201,198,90);
	};
	rectMode(CENTER);
	translate(width/2, height/2+100);
	rotate(mouseX*0.01)	
	rect(0, 0, rectSize, rectSize);
	pop();

	//left top rect
	push();
	if( dist(mouseX, mouseY, width/2-sqrt(5000), height/2-sqrt(5000)) < Math.abs(rectSize/2)) {
		fill(125,201,198,90);
	};
	rectMode(CENTER);
	translate(width/2-sqrt(5000), height/2-sqrt(5000));
	rotate(mouseX*0.01)	
	rect(0, 0, rectSize, rectSize);
	pop();

	//right top rect
	push();
	if( dist(mouseX, mouseY, width/2+sqrt(5000), height/2-sqrt(5000)) < Math.abs(rectSize/2)) {
		fill(125,201,198,90);
	};
	rectMode(CENTER);
	translate(width/2+sqrt(5000), height/2-sqrt(5000));
	rotate(mouseX*0.01)	
	rect(0, 0, rectSize, rectSize);
	pop();

	//right bottom rect
	push();
	if( dist(mouseX, mouseY, width/2+sqrt(5000), height/2+sqrt(5000)) < Math.abs(rectSize/2)) {
		fill(125,201,198,90);
	};
	rectMode(CENTER);
	translate(width/2+sqrt(5000), height/2+sqrt(5000));
	rotate(mouseX*0.01)	
	rect(0, 0, rectSize, rectSize);
	pop();

	//left bottom rect
	push();
	if( dist(mouseX, mouseY, width/2-sqrt(5000), height/2+sqrt(5000)) < Math.abs(rectSize/2)) {
		fill(125,201,198,90);
	};
	rectMode(CENTER);
	translate(width/2-sqrt(5000), height/2+sqrt(5000));
	rotate(mouseX*0.01)	
	rect(0, 0, rectSize, rectSize);
	pop();

	//outside circles
	push();
	//rotate as a big circle when the mouse moves 
	translate(width/2, height/2);	
	rotate(mouseX*0.01)
	ellipse(-dist1, 0, 15, 15);
	ellipse(dist1, 0, 15, 15);
	ellipse(0, -dist1, 15, 15);
	ellipse(0, dist1, 15, 15);
	ellipse(distCorner, -distCorner, 15, 15);
	ellipse(-distCorner, -distCorner, 15, 15);
	ellipse(distCorner, distCorner, 15, 15);
	ellipse(-distCorner, distCorner, 15, 15);
	pop();

	//instruction
	fill(255, 70);
	textSize(15);
	text("move your mouse to the squares or drag your mouse", 60, height-20); 

}

function mouseDragged(){	
	//when the mouse is dragged, the size of rects become bigger
	rectSize += 2;
	dist1 +=1.5;
	distCorner +=1.5;
	//if the size is bigger than 120, the rects become smaller
	if (rectSize > 120){
		rectSize *= dir;
		distCorner *=dir;	
		dist1 *=dir;	
	}

	//if the size is 0,the circles go back to original places
	if (rectSize == 0 ){
		distCorner = sqrt(11250);
		dist1 = 150;
		
	};

	//if the mouse if off the canvas, the graphic stop moving
	if(mouseX > 480 || mouseY > 680){
		rectSize = 100;
		distCorner = 1.5*sqrt(11250);
    	dist1 = 1.5*150;
	}
}


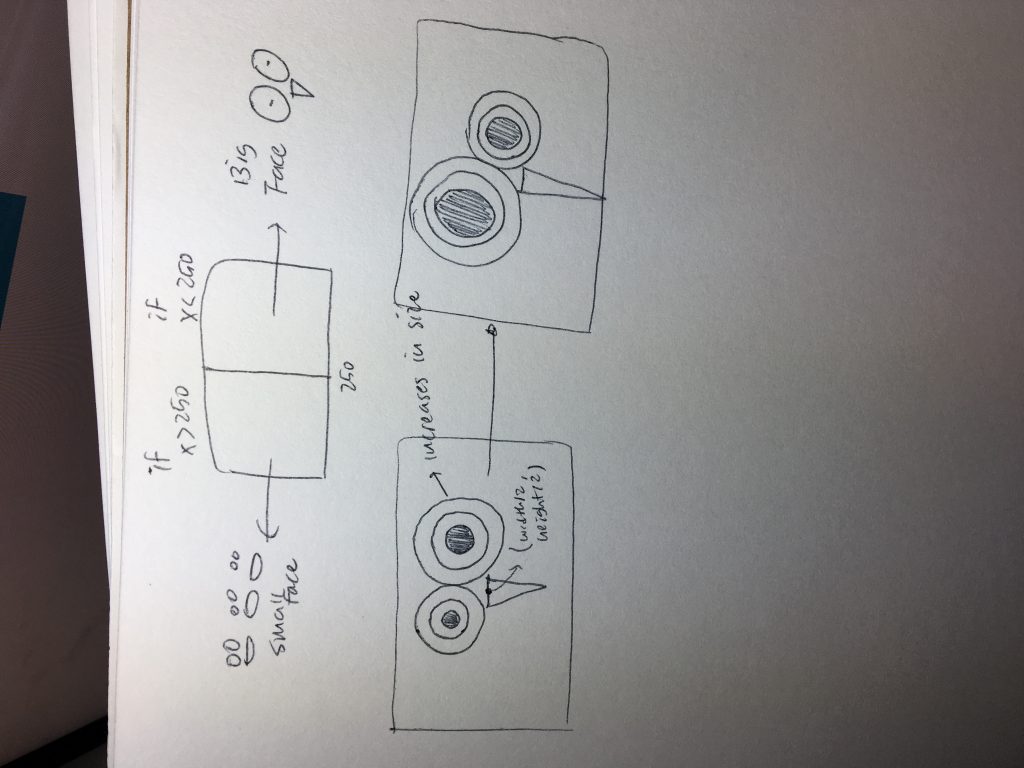
I planned to make a rotating dynamic drawing at first, so I started to build a circle of squares and when the mouse wheel was moved, the size of squares would be changed. However, I realized moving the wheel can also scroll down the page which would be very inconvenient. Therefore, I decided to change moving the wheel by dragging the mouse. Also, I realized it would be fun to change the color of squares, so I have made the color can be changed whenever the mouse is hovering on the squares.

kyungak-project-03-dynamic-drawing

sketch

//Kyunga Ko
//15104B
//kyungak@andrew.cmu.edu
//Project-03

var angle = 0;

function setup() {
    createCanvas(640, 480);

}

function draw() {
    background(mouseX-70,mouseY-30,mouseY);

    //WHen the mouse is on the right side of the canvas

    if (mouseX > 250) {

        var length = max(min(mouseX,640),0);
        var size = length * 600 / 640;
        
        //outer left white eye + black boarder 
        fill(255);
        strokeWeight(10);
        ellipse(100 + length,170,size,size);

        //inner left black iris
        fill(0);
        ellipse(100 + length,170,100,100);

        //inner left grey pupil
        fill(70);
        ellipse(100 + length,170,50,50);

        //outer right white eye + black baorder
        fill(255);
        strokeWeight(10);
        ellipse(500 - length,170,size-100,size-100);

        //inner right black iris
        fill(0);
        ellipse(500 - length,170,size-200,size-200);

        //inner right grey pupil
        fill(70);
        ellipse(500 - length,170,size-250,size-250);

        //mouth
        fill(209,65,65);
        triangle(250,330,340,330,300,380);

    }

    //When the mouse is on the left side of the canvas

    if (mouseX < 250) {

    //green mouth
    strokeWeight(10);
    fill(71,135,100);
    ellipse(mouseX,mouseY,100,random(0,30));

     //green eyes
     fill(71,135,100);
    ellipse(mouseX-50,mouseY-50,30,30);
    ellipse(mouseX+50,mouseY-50,30,30);
    sizeX = 50;
 
    //red mouth
    fill(198,41,88);
    ellipse(mouseX+100,mouseY+200,100,random(0,30));

    //red eyes
    fill(198,41,88);
    ellipse(mouseX+50,mouseY+150,30,30);
    ellipse(mouseX+150,mouseY+150,30,30);
        
    //blue mouth
    fill(42,149,199);
    ellipse(mouseX+200,mouseY,100,random(0,30));

    //blue eyes
    fill(42,149,199);
    ellipse(mouseX+150,mouseY-50,30,30);
    ellipse(mouseX+250,mouseY-50,30,30);

    //line
    push();
    translate(mouseX,mouseY);
    rotate(radians(angle));
    rectMode(CENTER);
    line(mouseX,mouseY,100,100);
    fill(30,60,100);
    rect(mouseX+50, mouseY+50, 50, 50);
    fill(100,240,245);
    rect(mouseX+70, mouseY+150, 70, 70);
    text("BABABA", mouseX+30, mouseY+30);
    pop();
    angle = angle + 0.5;

    }

}


For this project, I wanted to divide the drawing into two parts: left and right. I tried to integrate two different parts into a single painting and continue with the “face” theme that we have been practicing in our previous works. While working on this project, I was able to learn from my mistakes and overcome problems. Although stressful, I believe I can now understand the language better.


(The picture is straight up on my desktop, but it turns around like this as soon as I attach it…)

jamieh-LookingOutwards-03

The Silk Pavilion by the MIT Media Lab consists of 26 polygonal panels and silk threads woven by a CNC (computer-numerically controlled) machine. The algorithm used to weave out the silk threads was based upon study of silk worms, their natural behavior and how they use something 2-dimensional to create a space that is 3-dimensional. The shape of the pavilion uses an algorithm that uses a continuous thread to weave the panels with differing degrees of density. Once the machine-aspect of the pavilion was finished, 6500 silkworms were placed onto the pavilion was to bring in the natural aspect by allowing them to reinforce any gaps neglected by the CNC machine.

This project is a synthesis between man-made, digital form and natural form. It’s introducing something controlled to the natural environment and introducing something natural to the machine. What is also admirable about this project is the focus on studying the silkworms and its natural instincts, which the team was able to transfer into code for the machine to develop an architecture for the silkworms.


jamieh-Project-03-Dynamic-Drawing

sketch

/*
Jamie Ho
10:30
jamieh@andrew.cmu.edu
Project 03
*/

var rectSize = 10;
var d = 75; //distance from edges and distance between each rectangle's corner

function setup() {
    createCanvas(640, 480);
    rectMode(CORNER);
    angleMode(DEGREES);
}

function draw() {
    background(0);
    fill(256);
    
    //to create array of rectangles
    for(var x = 0+d; x <= width-d; x+=d){
        for(var y = 0+d; y <= height-d; y+=d){
            
            //dis = distance between mouse pointer and rectangle
            var dis = dist(x, y, mouseX, mouseY);
            var inCanvas = d < mouseX & mouseX < width-d && d < mouseY && mouseY < height-d;
                
                
        //CHANGING COLOURS
            //if rectangles are far from mouse: rectangles are white
            //far = more than half the width of canvas
            if(dis > width/2 & inCanvas){            
                fill(256, 256, 256);
            }

                //if rectangles are close from mouse: rectangles flash in colour
                //close = less than half the width of canvas
                else if(dis < width/2 & inCanvas){
                    fill(random(0, 256),random(0, 256),random(0, 256));
                }


        //ROTATING + TRANSLATION
            
            //Top L = "starting point" 
                //no rotation no translation no shear, just size change
            
            //Top R = rotates a bit
            if(mouseX > width/2 & mouseY < height/2 && inCanvas){
                rotate(random(-0.05, 0.05));
            }

            //Bottom R = rotates double of Top R + translates
            if(mouseX > width/2 & mouseY > height/2 && inCanvas){
                rotate(random(-0.1, 0.1));
                translate(x*random(0.005, 0.0075), y*random(0.005, 0.0075));
            }

            //Bottom L = rotates quadruple of Top R/double of Bottom R + translates + shears
            if(mouseX < width/2 & mouseY > height/2 && inCanvas){
                rotate(random(-0.2, 0.2));
                translate(x*random(0.005, 0.0075), y*random(0.005, 0.0075));
                shearX(PI/16);
            }


        //CHANGING SIZE
            //if mouse is within borders of "new" canvas, 
            //then rectangles change size based on distance of pointer to rectangle
            if(inCanvas){
                rect (x, y, dis*0.1, dis*0.1);
            }

                //if mouse is not within canvas, then rectangles are small AND rotates
                else{
                    rect (x, y, rectSize, rectSize)

                }

        }
    }
   
}


For this project, I made use of for loops to create an array of the same shapes, then used conditional statements to make modifications. The dynamic drawing starts off static with the original rectangles, but when the mouse moves, the rectangles change in size based on each of their distances from the mouse. When the mouse moves into a different quadrant, the rectangles react differently through rotation, translation, shear. From the top left quadrant to the bottom left quadrant (clockwise), the movements to the rectangles become more dramatic. The hardest parts of this project were making the for loop work, making sure the conditional statements made sense and adjusting the numbers assigned to variables to an appropriate range so that the shapes appear on canvas.

Project 3-Dynamic Art

Dave Dynamic

//Yoonseo(Dave) Choi
//Section B
//yoonseo1@andrew.cmu.edu
//Assignment-03-B
//variable for Bezier curvature 
var Curv;
//variable for Red, Green, Blue color. 
  var R = 0;
  var B = 0;
  var G = 0;
  function setup() {
  createCanvas(640, 480); //setting Canvas size to 600x480
  //No fill for any geometry
  noFill();
  //initializing Curv 
  Curv = 0;
}
function draw() {
  //adding random number to Red for change of color when it is < 255 
  
  //adding random number to Blue for change of color when it is < 255 
 
   //adding random number to Green for change of color when it is < 255  

  //When any of R,G,B elements are over 255, it resets to 0.
  if (R >= 255){
    R = 0;
  }
  if (G >= 255){
    G = 0;
  }
  if (B >= 255){
    B = 0;
  }
  //variable for color c
  var c = color(R,B,G);
  //continuously assign color variable to stroke
  stroke(c, 10);
  //setting up standard place for x and y coordinate. 
  var x = width/2;
  var y = height/2;
  //Dividing the canvas into four difference quadrant. 
  if (mouseX > x & mouseY < y ) { //when mouse is on right top quadrant
    Curv += mouseX/60; //Curv value goes up randomly from 1 to 5
    R += mouseX/120 + mouseY/50;// Red is sum of differenct X and Y value
   }
   if (mouseX < x & mouseY < y){//when mouse is on left top quadrant
    Curv -= mouseY/30; //Curv value goes down randomly from 4 to 12
    B += mouseX/40 + mouseY/80;// Blue is sum of differenct X and Y value
   }
   if (mouseY > y & mouseX > x){//when mouse is on right bottom quadrant
    Curv += mouseY/60;//Curv value goes up randomly from 4 to 12
   }
   if (mouseY > y & mouseX < x){//when mouse is on left bottom quadrant
    Curv -= mouseX/30;//Curv valvue goes down randomly from 1 to 5
    G += mouseX/70 + mouseY/100;// Green is sum of differenct X and Y value
   }
   //when Curv is larger than height or width, or less than 0 , it will reset to 0.
  if ( Curv > height || Curv < 0 || Curv > width){ 
    Curv = 0;
   }
   //setting background to black 
  background(0);
  //bezier curves.
  //each for statement is used to generate multiple bezier curve based on increment of i value
  //bezier curve assigns, anchor points and control points to create paramatric curve. 
  //bezier(anchor pts, anchor pts, control pts, control pts, control pts2,control pts2, anchor pts2,anchor pts2)
  for (var i = 0; i < mouseX; i += 30){
    bezier(mouseX-(Curv+i/2.0), mouseY-Curv+i, Curv*2, Curv, Curv*2, Curv*2, mouseX, 0);
  }
  //based on the i and z constraint, number of lines are decided. 
  // i or z's constraints are defined by mouse X adn Y position
  // all the position of the anchor points are based on the mouse X and Y 
  for (var z = 200; z < mouseY; z += 30){
    bezier(mouseX-(Curv+z/2.0), mouseY-Curv+z, Curv*4, Curv/6, Curv*3, Curv*2, width-mouseX, 0);
  }
 for (var i = 0; i < height-mouseY; i += 30){
    bezier(mouseX+(Curv+i/2.0), mouseY+Curv+i, Curv*2, Curv, Curv*2, Curv*2, 0, mouseY);
  }
  for (var z = 200; z < width-mouseX; z += 30){
    bezier(mouseX+(Curv+z/2.0), mouseY-Curv+z, Curv*4, Curv/6, Curv*3, Curv*2, width, height-mouseY);
  }
  

}

For this Dynamic art project, I focused on the movement of line in a curve form. At first, I wanted to express very light wing like motion based on the mouse position. I abstracted the initial concept and created the following digital illustration of movement. Fortunately, I found a example at p5js website that resembles part of what I imagined. I took that example and modified to create my own dynamic art.

kyungak-lookingoutwards-03

(Eric van Straaten, Groomer , 2012)

Pictures from: http://marbellamarbella.es/2016-02-06/world-fine-art-professionals-and-their-key-pieces-70-eric-van-straaten/ and http://imgur.com/gallery/45CapMf

Link (#5 on the list): https://3dprint.com/34900/10-cool-3d-printed-artworks/

Eric’s art takes the advantage of 3D printers to create surreal models of human figures. His work ranges from enlarged body parts to miniature figures of human, with most of them being young girls. Through his series of work, Eric tries to express aging and especially his transition from being young to old. Eric calls the above 3D printed sculpture as a self-portrait. He wanted to express the worst stage of a man’s life that he going through at this moment.

Looking at this project, I really admire the quality of the 3D printed result. It is already amazing to look at the details through the screen, and I wonder what it would be like to look at it in real life. Although he hasn’t specified which 3D printer system he uses, he has expressed his love for digital art for being able to make mistakes, undo, and fix.

Looking Outwards 3:Computational Fabircation

This is Furniture project that collaborated with 3D printing technique. It is done by Studio Minale-Maeda. This project comes to me as inspirational project and differentiate from lots of 3D printed projects that I have seen. Most of 3D printed projects I have seen are consisted of abstract shapes, or stands out by itself. This was interesting concept because it is interacting with the other physical material as part of structural support with addition to its aesthetic. Generating this type of structure requires the understanding of the initial structure of the table, or any type of furniture, then removing some parts of structure and replace the existing with newly developed 3D printed parts.