LO-3: Computational Fabrication

The work “Intersections” by the Bengler team really stuck out to me. The project aimed to create laser sintered sculptures that depicted the map of Oslo, Norway. In one of the maps, they focused on the roads and on the other they took a look at how the map intersected with income statistics. I found it extremely beautiful with the black and white contrast between the map and the ground. It seems so delicate and intricate which just adds to how visually appealing it is. You can tell that the team who worked on this project have artistic tendencies that lean towards simplicity in broad form, but intricacy in details. The website says that they used laser sintered technology to produce this piece. From just googling the process, it seems to be an additive process that binds a material to create a form. I think the algorithm would probably tell the laser at what points to add pieces or bind them together.

Creator: Bengler Team
Title: “Intersections”

http://bengler.no/intersections

Project 3: Dynamic Drawing

sketch

//Jacky Lococo
//jlococo
//Section C
var Rc = 255 // color variables for the moving cirlce, top rectagle, small circles
var Gc = 193
var Bc = 193
var angle = 0
var Rr = 0
var Gr = 60
var Br =  255
var colorChange = 1
var strokeOpacity = 255

function setup() {
    createCanvas(600, 600);
}

function draw() {
    background(255);
    strokeWeight(0);
    fill(Rr, Gr, Br);
    ellipse(160, 160, 200, 200);
    fill(255, 239, 239);
    rect(0, 300, 600, 300); //pink rectangle

    strokeWeight(0);
    fill(Rc, Gc, Bc, 100);
    ellipse(mouseX + 10, mouseY + 10, min (mouseX, 200), min (mouseX,200));
        //shadow of ellipse that follows mouse

    fill(255, 239, 239);
    ellipse(mouseX, mouseY, min (mouseX, 200), min (mouseX,200)); 
        //pale pink circle behind main ellipse

    fill(Rc, Gc, Bc, 200);
    ellipse(mouseX, mouseY, min (mouseX, 200), min (mouseX,200)); 
        //ellipse that follows the mouse and grows smaller at x=200

    fill(Rr, Gr, Br, 200);
    rect(0, 0, 600, 300)
    strokeWeight(0);
    fill(255, 239, 239);
    ellipse(150, 150, 200, 200);
    fill(Rc, Gc, Bc, 200);

    push(); //for top rotating tiny circles
    translate(150, 150)
    rotate(radians(angle));
    ellipse(50, 50, 50, 50);
    angle += 1
    rotate(radians(angle));
    ellipse(50, 50, 50, 50);
    angle += 0.5
    rotate(radians(angle));
    ellipse(50, 50, 50, 50);
    angle +=0 // on circle slower at 0 speed
    if(mouseY > 300){
        angle += 1
    }
    pop();

    push(); // for mouse following rotating cirlces
    translate(mouseX, mouseY);
    rotate(radians(angle));
    ellipse(50, 50, 50, 50);
    angle += 1
    rotate(radians(angle));
    ellipse(50, 50, 50, 50);
    angle += 0.5
    rotate(radians(angle));
    ellipse(50, 50, 50, 50);
    angle += 0
    if(mouseY > 300){
        angle += 1
    }
    pop()

    strokeOpacity = mouseX - 150
    //line that moves - starting from bottom of canvas
    strokeWeight(7)
    stroke(255, 255, 255, strokeOpacity);
    line(100, 0, 100, 600)

    //line that moves - starting from top of canvas
    strokeWeight(7) 
    stroke(255, 255, 255, strokeOpacity);
    line(140, 0, 140, 600)


    //colors alternating with each press if the mouse
    if (colorChange == 1){
        Rc = 255
        Gc = 193
        Bc = 193
        Rr = 0
        Gr = 60
        Br =  255
    }
    if (colorChange == 2){
        Rc = 0
        Gc = 60
        Bc = 193
        Rr = 255
        Gr = 193
        Br = 193
    }
    //text that follows the mouse
    strokeWeight(0);
    fill(255);
    textSize(15)
    text('p r e s s', mouseX, mouseY);
} 

//mouse pressed function that switches the colors
function mousePressed () {
    colorChange = colorChange + 1
    if (colorChange == 3)
        colorChange = 1
    print(colorChange.toString);
}


This project was a bit challenging at first, but I think once I had a clear sketch and idea for it, the tasks and process became a lot more manageable.

Sketch:

Looking Outwards 3

The Free Universal Construction Kit

by F.A.T. Lab and Sy-Lab

The Free Universal Construction Kit is a set of 3D printable blocks that enable compatibility between ten different popular children’s construction toys. These blocks are not necessarily algorithmically generated, but I think that they are a particularly exciting example of computational fabrication. I think the way that they hijack existing toy systems is brilliant. With a fairly simple set of models this project activates a nearly endless set of new hybrid formal possibilities generated by a network of children at play. I also think it is really interesting how this piece subverts the strictly protected intellectual property of these toy systems. It is super playful, but also opens up an interesting conversation about how intellectual property laws can actually exclude possibilities for creativity rather than supporting it. It also speaks to a radical vision of the future where a robust open source commons combined with publicly accessible digital fabrication technology can provide an alternative means of production to corporate control.

video describing the project

http://fffff.at/free-universal-construction-kit/

Project 3: Dynamic Drawing

For this project I wanted to mess around with 3D geometries. I used the mouse position to change the size, and color of various objects as well as the color and the position of a point light source.

sketch 3

//Tim Nelson-Pyne
//Section C

var diameterA = 5;
var diameterB = 0;

function setup() {
    createCanvas(450, 600, WEBGL);
}

function draw() {
    noStroke();

    //sets the background color and changes it based on mouse position
    background((mouseY/width)*255, 0, 255-(mouseX/width)*255);

    //sets the material for all 3d objects and allows the color to be changed based on mouse position
    specularMaterial(255-(mouseX/width)*255, (mouseY/width)*255, (mouseX/width)*255); 
    ambientLight(255);
    //creates a point light and moves it and changes its color based on mouse position
    pointLight((mouseY/width)*255, 0, 255-(mouseX/width)*255, mouseX, mouseY, mouseY);
    shininess(0);


    //changes the size of the spheres based on mouseX position
    diameterA = 100 * sin(PI *mouseX/450);

    //changes the size of the boxes based on mouseX position
    //also changes the diameter of the torus
    diameterB = 100 * cos(PI *mouseY/600);


    //draws top right sphere and box
    push();
    translate(width/4, height/4);
    sphere(diameterA);
    box(diameterB);
    pop();


    //draws bottom right sphere and box
    push();
    translate(width/4, -height/4);
    sphere(diameterA);
    box(diameterB);
    pop();

    //draws top left sphere and box
    push();
    translate(-width/4, height/4);
    sphere(diameterA);
    box(diameterB);
    pop();

    //draws bottom left sphere and box
    push();
    translate(-width/4, -height/4);
    sphere(diameterA);
    box(diameterB);    
    pop();

    //draws middle sphere and torus
    sphere(diameterA);
    specularMaterial(0,0,(mouseX/width)*255);
    torus(2*diameterB, mouseY/4);


}


function mousePressed() {
    

}

Project 3: Dynamic Drawing

sketch-beansDownload
//Yeon Lee, Section C
//Project-03: Dynamic Drawing

var s = 100;
var starY = 0;

function setup() {
    createCanvas(600, 450);
}

function draw() {
    //background
    let s = map(mouseX, 0, width/2, 50, 100); 
    background(s, 100, 140); //use mouseX to change the background color and change the size of the moon/sun
  
    //moon + sun (could be either - moon on blue background and sun on pink background)
    fill(255, 250, 198); 
    ellipse(s, s, s);
  
    //stars
    s = 450 - mouseY; //use mouseY to scroll stars up and down (stars are up at night and they go down when it becomes the sun)
    fill(255, 250, 198, 200);
    circle(30, 30 + starY, 5);
    circle(40, 200 + starY, 5);
    circle(50, 100 + starY, 5);
    circle(70, 50 + starY, 5);
    circle(90, 100 + starY, 5);    
    circle(120, 130 + starY, 5);
    circle(150, 200 + starY, 5);
    circle(170, 40 + starY, 5);
    circle(200, 150 + starY, 5);
    circle(240, 100 + starY, 5);    
    circle(260, 240 + starY, 5);
    circle(290, 150 + starY, 5);
    circle(310, 40 + starY, 5);
    circle(330, 150 + starY, 5);
    circle(360, 30 + starY, 5);
    circle(380, 200 + starY, 5);
    circle(410, 50 + starY, 5);
    circle(440, 100 + starY, 5);    
    circle(470, 260 + starY, 5);
    circle(490, 150 + starY, 5);
    circle(510, 40 + starY, 5);
    circle(530, 150 + starY, 5);
    circle(550, 100 + starY, 5);  
    circle(570, 200 + starY, 5);
    circle(580, 150 + starY, 5);
    circle(590, 40 + starY, 5);
    starY = mouseY;

    //clouds
    fill(255, 255, 255, 100);
    rect(mouseX - 60, 30, 50, 25, 20); //use mouseX to move clouds left and right
    rect(mouseX, 30, 150, 25, 20);
    rect(mouseX - 20, 65, 120, 25, 20);
    rect(mouseX + 180, 130, 100, 25, 20);  
    rect(mouseX + 160, 150, 80, 25, 20);
    rect(mouseX + 290, 55, 35, 25, 20);
    rect(mouseX + 335, 55, 110, 25, 20);
    rect(mouseX + 365, 35, 130, 25, 20);
    noStroke();
   
    //desert
    fill(199, 141, 110); //third layer: light brown
    rect(0, 340, 600);
    rect(-100, 310, 330, 300, 20);    
    rect(0, 300, 130, 300, 20);
    ellipse(100, 345, 300, 50);
    ellipse(400, 360, 450, 60);
    rect(330, 320, 330, 400, 20);
    rect(420, 300, 330, 400, 20);
    rect(480, 290, 330, 400, 20);
    rect(540, 260, 330, 400, 20);
    fill(186, 85, 73); //second layer: red brown
    rect(0, 380, 600);
    rect(-20, 340, 140, 60, 300);
    rect(-50, 360, 260, 60, 300);
    ellipse(200, 390, 200, 40);  
    ellipse(400, 380, 500, 60); 
    fill(92, 21, 13); //first layer: dark brown
    rect(mouseX, 410, 600); //use mouseX to move the foreground left and right 
    ellipse(mouseX + 100, 410, 500, 20);
    ellipse(mouseX + 250, 405, 500, 30);
    rect(mouseX + 300, 360, 400, 300, 20);
    rect(mouseX + 340, 320, 400, 300, 20);
    rect(mouseX - 1000, 370, 500, 300, 20);
    rect(mouseX - 900, 350, 300, 300, 20);
    rect(mouseX - 2000, 400, 3000, 300);
 
    //cactus1
    fill(39, 7, 4);
    rect(mouseX - 420, 250, 25, 170, 5);
    ellipse(mouseX - 407.5, 251, 25, 28);
    rect(mouseX - 460, 330, 60, 20, 10);
    rect(mouseX - 460, 290, 20, 60, 20);

    //cactus2
    rect(mouseX + 130, 250, 25, 170, 5);
    ellipse(mouseX + 142.5, 251, 25, 28);
    rect(mouseX + 130, 280, 60, 15, 10);
    rect(mouseX + 175, 250, 15, 40, 10);
    rect(mouseX + 90, 330, 60, 20, 10);
    rect(mouseX + 90, 290, 20, 60, 20);
}

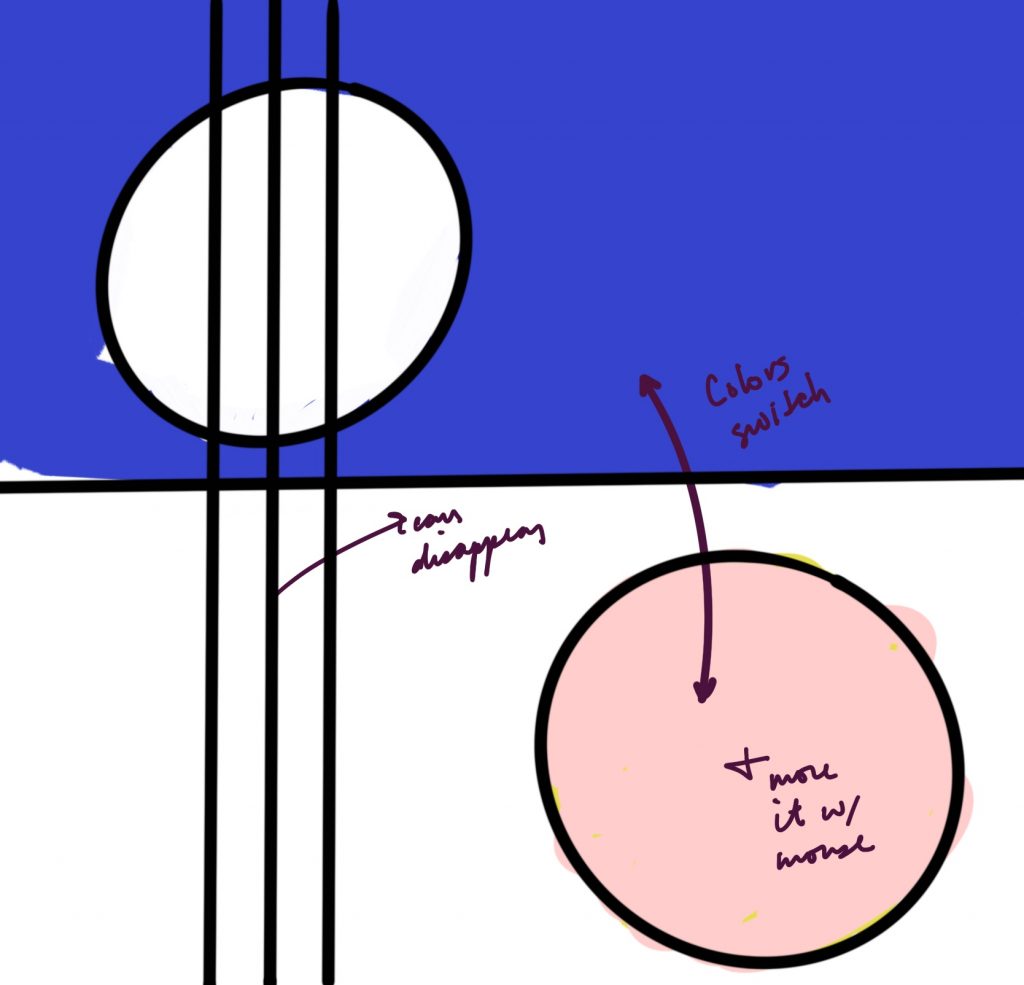
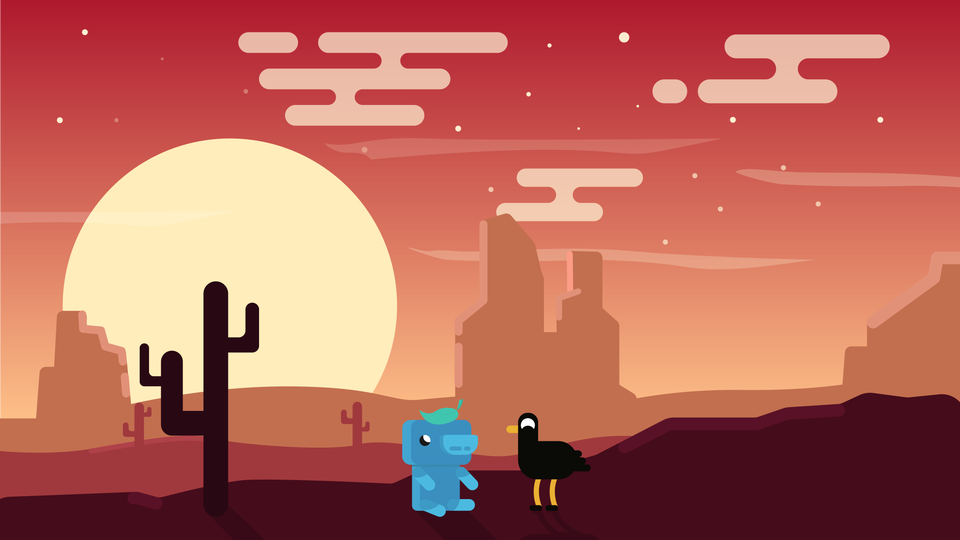
I was inspired by an artwork I found online and decided I would love to animate this illustration. I changed the background color from blue (representing night) to pink (representing sunrise). As user moves from left to right, the moon expands in size, depicting like a sun, and the cloud moves accordingly as well. Simultaneously, as user moves up and down, the stars shine at night. This project was really fun to play with mouseX and mouseY motions as well as use dynamic shapes to create a beautiful scenery.

LO: Computational Fabrication

The work generates a beautiful, intricate arrangements using continuous pattern and motion.

John Edmark’s “Blooms” is a 3D printed kinetic objects that uses mathematical formulas and concepts to create animation effect like spiral patterns. The work uses progressive rotations of the golden ratio, phi (ϕ), to generate interesting designs such as a sunflower or pinecone-like appearances. I really admire how it not only creates a special pattern each time under a strobe light, but also the synchronized “blooming” form under a constant rotational speed is really satisfying to watch. According to Edmark, the generated artwork increases our cognizance of the fine, delicate relationship between reality and consciousness. I found it absolutely fascinating that every time the bloom turns 137.5º, which is the angular version of phi, the sculpture seems to be illuminated. In the final form, Edmark manifests the simplest paramedic systems, but creates a vibrant visual property using pattern, movement, and light exposure.

Reference: http://www.johnedmark.com/phifib/2016/4/28/blooms-strobe-animated-phi-based-sculptures

Looking Outwards 03: Computational Fabrication


Project Title: Wooden Carpet

Year of Creation: 2009

Artists: Elisa Strozyk

The wood pieces are just substantial enough such that the flexible carpet is able to prop itself up.

The project is a wooden textile carpet. I admire how the veneer pieces are assorted in color (light to medium brown) because this adds to the rendering’s depth, and makes the artwork look especially fascinating when contorted and crinkled. I also admire how it combines two of the most common floor coverings as this has me questioning other familiar materials and imagining how these can be hybridized with each other. A critique might be that the artwork would be even more interesting to observe if the pieces used on a single carpet were varying shapes instead of all triangles. The geometric shapes were generated by an algorithm unknown to myself, and then realized in wood-veneer through laser cutter machinery. The creator then bonded the pieces onto fabric. Strozyk’s artistic sensibilities include viewing substances in different ways than they are normally viewed and the “possibility of surprising elements.” The final form transforms wood to appear and be malleable as it can bend and maintain a unique shape unlike a typical carpet rug or wood floor, encouraging the audience to rethink our assumptions about the resources we use and expand our creative bounds.

Project03-Dynamic Drawing

sketchDownload
var R=255;
var G=153;
var B=203;
var x=380;
var y=280;

function setup(){
    createCanvas(600, 450);
    background(0);
}

function draw() {
    background(0);
    stroke(0);
    line(600,0,mouseX,mouseY);
   //change angle
    var angle=mouseX;
    push();
    //change origin
    if(mouseY>225){
        translate(200,225);
    }
    else{translate(400,225);
    }
    rotate(radians(angle));
    fill(R,G,B);
    var x=mouseX;
    var y=mouseY;
    circle(x,y,200);
    circle(x+30,y-160,50);
    circle(x-160,y+30,70);
    circle(x-140,y+50,30);
    //change color
    if(mouseY<150){
        R=0,
        G=255;
        B=255;
    }
    else if(mouseY>300){
        R=255;
        G=255;
        B=102;
    }
    else{
        R=255;
        G=153;
        B=203;
    }
    //change scale
    if(mouseX<200){
        scale(0.6);
        fill(R,G,B);
        circle(x,y,300);
        circle(x+30,y-160,50);
        circle(x-160,y+30,70);
        circle(x-140,y+50,30);
    }
    else if(mouseX>400){
        scale(0.4);
        fill(R,G,B);
        circle(x,y,300);
        circle(x+30,y-160,50);
        circle(x-160,y+30,70);
        circle(x-140,y+50,30);
    }
    else{
        scale(0.2);
        fill(R,G,B);
        circle(x,y,300);
        circle(x+30,y-160,50);
        circle(x-160,y+30,70);
        circle(x-140,y+50,30);
    }
    pop();

}

When I first started this dynamic drawing, I have no idea what to do. Therefore, I simply drew 4 circles, and then changed their color, rotating position, scaling size, and rotating angle. I encountered several difficulties on making my drawing move by my logic, because I didn’t fully understand how certain function work in computer logic. As I look at detailed instructions on these function, I made it work eventually, and I had a more comprehensive understanding of these functions.

Project 3- Dynamic Drawing

sketch
var x;
var y;
var strokeValue;
var mx;
var my;
var dragging 

function setup() {
    createCanvas(600, 450);
    background(0);
    text("p5.js vers 0.9.0 test.", 10, 15);
}

function draw() {
    //center point variables
    let x = width/2;
    let y = height/2;
    //stroke color variable
    let strokeValue = 255;
    //map of black screen ellipse
    let mx= map(mouseX, 0, width, 0, 600);
    //allows for ellipse to drag (which I just realized
    //is pointless for this code)
    if(dragging == true) {
        x=mouseX;
        y=mouseY;
    }
    //redraws ellipse with no background
    if (mouseIsPressed) {
    stroke(strokeValue);
    noFill();
    ellipse(x, y, (mouseX), (mouseY));
    fill(0);
    //draws two ellipses on black screen, one is mapped
    } else {
        background(0)
        stroke(mouseX,0,mouseY);
        noFill();
        ellipse(mouseX, mouseY, mouseX, mouseY);
        ellipse(mx, y, mouseX, mouseY);
        text('press :)', mouseX, mouseY);
    }
}
//changes background value to current value of mouseX,mouseY
function mousePressed() {
    background(mouseX,0,mouseY);
    dragging = true;
}
//changes dragging to false
function mouseReleased() {
    dragging = false;
}


Originally, I wanted to do something really cool with infinitely generating circles. That idea morphed into this fun, interactive circle drawing. You can click anywhere on the canvas to generate a new background color based on the location of your mouse, and draw cool circles!

I’ll admit I struggled a lot with this project, but overall I am happy with what I came up with. I know it’s maybe not as complex as what we’re aiming for, however I learned a lot by creating it.

Generative Art

05-tensor-field-streamlines.jpg

I really like this piece by Sawako & Panagiotis. I found them from the Scripted By Purpose page. https://scriptedbypurpose.wordpress.com/participants/akt/ 

They are computational design researchers, who tie programming and architecture to generate infrastructure. I picked this image in particular because it looks like something I could try to recreate in p5.js if I spent a good amount of time working on it. 

The piece seems like it consists of one string of a manipulated shape being repeated over and over again, similarly to if you were to draw a series of ellipses or rectangles without redrawing the background. I’m sure a lot more went into rendering this image than just that, but those are my initial thoughts. I’m curious about what sort of functions would create the manipulation of the shape? I am not a numbers person, so navigating this type of computational art is a challenge.