daphnel-Project 04-String Art

string

//Daphne Lee
//15-104::1 (9:30am) Section D
//daphnel@andrew.cmu.edu
//Project 04-String Art

function setup() {
    createCanvas(400,300);
}
function draw(){
    background(0);
    strokeWeight(1);
    stroke(255);
    var xCanvas=400;
    var yCanvas=300;
    var x=0;
    var y2=0;
    //anytime the increment is increasing the y coord, it's 3/4*x1 because 
    //the height is less than the width
    for(var x1 = 0; x1 < xCanvas; x1 += 10){
        //bottom left curve
        var y = x1 * 3/4;
        line(x, y, x1, yCanvas);
        //top left curve
        line(x, yCanvas-y, x1, y2);
        //bottom right curve
        line(xCanvas, y, xCanvas-x1,yCanvas);
        //top right curve
        line(x1,y2,xCanvas,y);
      }
}

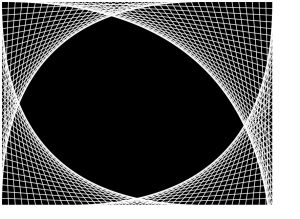
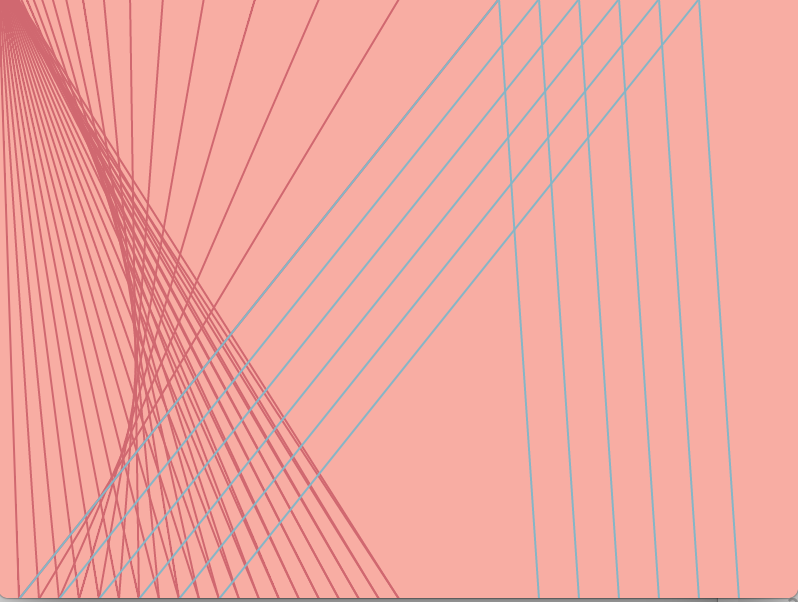
Since I’ve never done much work with using such lines to create curves, I looked a lot at the 7th grade webpage provided to us. I wanted to do something simple yet nice and thought of this.

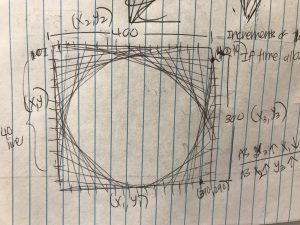
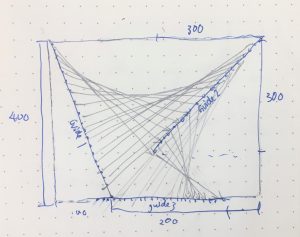
It took me a while to get the lines to fit the way I wanted them too especially because the canvas isn’t a square. I had to tinker around with the variables to make them fit better. Additionally, I spent more time probably looking at my paper trying to figure out which points connected to which and how I would get the coordinates of them.

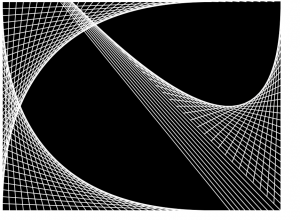
Some screenshots of my process. The first one was just flew out of the canvas literally while the other one was just not having symmetrical halves at all.

cduong-looking outward 04-FabricKeyboard

The project is “FabricKeyboard”, which is a stretchable fabric that is used as a musical instrument. It is a physical interaction media based on fabric. The way it functions is that it is a multilayer design that is created in a way to look as though it has different ‘keys” that have extensions that can determine things such as touch, proximity, pressure, stretch, position, etc. The video was honestly so amazing to watch, especially with the range of sounds that they can make and it is just so interesting to think that technology has advanced so far that people can now produce sounds from a piece of fabric.

They used software known as MIDI that allows the FabricKeyboard to “plug and play” and they are currently exploring the OSC protocol to use it wirelessly. The algorithms that were possibly used to develop this work had to be working on different combinations of factors such as pressure, proximity, etc. to produce a specific type of sound and they had to determine exactly what types of sounds they wanted to produce.

They had to develop this fabric to look a specific way and it looks somewhat like a futuristic keyboard or piano, especially with the sounds that it makes. The creator’s had full control of what they wanted the sounds to be and how they wanted every little factor to affect the sounds.

The FabricKeyboard was created by the Responsive Environments team at the MIT Media Lab. This was created this year in 2017.

FabricKeyboard – Stretchable fabric (sensate media) as a musical instrument

alchan-Project04-string art

alchan project 04

//line properties
var startX;
var startY = 200;
var endX = 150;
var endY;
var startDist = 20;
var endDist = 20;

//adjust background color
var backColor = 100;

//check whether lines should move back or forth
var shouldMove = true;

function setup() {
    createCanvas(400,300);
    stroke(256);
    strokeWeight(2);
    frameRate(30);
}

function draw() {
  background(backColor, backColor, 200);


    //top left corner
    startX = 0;
    startY = 150;
    endX = 200;
    endY = 0;
    for(var i = 0; i < 10; i++) {
        line(startX, startY + startDist, endX + endDist, endY);
        startY -= 10;
        endX += 10;
    }

    //top right corner
    startX = 400;
    startY = 150;
    endX = 200;
    endY = 0;
    for(var i = 0; i < 10; i++) {
        line(startX, startY + startDist, endX - endDist, endY);
        startY += 10;
        endX += 10;
    }

    //bottom left corner
    startX = 0;
    startY = 150;
    endX = 200;
    endY = 300;
    for(var i = 0; i < 10; i++) {
        line(startX, startY - startDist, endX + endDist, endY);
        startY -= 10;
        endX -= 10;
    }

    //bottom right corner
    startX = 400;
    startY = 150;
    endX = 200;
    endY = 300;
    for(var i = 0; i < 10; i++) {
        line(startX, startY - startDist, endX - endDist, endY);
        startY -= 10;
        endX += 10;
    }

    //check whether the lines have reached a certain position
    //and change the value of shouldMove to switch direciton
    if (startDist >= 300) {
        shouldMove = false;
    } else if (startDist <= 0) {
        shouldMove = true;
    }

    //move the position of the lines' endpoints
    //changing direction depending on shouldMove
    if (shouldMove === true) {
        startDist += 10;
        endDist -= 10;
      backColor += 5;
    } else if (shouldMove === false) {
        startDist -= 10;
        endDist += 10;
        backColor -= 5;
    }
}

I wanted to try making an animated piece (without mouse interaction), so once I figured out how to calculate and draw the lines I played around with moving all of the points to animate the entire drawing. The final piece wasn’t quite what I had originally planned to make, as I had wanted to incorporate rotation again somehow, but I also learned a lot in figuring out how to create a back-and-forth motion.

mecha-lookingoutwards-04

Patatap was created by designer Jono Brandel in collaboration with Lullatone and published on March 26, 2014. Described as a “portable animation and sound kit”, patatap generates sounds created by the Lullatone team, Shawn and Yoshimi, with corresponding graphics at the push of a key. As both a graphic designer and a computer programmer, Jono wanted to create a program that introduced synesthesia–more specifically visual music–to creators.

What drew me to this project specifically was the way that sound and graphics were combined in such a precise manner. When first introduced to this website a few years ago, I did not even consider the fact that it had to have been coded. With the knowledge that I know now, I have even more respect for the designers and the project itself. I am also inspired by Jono’s ability to purposefully exemplify the concept of synesthesia through Patatap.

sntong-Project-04-String-Art

sketch

//scarlet Tong
//sntong@andrew.cmu.edu
//Section A
//Project-04-String-Art


//variables for y compment of guiding lines
var aLineX1 = 200;
var aLineX2 = 400;
var aLineY = 0;
// variable for x component of guiding lines
var bLineX = 100;
var bLineY1 = 0;
var bLineY2 = 350;

//color variables
var R = 255;
var G = 200;
var B =200;

function setup() {
    createCanvas(400, 300);
    background(0);

}

function draw() {
  //create invisible guiding lines that determines where the points are generated
  //each guiding line creatres 20 points
  for (var i = 0; i <= 1; i+= .05) {
    //guiding line 1
    var x1 = lerp(bLineY1,bLineX,i);
    var y1 = lerp(bLineY1,bLineY2,i);
    //guiding line 2
    var x2 = lerp(aLineX1,aLineX2,i);
    var y2 = lerp(aLineX1,aLineY,i+.01);
    //guiding line 3
    var x3 = lerp(bLineY2,bLineY1,i);
    var y3 = lerp(aLineX2,bLineY2,i);
    //first web has the color pink
    stroke(R,G,B);
    strokeWeight(.85);
    line(x1,y1,x2,y2);
    //second web is colored white
    stroke(B,R,G);
    strokeWeight(.5);
    line(x2,y2,x3,y3);
    }

    //add changing colors with respect for mouse location for fun 
    if (mouseX < width) {
      R = mouseX;
      G = mouseY;
      B = R-G;
    }
}

I explored using the lerp() function to help me generate “guiding” lines that will govern the shape of resulting “web”. Using for loop, I was able to generate 2 webs with 3 guiding lines for this composition. The color of the lines relate to the location of the mouse on the canvas (so the drawing appears and disappears as you interact with it with the mouse), and I struggled working out the location of the guiding lines and using variables to sort out the sequences of points when working on this project

rfarn-Project-04-StringArt

My string art design is fairly simple. Once understanding the concept of a for loop, I was able to quickly apply it to the creation of this string art. There were only a few small problems I faced, such as having to reverse the direction of the increments by subtracting them from the height. Besides little technical/syntax troubles, the overall project was quick and straight forward.

sketch

var yincrement = 15; //increments along y-axis
var xincrement = 20; //increments along x-axis
var x1position = 1; //points constantly flush left
var y1position = 299; //points constantly flush bottom
var x2position = 399; //points constantly flush right
var y2position = 1; //points constantly flush top

function setup(){
    createCanvas(400, 300);
    background(0);
}

function draw() {
	for(var i = 0; i < 21; i += 1) {
		strokeWeight(0.5);
		stroke(255); //white
		line(x1position, yincrement * i, xincrement * i, y1position); //lines between left and bottom
		stroke(255, 0, 0); //red
		line(x2position, yincrement * i, xincrement * i, y2position); //lines between right and top
		stroke(0, 255, 0); //green
		line(xincrement * i, y1position, x2position, height - yincrement * i); //lines between bottom and right
		stroke(0, 0, 255); //blue
		line(x1position, height - yincrement * i, xincrement * i, y2position); //lines between top and left
	}
}

dnam-Looking Outwards-04

The Program Detecting Wine on the Table

Artificial intelligence is becoming more and more relevant. ‘The Classyfier” created by Benedict Hubener, Stephanie Lee, and Kelvyn Marte is another display of modern artificial intelligence that makes our lives easier. The program (and the table) detect people’s drinks by sound. For example, dinks of wine glasses tell the program to turn on smooth, sexy music. While the opening of a cool beer would trigger the program to turn on fast-paced rock. Artificial intelligence to have understandings of the environment through sound could help humans have homes that would ‘live and breathe’ along with them, always keeping up with what is happening. More information about the Classyfier can be found here.

Bettina-Project04-SectionC

sketch

// yuchienc@andrew.cmu.edu
// Section C
// project 4--stringart

function setup() {
  createCanvas(400,300);
}

var bgColor='#f8ada3'
var fuschia='#d06870'
var lightBlue='#86b5c6'
var ochre='#d0b268'

function draw() {
  background(bgColor);
  fuschiaCurve(mouseX);
  lightBlueCurve(mouseX);
  ochreCurve(mouseX);
}

function fuschiaCurve(mouseX) {
  var x1=mouseX;
  var y1=0;
  var x2=10;
  var y2=300;
  var x3=250;
  var y3=0;
  var cmx=constrain(mouseX,75,500);
  for (i=0;i<400;i+=20) {
    stroke(fuschia);
    line(x1,y1,x2,y2);
    line(x2,y2,x3,y3);
    x1+=.5;
    x2+=10;
    x3*=.8;
  }
}

function lightBlueCurve(mouseX) {
  var x1=10;
  var y1=300;
  var x2=250;
  var y2=0;
  var x3=x2+20;
  var y3=300;
  var cmx=constrain(mouseX,100,500);
  for (i=0;i<300;i+=50) {
    stroke(lightBlue);
    line(x1,y1,x2,y2);
    line(x2,y2,x3,y3);
    x1+=20;
    x2+=cmx/25;
    x3=x2+20;
  }
}

function ochreCurve(mouseX) {
  var x1=150;
  var y1=300;
  var x2=300;
  var y2=0;
  var cmx=constrain(mouseX,100,500);
  for (i=0;i<260;i+=20) {
    stroke(ochre);
    line(x1,y1,x2,y2);
    x1+=cmx*.05;
    x2+=cmx*.05;
  }
}

My previous projects, I had sketched a clear visual and then figured out the code to execute it. This time, I wanted to embrace the nature of code and draw something directly in p5 without sketching ideas prior. I’d used the print statement to find the values for x and y at certain points in the loop so I could use those values for other curve functions. I spent the most time adjusting the increments to x and y so the composition outcome was balanced. Some process pictures are below.


I also added an interactive portion, building off of last week’s assignment, so the positions of certain coordinates varied with mouseX.

jennyzha – Looking Outwards 04

Carsten Nicolai is a german artist and musician based in berlin. He often incorporates mathematic patterns such as grids and codes, as well as error, random and self-organizing structures.

For his musical attributes he uses the pseudonym alva noto; leading his sound experiments into the field of electronic music by creating his own code of acoustics and visual symbols.

Reflektor distortion is a rotating, basin filled with water – is inspired by the shape of a parabolic mirror that ‘rotates’ water. The installation consists of the three main parts including mirror, reflection and distortion. Both the curve and distortion of the water is affected by speed and integrated resistors that generate a permanently new and re-organizing mirror reflection. The water surface will be affected by the speaker due to the low sound frequencies. Therefore, the water shows the distorted reflection; ultimately personifying a distorted reality.

http://www.carstennicolai.de/ 

ghou-lookingoutwards-04

SOUNDLEAK

Keiko Uenishi is known for being a sound art-i-vist, as she described herself on her website bio. Her work includes reconstructing and experimenting with materials and one’s relationship with them in sociological and psychological environments. Uenishi’s present works include BroadwayDreams, Aboard: Fillip2, LandFilles, and many others.

Her installation LandFilles_UrbanDump is a project that took place at the Emily Harvey Foundation located in New York City in 2013. This piece was very inspiring because it takes a look at our urban environments using recycled material. This project was divided into several steps:

  1. Collection and Construction: recycling empty, clear, plastic bottles and constructing a structure from recycled materials
  2. Live processes/Performance: the structure is built with help from visitors and interacts with the pieces to produce audio feedback derived from the hollow shapes of the bottles.
  3. Demolition/Giveaway: the structure is torn down and given away to visitors or other people.