sunmink-LookingOutwards-03

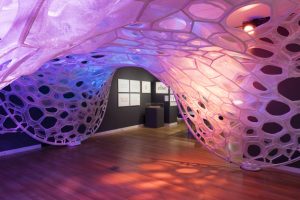
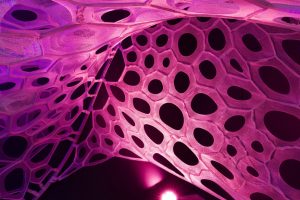
PolyThread Textile Pavilion is an architectural installation that is designed by Jenny E.Sabin. This installation is part of the Cooper Hewitt Smithsonian Design Museum exhibition, which focuses on aesthetic innovation. PolyThread Textile Pavilion is a seven-foot-tall-square-foot knitted textile structure that is in shape of the rippled dome with the underlying structure made up of aluminum tubes. It illuminates under the control of ETC Express LPC, which is a lighting Playback Controller that runs the day-to-night lighting sequence. Using the computation, Sabin successfully fabricates her inspirations into an art.

I admire the designer Sabin for her innovative idea to combine her inspirations from nature and mathematics which are not a common marriage. Experimenting new material as well as methods to create her works, Sabin also plans to help parts of the world where there is little or no access to electricity by studying the “PolyThread” which is a potential solution for portable and lightweight electricity.

katieche – looking outwards 03


Ever since I was young, I had an interest in fashion, so when I saw Iris Van Herpen’s 3D generative work, I was very intrigued. Unfortunately her website only showcased examples and videos of her work and not how the work was made, so I had to search for other articles. Some of her pieces are hand molded, however, a lot are also 3D printed work as she collaborated with Stratasys’ unique Objet Connex multi-material 3D printing technology. They aim to use generative art to create non-traditional pieces that “animate the body in an organic way,” (dezeen) utilizing computational methods. Although I was unable to find what exact programs or languages she uses to generate her pieces, I did find that for her Magnetic Motion SS 2014 Paris Fashion Week show she collaborated with Canadian architect Philip Beesley and used a combination of advanced computation, synthetic biology, and mechatronics engineering to create the line.

her work
article about her collaboration with Stratasys

dnoh-sectionD-project3-dynamicdrawing

sketch

// red = 205, 63, 63
// green = 63, 205, 63

var liney = 20;
var redX = -15;
var redX2 = 655;
var blueY = -15;
var blueY2 = 495;
var lineT = 0;
var lineB = 480;
var lineL = 0;
var lineR = 640;
var whiteFill = 255;
var lineStrokeR = 63;
var lineStrokeG = 205;
var lineStrokeB = 63;

function setup() {
  createCanvas(640,480);
  background(39,48,47);
}

function draw() {
  background(39,48,47);
//refreshing background

//blinking effect in background
  stroke(39,64,47);
  line(0,liney,width,liney);
  line(0,liney+40,width,liney+40);
  line(0,liney+80,width,liney+80);
  line(0,liney+120,width,liney+120);
  line(0,liney+160,width,liney+160);
  line(0,liney+200,width,liney+200);
  line(0,liney+240,width,liney+240);
  line(0,liney+280,width,liney+280);
  line(0,liney+320,width,liney+320);
  line(0,liney+360,width,liney+360);
  line(0,liney+400,width,liney+400);
  line(0,liney+440,width,liney+440);
  line(0,liney+480,width,liney+480);
  line(0,liney+520,width,liney+520);
  line(0,liney+560,width,liney+560);
  line(0,liney+600,width,liney+600);
  line(0,liney+640,width,liney+640);
  liney = liney + 80;

  if (liney > height) {
    liney = 0;
  }
//reset green lines to make it blink

//color blocks that shoot out
  noStroke();
  rectMode(CENTER);
  fill(0,255,255); //c
  rect(redX,mouseY,20,20);
  redX = redX - 25;
  fill(255,0,255); //m
  rect(redX2,mouseY,20,20);
  redX2 = redX2 + 25;
  fill(255,255,0); //y
  rect(mouseX,blueY,20,20);
  blueY = blueY - 25;
  fill(0); //k
  rect(mouseX,blueY2,20,20);
  blueY2 = blueY2 + 25;

//green crooshair
  stroke(lineStrokeR,lineStrokeG,lineStrokeB);
  strokeWeight(2);
  line(mouseX,lineB,mouseX,lineT);
  line(lineL,mouseY,lineR,mouseY);

  var rectX = 20;
//white box in crosshair
  fill(whiteFill);
  rect(mouseX,mouseY,rectX,rectX);

//white box enlarges when pressed, white box becomes gray, green becomes red
  if (mouseIsPressed) {
    lineM1 = mouseX-50;
    lineV1 = mouseY-50;
    lineM2 = mouseX+50;
    lineV2 = mouseY+50;
    lineM3 = mouseX+50;
    lineV3 = mouseY-50;
    lineM4 = mouseX-50;
    lineV4 = mouseY+50;
    line(lineM1,lineV1,lineM2,lineV2);
    line(lineM3,lineV3,lineM4,lineV4);

    ellipse(mouseX,mouseY,70,70);
    lineStrokeR = 255;
    lineStrokeG = 63;
    lineStrokeB = 63;
    whiteFill = 80;
  } else {
    whiteFill = 255;
    lineStrokeR = 63;
    lineStrokeG = 205;
    lineStrokeB = 63;
  }
  print(mouseIsPressed);
}


function mouseClicked() { //when mouse is clicked, the color squares jump to mouse and start moving again
  redX = mouseX;
  redX2 = mouseX;
  blueY = mouseY;
  blueY2 = mouseY;
}

The background lines are constantly blinking to add an effect of constant movement. The mouse is followed by a vertical and horizontal line that changes colors from green to red when clicked. When clicked, the square in the center changes colors and shapes. Finally, four color blocks jump out of the crosshair when clicked.

Initially I wanted to create a code that would print a square wherever I clicked and the four blocks would collide into that square. However, I could not figure out a code that would let me keep the square after I clicked it.

mstropka-Project 03-Section E

sketch

//Max Stropkay
//Section E
//mstropka@andrew.cmu.edu
//Project 03

var squares = []; //empty array for squares
var speed = 5; // speed multiplyer for motion of squares
var squaresize = 40; //initial square size
var angle = 0 //initial rotation of squares

function setup() {
    angleMode(DEGREES);
    createCanvas(640, 480);

    //loop that continually makes 400 squares inside the array
    for (var i = 0; i < 400; i++) {
      squares[i] = {
      //squares are drawn at a random location on canvas
      x : random(0, width),
      y : random(0, height),
      //draw the squares
      display: function() {
        push();
        noFill();
        stroke(225);
        //if the mouse is within 100 pixels of any of the squares
        if(dist(mouseX, mouseY, this.x, this.y) < 100){
          stroke(255,0,0); //stroke will become red
          rotate(angle + random(-10,10)); //squares will rotate +-10 degrees
          squaresize = squaresize + 10; //squares will grow by 10 pixels in the x and y direction
        }else{
          squaresize = 40; //if the mouse is not close, the squares will return to normal size
        }
        rect(this.x, this.y, squaresize, squaresize); //draw the squares
        pop();
      },
      //gives squares random movement in x and y direction if mouse is within 100 pixels
      move: function() {
        if(dist(mouseX, mouseY, this.x, this.y) < 100){
          this.x = this.x + random(-1, 1) * speed; //causes squares to move in a random x direction
          this.y = this.y + random(-1, 1) * speed; //causes squares to move in a random y direction
          }else{
          this.x = this.x //if the mouse is not within 100 pixels, dont move
          this.y = this.y
        }
      }
    }
  }
}
function draw() {
    background(120);
    //make squares until the array is full
    for (var i = 0; i < squares.length; i++){
    squares[i].move(); //runs move function
    squares[i].display(); //runs display funtion

  }

}

For this project I wanted the mouse to interact with a lot of shapes in the sketch. I did some research and figured the best way to do that was to set up an array for all of the objects that the mouse was to interact with. After watching several explanations on youtube, I figured out how to apply what we learned about changing shapes in class to what I learned online about arrays. The result is a program that generates a bunch of squares that rotate, grow, move, and change color when the mouse is near them.

dchikows – Section C – Category Project – 02 – Variable-Face

sketch

// David Chikowski
// Section C
// dchikows@andrew.cmu.edu
// Project-02


var eyeSize = 12;
var backFinTopX = 541;
var backFinTopY = 162;
var backFinBottomX = 540;
var backFinBottomY = 322;
var mouthOpenTopY = 234;
var mouthOpenBottomY = 245;


function setup() {
    createCanvas(640, 480);
}

function draw() {
    background(130,163,196);

    noStroke();
    fill(191,94,71);
    ellipse(279,238,359,131);
    //Main body

    noStroke();
    fill(191,94,71);
    quad(80,231,139,202,136,277,81,248);
    //mouth

    noStroke();
    fill(130,163,196);
    triangle(79,mouthOpenTopY,80,mouthOpenBottomY,103,242);
    //mouth opening

    noStroke();
    fill(56,54,8);
    ellipse(137,232,eyeSize,eyeSize);

    noStroke();
    fill(191,94,71);
    triangle(240,145,205,182,336,188);
    //top fin

    noStroke();
    fill(191,94,71);
    triangle(backFinTopX, backFinTopY, 403, 242, backFinBottomX, backFinBottomY);
    //Back fin


}


function mousePressed() {
    // when the user clicks, these variables are reassigned
    // to random values within specified ranges. For example,
    // 'eyeSize' gets a random value between 12 and 22.

    eyeSize = random(12,22);
    backFinTopX = random(525, 541);
    backFinTopY = random(145, 162);
    backFinBottomX = random(515, 540);
    backFinBottomY = random(295, 322);
    mouthOpenTopY = random(234,246);
    mouthOpenBottomY = random(235,245);


}


I initially approached the project by trying to make an interactive robot, but my process took a turn when I realized I am not very good at coding yet. So I decided to make a fish instead, but it is okay I really enjoy fishing.

Michelle Janco – Looking Outwards – 03

For this week’s Looking Outwards, I chose to read about and look at was a 3D printed “fabric” made by the 3D print service “Digits2Widgets” in 2014, which was presented at NYC’s 3D Printshow. The 3D printed material is made to be flexible like cloth of fabric. I found it fascinating that something made with a computer could behave like an otherwise flexible, sometimes organic material. I don’t know what specific algorithms were used in the making of this material, but I know it must have involved repeatedly creating patterns, as the material is made of millions of small interlocking pieces. You can see that comfort is trying to be achieved, as 3D printed forms are usually hard and not flexible. The Design Director of Digits2Widgets, Jonathan Rowley, said he “hopes artists and designers pick up on this concept and begin to print ‘real’ flexible garments that are actually light, comfortable and totally flexible.” I could not find an official title for the product other than 3D Printed Nylon.

http://www.fabbaloo.com/blog/2014/2/14/its-3d-printed-and-its-flexible


katieche – project 03 – dynamic drawing

katieche-03

// alters:
// dot position
// line length
// line and dot color
// speed that dots follow cursor
// angle of lines

// dot 1
var x = 300;
var y = 300;
var diffx = 0;
var diffy = 0;

// dot 5
var a = 320;
var b = 240;
var diffa = 0;
var diffb = 0;

// dot 3
var c = 320;
var d = 240;
var diffc = 0;
var diffd = 0;

// dot 4
var e = 320;
var f = 320;
var diffe = 0;
var difff = 0;

// dot 2
var g = 270;
var h = 220;
var diffg = 0;
var diffh = 0;

function setup() {
    createCanvas(640, 480);
    background(220);
}

function draw() {
	background(0);
    
    stroke(500-mouseX);
    // lines that follow cursor
    // line 1
    line(320, 240, mouseX, mouseY);
    // line 2
    var mx = map(mouseX, 0, width, mouseX, mouseY);
    line(320, 240, mx, mouseY);
    // line 3
    var mx = map(mouseX, 0, width, mouseX, mouseY);
    line(320, 240, mx, mouseY);
    // line 4
    var mx = map(mouseX, 0, width, mouseX, mouseY);
    line(320, 240, mx, mouseY);
    // line 5
    var mx = map(mouseX, 100, width,mouseX, mouseY);
    line(320, 240, mx, mouseY);

    // longer lines
    stroke(320-mouseX);
    // line 1
    var mx = map(200, mouseY, width, -260, 380);
    line(320, 240, mx, mouseY);
    // line 2
    var mx = map(-mouseX, 40, width, 760, -180);
    line(320, 240, mx, mouseY);
    // line 3
    var mx = map(mouseX, 30, width, -260, 100);
    line(320, 240, mx, mouseY);
    // line 4
    var mx = map(-mouseX, 300, width, 660, 190);
    line(320, 240, mx, mouseY);

    // dot 1 (slow)
    // dots are in order: slow to fast
    noStroke();
	diffx = mouseX - x;
    diffy = mouseY - y;
    x = x + 0.01*diffx;
    y = y + 0.01*diffy;
    fill (250-mouseY);
    ellipse(x, y, 10, 10);

    // dot 2
    diffg = mouseX - g;
    diffh = mouseY - h;
    g += 0.03*diffg;
    h += 0.03*diffh;
    fill (240-mouseX);
    ellipse(g, h, 35, 35);

    // dot 3
    diffc = mouseX - c;
    diffd = mouseY - d;
    c = c + 0.05*diffc;
    d = d + 0.05*diffd;
    fill (240-mouseX);
    ellipse(c, d, 30, 30);

  	// dot 4
    diffe = mouseX - e;
    difff = mouseY - f;
    e += 0.07*diffe;
    f += 0.07*difff;
    fill (300-mouseY);
    ellipse(e, f, 25, 25);

   	// dot 5 (fastest)
    diffa = mouseX - a;
    diffb = mouseY - b;
    a = a + 0.1*diffa;
    b = b + 0.1*diffb;
    fill (500-mouseX);
    ellipse(a, b, 20, 20);

}

This project was hard for me since it was so open ended, I didn’t know where to start or where to go, so I referenced the notes a lot. I knew I wanted to do something abstract, so I started with a few interactive functions that I thought were cool (ie. the dots following the cursor, and the lines changing based on the mouse position), and then played around with the code from there. Here are a few things I first tried:

I wanted to combine some of these functions but the circles and the lines just looked too crowded together so I switched to the dots that follow the cursor, so it seems like the lines follow the dots.

rkarp1 – Project-03 – Section A

Rachel Karp – Dynamic Drawing

var d = 10; // distance between triangles

/*
This drawing consists of three "modes"
1) "Old" mode, when mouseY is above the middle of the canvas
(minus variable d, the space between the triangles)
2) "Young" mode, when mouseY is below the middle of the canvas
(plus variable d, the space between the triangles)
3) "Contemplative" mode, when mouseY is within the space between the traingles
*/

function setup() {
    createCanvas(480, 640);
}

function draw() {
    //BACKGROUND
    //set background color for "old" mode
    background(0);
    //background color changes in "young" mode
    if(mouseY>height/2+d){
        background(255, 255, 77);
    }
    //backgrond color changes in "contemplatative" mode
    if(mouseY>=height/2-d & mouseY<=height/2+d){
        background(255);
    }

    //set outline color
    stroke(255);

    //TOP TRIANGLE
    //set color in "young" mode
    fill(255, 51, 0);
    //set color in "old" mode
    if(mouseY<height/2-d){
        fill(150);
    }
    //set color in "contemplative" mode
    if(mouseY>=height/2-d & mouseY<=height/2+d){
        fill(255);
    }
    //draw triangle dependent on mouseY
    triangle(width/4, height/2-d, width/2, mouseY, 
        width-width/4, height/2-d);

    //BOTTOM TRIANGLE
    //set color in "young" mode
    fill(255, 51, 0);
    //set color in "old" mode
    if(mouseY<height/2-d){
        fill(150);
    }
    //set color in "contemplative" mode
    if(mouseY>=height/2-d & mouseY<=height/2+d){
        fill(255);
    }
    //draw triangle dependent on mouseY
    triangle (width/4, height/2+d, width/2, height-mouseY, 
        width-width/4, height/2+d);

    //TOP TRIANGLE LINE (age line)
    strokeWeight(3);
    //draw line dependent on mouse Y
    line(0, mouseY, width, mouseY);

    //BOTTOM TRIANGLE LINE (age line)
    //draw line dependent on mouse Y
    line(0, height-mouseY, width, height-mouseY);

    //TEXT
    //add text in "young" mode
    if(mouseY>height/2+d){
        fill(102,102,255);
        //set font size dependent on mouseX
        //constrain font size so that "young!" will remain visible relative to mouseX
        var sizeX = constrain(mouseX, 0, 160);
        textSize(sizeX);
        textAlign(RIGHT);
        text("I feel " + mouseX + " years young!", width, mouseY);
    } 
    //add text in "old" mode
    if(mouseY<height/2-d){
        fill(107, 107, 71);
        //set font size dependent on mouseX
        //constrain font size so that "old." will remain visible relative to mouseX
        var sizeX = constrain(mouseX, 0, 300);
        textSize(sizeX);
        textAlign(RIGHT);
        text("I feel " + mouseX + " years old.", width, mouseY);
    }
    //add text in "contemplative" mode
    if(mouseY>=height/2-d & mouseY<=height/2+d){
        fill(0);
        noStroke();
        textSize(50);
        textAlign(CENTER);
        text("I feel...", width/2, mouseY);
    }

}

I had a hard time coming up with a concept for this project. I knew I wanted to experiment with triangles because I thought I hadn’t made myself work with them much before, and I knew I wanted to experiment with text. I ended up with this. I like the “age lines” that track age based on mouseX, and I like that I got to learn about constrain().

myoungsh-project03-dynamicdrawing

sketch

var topX = 320; //original triangle
var topY = 190;
var leftX = 260;
var leftY = 290 ;
var rightX = 380;
var rightY = 290;

function setup() {
    createCanvas(640, 480);
}

function draw() {
    background(256);
    noStroke()
    fill(0);
    triangle(topX, topY, leftX, leftY, rightX, rightY); //draw original triangle
    
    if(dist(mouseX, mouseY, topX, topY) > 25 || //return original triangle after transformations
    dist(mouseX, mouseY, rightX, rightY) > 25 || 
    dist(mouseX, mouseY, leftX, leftY) > 25) {
      topX = 320;
      topY = 190;
      leftX = 260;
      leftY = 290 ;
      rightX = 380;
      rightY = 290
    }
    
    if(dist(mouseX, mouseY, rightX, rightY) <= 25) { //build 1st itteration of large triangle
      rightX = 200;
      rightY = 190;
      fill(0, 256, 256);
      triangle(320, 190, 260, 290, 380, 290);
      fill(256, 256, 0);
      triangle(440, 190, 320, 190, 380, 290);
      fill(256, 0, 256);
      triangle(260, 290, 380, 290, 320, 390);
    }
    
    if(dist(mouseX, mouseY, topX, topY) <= 25) { //build 2nd itteration of large triangle
      topX = 320;
      topY = 390;
      fill(256, 0, 256);
      triangle(320, 190, 260, 290, 380, 290);
      fill(0 ,256, 256);
      triangle(440, 190, 320, 190, 380, 290);
      fill(256, 256, 0);
      triangle(200, 190, 320, 190, 260, 290);
    }
    
    if(dist(mouseX, mouseY, leftX, leftY) <= 25) { //build 3rd itteration of large triangle
      leftX = 440;
      leftY = 190;
      fill(256, 256, 0);
      triangle(320, 190, 260, 290, 380, 290);
      fill(256, 0, 256);
      triangle(200, 190, 320, 190, 260, 290);
      fill(0, 256, 256);
      triangle(260, 290, 380, 290, 320, 390);
    }
    
    if(dist(mouseX, mouseY, 320, 240) <= 25) { 
      triangle(320, 190, 260, 290, 380, 290);
      triangle(200, 190, 320, 190, 260, 290);
      triangle(260, 290, 380, 290, 320, 390);
      triangle(320, 190, 380, 290, 440, 190);
    }
}

For this project I kept it simple, after using them in the pong exercise I got very comfortable using if statement and they were the easy part of this project. Hardest part was finding coordinates, I assume I could have used some sort of relationships in place of numbers to save time in writing the code.

Michelle Janco – Project 3- Dynamic Drawing

changing drawing

//Michelle Janco
//Section B
//mjanco@andrew.cmu.edu
//Project - 3

var Xpos
var Ypos
var pupilYpos
var pupilXpos

function setup() {
    createCanvas(400, 400);
}
function draw() {
  background(255);
//drawing the eye
if (mouseX < (width/2)){
  noStroke();
  fill(249, 214, 87);
}
else {
  noStroke();
  fill(random(0, 255), random(0, 255), random(0, 255));
}
ellipse(200, 200, 350, 350);
//shaking iris
fill(255);
ellipse(Xpos, Ypos, 200, 100);
if (mouseX > width/2) {
Xpos = width/2+ random(0,mouseX/60);
Ypos = height/2 + random(0,mouseX/60);
}
//pupil movement
var pupilXpos = constrain(mouseX, 150, 250);
noStroke();
fill(0);
ellipse(pupilXpos, 200, 40, 40);
}

For this assignment I created an eye that changes color when it looks to the right and follows the mouse. I had a little trouble with the order of things, but finally found the way to make it work.