egrady-LookingOutwards-02

http://marcinignac.com/projects/city-icon/

This work of generative art by Marcin Ignac is a virtual city, that features intersecting systems such as traffic jams, water streams, nature enclaves, emergency states and energy sources interacting with each other to form complex patterns. A city is one giant and complex organism, with an abundance of unique patterns forming as a result. The generation of a city is much like the process for which generative art is developed, with the final piece being a rendering based upon the random values of different variables that all add to the final work. In the author’s “about” page he states that he finds inspiration in “structures of biological organisms” and in “patterns emerging from data and complexity of computer algorithms.” His inspiration makes perfect sense in reference to ‘City Icon’, as it represents a biological organism with emerging patterns formed with complex computer algorithms.

I think that this project is particularly interesting because it shows that programming (and generative art) also has the function of creating entire complex systems that very nearly simulate organic life. This project has inspired me to think of programming as a tool for which I can turn my ideas into reality. As for how this work was made, I think it has to do with assigning random variables for different events to happen, like if there is a traffic jam or natural disaster, there is a variable that determines when and where it occurs.

Creator Name: Marcin Ignac
Title of Work: City Icon
Year of Creation: 2012

sunmink-LookingOutwards-02

Turbulence by Dr.Woohoo is a collection of paintings drawn with robot arm using the algorithm of Perlin Noise effect. Perlin Noise effect is usually used for generating randomness in films when creating water effects in sceneries, however, Woohoo used it to instruct the robot to repeatedly draw a hexagon shape. With this algorithm, Dr.Woohoo created a delicate and organic art piece.

Dr.Woohoo as an artist combines various fields of his interest such as 3d printing and robotics to create interesting artwork that is delicate and organic. Although he used water color for the Turbulence, he is known for incorporating mediums in various methods to create his art piece. He not only pushes himself to integrate different fields but also desires to break through the traditional idea of art and introduces innovative styles to produce art. This for me is inspirational because he proves that art is not something that has an outline. For him, using the same medium does not mean the same. Depending on how he uses the medium it can turn into shoes with a wonderful pattern or a beautiful painting.

Matthew Erlebacher LookingOutwards-02

Robert Hodgin/flight404 “Taxi, Taxi!” 2/26/2016

The piece of generative art that I found to be the most interesting was “Taxi, Taxi!” by Robert Hodgin. The main thing that I admire about it is how much the piece has going on at once. The video has a bird’s eye view of a large city and has several glowing dots moving across the street (these presumably represent taxis). I also feel that it provides an interesting and meta perspectives on large cities. From the bird’s eye view you realize how large the city is and how many different people are moving around in it. One critique of the project that I would make is that it keeps cutting between shots. While cuts are good so that the audience doesn’t get bored they use this to often, and it becomes more distracting than anything else.

rsp1-SectionB-Project-02-VariableFace

sketch

//Rachel Park
//Section B @ 10:30 AM
//rsp1@andrew.cmu.edu
//Project-02-VariableFace


function setup() {
    createCanvas(480,640);

}
    //variables for the face
    var eyesize = 20; //a
    var facewidth = 155; //b
    var faceheight = 125; //c
    var earwidth = 30;
    var earheight = 60;
    var antwidth = 20;
    var armswidth = 20;
    var armsheight = 20;
    var armheight = 20;
    var handsheight = 440;
    var handswidth = 155/3;
    var bodywidth = d/2-20;
    var d = 480; //bodysize
    var e = 180; //medium gray fill color
    var f = 138; //dark gray fill color

function draw() {
    background(212,249,246);

    //robot face
    var faceX = width/2
    var faceY = height/3

    rectMode(CENTER);
    noStroke();
    fill(e);
    rect(faceX,faceY,facewidth,faceheight,10);

    fill(220);
    rect(faceX,faceY,facewidth-20,faceheight/2,10);

    //ear things
    var earX = width/3
    var earY = height/3

    noStroke();
    fill(f);
    rect(earX-10,earY,earwidth,earheight,5);

    noStroke();
    fill(f);
    rect(width/2+90,earY,earwidth,earheight,5);

    //antennae
    var antY = height/6

    noStroke();
    fill(f);
    rect(width/2,antY+20,antwidth/2,antwidth*2+10,10);

    noStroke();
    fill(255,41,41);
    ellipse(width/2,antY-10,antwidth,antwidth,10);

    //eyes
    var eyeLX = width/2-38.75;
    var eyeRX = width/2+38.75;
    var eyeY = height/3

    noStroke();
    fill(255);
    ellipse(eyeLX,eyeY,eyesize*2,eyesize*2);
    ellipse(eyeRX,eyeY,eyesize*2,eyesize*2);

    fill(203,35,35);
    ellipse(eyeLX,eyeY,eyesize+10,eyesize+10);
    ellipse(eyeRX,eyeY,eyesize+10,eyesize+10);

    //arms joints
    var armsY = height/2
    fill(f);
    ellipse(width/4,armsY,armswidth,armsheight);
    ellipse(width-120,armsY,armswidth,armsheight);

    //legs & feet
    var legsX = width/2
    var legsY = height-125-35
    var legsYX = height-125+35

    fill(f);
    rect(legsX+60,legsY,40,100);
    rect(legsX-60,legsY,40,100);

    fill(203,35,35);
    rect(legsX+60,legsYX,80,40);
    rect(legsX-60,legsYX,80,40);

    //body
    var bodyX = width/2
    var bodyY = height/2+40
    var bodywidth = d/2-20
    var bodyheight = d/3

    noStroke();
    fill(e);
    rect(bodyX,bodyY,bodywidth,bodyheight,10);

    //arms down

    fill(180);
    rect(width/5+5,armheight+340,21,125,5);
    rect(width-100,armheight+340,21,125,5);

    //hands down
    fill(203,35,35);
    arc(width/4-20,armheight+420,155/3,155/3,3*PI/4,PI/4,PIE);
    arc(width/2+155-15,armheight+420,155/3,155/3,3*PI/4,PI/4,PIE);
}

function mousePressed(){
  armheight = random([10,30]);
  armswidth = random([20,30]);
  eyesize = random(10,20);
  facewidth = random(155,160);
  faceheight = random(125,150);
  earwidth = random(30,55);
  earheight = random(25,60);
  antwidth = random(20,30);
  bodywidth = random([220,210]);
}

For my project, I wanted to make a visual of a small robot because I honestly that it was fun to change up of the possible movements of the figure along with the various facial feature sizes. I had an okay time creating the graphics within the code, but eventually got stuck on the actual functions that were used to make the arms and facial features vary in sizes and locations on the canvas. Overall, I thought that this was a very interesting project and thought that it was a good way to continue to practice the skills that we have learned thus far.

Image of the screenshot of my robot before I could figure out the solution to my function problem. I was able to make the arm shapes themselves, but couldn’t get them to appear separately so that it would make the robot look like its raising and lowering its arms with each click.
Variation on the sizes of the head, antenna, ears, and location of the arms.


My process included a lot of trial and error. Initially, I wanted the arms of the robot to translate upwards, making it look like it was waving its arms like a “hurrah!”, but eventually I came up with a code with slight changes to the image itself, making the robot look like it’s shrugging instead.

egrady-project02-variableface

sketch

//Ean Grady
//Section B
//egrady@andrew.cmu.edu
//project-02

var mouth = 25;
var nose = 250;
var eyes = 25;
var eyes2 = 25;
var faceHeight = 150;
var faceWidth = 400;
var x = 0
var y = 0
var z = 0
var x2 = 0
var y2 = 0
var z2 = 0

function setup() {
    createCanvas(640, 480);
}

function draw() {
    background (120, 200, 400);

    //hair
    fill (x, y, z)
    triangle(250, 190, 225, 190, 220, 120)
    triangle(250, 192, 275, 190, 260, 100)
    triangle(275, 190, 300, 190, 300, 120)

    //face
    fill (255, 255, 255)
    stroke (0, 0, 0)
    ellipse (300, 225, faceWidth, faceHeight)

    //eyes
    fill (255, 255, 255)
    stroke (0, 0, 0)
    ellipse (170, 220, eyes*4, eyes*2)
    ellipse (420, 220, eyes*4, eyes*2)
    fill (x2, y, z)
    ellipse (170, 220, eyes2, eyes)
    ellipse (420, 220, eyes2, eyes)

    //nose
    line (nose, 180, 330, 240)
    line (nose, 220, 330, 240)

    //mouth 
    fill (0, 0, 0)
    ellipse (300, 260, 50, mouth)
}

function mousePressed() {
    faceWidth = random(350, 450);
    faceHeight = random(100, 200);
    eyes = random(20, 30);
    nose = random(240, 260);
    mouth = random(10, 40);
    eyes2 = random(20, 70);
    x = random (0, 255);
    y = random (0, 255);
    z = random (0, 255);
}

I found that with this project I had a much easier time setting everything up, and I feel as though I’m finally starting to get the hang of things. I still had a hard time attempting to make the face look more visually pleasing/aesthetic, but I am not mad with the results. Hopefully in future projects I will be able to produce a piece that is both functional (i.e. fulfills the requirements) and visually pleasing.

The design for the face came from a drawing I used to do a lot as a kid whenever I had a sketchbook. It’s pretty simplistic, but I thought that it could fit the goals of the project.

nahyunk1-Project-02-Variable-Face

sketch-124.js

  var eyeSize = 10;
  var faceWidth = 350;
  var faceHeight = 370;
  var red = 255;
  var green = 255;
  var blue = 255;

  function setup() {
      createCanvas(640, 480);
  }

  function draw() {
      background(red, green, blue);
      noStroke();
      smooth();
      //watermelon skin
      fill("green");
      arc(320, 240, faceWidth,  faceHeight, 0, PI, CHORD);
      //watermelon fruit inside
      fill("red");
      arc(320, 240, faceWidth-20, faceHeight-30, 0, PI, CHORD);
      //watermelon smiley mouth
      fill("orange");
      arc(320, 270, eyeSize, eyeSize, 0, PI, CHORD);
      //eyesizes&color
      var eyeLX = 640 / 2 - 20;
      var eyeRX = 640 / 2 + 20;
      fill("black");
      ellipse(eyeLX, 320-50, eyeSize, eyeSize);
      ellipse(eyeRX, 320-50, eyeSize, eyeSize);
  }

  function mousePressed() {
      faceWidth = random(100, 400);
      faceHeight = random(100, 350);
      eyeLX = random(250, 300);
      eyeRX = random(340, 370);
      eyeSize = random (10, 25);
      red = random (0, 255);
      green = random (0, 255);
      blue = random(0, 255);
  }

I really hoped to be able to change the color of the background while trying to make my slice of watermelon character. I made the character with arcs and ellipses.

hschung-Project-02

sketch

//Heidi Chung
//Section A
//hschung@andrew.cmu.edu
//Project-02: Variable Faces; Face Variables
var eyeWidth = 22;
var eyeHeight = 22;
var mouthSize = 40;

var cheekR = 234;
var cheekG = 175;
var cheekB = 152;
var cheekWidth = 60;
var cheekHeight = 60;

var hairR = 76;
var hairG = 54;
var hairB = 36;

var eyebrowWidth = 40;
var eyebrowHeight = 10;
//var leftBrowX = 253;
var BrowY = 210;
//var rightBrowX = 347;
var BrowY = 210;

function setup() {
	 createCanvas(640,480);
	 background(145, 193, 191);

	 noStroke();
	}

function draw() {
	 fill(hairR-30, hairG-30, hairB-50); //background hair //fill(31, 34, 13);
	 quad(200, 195,  400, 185,  425, 375,  180, 375);

	 fill(234, 178, 117); //neck
	 rect(263, 380, 78, 78);

	 fill(235, 207, 155); //face
	 ellipse(300, 260, 210, 260);

	 fill(200, 125, 95); //mouth
	 ellipse(600/2, 600/2 +10, 60, mouthSize);

	 fill(235, 207, 155);//eclipse over mouth
	 rect(600/2 -40, 600/2 -75, 70, 85);


	 fill(cheekR, cheekG, cheekB); //left blush //fill(234, 175, 152);
	 ellipse(235, 265, cheekWidth, cheekHeight); //ellipse(235, 265, 60, 60);

	 fill(cheekR, cheekG, cheekB); //right blush
	 ellipse(365, 265, cheekWidth, cheekHeight);

	  fill(61, 44, 23); //left eye
	 ellipse(250, 240, eyeWidth, eyeHeight);

	 fill(61, 44, 23); //right eye
	 ellipse(350, 240, eyeWidth, eyeHeight);

	 fill(hairR-20, hairG-10, hairB-20); //left eyebrow // ellipse(253, 210, 40, 10)
	 ellipse(253, BrowY, eyebrowWidth, eyebrowHeight); //ellipse(253, 210, width, height)

	  fill(hairR-20, hairG-10, hairB-20); //right eyebrow
	 ellipse(347, BrowY, eyebrowWidth, eyebrowHeight); //ellipse(347, 210, width, height)


	 fill(234, 178, 117); //nose
	 triangle(300, 267, 320, 290, 280, 290);

	 fill(hairR, hairG, hairB); //more hair// fill(76, 54, 36);
	 quad(222, 159,  345, 129,  420, 220,  391, 230);

	 fill(hairR, hairG, hairB); //more hair
	 quad(371, 398,  391, 228,  421, 219,  433, 340);

	 fill(hairR, hairG, hairB); //more hair
	 quad(215, 156,  183, 234,  206, 245,  247, 163);

	 fill(hairR, hairG, hairB); //more hair
	 quad(183, 234,  174, 345,  237, 400,  207, 244);

	 fill(hairR, hairG, hairB); // top part of hair
	 quad(216, 157,  275, 123,  377, 132,  420, 219);

	 fill(hairR, hairG, hairB);
	 triangle(183, 235,  207, 149,  275, 122);
	}
function mousePressed() {
	eyeWidth = random(20, 35);
	eyeHeight = random(15, 35);
	mouthSize = random(10, 85);
	cheekR = random(234, 274);
	cheekG = random(175, 195);
	cheekB = random(152, 172);
	hairR = random(50, 100);
	hairG = random(54, 80);
	hairB = random(36, 70);
	eyebrowWidth = random(35, 50);
	eyebrowHeight = random(10, 20);
	cheekWidth = random(50, 75);
	cheekHeight = random(50, 75);
	BrowY = random(210, 223);
	//leftBrowX = random (253, 263);
	//rightBrowX = random (347, 357);
	

}

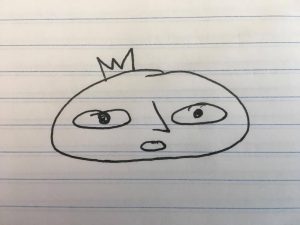
I used my previous face from the self-portrait as a base. I did a sketch in Illustrator for that face to give me direction as I drew it in code.

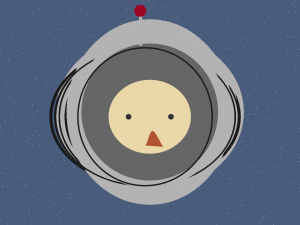
It took me a couple times to get used to manipulating the different values as variables, but once I got the hang of a few variables, it was easier for me to think of other values to turn into variables. Rather than make completely different faces, I made my program create mildly different versions of my self portrait. If I changed the hair too, it’d be drastically different, but I like it this way.

ljkim – project 02

sketch

/*Lois Kim
Section A
ljkim@andrew.cmu.edu
Project-02*/

var helmetWidth = 323;
var helmetHeight = 323;
var shieldWidth = 275;
var shieldHeight = 275;
var shieldOHeight = 275;
var shieldOWidth = 275;
var faceWidth =  178;
var faceHeight = 183;

//stars in sky
var star = {
  x: 100,
  y: 50
}

//color of stars
var col = {
  r: 255,
  g: 255,
  b: 255
}

function setup() {
  createCanvas(640,480);
}

function draw() {
  //background color
  background("#495C7C");
  
  //random stars in background
  star.x = random(0,width);
  star.y = random(0,height);
  fill(col.r, col.g, col.b);
  noStroke();
  ellipse(star.x, star.y, 1, 1);
  
  //helmet
  fill("#B3B3B3");
  noStroke();
  ellipse(320, 240, helmetWidth, helmetHeight);
  
  //shield
  fill("#666666");
  noStroke();
  ellipse(320, 240, shieldWidth, shieldHeight);
  
  //shield outline
  stroke("#1A1A1A");
  strokeWeight(3);
  noFill();
  ellipse(310, 250,shieldOHeight, shieldOWidth);
  
  //antenna stick
  fill("#B3B3B3");
  noStroke();
  rect(297, 29, 7, 70);
  
  //antenna circle
  fill("#9E0421");
  noStroke();
  ellipse(300,25,25,25);
  
  //face
  fill("#EAD8A9");
  noStroke();
  ellipse(320, 250, faceWidth, faceHeight);
  
  //left eye
  fill("#333333");
  noStroke();
  ellipse(365,250,12,12);
  //right eye
  fill("#333333");
  noStroke();
  ellipse(275,250,12,12);
  
  //mouth
  fill("#B2542F");
  beginShape();
  curveVertex(292, 303);
  curveVertex(310, 311);
  curveVertex(326, 280);
  curveVertex(349, 314);
  curveVertex(356, 308);
  endShape();
  
}

function mousePressed() {
  helmetWidth = random (200, 400);
  helmetHeight = random (310, 400);
  shieldWidth = random (300, 290);
  shieldHeight = random (350, 240);
  shieldOHeight = random (200, 430);
  shieldOWidth = random (290, 300);
  faceWidth = random (150, 200);
  faceHeight = random (100, 200);
}

I wanted to do an astronaut as my project this week. I attempted to add a stars generator in the background (as seen in my code) – however it would not allow my random generator for the face to start fresh. It would over draw what was existing before. Although I had fixed that issue – the star generator had disappeared. This is what it looked like with the stars:

Before I begin any project I always start in adobe illustrator and this always helps visualize projects.

TSWARSTA- Section A- Project-02-Variable-Face

swarstad-face-sketch

// Treat Swarstad
// 15-104 A
//tswarsta@andrew.cmu.edu
//Project 02 -Variable -Face

var eyeSize = 100;
var faceWidth = 350;
var faceHeight = 350;
var mouthsize=100;
var cheek=50;

 
function setup() {
    createCanvas(640, 480);
}
 
function draw() {
	noStroke();
    background(0,255,255);
    fill(255,224,189);
    ellipse(width / 2, height / 2, faceWidth,  faceHeight);
    var eyeLX = width / 2 - faceWidth * 0.25;
    var eyeRX = width / 2 + faceWidth * 0.25;
    fill(250,128,114);
    var cheekY = height/2 + faceHeight/6; //so cheeks will not appear outside of the face
    ellipse(eyeLX, cheekY, cheek, cheek);
    ellipse(eyeRX, cheekY, cheek, cheek);
    fill(255,255,255);
    ellipse(eyeLX, height / 2, eyeSize, eyeSize);
    ellipse(eyeRX, height / 2, eyeSize, eyeSize);
    fill(0,0,255);
    ellipse(eyeLX, height / 2, eyeSize/2, eyeSize/2);
    ellipse(eyeRX, height / 2, eyeSize/2, eyeSize/2);
    fill(0,0,0);
    ellipse(eyeLX, height / 2, eyeSize/4, eyeSize/4);
    ellipse(eyeRX, height / 2, eyeSize/4, eyeSize/4);
    fill(255,0,0);
    var mouthY = height/2+faceHeight*0.25; // so mouth will appear within the face
    ellipse(width/2, mouthY, mouthsize/2, mouthsize/2);
    fill(0,0,0);
    ellipse(width/2, mouthY, mouthsize/3, mouthsize/3);
    fill(0,255,0);


}
 
function mousePressed() {
    faceWidth = random(50, 500);
    faceHeight = random(50, 500);
    eyeSize = random(10, 120);
    mouthsize = random(50,150);
    cheek = random(25,75);
    clear();
}

BrandonHyun-Project-02-Variable Face

bhyun1-project02.js

//brandonhyun
// 15-104 Section B
//bhyun1@andrew.cmu.edu
//project-02

var eyeSize = 50;
var noseSize = 50;
var faceWidth = 300;
var faceHeight = 300;
var eyebrowslength = 180;


function setup() {
    createCanvas(640, 480);
    background(220);
}

function draw() {
//ears
  strokeWeight(5);
  //left Ear
  fill(219,153,52);
  ellipse(width/2.7 ,height/4.8 ,50,50);
  //RightEar
  fill(219,153,52);
  ellipse(width/2.7 + 170 , height/4.8 ,50,50);


//Shape of a face
  stroke(0);
  fill(219,153,52);
  ellipse(width/2,height/2,faceWidth,faceHeight);

  var eyeLX = width / 2 - faceWidth * 0.2;
  var eyeRX = width / 2 + faceWidth * 0.2;

//eye
  fill(0);
  ellipse(eyeLX,height/2.3,eyeSize/3,eyeSize/3);
  ellipse(eyeRX,height/2.3,eyeSize/3,eyeSize/3);
//eyebrows
fill(0);
strokeWeight(5);
strokeCap(ROUND);
line(eyeLX-30,eyebrowslength, eyeLX+30,eyebrowslength);
line(eyeRX-30,eyebrowslength, eyeRX+30,eyebrowslength);

//nose
fill(0);
ellipse(width/2,height/2 + 10,noseSize/3,noseSize/3);
fill(255);
noStroke();
ellipse(width/2 - 10,height/2 + 20,noseSize/2,noseSize/2);
fill(255);
noStroke();
ellipse(width/2 + 10,height/2 + 20,noseSize/2,noseSize/2);
}


function mousePressed() {

  eyebrowslength = random (100,200);
  eyeSize = random(10, 100);
  noseSize = random(10,50);

}

I was interested with the Character named Ryan from Kakao Talk, which is a messaging platform in South Korea. Everyone is obsessed with this character and this character became one of the icons for the Kakao co.

When I was working I wanted to recreate the character by myself by using codes and I also wanted to have some movements when the user is clicking.

Components that moves when there is a click are the eyebrows, eyes, and the nose. By having this movement it seems like Ryan is expressing different emotions.