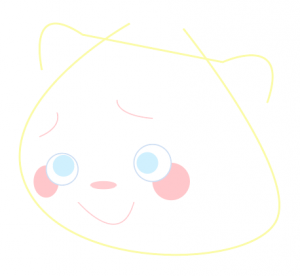
aranders-project-02

aranders-project-02

//Anna Anderson
//Section D
//aranders@andrew.cmu.edu
//project-02

var mouth = 15;
var nose = 10;
var eyes = 25;
var brows = 10;
var faceHeight = 230;
var faceWidth = 200;

function setup() {
  createCanvas(640, 480);
}

function draw() {
  background(130, 211, 168);

  //face
  fill(249, 231, 126);
  ellipse(320, 240, faceWidth, faceHeight);

  //mouth
  fill(240, 125, 140);
  ellipse(320, 315, mouth * 2, mouth)
  noFill();
  beginShape();
  curveVertex(280, 290);
  curveVertex(300, 309);
  curveVertex(320, 316);
  curveVertex(340, 309);
  curveVertex(360, 290);
  endShape();

  //nose
  fill(250);
  triangle(315 - nose, 270, 320, 250 + nose, 325 + nose, 270);

  //eyes
  fill(0);
  ellipse(275, 230, eyes, eyes * 1.5);
  fill(0);
  ellipse(365, 230, eyes, eyes * 1.5);

  //brows
  line(260 - brows, 180 + brows, 290, 180);
  line(350, 180, 400 - brows, 180 + brows);
}

function mousePressed() {

  mouth = random(5, 20);
  nose = random(5, 20);
  eyes = random(15, 35);
  brows = random(5, 20);
  faceHeight = random(220, 300);
  faceWidth = random(190, 250);
}

I really enjoyed creating this interactive face! I made many dumb errors in the course of creating it, but eventually it came together.

katieche – project 02 variable face

katieche-02

// Katie Chen
// 9:30 AM Class
// katieche@andrew.cmu.edu
// Assignment-02

var eyeSize = 20;
var earWidth = 50;
var earHeight = 55;
var headHeight = 200;
var headWidth = 220;
var ewSize = 30;
var cSize = 25;
var ccSize = 25;
var x = 6;
var y = 4;
var v = 6;
var z = 5;

 
function setup() {
    createCanvas(480, 640);
}
 
function draw() {
    background(207, 228, 247);

    // head
    strokeWeight(0);
    stroke(250);
    strokeCap(ROUND);
    fill (250);
    beginShape();
    	// top right
		curveVertex(headWidth/2, headHeight);
		// top left
		curveVertex(headWidth*2, headHeight);
		// bottom right
		curveVertex(headWidth*2, headHeight*2);
		// bottom left 
		curveVertex(headWidth/2, headHeight*2);
	endShape(CLOSE);

	// ears
    fill (250);
    var earL = width / 2 - headWidth * 0.25;
    var earR = width / 2 + headWidth * 0.25;
    ellipse(earL, headHeight, earWidth, earHeight);
    ellipse(earR, headHeight, earWidth, earHeight);

    // cheeks
    fill (255, 221, 211);
    noStroke();
    var cL = width / 2 - headWidth * 0.25 - 10;
    var cR = width / 2 + headWidth * 0.25 + 10;
    var dist = 25
    ellipse(cL, height / 2 + dist, cSize, cSize);
    ellipse(cR, height / 2 + dist, ccSize, ccSize);
    
    // eyes
    fill (250);
    strokeWeight(1);
    stroke (0);
    var ewL = width / 2 - headWidth * 0.25;
    var ewR = width / 2 + headWidth * 0.25;
    ellipse(ewL, height / 2, ewSize, ewSize);
    ellipse(ewR, height / 2, ewSize, ewSize);
    fill (0);
    var eL = width / 2 - headWidth * 0.25;
    var eR = width / 2 + headWidth * 0.25;
    ellipse(eL, height / 2, eyeSize, eyeSize);
    ellipse(eR, height / 2, eyeSize, eyeSize);

    // left eyebrow
    stroke (0);
    strokeWeight(y);
	strokeCap(ROUND);
    line(eL - 7, 290+x, eL +7, 290+y);

	// right eyebrow
    strokeWeight(y);
	strokeCap(ROUND);
    line (eR - 7, 290+v, eR +7, 290+z);


}
 
function mousePressed() {
    headWidth = random(150, 250);
    headHeight = random(200, 300);
    eyeSize = random(10, 30);
    cSize = random(20, 40);
    ewSize = random(20, 40);
    earWidth = random(15, 75);
    earHeight = random(55, 120);
    dist = random(20, 30);
    ccSize = random(20, 40);
    x = random(0, 10);
    y = random(0, 10);
    v = random(0, 10);
    z = random(0, 10);
}

I started the project with the template and shapes that I felt more comfortable playing around with (ellipses, lines, rectangles, etc.), before trying new shapes. For me, the body was the hardest to construct since I tried curveVertex(); for the first time, and even now, it doesn’t necessarily look the way I intended it to (it kind of just looks like a marshmallow now which I guess I’m also okay with). A lot of my project did come from happy accidents (i.e I was trying to make cheeks but ended up making ears, etc.) which I thought was fun, but it’d also be neat to eventually be confident enough in coding that I can actually make what I intend to make.

In terms of planning, I didn’t do anything much last project so I decided I’d try to make something in illustrator first (as seen below) this time and then recreate it with code. Unfortunately after a string of accidental shapes and still not being able to understand how to make curves, I ended up just kind of making everything on a whim for my final!

juyeonk-Looking Outwards-02

Creator: Julius Popp
Title: Bit.Flow
Year of Creation: 2008
Link to the project: https://collabcubed.com/2012/01/09/julius-popp-bit-fall-bit-code-bit-flow/

Julius Popp’s Bit.Flow is an installation where a machine pumps a small amount of liquids into a 45-m long, intertwined tube with specific time intervals. At first, the manner in which these liquids are pumped seem disorderly and chaotic, but at some point, these small pumps of liquid at different parts of the tube line up in an orderly fashion to form a certain letter. The letter then quickly disintegrates back into a chaos until another letter pops up among the seemingly random movements of the liquids.

There are multiple variations to this project: it could be hung from the wall as well as laid on the floor. Different colors of the liquid and shapes of the tube could be used.

The part that intrigued me the most was how computer generated programs were used to not only to pump the liquid at a very precise time intervals that enabled the letters to pop up at a certain time and place but also to reenact the random motions that seem to be able to exist only in the non-digital realm. In general, I enjoyed the little discoveries of order among the chaotic movements of the liquids. It seemed magical that these letters were popping out of nowhere without any patterns or warnings.

My guess is that an algorithm is set up to control the time at which the machine pumps out the liquids. These time intervals probably vary from a project to project according to the shape and the length of the tube.

Along with his other well-known project, Bit.Fall, Bit.Flow is supposed to represent how quickly the things that are important to us change, and how fast the things that were important to us become meaningless. According to Popp, these works symbolize the personhood that “changes permanently” as well as the cultures that is “changing the whole time”.

Image result for julius popp bit flow


ghou-lookingoutwards-02

Nervous System

The generative design studio, Nervous System, is founded by Jessica Rosenkrantz and Jesse Louis Rosenberg. They create art, jewelry, decorations and usable houseware using computer simulation and digital fabrication. Rosenkrantz studied architecture at Harvard Graduate school, I recognize architectural elements and find it very inspiring that she utilized many of the techniques and study of space into her jewelry and the design of smaller everyday items. In the Nervous System Mission Statement, they say: “Our inspirations are grounded in the natural forms and corresponding processes which construct the world around us.” In their work they draw geometries found in nature and evolve those forms into physical, interactive pieces.

Hyphae Zoetrope Project (2014)

This is one of the projects Nervous System has created. This project is nylon 3D printed by Selective Laser Sintering, MDF, electronics, and LEDs. This is created by an algorithm that follows the geometries of leaves. These leaves are attached to a central point and follows the progression of leaves growing as it spins.

dnoh-sectionD-lookingoutwards-02

artist: ralf baecker
website: www.rlfbckr.org
title: random access memory
2016

Turmite algorithm (based on a two dimensional operating system)

Random Access Memory is based on a binary system where the robot tries to fill up the system with as many “1”s as possible without overloading the system (1, being stone). These sand grains are placed in algorithmic placements as to create a sense of controlled randomness. It interests me to see the joining of simplicity and complexity through this project. The sand placement system is a fairly simple algorithm, however the result of the simple function is a complex grouping of grains spread out neatly in a disc formation that is ever-changing.

The artist, Ralf Baecker, is an artist that works to connect and intersect art, science, and technology. Through his works we are able to see both a technological aspect that shows the advancement of humanity, as well as traditional notions that keep us in touch with our history. In Random Access Memory, there is a mix of the two timelines which, I believe, brings us to ponder about how we should we advancing as people.

Jihee Kim (Section D)– Looking Outwards 02

The Digital Grotesque II

Digital Grotesque II – Grotto Fragments from Digital Grotesque on Vimeo.

Digital Grotesque II is a 3D printed grotto that was assembled in 2017, after about 2 years of designing and printing individual parts. The algorithmic architectural structure created by the architect Michael Hansmeyer is known for its intricate details and plethora of geometries that form the architecture. The project is a phenomenal piece that through its complexity captivates the viewer and bestows an unparalleled experience. The project is made of 7 tons of 3D printed sandstone. For its size, it is usual for such projects to be dull and rather lofty, but Digital Grotesque II defeats such a common notion with its details completely generated by computational design and algorithms.

The 3D Printed Details in the Columns

From the most minute details to the whole form are entirely made through algorithms in the Digital Grotesque. Although the specific divisional ratios are not specified, the project was generated through subdivisions. As you can see in the video directly below, different division ratios allow for nearly infinite possibilities, hence the dynamic, mind-blowing design of the project. Although the algorithms are surely organized and planned, the endless variations bestow an element of “randomness”.

Hansmeyer’s computational architecture is deeply rooted in perspectives and perceptions. The specific, single divisional algorithm that he uses reflects these concentrations. The algorithm creates interesting, engaging topographies that are subject to interpretation by the users. The method itself does not involve randomness, but the output does, so the author of the project is anticipating the public to be able to physically experience his work and add their personal thoughts. This trend is also parallel to the continuity of Digital Grotesque II. Even the smallest details acknowledgeable and are part of the whole enclosure and form the experience of the project’s users.

The Digital Grotesque II definitely explores the potential in computational architecture and defies the notion that technology is not advanced enough to articulate intricate details. In fact, the specific project clearly shows how algorithms and 3D printing skills can actually produce details that traditional methods could not while maintaining quality and high resolution.

More information on the Digital Grotesque II can be found on its website:

Home

Additionally, more information on Michael Hansmeyer’s computational architecture can be found on his website:

http://www.michael-hansmeyer.com/

Looking Outwards 02

http://roberthodgin.com/portfolio/work/additionsubtraction/

“Addition/Subtraction”, Robert Hodgin, C++, 2010

There is a flow field simulation, “Addition/ Subtraction”, by Robert Hodgin in 2010, that attracts me a lot when I was browsing many generative artwork. Compared to other programing art that I have looked at, Robert Hodgin’s works are the most artistics and aesthetics. Actually, the title and the image drew my attention towards it at first. When I also saw the image of the artwork, I kind of feel the addition and subtraction in it. Then, I looked into the explanation that describes the artwork. The idea that this flow field simulation is generated from C++ vectors and lists surprised me because at the first sight, I can’t figure out how to do such a digital art. Also, the amount of work made me admire me a lot. “It involves 20,000 particles which react to external forces and can be reborn locally if they should happen to stray too far”. So, if the programmer gives it an attractive force (gravity), those particles will be pulled together. If the programmer gives it a repulsive force, those particles will, on the other hand, be pushed away in the rotating motion, either clockwise or counterclockwise. The idea of using the beauty of force to create the feeling of addition and subtraction really gives meaning to this work, making it not only a program but an artwork.

jknip-SectionA-LookingOutwards-02

Tangent

“Tangent” by Marcin Ignac (2012)

Marcin Ignac is a polish artist/programmer/designer exploring hybrid work including data visualization, programmable art, and more. Tangent is a form of generative animation created from studying surface curvature, where tracing lines are programmed to appear across the surface of a generated shape. I really enjoy this project as the tracing lines are able to give a sense of dimension and life to these otherwise seemingly flat, line drawings. As the form rotates in his video documentation, we begin to understand the flow of the curvatures at different perspectives — these intricate details are really engaging to watch. Tangent was created using Javascript, Plask, OpenGL and glsl. Ignac heavily utilized Plask, a multimedia programming environment utilizing processing and open frameworks, through Javascript. His artistic sensibilities were integrated in the algorithm through choice of color, composition, line weight, and motion; which work cohesively to create delicate, rotating 3D forms.

http://variable.io/tangent/
http://marcinignac.com/projects/tangent/
http://marcinignac.com/blog/data-art-with-plask-and-webgl/

ENwandu-Section D-Looking Outwards-02


3D Visualization of ‘Mydoom Worm’

‘Malwarez’ is a series of visualizations of worms, viruses, trojans and spyware code. The project is made possible through the development of a program by Alex Dragulescu, which allows him to track the API calls, memory addresses and other subroutines of the disassembled code. The program analyzes the disassembled code; mapping their frequency, grouping and density input into the algorithm, which then grows these virtual 3D organisms. My understanding of the algorithm is limited, but I think the patterns and rhythms recorded are what influence the organism, making each one unique. I truly admire the creativity behind such a project: Who thinks of  modelling a computer virus in 3D, and actually does it? Additionally, his projects are a true integration of art and technology, and in some ways, moves past that. The Malwarez project, in the most literal sense reveals the artistic potential of technology. The project is admirable because it kind of forces the audience to move past the ideology focusing on the ‘art of technology’ into the realm of technology as art, and vice versa.

His projects span multiple computational domains, so I suppose the algorithms involve mimic the complexity of the work he is doing as a designer, programmer, and visual artist. Malwarez gives these invisible coded threats a face, while also providing captivating visuals for things no one wants to deal with.

mecha-project02-variable-face

sketch

//eyes
var eyeSize = 12;
var eyeAdd1 = 10;
var eyeAdd2 = 30;
var eyeAdd3 = 20;
var eyeAdd4 = 30;

//face
var faceWidth = 130;
var faceHeight = 150;
var roundX1 = 20;
var roundX2 = 20;
var roundY1 = 20;
var roundY2 = 20;

//mouth
var roundXX1 = 10;
var roundXX2 = 10;
var roundYY1 = 10;
var roundYY2 = 10;
var mouthWidth = 30;
var mouthHeight = 18;
var mouthX = 34;

//color
var colorR = 60;
var colorG = 200;
var colorB = 10;
var colorPr = 250;
var colorPg = 122;
var colorPb = 129;
var colorLr = 250;
var colorLg = 220;
var colorLb = 220;
var colorBr = 10;
var colorBg = 10;
var colorBb = 200;

//eyebrows
var browWidth = 10;
var browHeight = 10;

//nose
var noseHeight = 12;
var noseWidth = 6;

//hair
var hairX = 300;
var hairY = 190;
var hairWidth = 60;
var hairHeight = 30;

//eyebrows
var arcA = 0;
var arcB = 0;
var arcC = 0;
var arcD = 0;

function setup() {
    createCanvas(640,480);
    angleMode(degrees);
    textSize(12);
}

function draw() {
    background(255);
    //face
    noStroke();
    fill(colorLr,colorLg,colorLb);
    strokeWeight(3);
    rect(280,200, faceWidth, faceHeight,roundX1, roundX2, roundY1, roundY2);

    //eyes
    noStroke();
    fill(colorG+50,colorB+60,colorR);
    var eyeLX = width / 2 - faceWidth * 0.25;
    var eyeRX = width / 2 + faceWidth * 0.25;
    ellipse(eyeLX+eyeAdd1, height / 2+eyeAdd2, eyeSize, eyeSize);
    ellipse(eyeRX+eyeAdd3, height / 2+eyeAdd4, eyeSize, eyeSize);

    //text bubble
    fill(colorLr,colorLg-40,colorLb-30);
    strokeWeight(1.5);
    noStroke();
    rect(147,280,104,40,30,30,0,30);
    triangle(220,290,200,320,260,320);
    
    //text
    noStroke();
    fill(255);
    text("w o w z a ! !",168,293,400,400);

    //nose
    fill(colorPr, colorPb, colorPg);
    rect(((eyeLX+eyeRX)/2),height/2+eyeAdd2,noseWidth,noseHeight,40);

    //hair
    noStroke();
    fill(colorG+50,colorB+60,colorR);
    rect(hairX,hairY,hairWidth,hairHeight,200);

    //eyebrows
    noFill();
    strokeWeight(2);
    stroke(colorG+50,colorB+60,colorR);
    arc(eyeLX,height/2,40,40,PI+3.4-arcA,HALF_PI+arcB,OPEN);
    arc(eyeRX+6,height/2,40,40,HALF_PI-0.4-arcC,HALF_PI+0.6+arcD,OPEN);

    //blush
    fill(colorLr,colorLg-40,colorLb-30);
    noStroke();
    rect(eyeLX+eyeAdd1-10,height/2+eyeAdd2+12, 20,14,80)
    rect(eyeRX+eyeAdd3-10,height/2+eyeAdd4+12, 20,14,80)

    //mouth
    strokeWeight(3);
    stroke(colorPr, colorPb, colorPg);
    fill(255);
    rect(280+mouthX,height/2+eyeAdd2+20, mouthWidth, mouthHeight+random(0,10),roundXX1, roundXX2, roundYY1, roundYY2);

}

function mousePressed() {
    // when the user clicks, these variables are reassigned
    // to random values within specified ranges. For example,
    // 'faceWidth' gets a random value between 75 and 150.
    faceWidth = random(130, 150);
    faceHeight = random(150, 200);
    eyeSize = random(12, 15);
    roundX1 = random(10,70);
    roundX2 = random(10,70);
    roundY1 = random(10,70);
    roundY2 = random(10,70);
    colorR = random(10,80);
    colorG = random(100,230);
    colorB = random(10,80);
    eyeAdd1 = random(0,20);
    eyeAdd2 = random(30,70);
    eyeAdd3 = random(0,20);
    eyeAdd4 = random(30,70);
    roundXX1 = random(1,9);
    roundXX2 = random(1,9);
    roundYY1 = random(1,9);
    roundYY2 = random(1,9);
    mouthHeight = random(20,50);
    mouthWidth = random(20,50);
    mouthX = random(20,30);
    colorPr = random(200,255);
    colorPg = random(100,150);
    colorPb = random(100,150);
    colorLr = random(270,255);
    colorLg = random(220,255);
    colorLg = random(220,255);
    noseWidth = random(4,10);
    noseHeight = random(9,14);
    hairWidth = random(30,100);
    hairHeight = random(20,50);
    hairX = random(300,320);
    arcA = random(0,0.4);
    arcB = random(0,0.4);
    arcC = random(0,0.4);
    arcD = random(0,0.4);
    colorBr = random(0,140);
    colorBg = random(0,40);
    colorBb = random(200,255);
}

My process in completing this project was similar to the last one in that I worked trial and error through all of the elements of the face–starting with a base shape and going on to the eyes, mouth, nose, etc. As an attempt to stay consistent with the style of the face I created for the previous project, I decided generate faces with a similar worried expression. Rather than have my code be completely randomized, I set a lot of limitations to the range of values so as to be able to be able to have more control over the random nature of the project.

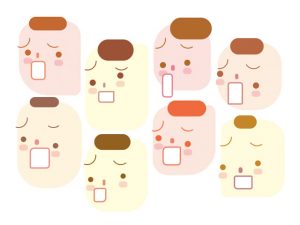
In the end, I focused most on creating a good color scheme in which all of the facial elements would go well together. I had a lot of trouble with this given the amount of randomization in my code. In order to achieve the color scheme that I liked, I altered the range of numbers for the R, G, and B values. I focused on having more warm pastel tones in my project so that the faces I generated would be aesthetically pleasing in a series.