jiaxinw-sectionB-Project 4-String Art

sketch

function setup() {
    createCanvas(300, 400);
    background(20);

    //left white crossed lines
    stroke(255);
    var yl = height/4*3;
    var ym1 = height/8*5;

    for(var i=0; i < 15; i++){
        line(0, yl, width/2, ym1);
        yl *=0.97;
        ym1 *= 1.02+mouseX;
    };

    //right white crossed lines
    var yr = height/4*3;
    var ym2 = height/8*5;

    for(var i=0; i < 15; i++){
        line(width, yr, width/2, ym2);
        yr *=0.97;
        ym2 *= 1.02;
    };


    //left top lines 
    var x1 = 0;
    var y1 = height/2;

    for (var i=0; i < 15; i++){
        stroke(251,63,65);
        line(x1, 0, 0, y1);
        x1 += 15;
        y1 -= 10;
    };

    // right top lines 
    var x2 = width;
    var y2 = height/2

    for (var i=0; i < 15; i++){
        stroke(18,187,255);
        line(x2, 0, width, y2)
        x2 -= 15;
        y2 -= 10;
    };

    // right bottom lines
    var x3 = width;
    var y3 = height/2;

    for(var i=0; i < 15; i++){
        stroke(255, 242, 0);
        line(x3, height, width, y3)
        x3 -= 15;
        y3 += 10;
    };

    // left bottom lines
    var x4 = 0;
    var y4 = height/2;

    for(var i=0; i < 15; i++){
        stroke(0,255,217);
        line(x4, height, 0, y4);
        x4 += 15;
        y4 += 10;
    }

    //upper left grey crossed triangle
    var x5 = width/4;
    var y5 = height/2;

    stroke(100);
    line(x5, y5, width/2, y5)
    line(x5, y5, x5+(width/2-x5)/2, y5- sqrt(3)/2*(width/2-x5));
    
    for(var i=0; i < 8; i++){
        line(x5+5, y5, width/4+(width/2-x5)/2, y5- sqrt(3)/2*(width/2-x5));
        x5 += 10;
    }

    //upper purple triangle
    var x6 = width/4*3;
    var y6 = height/2;

    line(width/2, y6, x6, y6)
    line(x6, y6, width/4+(width/4)/2, y5- sqrt(3)/2*width/4);

    for(var i=0; i < 8; i++){
        line(x6-5, y6, width/4+(width/4)/2, y5- sqrt(3)/2*width/4);
        x6 -= 10;
    }

    //lower purple triangle
    var x7 = width/4;
    var y7 = height/2;

    stroke(156,0,255);

    for(var i=0; i < 31; i++){
        line (x7, y7, width/2, height/4*3);
        x7 += 5;
    }

    var x8 = width/4;
    var y8 = height/2;

    for(var i=0; i < 31; i++){
        line (x8, y8, width/2, height/4);
        x8 += 5;
    };

    
}

function draw() {
    
}


I tried to create a common usual string art pattern like this at first :

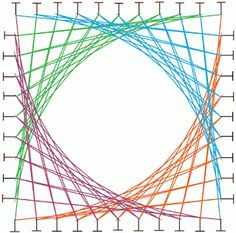
Later, I started to try to create a concrete shape in the middle of my canvas. During this project, I just had fun with combining different sequences of lines.

jamieh-Project-04-String-Art

Clicking the top and bottom grey bars changes the amount of lines and position of the lines.
Clicking the canvas flips the colours of the two different sets of lines.
Moving from quadrant to quadrant changes the line weights.

sketch

/*
Jamie Ho
jamieh@andrew.cmu.edu
10:30
Project 4
*/

var ratio;
var centreX;
var centreY;
var lines;
var t;


function setup() {
    createCanvas(400, 300); 

    ratio = 30;				//changes position of control points
    centreX = width/2;
    centreY = height/2;
    lines = 10;				//changes how how many divisions there are on the curve 
    						//which generates the white and blue lines 
}

function draw() {
	background(0);

	for (var i = 0; i <= lines; i++) {
	  t = i / lines;

	  //curve 1 from top L corner to mouse
	  c1x = curvePoint(mouseX, 0, mouseX, width/ratio*2, t);
	  c1y = curvePoint(mouseY, 0, mouseY, height/ratio*6, t);

	  //curve 2 from bottom L corner to mouse
	  c2x = curvePoint(mouseX, 0, width/ratio*6, width, t);
	  c2y = curvePoint(mouseY, height, mouseY, height/ratio*2, t);

	  //curve 3 from top R corner to mouse
	  c3x = curvePoint(width/ratio*2, width, mouseX, mouseX, t);
	  c3y = curvePoint(mouseY, 0, height/ratio*2, mouseY, t);

	  //curve 4 from bottom R corner to mouse
	  c4x = curvePoint(mouseX, width, width/ratio*6, 0, t);
	  c4y = curvePoint(mouseY, height, mouseY, height/ratio*6, t);

	  strokeWeight(1);
	  if(mouseX < centreX & mouseY < centreY){				//top L
			strokeWeight(0.15);
		} else if(mouseX > centreX & mouseY < centreY){	//top R
		  	strokeWeight(0.60);
		} else if(mouseX < centreX & mouseY > centreY){	//bottom L
		  	strokeWeight(0.30);
		} else {											//bottom R
		  	strokeWeight(0.90);
		}

	  if(mouseIsPressed){
		//white lines become blue
	  	stroke(204, 230, 255);
		  	line(c1x, c1y, c2x, c2y);
			line(c1x, c1y, c3x, c3y);
			line(c1x, c1y, c4x, c4y);
			line(c2x, c2y, c1x, c1y);
			line(c2x, c2y, c3x, c3y);
			line(c2x, c2y, c4x, c4y);
			line(c3x, c3y, c1x, c1y);
			line(c3x, c3y, c2x, c2y);
			line(c3x, c3y, c4x, c4y);

		//blue lines become white
		stroke("WHITE");
		  	line(c1x, c1y, c4y, c4x);
			line(c2x, c2y, c1y, c1x);
			line(c3x, c3y, c2y, c2x);
			line(c4x, c4y, c3y, c3x);

	  } else{
	  	//lines have different grey scales
	  	stroke(75);
			line(c1x, c1y, c2x, c2y);
			line(c1x, c1y, c3x, c3y);
			line(c1x, c1y, c4x, c4y);
		stroke(150);	  
			line(c2x, c2y, c1x, c1y);
			line(c2x, c2y, c3x, c3y);
			line(c2x, c2y, c4x, c4y);
		stroke(255);
			line(c3x, c3y, c1x, c1y);
			line(c3x, c3y, c2x, c2y);
			line(c3x, c3y, c4x, c4y);
		//blue lines
		stroke(0, 119, 230);
		  	line(c1x, c1y, c2y, c2x);
			line(c2x, c2y, c3y, c3x);
			line(c3x, c3y, c4y, c4x);
			line(c4x, c4y, c1y, c1x);
	  }
	}

		//the four rectangles here are for ease of seeing where to mouse click
		noStroke();
		fill(200, 200);
		rect(0, 0, width/2, 20);				
		rect(0, height-20, width/2, 20);		
		
		fill(200, 100);
		rect(width/2, 0, width, 20);
		rect(width/2, height-20, width, 20);

		stroke("RED");
		strokeWeight(1);
		//Up arrow
		line(width/4, 0, width/4, 20);	
		line(width/4-10, 10, width/4, 0);
		line(width/4+10, 10, width/4, 0);
		//Right arrow
		line(width/4*3-10, 10, width/4*3+10, 10);
		line(width/4*3, 0, width/4*3+10, 10);
		line(width/4*3+10, 10, width/4*3, 20);
		
		
		if(mouseIsPressed & mouseY < 20 && mouseX < width/2 && lines < 60){			//if click on top L bar
			lines += 1;																	//amt of lines increases to 59
		} else if(mouseIsPressed & mouseY > 280 && mouseX < width/2 && lines > 1){		//if click on bottom L bar
			lines -= 1;																	//amt of lines decreases to 1
		}

		if(mouseIsPressed & mouseY < 20 && mouseX > width/2){							//if click on top R bar
			ratio -= 1;																	//lines shift right
		} else if(mouseIsPressed & mouseY > 280 && mouseX > width/2){					//if click on bottom R bar
			ratio += 1;																	//lines shift left
		}
}

The hardest part was trying not to repeat code, which I had trouble with in the for loop to achieve the effect of what happens when mouse is pressed.

rsp1-Looking Outwards04

The project that I found this time is called Prismverse.

http://www.creativeapplications.net/openframeworks/prismverse-spatialising-paths-of-light-inside-a-diamond/

Prismverse is an art installation created by XEX for Dr. Jart+. It’s inspiration draws from the light rays that move through a diamond and its reflections that result from the multifaceted faces of the diamond structure. In short, it is inspired by Brilliant Cut, which according to the article linked above, is “a form that produces highest brilliance with maximized light return through its top.” The installation itself consists of a surrounding of complex geometrical tessellated mirror walls that produce visually pleasing reflections on the floor that is made of LED lights itself. It also produces unique omnidirectional sound qualities for the visitor.

With the use of software programs such as C4D, Redshift, Adobe Aftereffect, openFrameworksAbleton Live, Reaktor, Arduino, and Capacitive Sensors, the artists were able to achieve a breathtaking visual. The project itself illustrates an expertly executed installation of technology and art.

I personally liked this project because although it is similar to many other installations such a mirror maze, but it incorporates so many more complex elements, logic, and technology. Instead of a static installation where you see just your reflection, the installation now is something interactive and changeable. I thought it was interesting how the geometries were shaped as well. Its psychedelic qualities make it hard to look away and keep the visual interest of the viewer. I wonder now what the experience would be like to actually be within the installation itself.

Below is a video of the experience by the artists:


Matthew Erlebacher Looking Outward-04

One piece of sound art that I found to be interesting was the Hexome. The device sound beautiful while also looking aesthetically appealing. I think that what sells the look is its hexagonal shape. It is said that hexagons are the shape of nature, (many things in nature come in that for e.g. bee nests and turtle shells) and the shape is used to make this device incredibly attractive. The creator likely encoded each light with specific instructions on how to interact with each other using “if” and “else” statements. I think that the programmer’s creativity was able to manifest in the final project just by how much you can interact with it. The device can even do a small light show making it a highly versatile instrument. It also just looks fun to uses and see how many different combinations of sounds you can come up with.

rsp1-Project04-StringArt-SectionB

sketch

/*Rachel Park
rsp1@andrew.cmu.edu
Section B @ 10:30AM
Project 04: String Art*/


function setup() {
    createCanvas(400,300);
}

function draw() {
  background(100);

  //defines limit to how many lines are drawn
  for (var i = 0; i < 600; i++) {

  //variables determine location of the lines
  var x1 = 0;
  var x2 = i*width/35;
  var y1 = i*height/60;
  var y2 = height;

  strokeWeight(0.5);  //setting thickness of the line

  //red
  stroke(255,0,0);
  line(x1, y1, x2+100, y2);

  //orange
  stroke(255,119,0);
  line(x2, 0, x1, height-y1);

  //yellow
  stroke(247,255,0);
  line(width, height-y1, x2, y2);

  //green
  stroke(3,156,64);
  line(x2, 0, width, y1);

  //purple
  stroke(147,0,192);
  line(width+200, height-200, x2-1000, height);

  //blue
  stroke(49,75,243);
  line(width/2,height/2, x2+width, y1);
  }
}

When the project called for a “string project” I immediately thought of the string art that stands in the Renwick Gallery location in Washington, D.C. I liked how the colors of the rainbow just bleed together seemlessly.

I tried to emulate that style within my project, but with little tweaks to the location of the lines themselves.

dnam-project-04

sketch

//Doo Won Nam
//Section B
//dnam@andrew.cmu.edu
//Project-04

function setup() {
    createCanvas(400, 400);
}

function draw() {
    var unoY = 200; //y for triangle
    var unoX = 20; // x for triangle
    var yin = 37; //y increase
    var xin = 30; //x increase
//setting variables and x and y to change throughout code
    var x1 = 10;
    var y1 = 400;
    var x2 = 400;
    var y2 = 10;
    background(300, 100, 100); //pink
//start loop
    for (var i=0; i <200; i++) {
    strokeWeight(1);
    stroke(191, 50, 80); //dark pink
    line(i, i*10, i*5, 2); //line that goes across canvas

    stroke(mouseX, mouseY, mouseX); //changes color along mouse movement
    line(x1, i * yin, i * mouseX - 50, y1); //mouseX - 50 for increase of size
  	line(x2, i * yin, i * xin, y2);
  	line(xin * i, y1, x2, height - (i * mouseX) - 50);//size increase,right top
  	line(x1, height - (i * yin), i * x1, y2);

    stroke(100, 100, 180);
    line(unoX + 350, unoY, i/2 + 200, 400); //triangle at bottom
    line(200, unoY, i - 200, 0); //triangle at left top
	}
}

I made some of the lines (including the triangle which is just made out of bunch of lines). I changed some of the y increase to mouse commands to add interactions to the project. With the project, I wanted to create something like a light show that would change colors as well.

Matthew Erlebacher Project-04 String Art

Line Art

// Matthew Erlebacher
// Section B
// merlebac@andrew.cmu.edu
// Project-04

function setup() {
    createCanvas(400, 300);
    background(0);

    var verticalY = height
    // Creates variable for verticle lines
    var horizontalX = width
    // Creates variable for horizontal lines
    var graphSpace = 25
    // Creates space for grid lines
    var SpaceX = 10
    // Creates spacing between

    for (var verticleX = 25; // Gives a variable for the x-coordinate of each line
        verticleX <= 375; // Makes the lines stop at the end of the canvas 
        verticleX += graphSpace /* Increases the x-coordinate of each line */) {
        stroke(255);
        line(verticleX, 0, verticleX, verticalY);
    } // Creates white verticle lines across the canvas

    for (var horizontalY = 25; // Gives a variable for the y-coordinate of each line
        horizontalY <= 275; // Makes the lines stop at the end of the canvas
        horizontalY += graphSpace /* Increases the y-coordinate each line */) {
        stroke(255);
        line(0, horizontalY, horizontalX, horizontalY)
    } // Creates white horizontal lines across the canvas

    for (var greenX = 0; // Creates a variable for the green lines
        greenX < width / 2; // Sets a limit on the green lines
        greenX += SpaceX /* Increases the variable greenX */) {
        stroke(0, 255, 0);
        line(greenX /* Varies the first point */, height / 2, width / 2,
            height / 2 - 10 - greenX /* Makes it so the second point increases and is always over the midpoint */);
    } // Creates pattern of green lines

    for (var redX = 0; // Creates a variable for red lines
        redX < width / 2; // Sets a limit on the red lines
        redX += SpaceX /* Increases the variable redX */) {
        stroke(255, 0, 0);
        line(redX /* Varies the first point */, height / 2, width / 2,
            height / 2 + 10 + redX /* Makes it so the second point increases and is always under the midpoint */);
    } // Creates pattern of red lines

    for (var grayX = 400; // Creates a variable for the gray lines
        grayX > width / 2; // Sets a limit on the gray lines
        grayX -= SpaceX /* Decreases the variable grayX */) {
        stroke(125);
        line(grayX /*Varies the first point */, height / 2, width / 2,
            height / 2 + 410 - grayX /* Makes it so the second point increases and is always under the midpoint */);
    }
    
    for (var blueX = 400; // Creates a variable for the blue lines
        blueX > width / 2; // Sets a limit on the blue lines
        blueX -= SpaceX /* Decreases the variable blueX */) {
        stroke(0, 0, 255);
        line(blueX /* Varies the first point */, height / 2, width / 2,
            height / 2 - 410 + blueX /* Makes it so the second point increases and is always over the midpoint */);
    }

}

When I started this assignment I had no idea what to do for this project. However, after I reviewed the lecture notes and looked at some examples on the internet I eventually figured out what I wanted to do. I decided to have the lines create a diamond formation since it seemed visually appealing. I also decided to include grid lines in the background since it made the lines pop more.

rgroves – String Art – Section B

sketch

//Rebecca Groves
//rgroves@andrew.cmu.edu
//Section B
//Project 4 String Art

//sky - position of the ellipses
var x;
var y;

//spacing of the mountains
var m1 = 30;
var m2 = 25;
var m3 = 5; 

//lake spacing
var l = 1;
var k = 1.02; //constant to increase spacing by

//foreground hillsspacing
var f1 = 2;
var f2 = 2.2; 
var a = 260; //top of the back hill
var b = 310; //top of the middle hill
var c = 380; //top of the front hill

function setup() {
    createCanvas(600, 400);
    background(200, 210, 200);
    //sky
    for (var i = 0; i < 5000; i++) {
    	noStroke();
        ellipse(x, y, random(80), random(80));
        x = random(width);
        y = random((2/3) * height);
        if (dist(x, y, 150, 100) < 85) { //make the sky brighter near the sun
        	fill(random(230, 255), random(235, 255), random(225, 240), 75);
        } else {
            fill(random(180, 240), random(180, 255), random(220, 255), 50);
        }
    }
    noLoop(); // turn off looping
    //sun
    fill(255, 245, 180);
    ellipse(150, 100, 20, 20);
}

function draw() {
	//first row of mountains
	for (var i = 0; i < 35; i++) {
		stroke(210, 190, 180);
		strokeWeight(.25);
		line(200, 125, -300 + (i * m1), height);
		line(300, 130, -250 + (i * m1), height);
		line(475, 100, -50 + (i * m1), height);
	}

	//second row of mountains
	for (var i = 0; i < 50; i++) {
		stroke(160, 146, 160);
		strokeWeight(.5);
		line(50, 130, -400 + (i * m2), height);
		line(550, 140, 50 + (i * m2), height);
		line(350, 150, -600 + (i * m2), height);
		line(350, 150, 400 + (i * m2), height);
	}

	//front row of mountains
	for (var i = 0; i < 100; i++) {
		stroke(171 - i , 176 - i, 206 - i); //lighter on the side facing the sun
		strokeWeight(1);
		line(120, 165, -150 + (i * m3), (2/3) * height);
		line(450, 140, 200 + (i * m3), (2/3) * height);
		//reflections in the water
		stroke(120, 125, 170, 70);
		line(120, (4/3) * height - 165, -150 + (i * m3), (2/3) * height);
		line(450, (4/3) * height - 140 , 200 + (i * m3), (2/3) * height);

	}

	//lake
	for (var i = 0; i < 500; i++) {
		stroke(0, 255, 255);
		strokeWeight(.25);
		line(0, (2/3) * height + l, width, (2/3) * height + l);
		l = k * l; //geometrically increase the distance between lines
	}

	//foreground
	for (var i = -50; i < 55; i++) {
		strokeWeight(1);
		stroke(179 - (2 * i), 177 - (2 * i), 75); //brighter on the side facing the sun
		var m = map(i, -50, 40, -1, .5);
		line(375 + ((i + 50) * f2), 280, 420 + ((i + 50) * f1), a);
		a = a + m; //since m goes from negative to positive, this allows the hill to 
		           //slope upward and then downward
	}
		
	for (var i = -80; i < 60; i++) {
		strokeWeight(1);
		stroke(179 - (2 * i), 177 - (2 * i), 75);
		var m = map(i, -80, 60, -1, .5);
		line(310 + ((i + 80) * f2), 330, 350 + ((i + 80) * f1), b);
		b = b + m;
	}

	for (var i = -150; i < 100; i++) {
		strokeWeight(1);
		stroke(179 - (4 * i), 177 - (4 * i), 75);
		var m = map(i, -150, 100, -1, .5);
		line(210 + ((i + 150) * f2), height, 250 + ((i + 150) * f1), c);
		c = c + m;
	}
}

I liked how creating images with lines instead of solid shapes allows for a lot more visual interest. Without even trying to you can wind up with gradients and cool patterns from overlapping lines.

ctv-looking outwards-04-Sound Art

Jerobeam Fenderson/2014

This person has built an algorithm to draw images using two channels of an oscilloscope. The two channels use addition and subtraction of analog waveforms to create the imagery. I love this piece because he takes a computational approach to render drawings. I would love to see this attached to an analog oscilloscope (one that uses a laser to illuminate phosphor powder). Within the past could years, I was exposed to the idea of creating interfering waves to control amplitude (I never took calculus). Since then, I have been fascinated with moiré patterns to create visually dynamic art and to control density of color value. This work relates because the artist is using the same principles to send interfering information to create something that is recognizable to humans. In this class, I would like to learn about generating analog wave forms from static imagery: the inverse of this artists’ work.

ctv-project-04-String Art

sketch

//Ty Van de Zande
//Section B
//ctv@andrew.cmu.edu
//Project-04


var mx;
function setup() {
    createCanvas(400, 300);
    background(23, 95, 171);
    
}
 
function draw() {
    //redraws background every frame
    background(23, 95, 171);
    
    //creates a list that places the lines on the x-axis
    for(i = 0; i < 500; i+=5 ) {
    p1 = {x: i, y: 0}; 
        stroke(255);
        strokeWeight(2);
	   curve(p1.x, p1.y, p1.x, p1.y, p1.x, height, p1.x, height); 
    }
     
    //creates lines that are pretty much the same as above, but rotated
    push();
    rotate(radians(2));
    for(i = 0; i < 500; i+=5 ) {
    p1 = {x: i, y: 0}; 
        stroke(255, 95, 171);
        strokeWeight(.25);
	   curve(p1.x, p1.y, p1.x, p1.y, p1.x, height, p1.x, height); 
    }
    pop();
    
    //draws lines in an upside down triangle, maps mouseY to bottom position
    for(i = 0; i < 20; i++ ) {
        noFill();
        p1 = {x: i*20, y: 10}; 
        stroke(255);
        strokeWeight(1);
	   curve(p1.x, p1.y, p1.x, p1.y, mouseY, height, width/2, height);   
    }
    
    //rotates a bunch of lines based on mouseX position
     for(i = 0; i < 50; i++ ) {
        p1 = {x: i*15, y: -1110}; 
        push();
         translate(0, 0);
         rotate(radians(mouseX/10));
         stroke(255);
         strokeWeight(1);
         curve(p1.x, p1.y, p1.x, p1.y, p1.x, height, p1.x, height);
	   pop();
     }
   
}


For this project, I was inspired by moiré patterns created with lines. The interference of lines that overlap create bizarre, superimposed patterns. This sense of confusion continues through the person’s mouse interactions with the piece. the mouse x, y axis is mapped to unintuitive movements of specific points. this was done to pair with the neat moirés.