Project 5, odh

odhP5

//Owen D Haft
//Section D
//odh@andrew.cmu.edu
//Project 5

var Right = 0; //Declares the variable for how the series move horizontally 
var Down = 0;  //Declares the variable for how the series move vertically

function setup() {
    createCanvas(479, 479);
    background(150, 120, 200);
}
 
function draw() {
        translate(239, 239); //Moves the array of the series to be centes on the corner
        translate(-480, Down);
        translate(Right, 0);
        for (var y = 0; y < 500; y += 60) {     //Sets up the series of 
            for (var x = 0; x < 500; x += 60) { //intersecting lines
                strokeWeight(2);
                stroke(200, 255, 255);
                line(x, x, y + 80, y - 80);     //Creates the Series of intersecting lines
            };
        };
    Right = Right + 100;
    Down = Down - 100;
}

I chose to play with the criss-cross idea that often shows up on wallpapers. I am a fan of complex but organized patterns so I gave the lines a steroid injection while still keeping them in an array.

dnoh-sectionD-project5-wallpaper

sketch

function setup() {
  createCanvas(480, 480);
  background(220);
}

function draw() {
  for (x = 0; x <= 480;x += 120) {
    for (y = 0; y <= 480; y += 120) {
    //branches thicc
      stroke(105,72,31);
      strokeWeight(2);
      line(x+35,y+0,x+35,y+17);
      line(x+35,y+17,x+58,y+16);
      line(x+58,y+16,x+58,y+75);
      line(x+58,y+75,x+35,y+75);
      line(x+35,y+75,x+35,y+98);
      line(x+35,y+98,x+25,y+98);
      line(x+25,y+98,x+25,y+112);
      line(x+25,y+112,x+35,y+112);
      line(x+35,y+112,x+35,y+120);
      line(x+97,y+0,x+97,y+10);
      line(x+96,y+10,x+83,y+10);
      line(x+83,y+10,x+83,y+28);
      line(x+83,y+28,x+58,y+28);
      line(x+58,y+59,x+84,y+59);
      line(x+84,y+59,x+84,y+96);
      line(x+84,y+96,x+97,y+96);
      line(x+97,y+96,x+97,y+120);
    //branches thin left
      strokeWeight(1);
      line(x+0,y+68,x+13,y+68);
      line(x+13,y+68,x+13,y+78);
      line(x+13,y+78,x+27,y+78);
      line(x+27,y+78,x+27,y+67);
      line(x+27,y+67,x+31,y+67);
      line(x+31,y+67,x+31,y+54);
      line(x+31,y+54,x+58,y+54);
    //branches thin right
      line(x+97,y+10,x+107,y+10);
      line(x+107,y+10,x+107,y+60);
      line(x+107,y+60,x+100,y+60);
      line(x+100,y+60,x+100,y+67);
      line(x+100,y+67,x+120,y+67);
    //leaf top
      stroke(26,175,75);
      strokeWeight(2);
      line(x+7,y+0,x+5,y+2);
      line(x+5,y+2,x+21,y+1);
      line(x+21,y+1,x+22,y+0);
    //leaf 2nd to top
      line(x+35,y+16,x+37,y+26);
      line(x+37,y+26,x+26,y+37);
      line(x+26,y+37,x+25,y+22);
      line(x+25,y+22,x+35,y+16);
    //leaf 3rd to top
      line(x+83,y+28,x+83,y+35);
      line(x+83,y+35,x+101,y+42);
      line(x+101,y+42,x+95,y+28);
      line(x+95,y+28,x+83,y+28);
    //leaf 4th to top
      line(x+84,y+86,x+95,y+77);
      line(x+95,y+77,x+111,y+73);
      line(x+111,y+73,x+101,y+87);
      line(x+101,y+87,x+84,y+86);
    //leaf bottom
      line(x+7,y+120,x+19,y+109);
      line(x+19,y+109,x+25,y+112);
      line(x+25,y+112,x+22,y+120);
    //rose
      stroke(237,71,51);
      line(x+54,y+90,x+40,y+102);
      line(x+40,y+102,x+35,y+112);
      line(x+35,y+112,x+45,y+115);
      line(x+45,y+115,x+58,y+113);
      line(x+58,y+113,x+57,y+97);

      line(x+50,y+94,x+48,y+102);
      line(x+48,y+102,x+51,y+108);
      line(x+51,y+108,x+58,y+113);
      line(x+35,y+112,x+48,y+102);

      noStroke();
      fill(237,71,51);
      triangle(x+53,y+96,x+51,y+102,x+53,y+102);
      triangle(x+51,y+102,x+55,y+101,x+54,y+107);
    }
  }
}

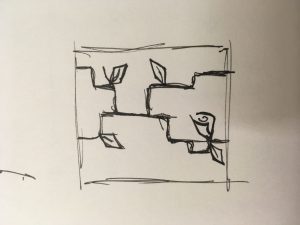
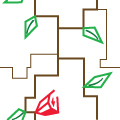
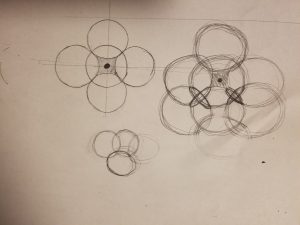
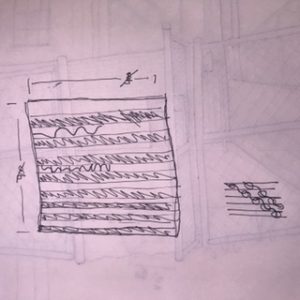
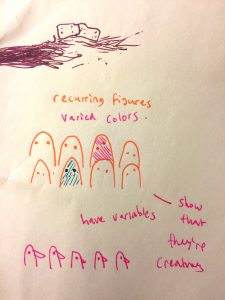
I started with an idea to have geometric natural figures. I started with various sketches, but decided to go with the one posted above. All the branches connect to each other to create a cohesive wallpaper. The sketch was remade in illustrator so I could find the exact pixels/locations of the lines. All in all, this was a fairly tedious project because I had to simply create lines for everything, thus having to check the pixels for everything.

Looking Outwards 05

https://cdna.artstation.com/p/assets/images/images/000/189/312/large/stefan-morrell-cablecorner2.jpg?1443928214

I looked at the work of the concept artist Stefan Morrell. I admire this piece specifically for its homage to classic architecture, but then for his futuristic additions. As someone who frequently has to render my work for work in architecture, I am greatly impressed by his details and clean render. I would imagine he had to let his computer render for hours to get the level of detail it appears to show. I am even more impressed with his expert use of Photoshop to add a more realistic feel the his piece. He titled the work “Cable Corner” and it was created in 2014. He modeled and rendered the piece in 3Dsmax, then used Photoshop for final touches.

aboyle-Looking Outwards-05

“Dynamic Earth” is a 24-minute long video that uses 3D computer graphics to explore concepts related to climate. It was completed in 2012 after a two year long collaboration between Spitz Creative Media, the Advanced Visualization Lab at the National Center for Supercomputing Applications at the University of Illinois, NASA’s Scientific Visualization Studio, and Thomas Lucas Productions, Inc.

I admire this project because it ties together science with beautiful computer graphics. I believe that computer graphics’ potential in the field of education is enormous and I’m glad to see such an impressive product made with those ideas in mind. The algorithms were entirely based on real world data, although I suppose there could have been a few creative liberties with regards to the aesthetic representation. I can tell that the creators have both a love for science and art; in the trailer, scientific models are interspersed with beautiful panning shots of Venus and the ocean floor. Although I don’t have access to the whole film, I’m sure it was beautiful, informational, and impressively cohesive.

enwandu-Project-05-Wallpaper

Wallpaper

// Emmanuel Nwandu
// enwandu@andrew.cmu.edu
// Section D
// Project-05-Wallpaper

cirY = 40; // Initial yposition of circle that start the columns
cirX = 40; // Initial xposition of circles that start the row
cSize = 80; // Diameter fo the circles
spacey = 20; // Controls vertical spacing betwen the circles
spacex = 20; // Controls horizontal spacing between the

function setup() {
    createCanvas(480, 480);
}

function draw() {
    background(0);

    // Draws a series of geometry in relation to each other
    // that fill the canvas
    for (var y = 0; y < height; y+=2.5){
        for(var x = 0; x < width; x+=2.5){
            var cy = cirY + y * spacey;
            var cx = cirX + x * spacex;
            noFill();
            // Controls stroke color based on position of circle
            stroke(cx, cy -100, cx + cy);
            strokeWeight(2);
            // Draws cirles that intersect with each other
            ellipse(cx - cSize/2, cy - cSize/2, cSize, cSize);
            rectMode(CENTER);
            noStroke();
            // Controls the color of the rectangle based on its position; matches the circles
            fill(cx, cy - 100, cx + cy);
            // Draws rectangle at the center of each circle
            rect(cx - cSize/2, cy - cSize/2, 15, 15);
            // Draws a small black dot at the center of each rectangle
            fill(0);
            ellipse(cx - cSize/2 ,cy-cSize/2 , 5, 5);
        }
    }

}

When I thought of wallpaper, my mind initially went to the ugly stuff you’d see on a grandparents wall in a movie or something. For this project, I was aiming for the opposite. My first pass at the code was essentially what I was trying to avoid; ugly wallpaper. Since I had initially had the intersecting circles as one color, i decided it would be interesting if they change depending on their position. After this I decided to accent the center of these circles, giving it a little more character.

sketch
// Emmanuel Nwandu
// enwandu@andrew.cmu.edu
// Section D
// Project-05-Wallpaper

cirY = 40; // Initial yposition of circle that start the columns
cirX = 40; // Initial xposition of circles that start the row
cSize = 80; // Diameter fo the circles
spacey = 20; // Controls vertical spacing betwen the circles
spacex = 20; // Controls horizontal spacing between the

function setup() {
    createCanvas(480, 480);
}

function draw() {
    background(0);

    // Draws a series of geometry in relation to each other
    // that fill the canvas
    for (var y = 0; y < height; y+=2.5){
        for(var x = 0; x < width; x+=2.5){
            var cy = cirY + y * spacey;
            var cx = cirX + x * spacex;
            noFill();
            // Controls stroke color based on position of circle
            stroke(cx, cy -100, cx + cy);
            strokeWeight(2);
            // Draws cirles that intersect with each other
            ellipse(cx - cSize/2, cy - cSize/2, cSize, cSize);
            rectMode(CENTER);
            noStroke();
            // Controls the color of the rectangle based on its position; matches the circles
            fill(cx, cy - 100, cx + cy);
            // Draws rectangle at the center of each circle
            rect(cx - cSize/2, cy - cSize/2, 15, 15);
            // Draws a small black dot at the center of each rectangle
            fill(0);
            ellipse(cx - cSize/2 ,cy-cSize/2 , 5, 5);
        }
    }

}

ssontag – Project – 05 – Wallpaper

For this project i wanted to be reminiscent about the striped blue and grey wallpaper i had in my childhood bedroom. I also decided i wanted to add some of the line work style that i have developed in architecture school.

sketch

;function setup() {
//variables to set up ordered spacing within the for loop
    var sY = 40;
    var sX = 20;

    var rX = 20;

    createCanvas(380, 380);
    background(210);
//a for loop that sets up the background bars of blue and grey iterating across the x axis
   for(var i = 0; i < 20; i++) {
        noStroke();
//modulus so there is an alternating pattern between even and odd
        if ((i % 2) == 0) {
            fill(70, 130, 180);
//an else statment that sets the fill as grey for every other
        } else {
            fill(210);
        }
        rect(i * rX, 0, rX, 400);
    }
//a for loop that wil set up the grid for th repeating pattern in the x direction 
    for(var x = 0; x < 20; x++) {
// an if statement and a for loop that makes the bezier curves and some ellipse's using modulus to
//make it occur every other row
        if ((x % 2) == 0) {
            for(var y = 0; y < 10; y++) {
                noFill();
                stroke(1);
                bezier(x * rX + sX, y * sY, x * rX, y * sY, x * rX + sX, y * sY + 20, 
                    x * rX + sX - 10, y * sY + 20);
                bezier(x * rX + sX - 10, y * sY + 20, x * rX, y * sY + 20, x * rX + sX,
                    y * sY + 40, x * rX, y * sY + 40);
                ellipse(x * rX + 10, y * sY + 20, 20, 20);
            }
        } else {
//an else statement that sest the lines and ellipses for the grey rows
            for(var y = 0; y < 10; y++) {
                line(x * rX + sX, y * sY, x * rX, y * sY);
                ellipse(x * rX + 10, y* sY, 35, 35);
            }
        }
    }
    noLoop();
//keeps the drawing from animating, it will draw itself once like a wallpaper
}

function draw() {

}

yunzhous-LookingOutward-04

Lumière III

Lumière III

Lumière III

This is Lumière III by Robert Henke. It is a audiovisual laser performance, in which an algorithm generates laser curves to bounce off the pre-designed spaces in the auditorium to create series of visual effect, including geometries, curves, lights, colors, etc. Sound also generated from the lasers. A dedicated sound synthesis engine was built for this particular project. Therefore, the artist built a custom algorithm for generating sound.

I appreciate that the algorithm generates both visual and sonic effect. Therefore, changing the laser would make change to both of them. From the geometries and colors, the observer can guess what the sound would be, because certain shapes and colors probably represent certain aspects of music. (eg. red represent dramatic emotion, etc). I thought the randomness of the lasers, and the random yet inter-connected visual and sonic effect generated by it is very interesting.

You can read more here

yunzhous-project-04-string art

sketch

var spacing = 5;

function setup() {
    createCanvas(300, 400);
}

function draw() {
    background(0);
    //botton right corner
    for (i = 0; i < 100; i++){
        stroke(251, 201, 137);
        //limit mouseX
        if (mouseX < 100){
            mouseX = 100;
        }
        if (mouseX > 300){
            mouseX = 300;
        }
        map(mouseX, 0, width, 0, 30);
        line(0, height, mouseX * i, 5*i);
    }
    for (i = 0; i < 20; i++){
        map(mouseY, 0, height, 0, 20);
        //upper left corner
        //color gradient
        stroke(50, 200, mouseX);
        line(0, i * spacing * 5, width - i * spacing * 3, 0);
        //upper right corner
        stroke(255, 255 - i * 3, 255 - i *10);
        line(width - i * spacing, 0, width - i * spacing, height - i * spacing *5);
        //red lines
        //limit mouseY
        if (mouseY > 50){
            mouseY = 50;
        }
        stroke("red");
        line(width - i * mouseY, 0, i * spacing, height);
    }
    //background white lines
    for (i = 0; i < 50; i++) {
        stroke(255);
        line(width, height - i * spacing * 3, sq(i * spacing/6), height - i * spacing * 3);
    }
}

I played around with different variables, compositions, color gradient to create a visually harmonious image.

Project-05-Chickoff

sketch

//Cora Hickoff
//Section D
//chickoff@andrew.cmu.edu
//Project-05

function setup() {
    createCanvas(600, 400);
    noStroke();
}
 
function draw() {
    background(136, 179, 130);
    drawGrid();
    noLoop(); 
}
function drawGrid() {
  for (var y = 0; y < height + 50; y += 100) {
        for (var x = 0; x < width + 100; x += 100) {
            fill(y*5/8, x*.9/2, x*1/3, 220);
            //body
            ellipse(x, y, 100, 200);
        }
    }
     for (var y = 0; y < height + 50; y += 100) {
        for (var x = 0; x < width + 10; x += 100) {
            fill(y, 100, 100);
            //mouth
            ellipse(x, y+50, 20, 10);
        }
    }
      for (var y = 0; y < height + 50; y += 100) {
        for (var x = 0; x < width + 2; x += 100) {
            fill(80, 70, 75);
            //left eye
            ellipse(x-15, y+13, 10, 10, 100);
            //left mole
            fill(0);
            ellipse(x-23, y+18, 1.5, 1.5, 100);
            //right eye
            fill(75);
            ellipse(x+20, y+30, 10, 10, 100);
            //right mole
            fill(0);
            ellipse(x+25, y+40, 1.5, 1.5, 90);
        }
    }

    noLoop();
}

When I started this project, I knew I wanted to make some kind of creature and have it duplicated in a way that made it look like they were in a crowd. I started by doing a quick sketch of these faces and then went from there, trying to make it a fun project. 🙂

daphnel-Project 05-Wallpaper

bg

//Daphne Lee
//15-104::1 (9:30am) Section D
//daphnel@andrew.cmu.edu
//Project-05-Background

var spaceX = 60; //controlled distances of circles
var spaceY = 60;//controlled distances of circles
var circleSize=90;
var cirX = 35;
var cirY = 35;

function setup() {
    createCanvas(480, 480);
    background(250, 230, 230);
    var trans = randomGaussian(25,100);
    var widthMore= 50
    var heightMore = 100;

    for (var y = 0; y < 9; y++) {
        for (var x = 0; x < 9; x++) {
            var cy = cirY + y * spaceY;
            var cx = cirX + x * spaceX;
            fill(255, 230, 179, trans);
            stroke(255);
            strokeWeight(5);
            //circles;
            ellipse(cx-circleSize/2, cy-circleSize/2, circleSize, circleSize);
        }
    }
    //added to width and height to make lines stretch more across canvas;
    for(var x = 0; x <= width+widthMore; x+=30){
      for(var y = 0; y <= height+heightMore; y+=50){
      strokeWeight(0.5);
      stroke(255);
      //different increments make the criss cross patterns for the lines;
      var xIncrement = 50;
      var yIncrement1= 20;
      var yIncrement2= 50;
      //line pattern in background;
      line(x-xIncrement,y-yIncrement1,x + xIncrement, y-yIncrement2);
      line(x+xIncrement, y+yIncrement2, x- xIncrement, y+yIncrement1);
    }
  } noLoop();
}

I started off wanting a circle based design. I tried to understand the idea of using loops in more depth so I combined the circles and lines to create a more aesthetic look. At the beginning, my main focus was just to get circles aligned side by side by each other throughout the entire canvas. After experimenting with the function, I realized that having them overlap looked pretty good. The way the loop of lines turned out was coincidental and I liked the way they turned out. I wanted to make the circle designs the main focus so I increased the stroke intensity for the circles and decreased it for the lines. Overall, I think this project was relatively more simple and I think it would be a cute design for a summer dress or skirt!