ssontag-Looking Outwards-03

Being an Architecture major, we discuss parametric design and digital fabrication quite often because it is the most groundbreaking technology in the field. Earlier this year we were introduced to a project done by a professor and group of researchers at MIT. I especially appreciate this project because it not only uses the most recent technology in parametric design and digital fabrication, but it uses a natural precedent to inform the structure of the weave for the panels. Using data collected by the research done on the silkworms, the CNC machine was programmed to weave a unique pattern on each panel that created a pavillion with ample lighting and enclosure.

Website


Project 3, odh

odhP3

//Owen D Haft
//Section D
//odh@andrew.cmu.edu
//Project 3

var R = 100; //"R" of RGB
var G = 100; //"G" of RGB
var W = 50; //Width of the ellipse
var H = 50; //height of the ellipse

function setup() {
    createCanvas(600, 480);
}
 
function draw() {
    background(50, 50, 100);
    noStroke();

    rectMode(CENTER);

    fill(100, 0, 0);
    rect(150, 240, 100, mouseX);

    fill(0, 100, 0);
    rect(450, 240, mouseY, 100);

    fill(R, G, 0);
    ellipse(mouseX, mouseY, W, H);

    H = mouseX;
    W = mouseY;


    //Changes the color of the ellipse depending on its location
    if (mouseX > 100) {
        G = 200;
    };
    if (mouseY > 100) {
        R = 200;
    };

}

I based all my changes on the location of the mouse, the change of size of the rectangles, the size of the ellipse, the color of the ellipse, and the location of the ellipse.

aboyle-Project 03-Dynamic Drawing

aboyle-Dynamic drawing

function setup() {
    createCanvas(640, 480);
  }

//Snow variables
    var snow=0
    var snowTwo=0
    var snowThree=0

function draw() {
    background(45,138,185)

//Tree variables
    var trunkWidth=30
    var trunkHeight=430-mouseY
    var leafHeight=mouseY-40
    var leafWidth=70+mouseY
    strokeWeight(0);

//Limits the trees' growth
    if(mouseY<250){
      trunkHeight=180
      leafHeight=210
      leafWidth=320}

//Summer sun
    if(mouseX<=160){
      fill(63,147,169);
      triangle(660,-30,0,480,400,480)
      fill(78,156,155);
      triangle(650,-10,100,480,300,480);
      fill(45,138,185)
      rect(575,0,90,90)
      fill(255,252,0);
      ellipse(575,70,60);
    }


//Trunks--as mouse moves up, the trunks grow
    fill(115,72,22);
    rect(75,480-trunkHeight,trunkWidth,trunkHeight);
    rect(210,480-trunkHeight,trunkWidth,trunkHeight);
    rect(345,480-trunkHeight,trunkWidth,trunkHeight);
    rect(480,480-trunkHeight,trunkWidth,trunkHeight);

//Leaves--as mouse moves up, position of leaves moves up
    fill(21,148,42)
    //tree one
    triangle(25,leafWidth,90,leafHeight,155,leafWidth);
    triangle(30,leafWidth-70,90,leafHeight-70,150,leafWidth-70);
    triangle(35,leafWidth-140,90,leafHeight-140,145,leafWidth-140);
    triangle(40,leafWidth-210,90,leafHeight-210,140,leafWidth-210);
    //tree two
    triangle(160,leafWidth,225,leafHeight,290,leafWidth);
    triangle(165,leafWidth-70,225,leafHeight-70,285,leafWidth-70);
    triangle(170,leafWidth-140,225,leafHeight-140,280,leafWidth-140);
    triangle(175,leafWidth-210,225,leafHeight-210,275,leafWidth-210);
    //tree three
    triangle(295,leafWidth,360,leafHeight,425,leafWidth);
    triangle(300,leafWidth-70,360,leafHeight-70,420,leafWidth-70);
    triangle(305,leafWidth-140,360,leafHeight-140,415,leafWidth-140);
    triangle(310,leafWidth-210,360,leafHeight-210,410,leafWidth-210);
    //tree four
    triangle(430,leafWidth,495,leafHeight,560,leafWidth);
    triangle(435,leafWidth-70,495,leafHeight-70,555,leafWidth-70);
    triangle(440,leafWidth-140,495,leafHeight-140,550,leafWidth-140);
    triangle(445,leafWidth-210,495,leafHeight-210,545,leafWidth-210);

//Summer birds--change position depending on mouse
    if(mouseX<=160){
      strokeWeight(5);
      line(mouseX,mouseY-50,mouseX+10, mouseY-40);
      line(mouseX+10,mouseY-40,mouseX+20,mouseY-50);
      line(mouseX-30,mouseY-30,mouseX-20,mouseY-20);
      line(mouseX-20,mouseY-20, mouseX-10,mouseY-30);
      line(mouseX-30,mouseY-70,mouseX-20,mouseY-60);
      line(mouseX-20,mouseY-60, mouseX-10,mouseY-70);
      line(mouseX-60,mouseY-90,mouseX-50,mouseY-80);
      line(mouseX-50,mouseY-80,mouseX-40,mouseY-90);
      line(mouseX-60,mouseY-10,mouseX-50,mouseY);
      line(mouseX-50,mouseY,mouseX-40,mouseY-10);

//Summer text
      textSize(30)
      fill(0);
      text("Summer", 40,40)
    }

//Autumnn
      if(mouseX>160 & mouseX<=320){
      //pumpkins
      fill(205,123,28)
      ellipse(0,460,80,90)
      ellipse(95,460,75,75)
      ellipse(170,460,50,50);
      ellipse(250,460,100,100)
      ellipse(345,460,60,60)
      ellipse(450,460,120,100)
      ellipse(560,460,75,75)
      ellipse(640,460,60,60)
      //ghost--changes position depending on mouse
      //and the mouth changes shape depending on x coordinates
      fill(256);
      rect(mouseX,mouseY-90,60,80);
      ellipse(mouseX+30,mouseY-95,60)
      fill(0);
      ellipse(mouseX+15,mouseY-100,20)
      ellipse(mouseX+45,mouseY-100,20)
      ellipse(mouseX+30,mouseY-60,40,mouseX-250)
      text("Autumn",40,40)
            }

//Snow and rain
    //three different speeds for snow
    snow+=6;
    snowTwo+=5;
    snowThree+=3;

    if(mouseX>320){
      //if it's winter, make snow on the ground
      if(mouseX<=480){
        fill(256);
        ellipse(320,480,640,100);}
      //if it's spring, make rainclouds in the sky
      else{
        fill(100);
        ellipse(0,0,130,70);
        ellipse(100,20,150,80);
        ellipse(200,10,140,90);
        ellipse(300,0,130,70);
        ellipse(400,10,140,80);
        ellipse(500,0,130,90);
        ellipse(600,20,150,70)
      }
      //if it's winter, make snow white
      if(mouseX<=480){
        fill(256);}
      //if it's spring, make rain blue
      else{
        fill(18,38,169)
      }
      //droplets of snow/rain
      ellipse(10,snow,10);
      ellipse(10,snowTwo+30,10);
      ellipse(40,snow+30,10);
      ellipse(40,snowThree,10);
      ellipse(70,snowTwo+30,10);
      ellipse(70,snowThree,10);
      ellipse(100,snow+60,10);
      ellipse(100,snowTwo+30,10);
      ellipse(130,snow+60,10);
      ellipse(130,snowThree+30,10);
      ellipse(160,snowThree+60,10);
      ellipse(160,snowTwo+40,10);
      ellipse(190,snow,10);
      ellipse(190,snowTwo+70,10);
      ellipse(220,snow+20,10);
      ellipse(220,snowThree,10);
      ellipse(250,snowTwo+60,10);
      ellipse(250,snowThree,10);
      ellipse(280,snowThree+60,10);
      ellipse(280,snowTwo+10,10);
      ellipse(310,snowTwo,10);
      ellipse(310,snow+30,10);
      ellipse(340,snow,10);
      ellipse(340,snowThree+60,10);
      ellipse(370,snowThree+20,10);
      ellipse(370,snowTwo,10);
      ellipse(400,snowTwo+30,10);
      ellipse(400,snowThree+50,10);
      ellipse(430,snow+30,10);
      ellipse(430,snowTwo+60,10);
      ellipse(500,snowThree,10);
      ellipse(500,snow+60,10);
      ellipse(530,snowTwo+30,10);
      ellipse(530,snowThree,10);
      ellipse(560,snow+20,10);
      ellipse(560,snowTwo,10);
      ellipse(590,snowThree+60,10);
      ellipse(590,snow+10,10);
      ellipse(620,snowTwo+20);
      ellipse(620,snowThree+40,10);

//Winter text
      if(mouseX<=480){
        fill(0);
        text("Winter",40,40);}
      if(mouseX>480){

//Spring flowers
      //stems
      fill(52,108,8)
      rect(145,575-trunkHeight,10,trunkHeight);
      rect(295,575-trunkHeight,10,trunkHeight);
      rect(420,575-trunkHeight,10,trunkHeight);
      //petals--mouseX makes color change
      fill(215,mouseX-500,32);
      ellipse(140,580-trunkHeight,20);
      ellipse(145,565-trunkHeight,20);
      ellipse(153,585-trunkHeight,20);
      ellipse(160,573-trunkHeight,20);
      ellipse(290,580-trunkHeight,20);
      ellipse(295,565-trunkHeight,20);
      ellipse(303,585-trunkHeight,20);
      ellipse(310,573-trunkHeight,20);
      ellipse(415,580-trunkHeight,20);
      ellipse(420,565-trunkHeight,20);
      ellipse(427,585-trunkHeight,20);
      ellipse(435,573-trunkHeight,20);
      //centers
      fill(85,47,27);
      ellipse(150,575-trunkHeight,15);
      ellipse(300,575-trunkHeight,15);
      ellipse(425,575-trunkHeight,15);

//Spring text
      textSize(30);
      fill(0);
      text("Spring",40,40)
        }
    }

//Loops the snow
    if(snow>480){
      snow=-60}
    if (snowTwo>480){
      snowTwo=-60}
    if(snowThree>480){
      snowThree=-60}

  }

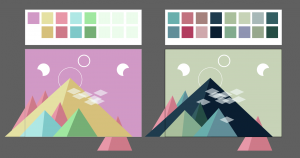
This assignment was very cool! I didn’t use as many variables as I thought I would, mainly because I thought it made more sense to input mouseX and mouseY instead of setting them equal to a variable and then inputting that variable. I forgot that wordpress doesn’t allow a width of 640, which unfortunately means that you can’t see the sun or the flowers change color on the blog. I also wish I had been able to make the rain and snow look more random, but since that wasn’t the point of the exercise I decided to spend more time on adding aspects that changed according to the mouse–the birds, the ghost, the flowers, etc. Overall I’m pretty pleased with how it came out!

NatalieKS-Looking-Outwards-03

A team of researchers from MIT and UMass Amherst have created a 3D printed product that is able to fold itself up. These self-folding structures are made using a 3D printer and a special ink that expands once it solidifies, thus forcing the “legs” of the structure to fold themselves up. Due to its self-folding capabilities, these devices are also able to contain functional electronics. These researchers were inspired to create a material with complex, programmed shapes – not much is mentioned about the algorithm used, but it does mention that they programmed specific shapes for specific purposes – in order to further research into robotics and sensing.

This is inspiring because it broadens the opportunities and sources of material for other structures. Since other structures require heat or some other external stimulus to do this kind of behavior (which can be detrimental and degrade the material), this product can accomplish the same thing without using those additional resources and without the potential danger of those external resources. It’s exciting to see new forms of pre-existing material being made into something that is better for human action/interaction as well as the environment.

This project was completed and published in 2017. This video demonstrates the device and talks more in detail about its properties.

sketch

//Dana Kim
// danakim@andrew.cmu.edu
//Section D
// Project-03

function setup() {
  createCanvas(640, 480);
  background(50);
}

var x = 320;
var y = 240;
var w = 4;
var angle = 0;

function draw() {
  //ColorChoice1
  if ((mouseY < y) & (mouseX < x)){
    c1 = "#FFA977"; //color for left cube
    c2 = "#FF3C38"; //color for top cube
    c3 = "#FF8D38"; //color for right cube
  }
  //ColorChoice2
  if ((mouseY > y) & (mouseX > x)){
    c1 = "#7A5C61";
    c2 = "#FF3C38";
    c3 = "#A23E48";
  }
  //ColorChoice3
  if ((mouseY > y) & (mouseX < x)){
    c1 = "#BB7279";
    c2 = "#68282E";
    c3 = "#A23E48";
  }

  //Rectangles change size, angle, and color
  push();
  noStroke();
  fill(c1);
  rotate(radians(angle));
  rect(318, 225, w, 30);
  translate(0, 100);
  fill(c2);
  rect(318, 225, w, 30);
  translate(0, -200);
  fill(c3);
  rect(318, 225, w, 30);
  pop();
  angle = angle + 50;

  //width of rectangles change
  if(mouseX>320){
    w = mouseX-300;
  }
  //circles change color and size
  if(mouseX < 320){
  fill(mouseX-200, mouseX+100, mouseY-200);
  stroke(265);
  ellipse(160, mouseY, mouseX-10, mouseX-10);
  }


}

I had originally planned on making a sandwich that would come apart and rotate. However, due to time constraints I decided to go with something simpler. The only problem I really bumped into was that the script kept redrawing the shapes. However, I thought it looked better with the redrawn parts.

dnoh-sectionD-project3-dynamicdrawing

sketch

// red = 205, 63, 63
// green = 63, 205, 63

var liney = 20;
var redX = -15;
var redX2 = 655;
var blueY = -15;
var blueY2 = 495;
var lineT = 0;
var lineB = 480;
var lineL = 0;
var lineR = 640;
var whiteFill = 255;
var lineStrokeR = 63;
var lineStrokeG = 205;
var lineStrokeB = 63;

function setup() {
  createCanvas(640,480);
  background(39,48,47);
}

function draw() {
  background(39,48,47);
//refreshing background

//blinking effect in background
  stroke(39,64,47);
  line(0,liney,width,liney);
  line(0,liney+40,width,liney+40);
  line(0,liney+80,width,liney+80);
  line(0,liney+120,width,liney+120);
  line(0,liney+160,width,liney+160);
  line(0,liney+200,width,liney+200);
  line(0,liney+240,width,liney+240);
  line(0,liney+280,width,liney+280);
  line(0,liney+320,width,liney+320);
  line(0,liney+360,width,liney+360);
  line(0,liney+400,width,liney+400);
  line(0,liney+440,width,liney+440);
  line(0,liney+480,width,liney+480);
  line(0,liney+520,width,liney+520);
  line(0,liney+560,width,liney+560);
  line(0,liney+600,width,liney+600);
  line(0,liney+640,width,liney+640);
  liney = liney + 80;

  if (liney > height) {
    liney = 0;
  }
//reset green lines to make it blink

//color blocks that shoot out
  noStroke();
  rectMode(CENTER);
  fill(0,255,255); //c
  rect(redX,mouseY,20,20);
  redX = redX - 25;
  fill(255,0,255); //m
  rect(redX2,mouseY,20,20);
  redX2 = redX2 + 25;
  fill(255,255,0); //y
  rect(mouseX,blueY,20,20);
  blueY = blueY - 25;
  fill(0); //k
  rect(mouseX,blueY2,20,20);
  blueY2 = blueY2 + 25;

//green crooshair
  stroke(lineStrokeR,lineStrokeG,lineStrokeB);
  strokeWeight(2);
  line(mouseX,lineB,mouseX,lineT);
  line(lineL,mouseY,lineR,mouseY);

  var rectX = 20;
//white box in crosshair
  fill(whiteFill);
  rect(mouseX,mouseY,rectX,rectX);

//white box enlarges when pressed, white box becomes gray, green becomes red
  if (mouseIsPressed) {
    lineM1 = mouseX-50;
    lineV1 = mouseY-50;
    lineM2 = mouseX+50;
    lineV2 = mouseY+50;
    lineM3 = mouseX+50;
    lineV3 = mouseY-50;
    lineM4 = mouseX-50;
    lineV4 = mouseY+50;
    line(lineM1,lineV1,lineM2,lineV2);
    line(lineM3,lineV3,lineM4,lineV4);

    ellipse(mouseX,mouseY,70,70);
    lineStrokeR = 255;
    lineStrokeG = 63;
    lineStrokeB = 63;
    whiteFill = 80;
  } else {
    whiteFill = 255;
    lineStrokeR = 63;
    lineStrokeG = 205;
    lineStrokeB = 63;
  }
  print(mouseIsPressed);
}


function mouseClicked() { //when mouse is clicked, the color squares jump to mouse and start moving again
  redX = mouseX;
  redX2 = mouseX;
  blueY = mouseY;
  blueY2 = mouseY;
}

The background lines are constantly blinking to add an effect of constant movement. The mouse is followed by a vertical and horizontal line that changes colors from green to red when clicked. When clicked, the square in the center changes colors and shapes. Finally, four color blocks jump out of the crosshair when clicked.

Initially I wanted to create a code that would print a square wherever I clicked and the four blocks would collide into that square. However, I could not figure out a code that would let me keep the square after I clicked it.

cespinoz-Looking Outwards -03

For this topic I chose to look through Pinterest and picked this scaled 3D model of San Francisco.

I really am fascinated by this since it is quite literally a miniature model of San Francisco. It was made by members of Autodesk and Steelblue, by using, what I assume to be Autodesk’s Computer Aided Design (CAD) program (it is not clearly mentioned in the article). I particularly admire this since I have been exposed to CAD before, through my robotics team in high school. I was never quite proficient in it, but I managed to make and print some parts, though admittedly, the process of ensuring the right calculations and sizes and everything in CAD took me what seemed forever. That said, I cannot imagine how much time it would take to make a model of an entire city to scale. To make it to scale, the creators must have had to note somewhere all the sizes of actual buildings, roads, park, etc, and hen find the appropriate scaling measurements. Then they would actually have to CAD each individual building and part, which includes drawing and labeling several boxes and rectangles on CAD (as how I remember it). Then they would have to put it all together, to follow the shape of the actual city itself, and send it to the 3D printer. And although there isn’t an artistic value seen on the model, the art specific to the makers is in the hard work to make an accurate model through CAD and 3D printing.

Here is an article about the model:unveiling-the-largest-ever-3d-printed-model-of-san-francisco.html

creyes1-Project-03-Dynamic-Drawing

creyes1-Project-03 Dynamic Drawing

//Christopher Reyes
//Section D
//creyes1@andrew.cmu.edu
//Project-03 (Dynamic Drawing)

var backgroundR = 209
var backgroundG = 153
var backgroundB = 198

var ringSize = 0
var ringColor= 256

function setup() {

    createCanvas(640, 480);
    angleMode(DEGREES);

}

function draw() {

    var colorConstrain = constrain(mouseX, 102, 540)

    background(backgroundR, backgroundG, backgroundB);
    fromBG = color(209, 153, 198);
    toBG = color(199, 211, 183);
    backgroundColor = lerpColor(fromBG, toBG, mouseX/width);
    background(backgroundColor);

    var moonConstrainX = constrain(mouseX, 102, 540)

    //Moon, moves in the X direction as mouseX changes
    noStroke();
    fill(256);
    ellipse(moonConstrainX, 80, 64, 64);

    //Moon shadow, follows moon at a rate that eventually overtakes it
    //Color set to be the same as the background to hide it
    fill(backgroundR, backgroundG, backgroundB);
    fill(backgroundColor);
    ellipse(moonConstrainX*1.30 - 95, 80, 54, 54);

    //Mountain ring, changes scale according to mouseX
    noFill();
    stroke(ringColor);
    strokeWeight(5);
    ringSize = constrain(mouseX, 100, 545) - 100
    ellipse(248, 158, ringSize, ringSize);

    //Secondary rings that rotate while revolving around mountain's peak,
    //based on mouseX position
    var spinConstraint = constrain(mouseX, 102, 540)

    push();
    translate(248, 158);
    rotate(spinConstraint);
    arc(248, 158, ringSize, ringSize,
        spinConstraint + 5, spinConstraint + 115);
    arc(248, 158, ringSize, ringSize,
        spinConstraint + 125, spinConstraint + 235);
    arc(248, 158, ringSize, ringSize,
        spinConstraint + 245, spinConstraint + 355);
    pop();

    push();
    translate(248, 158);
    rotate(spinConstraint - 160);
    arc(248, 158, ringSize*.75, ringSize*.75,
        spinConstraint + 5, spinConstraint + 115);
    arc(248, 158, ringSize*.75, ringSize*.75,
        spinConstraint + 125, spinConstraint + 235);
    arc(248, 158, ringSize*.75, ringSize*.75,
        spinConstraint + 245, spinConstraint + 355);
    pop();

    //Hides rings when they get too small - given same color as background
    if (ringSize == 0) {
        ringColor = backgroundColor;
    } else {
        ringColor = 256;
    }

    noStroke();

    //Draws triangles for mountains that change colors as mouseX changes
    //Note: For organization, for each mountain, the left side is drawn first
    //
    //Mountain color variable format: Mount(#)[(L)eft||(R)ight]

    //Mountain 1, transitions from pink to blue
    fill(232, 151, 168);
    fromMount1L = color(232, 151, 168);
    toMount1L = color(105, 175, 173);
    mount1LColor = lerpColor(fromMount1L, toMount1L, mouseX/width);
    fill(mount1LColor);
    triangle(111, 226, 57, 416, -3, 416);

    fill(206, 122, 137);
    fromMount1R = color(206, 122, 137);
    toMount1R = color(97, 142, 153);
    mount1RColor = lerpColor(fromMount1R, toMount1R, mouseX/width);
    fill(mount1RColor);
    triangle(111, 226, 57, 416, 189, 416);

    //Mountain 2, pink
    fill(232, 151, 168);
    triangle(41, 254, -13, 444, -73, 444);
    fill(206, 122, 137);
    triangle(41, 254, -13, 444, 119, 444);

    //Mountain 3, pink
    fill(232, 151, 168);
    triangle(510, 366, 456, 556, 396, 556);
    fill(206, 122, 137);
    triangle(510, 366, 456, 556, 588, 556);

    //Mountain 4, largest, transitions from yellow to navy
    fill(229, 225, 163);
    fromMount4L = color(229, 225, 163);
    toMount4L = color(31, 60, 78);
    mount4LColor = lerpColor(fromMount4L, toMount4L, mouseX/width);
    fill(mount4LColor);
    triangle(248, 158, 154, 480, -111, 480);

    fill(214, 192, 123);
    fromMount4R = color(214, 192, 123);
    toMount4R = color(10, 30, 49);
    mount4RColor = lerpColor(fromMount4R, toMount4R, mouseX/width);
    fill(mount4RColor);
    triangle(248, 158, 154, 480, 591, 480);

    //Stray cloud with transparency
    fill(256, 125);
    quad(210.5, 272, 250.5, 290, 210.5, 308, 170.5, 290);

    //Mountain 5, transitions from pink to dark green
    fill(232, 151, 168);
    fromMount5L = color(232, 151, 168);
    toMount5L = color(51, 93, 97);
    mount5LColor = lerpColor(fromMount5L, toMount5L, mouseX/width);
    fill(mount5LColor);
    triangle(193, 290, 139, 480, 79, 480);

    fill(206, 122, 137);
    fromMount5R = color(206, 122, 137);
    toMount5R = color(37, 77, 68);
    mount5RColor = lerpColor(fromMount5R, toMount5R, mouseX/width);
    fill(mount5RColor);
    triangle(193, 290, 139, 480, 271, 480);

    //Mountain 6, transitions from blue to pale green
    fill(175, 232, 229);
    fromMount6L = color(175, 232, 229);
    toMount6L = color(170, 191, 156);
    mount6LColor = lerpColor(fromMount6L, toMount6L, mouseX/width);
    fill(mount6LColor);
    triangle(108, 334, 93, 480, -30, 480);

    fill(127, 201, 201);
    fromMount6R = color(127, 201, 201);
    toMount6R = color(130, 171, 142);
    mount6RColor = lerpColor(fromMount6R, toMount6R, mouseX/width);
    fill(mount6RColor);
    triangle(108, 334, 93, 480, 253, 480);

    //Mountain 7, transitions from green to light blue
    fill(160, 232, 160);
    fromMount7L = color(160, 232, 160);
    toMount7L = color(105, 175, 173);
    mount7LColor = lerpColor(fromMount7L, toMount7L, mouseX/width);
    fill(mount7LColor);
    triangle(295, 323, 229, 480, 153, 480);

    fill(117, 175, 117);
    fromMount7R = color(117, 175, 117);
    toMount7R = color(97, 142, 153);
    mount7RColor = lerpColor(fromMount7R, toMount7R, mouseX/width);
    fill(mount7RColor);
    triangle(295, 323, 229, 480, 399, 480);

    //Clouds with transparency
    fill(256, 125);
    quad(332.5, 231, 372.5, 249, 332.5, 267, 292.5, 249);
    quad(393.5, 217, 433.5, 235, 393.5, 253, 353.5, 235);
    quad(298.5, 240, 338.5, 258, 298.5, 276, 258.5, 258);
    quad(275.5, 235, 315.5, 253, 275.5, 271, 235.5, 253);
    quad(258.5, 214, 298.5, 232, 258.5, 250, 218.5, 232);
    quad(313.5, 265, 353.5, 283, 313.5, 301, 273.5, 283);
    quad(339.5, 369, 379.5, 387, 339.5, 405, 299.5, 387);
    quad(403.5, 258, 443.5, 276, 403.5, 294, 363.5, 276);
    quad(353.5, 265, 393.5, 283, 353.5, 301, 313.5, 283);

}

Admittedly, it took me a while to come to this final idea, as a lot of my ideas required code that was out of my current technical abilities, although I do hope to act on them sometime in the future. After mocking up a design in Illustrator, I wanted to have a drawing that transitioned between states rather than an open-ended series of relations. I had some difficulties figuring out exactly how to execute all of the color transitions, but lerpColor(); wound up being the perfect solution, where the color in between the two I specified was determined by the mouse’s X position relative to the width of the canvas, creating the required interval number between 0-1. After finally figuring that out, the rest was a lot of trial and error, playing around with the code in order to see what kind of movement could be created while still making sense composition-wise.

creyes1-LookingOutwards-03

Mohanned Iskanderani’s RAYGON

Created in 2016 by Mohanned Iskanderani, the RAYGON lamp is created solely from the parametric graphic algorithm editor, Grasshopper, so that as Iskanderani describes, “the computer is allowed to design as much as the designer is.”

What’s really astounding about this project is that while the script was created by hand, the actual form of the lamp was entirely computer-generated, and likely easily modifiable. With this, it allows further experimentation of customized intricate designs that would otherwise be difficult to manually create. Of course, Iskanderani still had a hand in creating the final lamp form, with his main goal being to create a lamp that projected a unique pattern to truly fill the space in which it resides. The final product is something that makes itself known not simply to make itself the focal point, but to enhance the room that surrounds it.

RAYGON is still under development, and not much information regarding it has been made available since its initial appearance, but is intended to be 3D printed in plastic and finished in some other material.

RAYGON earned an Honorable Mention in the 2016 VMODERN Furniture Design Competition. The project is also available to view on Behance.

cduong-LookingOutward-03

The picture above is from the weurbanist website linked below and shows one of the many 3D-printed connectors that were made for this project.

The project is about 3D-Printable Connectors that help make DIY furniture assembly easier. They use 3D printers to create an array of possible connectors that could be used to make all types of furniture. The goal of this project is to allow people to easily make their own furniture into something that fits their needs. I admire how the project is aimed to benefit anyone; it is not just for one specific group of people. I find this really interesting because I worked in woodshop a lot during my last school year and I also love working with 3D printers. I also love the idea of DIYs and do a few of them whenever I find something interesting on pinterest.

I suppose the algorithms they use varies depending on the type of furniture that they are aiming to make, whether it’s a table or a chair or something else. These algorithms have to create different angles and forms to accomplish a connection that could be used to create a table or a chair, since both pieces of furniture are used in very different ways. There is an infinite amount of algorithms that these creators could use and I’m sure they produce all types of connectors, hundreds of unique connectors.

The creator’s artistic sensibilities manifest into the final form by creating a specific type of connector that may force a piece of furniture to look or work a certain way, possibly a way that the creator prefers.

3D-Printable Connectors Make DIY Furniture Assembly Easy

This was created by Studio Minale-Maede (http://www.minale-maeda.com/) in 2012. It was known as the Keystone project.

Another photo from weurbanist that shows another type of connector that was created.