![[OLD FALL 2017] 15-104 • Introduction to Computing for Creative Practice](../../wp-content/uploads/2020/08/stop-banner.png)
*Move mouse around canvas to move particles
*Click and/or drag to add more particles
/*
Jamie Ho
jamieh@andrew.cmu.edu
10:30
Project 12
*/
var particles = []; //array to store circle particles
var d; //distance between two particles
var md; //distance between particle and
var r = 255;
var g = 255;
var b = 255;
function setup(){
createCanvas(480, 480);
}
function draw(){
background(0);
//create particles and push into array
p = new Particle();
particles.push(p);
//if mouse is pressed, then add more particles & invert background colour
if(mouseIsPressed){
particles.push(p);
background(255);
}
//first for loop counting backwards of the array
for(var i = particles.length-1; i > 0; i--){
particles[i].show();
particles[i].update();
//second for loop counting forwards of the array. two for loops needed to draw lines between all particles
for(var j = 0; j < particles.length; j++){
//distance between two particles
d = dist(particles[i].x, particles[i].y, particles[j].x, particles[j].y);
//distance between particle and mouse
md = dist(particles[i].x, particles[i].y, mouseX, mouseY);
//if distance between two particles is less than 45 then lines will be blue and thicker
if(d < 45){
if(d < 25){
stroke(102, 204, 255);
strokeWeight(0.35);
} else if(d < 45 & d > 25){
//if mouse is pressed, inverse colours
if(mouseIsPressed){
stroke(0);
strokeWeight(0.1);
} else{
stroke(255);
strokeWeight(0.1);
}
}
line(particles[i].x, particles[i].y, particles[j].x, particles[j].y);
}
//if the distance between particle and mouse is between range to determine whether or not to push particles away
if(md < 50 & mouseIsPressed == false){
if(particles[i].x > mouseX){
particles[i].x += random(md/4, md/2);
} else if(particles[i].x < mouseX){
particles[i].x -= random(md/4, md/2);
} else if(particles[i].y > mouseY){
particles[i].y += random(md/4, md/2);
} else if(particles[i].y < mouseY){
particles[i].y -= random(md/4, md/2);
}
}
//if the alpha is less than 0 and returns true
//then that particle is "killed off" or removed from array
if(particles[i].finished()){
particles.splice(i, 1);
}
}
}
}
class Particle{
//defines locations of particles and velocities and alphas
constructor(){
//if mouse is pressed then particle shows up where mouse is clicked
if(mouseIsPressed){
this.x = mouseX;
this.y = mouseY;
} else {
//otherwise anywhere on canvas
this.x = random(width);
this.y = random(height);
}
//size of particles
this.cSize = random(2, 8);
//velocities
this.vx = random(-0.5, 0.5);
this.vy = random(-0.5, 0.5);
//brightness of circles
this.alpha = 255;
}
//creates the particles
show(){
noStroke();
if(mouseIsPressed){
fill(r, g, b, this.alpha);
} else {
fill(255, this.alpha);
}
ellipse(this.x, this.y, this.cSize);
}
//to move the particles
update(){
//make particles move
this.x += this.vx;
this.y += this.vy;
//conditions where if particles hit the four edges, bounce
if(this.x > width-this.cSize/2){
this.vx -= random(0.5, 1.5);
} else if(this.x < 0+this.cSize/2){
this.vx += random(0.5, 1.5);
} else if(this.y > height-this.cSize/2){
this.vy -= random(0.5, 1.5);
} else if(this.y < 0+this.cSize/2){
this.vy += random(0.5, 1.5);
}
//to decrease the brightness of particles
this.alpha -= 1.25;
}
//to "kill off" particles
finished(){
return this.alpha < 0; //either true or false
}
}
function mouseDragged(){
if(particles.push(p) & mouseIsPressed){
r = map(mouseY, 0, height, 100, 255);
g -= random(2, 3);
b = map(mouseX, 0, width, 150, 255);
}
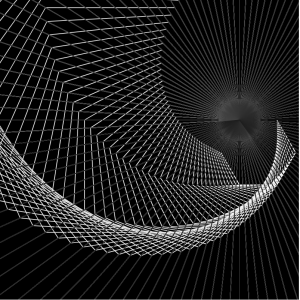
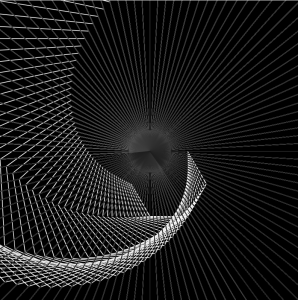
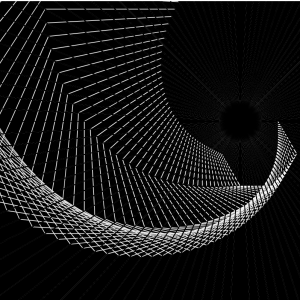
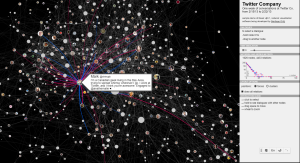
}For my final project, I wanted to work with objects again to become more familiar with it. I chose to use particles and linking those particles based on different conditions. The particles are also interactive so that they’re not just floating circles that move by itself randomly. And while the mouse is clicked, the colours invert to show something more geometrical based on the lines drawn between particles.