![[OLD FALL 2017] 15-104 • Introduction to Computing for Creative Practice](../../../../wp-content/uploads/2020/08/stop-banner.png)
I came to CMU with a background in product design and I did most of my work by hand in a metal and wood shop never really being able to make the leap to bigger CNC or printer type tools. I found a Project, while it is an interesting application of CNC tools and a beautiful project what interested me most about it was the guy’s thoughts on how he was using the tools. He talked about how his use of the CNC tools allowed the project to be shared, meaning him posting the plans (files) he created and used for the project. I thought that was an interesting side to CNC machining because I am not so sure I 9would be willing to replace working with regular power tools or even could with now automated technology. I understand robotics work great for mass production and have personally used 3D printing as a great prototyping tool but neither have replaced hand craftsmanship in metal or wood for custom projects as far as I can tell.
Category: Uncategorized
enwandu-Project-03-Dynamic-Drawing2 (Video Download Attached)
Here is what the code is supposed to look like.
IMG_5313
/*  Emmanuel Nwandu
    enwandu@andrew.cmu.edu
    Section D
    Project-03-Dynamic-Drawing
*/

// Lower Window Lights Color
var WindowR = noFill();
var WindowG = noFill();
var WindowB = noFill();
//Controls background color and Building color
var bRed = 77;
var bGreen = 125;
var bBlue = 135;
// Controls the color of the Avengers Symbol
var AvengersR = 124;
var AvengersG = 198;
var AvengersB = 218;

function setup() {
    createCanvas(480, 640);
}

function draw() {
    background (bRed, bGreen, bBlue);
    stroke(255);
    strokeWeight(3);

//Changes Sky and building color as mouseY moves the length of the canvas
    if (mouseY > 0 || mouseY < 640){
        bRed = mouseY * ((77 -75)/640) + 40;
        bGreen = mouseY * ((125 -75)/640) + 40;
        bBlue = mouseY * ((135 -75)/640) + 40;
    }

//Changes "A" symbol color as mouseY moves the length of the canvas
    if(mouseY > 0 || mouseY < 640){
        AvengersR = mouseY * ((124 -75)/640) + 40;
        AvengersG = mouseY * (198/ 640);
        AvengersB = mouseY * (218/640);
    }

//Changes "A" symbol as mouse X moves across canvas if mouseY less than 270
    if(mouseX > 0 & mouseY < 270 || mouseX < 480 && mouseY <270){
        AvengersR = mouseX * ((212-50)/640) + 4;
        AvengersG = mouseX * ((30 -10)/640) + 4;
        AvengersB = mouseX * ((16-5)/640) + 4;
    }

// Window Detailing
    strokeWeight(0.5);
// Verticals
    line(105, 271, 105, 640);
    line(143, 143, 143, 521);
    line(181, 271, 181, 405);
    line(219, 271, 219, 345);
    line(257, 271, 257, 305);
// Horizontals
    line(67, 21, 98, 21);
    line(67, 49, 104, 49);
    line(67, 78, 111, 78);
    line(67, 102, 117, 102);
    line(67, 127, 127, 127);
    line(67, 154, 157, 154);
    line(67, 181, 342, 181);
    line(67, 215, 108, 215);

// Lower Window Color
    fill(WindowR, WindowG, WindowB);
    noStroke();
    strokeJoin(ROUND);
    beginShape();
    vertex(195, 407);
    vertex(278, 640);
    vertex(132, 640);
    vertex(144, 575);
    vertex(150, 540);
    vertex(161, 500);
    vertex(164, 487);
    vertex(166, 480);
    endShape();
// Lower Window Detailing
    stroke(200);
    strokeWeight(7);
    line(185, 432, 202, 432);
    line(174, 462, 211, 462);
    line(164, 492, 223, 492);
    line(156, 522, 234, 522);
    line(150, 552, 244, 552);
    line(144, 582, 254, 582);
    line(138, 612, 265, 612);
    stroke(255);
    strokeWeight(2);
    line(138, 600, 138, 640);
    line(147, 554, 147, 640);
    line(156, 518, 156, 640);
    line(165, 484, 164, 640);
    line(174, 459, 174, 640);
    line(183, 434, 183, 640);
    line(192, 410, 192, 640);
    line(201, 425, 201, 640);
    line(210, 434, 210, 640);
    line(219, 459, 219, 640);
    line(228, 484, 228, 640);
    line(237, 518, 237, 640);
    line(246, 530, 246, 640);
    line(255, 554, 255, 640);
    line(264, 582, 264, 640);

// General Building form
    stroke(255);
    strokeWeight(2);
    line(67, 0, 67, 640);
    fill(200);
    quad(234, 347, 227, 355, 325, 640, 337, 640);
    quad(212, 377, 195, 404, 278, 640, 300, 640);

    noFill();
    bezier(93, 0, 123, 195, 154, 155, 334, 175);
    bezier(121, 640, 158, 408, 203, 325, 319, 269);
    bezier(127, 640, 164, 408, 209, 325, 338, 269);
    bezier(131, 640, 166, 408, 221, 325, 335, 271);

//Dark Glazing behind "A" symbol
    fill(31, 51, 70);
    stroke(255);
    strokeWeight(2);
    ellipse(138, 220, 80, 80);
    noStroke();
    quad(328, 182, 319, 224, 153, 224, 153, 182);
    quad(279, 231, 265, 257, 153, 257, 153, 231);
    fill(200);
    stroke(255);
    ellipse(138, 220, 68, 68);
    fill(31, 51, 70);
    ellipse(138, 220, 60, 60);

    fill(200);
    noStroke();
    strokeJoin(ROUND);
    beginShape();
    vertex(275, 266);
    vertex(154, 266);
    vertex(154, 257);
    vertex(265, 257);
    vertex(279, 231);
    vertex(177, 231);
    vertex(179, 224);
    vertex(354, 224);
    vertex(354, 231);
    vertex(295, 231);
    endShape();
    ellipse(354, 227.5, 7, 7);

// Extends landing pad using mouseX within the range of 365 to 448
// and 335 to 418
    var LeftWall = 365;
    var RightWall = 448;
    var LeftWallb = 335;
    var RightWallb = 418;

    var xc = constrain(mouseX + 30, LeftWall, RightWall);
    var xcb = constrain(mouseX, LeftWallb, RightWallb);

    fill(31, 51, 70); // Controls color of landing pad explicitly
    stroke(255);
    strokeWeight(2);
    quad(59, 266, xc, 266, xcb, 271, 65, 271);// Draws landing pad

//Lighter Glazing
    fill(89, 116, 135);
    stroke(255);
    strokeWeight(1);
    quad(93, 0, 105, 0, 111, 19, 97, 19);
    quad(97, 20, 111, 20, 117, 39, 101, 39);
    quad(101, 40, 117, 40, 123, 59, 105, 59);
    quad(105, 60, 123, 60, 129, 79, 109, 79);
    quad(110, 80, 129, 80, 137, 99, 115, 99);
    quad(115, 100, 137, 100, 147, 119, 124, 119);
    quad(124, 120, 147, 120, 162, 139, 138, 139);
    triangle(139, 140, 162, 140, 175, 159);

//Avengers symbol
    fill(AvengersR, AvengersG, AvengersB);
    strokeWeight(2);
    strokeJoin(MITER);
    beginShape();
    vertex(108, 263);
    vertex(97, 263);
    vertex(144, 180);
    vertex(155, 180);
    vertex(155, 226);
    vertex(146, 218);
    vertex(146, 198);
    vertex(132, 223);
    vertex(146, 223);
    vertex(146, 220);
    vertex(157, 228);
    vertex(146, 236);
    vertex(146, 233);
    vertex(127, 233);
    vertex(108, 263);
    endShape();

    beginShape();
    vertex(155, 234);
    vertex(155, 249);
    vertex(147, 249);
    vertex(147, 240);
    vertex(155, 234);
    endShape();

}

function mousePressed(){
    if(mouseX > 0 & mouseY < 270 || mouseX < 480 && mouseY <270){
    WindowR = 194;
    WindowG = 209;
    WindowB = 15;
} else if (true) {
    WindowR = noFill();
    WindowG = noFill();
    WindowB = noFill();
}
}
monicah1-project-03
var x;
var y;
var offset = 300;

function setup() {
    createCanvas(640, 480);
    ellipse (CENTER);

}

function draw() {
	background (245,255,0);
	fill (30,255,0);
	noStroke();

	var m = max (min(mouseX, 640), 0);
	var size = m *100.0 / 200.0;
	ellipse (10 + m *190.0 / 400.0, 200.0, size, size);

	fill (0,0,255);
	size = 350 - size;
	ellipse(200 + m * 190.0/400.0, 200.0. size, size);
	ellipse (10 + m *190.0 / 250.0, 200.0, size, size);
	ellipse (40 + m *190.0 / 100.0, 150.0, size, size);

	fill (240,70,20);
	rect (40 + m *300.0 / 100.0, 150.0, size, size);
	rect (50 + m *100.0 / 50.0, 70.0, size, size);


	var line1 = map(mouseY, 100, 400, 76, 310);
    stroke(240, 10, 150);
    strokeWeight(10);
    line(240, line1, 240, 311);


    var line2 = map(mouseY, 100, 400, 76, 312);
    stroke(240, 10, 150);
    strokeWeight(10);
    line(252, line1, 253, 313);

    var line3 = map(200, mouseY, 400, 76, 310);
    stroke(240, 10, 150);
    strokeWeight(10);
    line(240, line4, 240, 311);


    var line4 = map(200, mouseY, 400, 76, 312);
    stroke(240, 10, 150);
    strokeWeight(10);
    line(252, line2, 253, 313);


    noStroke();


    fill(255);
    ellipse(mouseX, 100, 60, 60);

    fill(0);
    ellipse(width - mouseX, 200, 60, 60);

    if (mouseX > x) {
    	x += 10;
    	offset = -10;
    }

    if (mouseX > x){
    	x -= -10;
    	offset = 10;
    }

}
I tried to play with depth, rotation, and colors of objects in this assignment.
test
//Shariwa Sharada
//Section-A
//ssharada@andrew.cmu.edu
//Assignment-03-A

var ssw = 135;
var ssh = 160;

function setup(){
    createCanvas (400, 300);
    rectMode(CENTER);
}

function draw(){
//changing the background depending on the position of the cursor
    background(mouseX, mouseY, 191);
    push();
    //limiting the colour change to certain types - dependent on the mouse placement within a 4x3 grid
    //changing colours dependent on the x-axis placement
    if (mouseX>0 & mouseX < ssw){
        mouseX = 246
    }
    if (mouseX>ssw && mouseX < ssw*2){
        mouseX = 236
    }
    if (mouseX>ssw*2 && mouseX < ssw*3){
        mouseX = 226
    }
    if (mouseX>ssw*2 && mouseX < width){
        mouseX = 216
    }
    //changing colours dependent on the y-axis placement
    if (mouseY>0 && mouseY < ssh){
        mouseX = 180
    }
    if (mouseY>ssh && mouseY < ssh*2){
        mouseX = 170
    }
    if (mouseY>ssh*2 && mouseY < height){
        mouseX = 160
    }
    pop();

    push();
//creating the translating and moving squares
    translate (width/2, height/2);
    //stating the number of squares i want within the first level -
    //using the increment command to have the squares rotated with equal distances.
    for (var a = 0; a < 15; a++){
        push();
        //rotation and pasting
        rotate(TWO_PI * a / 15);
        //making the placement of the level dependent
        //on the y-axis placement of the cursor
        var X = mouseY;
        translate(X, 0);
        //the colour of this rectangles and randomising the transparancy
        //of the white to make the quares appear to flicker
        fill(255, random(20,90));
        noStroke();
        //the size of the first level of rectangles.
        rect(0,0,60,60);
        //stating the number of squares i want within the second level -
        //using the increment command to have the squares rotated with equal distances.
        for (var b = 0; b < 12; b++){
            push();
            //rotation and pasting
            rotate(TWO_PI * b/12);
            //making the placement of the level dependent
            //on the x-axis placement of the cursor
            var Y = mouseX;
            //the size of the second level of rectangles.
            rect (Y,0,30,30);
            //the colour of this rectangles and randomising the
            //transparancy of the white to make the quares appear to flicker
            fill(255, random(10,80));
            noStroke();
            //stating the number of squares i want within the third level -
            //using the increment command to have the squares rotated with equal distances.
            for (var c = 0; c < 8; c++){
                push();
                //rotation and pasting
                rotate(TWO_PI* c/8);
                //making the placement of the level dependent
                //on the y-axis placement of the cursor
                var Z = mouseY;
                //the size of the third level of rectangles.
                rect (0,Z,10,10);
                //the colour of this rectangles and randomising the
                //transparancy of the white to make the quares appear to flicker
                fill(255, random(10,50));
                noStroke();
                //preventing the code from affecting other factors of the program
                pop();
            }

            //preventing the code from affecting other factors of the program
            pop();
            }

        //preventing the code from affecting other factors of the program
        pop();
    }
    pop();
}
hdw – Project 3 – Dynamic Drawing
Press any key to interact.
var x = 180
var r = 30;
var ellipseX;//ellipse's x position
var ellipseY;
var z = 0 //distance from center + opacity
var canBig = 1;

function setup() {
    background(255, 255, 255);
    createCanvas(640, 480);
    ellipseY = .5*height;
    ellipseX = .5*width;

}

function keyPressed() {
  if(canBig == 1){
    r=r+5;
    x=x-5;
    z=z+1;
  }
  if(r>320 & canBig == 1){
    canBig = 0;
    print(boundary);
  }
  if(canBig == 0){
    r=r-5;
    x=x+5;
    z=z-1;
  }
  if(r < 5 & canBig == 0){
    canBig = 1;
  }
}

function draw() {

    background(255, 255, 255, 200);
    noStroke();
    fill(0);

//middle flower
    //outer right
    fill(255,0,x,30+z*.15)
    ellipse(ellipseX+z, ellipseY, r, r);

    //white
    fill(255,255,255,30)
    ellipse(ellipseX, ellipseY, r, r);

    //outer left
    fill(255,0,x,30+z*.15)
    ellipse(ellipseX-z, ellipseY, r, r);

    //outer bottom
    fill(255,0,x,30+z*.15)
    ellipse(ellipseX, ellipseY+z, r, r);

    //white
    fill(255,255,255,30)
    ellipse(ellipseX, ellipseY, r, r);

    //outer top
    fill(255,0,x,30+z*.15)
    ellipse(ellipseX, ellipseY-z, r, r);

    //white center
    fill(255,255,255,5+.25*z)
    ellipse(ellipseX-0.7,ellipseY,2*z,2*z)
    ellipse(ellipseX+0.7,ellipseY,2*z,2*z)
    ellipse(ellipseX,ellipseY-0.7,2*z,2*z)
    ellipse(ellipseX,ellipseY+0.7,2*z,2*z)

    //center ellipses
    fill(255,0,x,30+z*.15)
    ellipse(ellipseX,ellipseY,2*z,z)
    ellipse(ellipseX,ellipseY,z,2*z)

    //magenta center
    fill(255,0,x+3*z,30+z*.15)
    ellipse(ellipseX,ellipseY,1.3*z,z)
    ellipse(ellipseX,ellipseY,z,1.3*z)

    //white center bud
    fill(255,255,255)
    ellipse(ellipseX,ellipseY,z*.1,z*.1)
  }
This week’s drawing is a blooming flower. I had originally wanted to do something more complicated but struggled with the code as is. I had Stella Han help me figure out how to create boundaries so that when it hit a certain height it would shrink again. I also had Shovik Mani help me figure out a bug in my code. Originally I had posted the function for keyPress inside the drawing function and couldn’t figure out why it wouldn’t draw.
looking-outwards-03-ssharada-section a
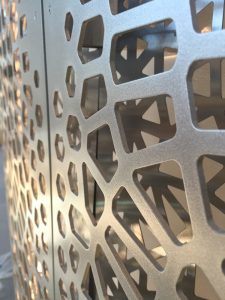
As a response to how data can affect our built environments, Synthesis Design + Architecture teamed up with IBM Watson Analytics to design an interior feature wall for the Watson Experience Center in San Francisco. The project, named Data Moiré after the dizzying patterns created by overlapping sets of lines, uses data from the influence of mobile phones on monthly consumer spending to create a precise screen material that defines the wall.
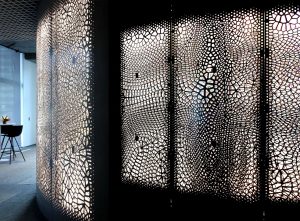
The data-driven patterns on the surface of the wall are a result of parametric modeling based on Watson’s own data analysis, actively showing off the capabilities of the system itself. The generative design was CNC milled onto two sheets of aluminium, which creates an intricate screen of information that is lit from between the two layers.
akluk – section A – project-03 – DynamicDrawings
sketch.jsIt was quite challenge to align and create a dynamic ring of shapes that was uniformly spaced and distributed.
var radius = 200
var x_c = 320;
var y_c = 240;
//1/8 of 2 pi
var theta = 0.785;
var shapes = 8;
function setup() {
    createCanvas(640, 480);
    background(220);
}

function draw() {
    background(0);

    //draws dynamically colored background
    //left rectangle
    fill(color(255-mouseX/3,mouseX/2,255-mouseX/3));
    rect(0,0,mouseX,480);

    //right rectangle
    fill(color(100,170,255-mouseX/4));
    rect(mouseX,0,640-mouseX,480);

    //calculations to create dynamic behavior
    var distance = dist(width,y_c,mouseX,mouseY);
    radius = distance/2;
    translate(320,240);
    push();

    //offset rotation
    rotate(radius/10);

    //creates the ring of shapes
    for (i = 0; i < shapes; i++)
    {
    	rotate(theta);
    	fill(color(40+i*radius/8,100-i*radius/8,100));
    	if (i%2 == 1){
    		triangle(160-radius,0,180-radius,-20,180-radius,20);
    	}
    	else{
    		ellipse(160-radius,0,30+radius/6,30+radius/6);
    	}
    }
    pop();
}Ziningy1 – Section C- Looking Outwards -03
Silk Pavillion
MIT Mediated Matter Group’s project Silk Pavilion immediately attracted my attention as I am browsing through their project page. I am surprised by how computer algorithm can generated such organic form. The Silk Pavilion is done by Prof. Fiorenzo Omenetto (TUFTS University) and Dr. James Weaver (WYSS Institute, Harvard University). Inspired by the silkworm’s ability to generate a 3D cocoon out of a single multi-property silk thread, the pavilion’s overall geometry was created using an algorithm that assigns a single continuous thread across patches, providing various degrees of density. Overall density variation was informed by deploying the silkworm as a biological “printer” in the creation of a secondary structure. Positioned at the bottom rim of the scaffold, 6,500 silkworms spun flat, non-woven silk patches as they locally reinforced the gaps across the silk fibers.
I really enjoyed this project/installation as how they explore the relationship between digital and biological fabrication. The method of deploying the actual silk worms as biological “printer” is very impressive to me, and this also shows that the blind instinct of silkworms is sometimes revealed as almost machine-like.
Project 3, odh
//Owen D Haft
//Section D
//odh@andrew.cmu.edu
//Project 3

var R = 100; //"R" of RGB
var G = 100; //"G" of RGB
var W = 50; //Width of the ellipse
var H = 50; //height of the ellipse

function setup() {
    createCanvas(600, 480);
}

function draw() {
    background(50, 50, 100);
    noStroke();

    rectMode(CENTER);

    fill(100, 0, 0);
    rect(150, 240, 100, mouseX);

    fill(0, 100, 0);
    rect(450, 240, mouseY, 100);

    fill(R, G, 0);
    ellipse(mouseX, mouseY, W, H);

    H = mouseX;
    W = mouseY;


    //Changes the color of the ellipse depending on its location
    if (mouseX > 100) {
        G = 200;
    };
    if (mouseY > 100) {
        R = 200;
    };

}
I based all my changes on the location of the mouse, the change of size of the rectangles, the size of the ellipse, the color of the ellipse, and the location of the ellipse.
monicah1_lookingoutward_03
Digital Fabrication by Iris Van Herpen Collaborated with Neri Oxman and Julia Koerner at 2013 Paris Fashion week.
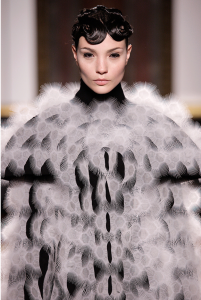
The inspiration of Iris Van Herpen coulture is inspired by nature, generating augmentation and thinking about form, materials, movement, and wearability. They work on designing algorithm that centered by humans’ moment and material behavior.
I am impressed by the high fidelity of work that is possible in computational and 3D fabrication. Often times, we may not be able to control what the computational work would produced base on algorithms. Here, the computational work is closely human form centered, which is amazing. High craftsmanship with 3D fabrication can powerfully apply on so many things. This fashion work of line show how technology is already advanced, hoping 3D fabrication can integrated to common people.