15 Bricks


Summary

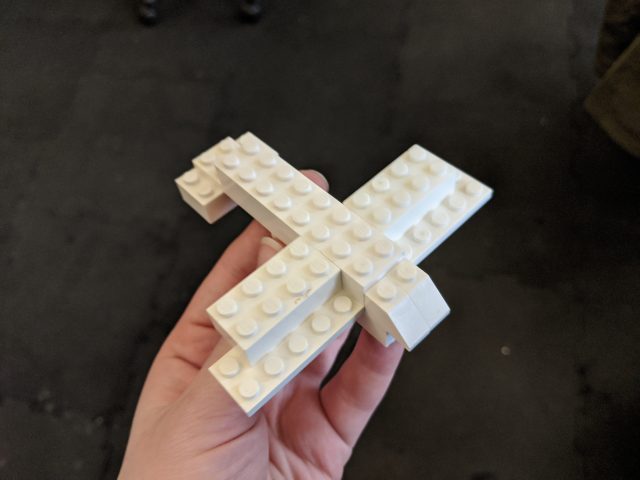
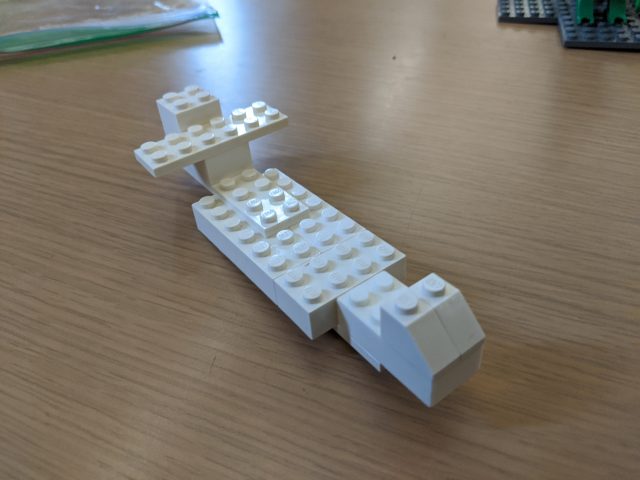
“15 Bricks” is a partial typology of Lego airplanes that are built with the same 15 Legos. These were obtained by asking different CMU students to build an airplane using all of the pieces in a set I chose. I gave 20 people the same 15 Lego pieces and asked each of them to use all the pieces to build an airplane. With so little to work with, they had to reduce the shape of a plane to its most important features, and each person had a unique approach.

Development Process

Initial Ideation/Planning

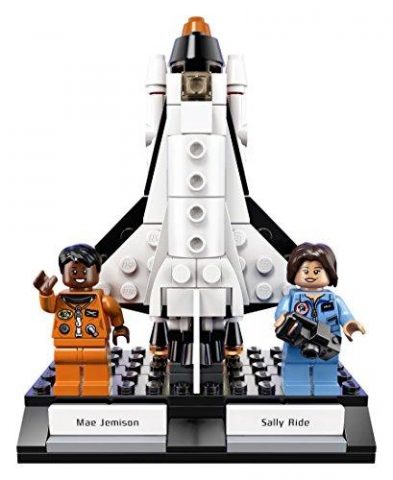
Of all the typology examples in lecture, I was particularly inspired by the ones that involved many people each contributing something creative, like Kim Dingle’s “The United Shapes of America.” I think these can serve as indirect portraits of the individual participants while also revealing patterns in our collective thoughts about something. I brainstormed things I could ask people to do and/or materials I could ask them to work with, and I landed on Lego as a fun, accessible medium that’s well suited for 3D shapes.

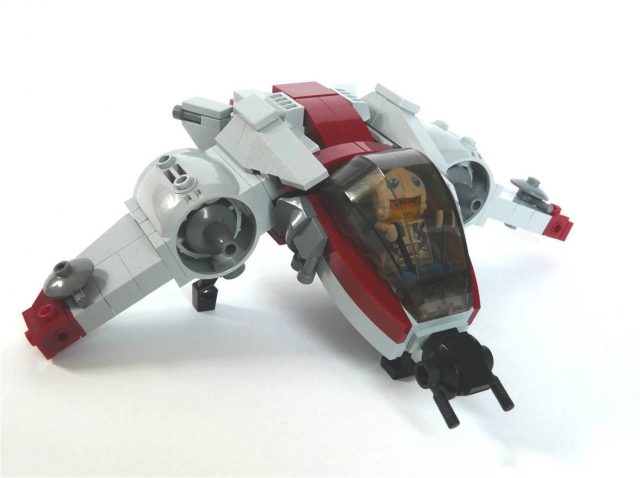
My initial vision as described in my proposal was that I would have a large (hopefully effectively limitless) pool of Legos that participants could use. I then would ask each one to build a spaceship, and I’d record a video of their construction process. I expected highly varied ships, and to really let people’s creativity run wild. Under this scenario, Lego would be simply the medium people were using to construct their spaceships, and it would be the theoretical spaceship designs that were ultimately being recorded and compared in the typology. That didn’t make as much use of the unique properties of Lego as I’d have liked, so I moved away from it and towards the version I ended up using: one where the limited Legos pose a very tight constraint on their construction.

Playtesting and Fine-Tuning Procedure

Now I had to make a few decisions, including what I was going to ask people to make and what bricks I was going to give them to do it. I decided on the first answer in a discussion with Golan. We went with “airplane” because it’s a fairly simple, familiar, and well-defined shape. Unlike, spaceships or cars, there isn’t too much variance in commercial plane design, so I can be pretty sure that most participants have the same thing in mind when they begin (though it’s okay if not all do). This would make it easier to meaningfully compare people’s constructions.

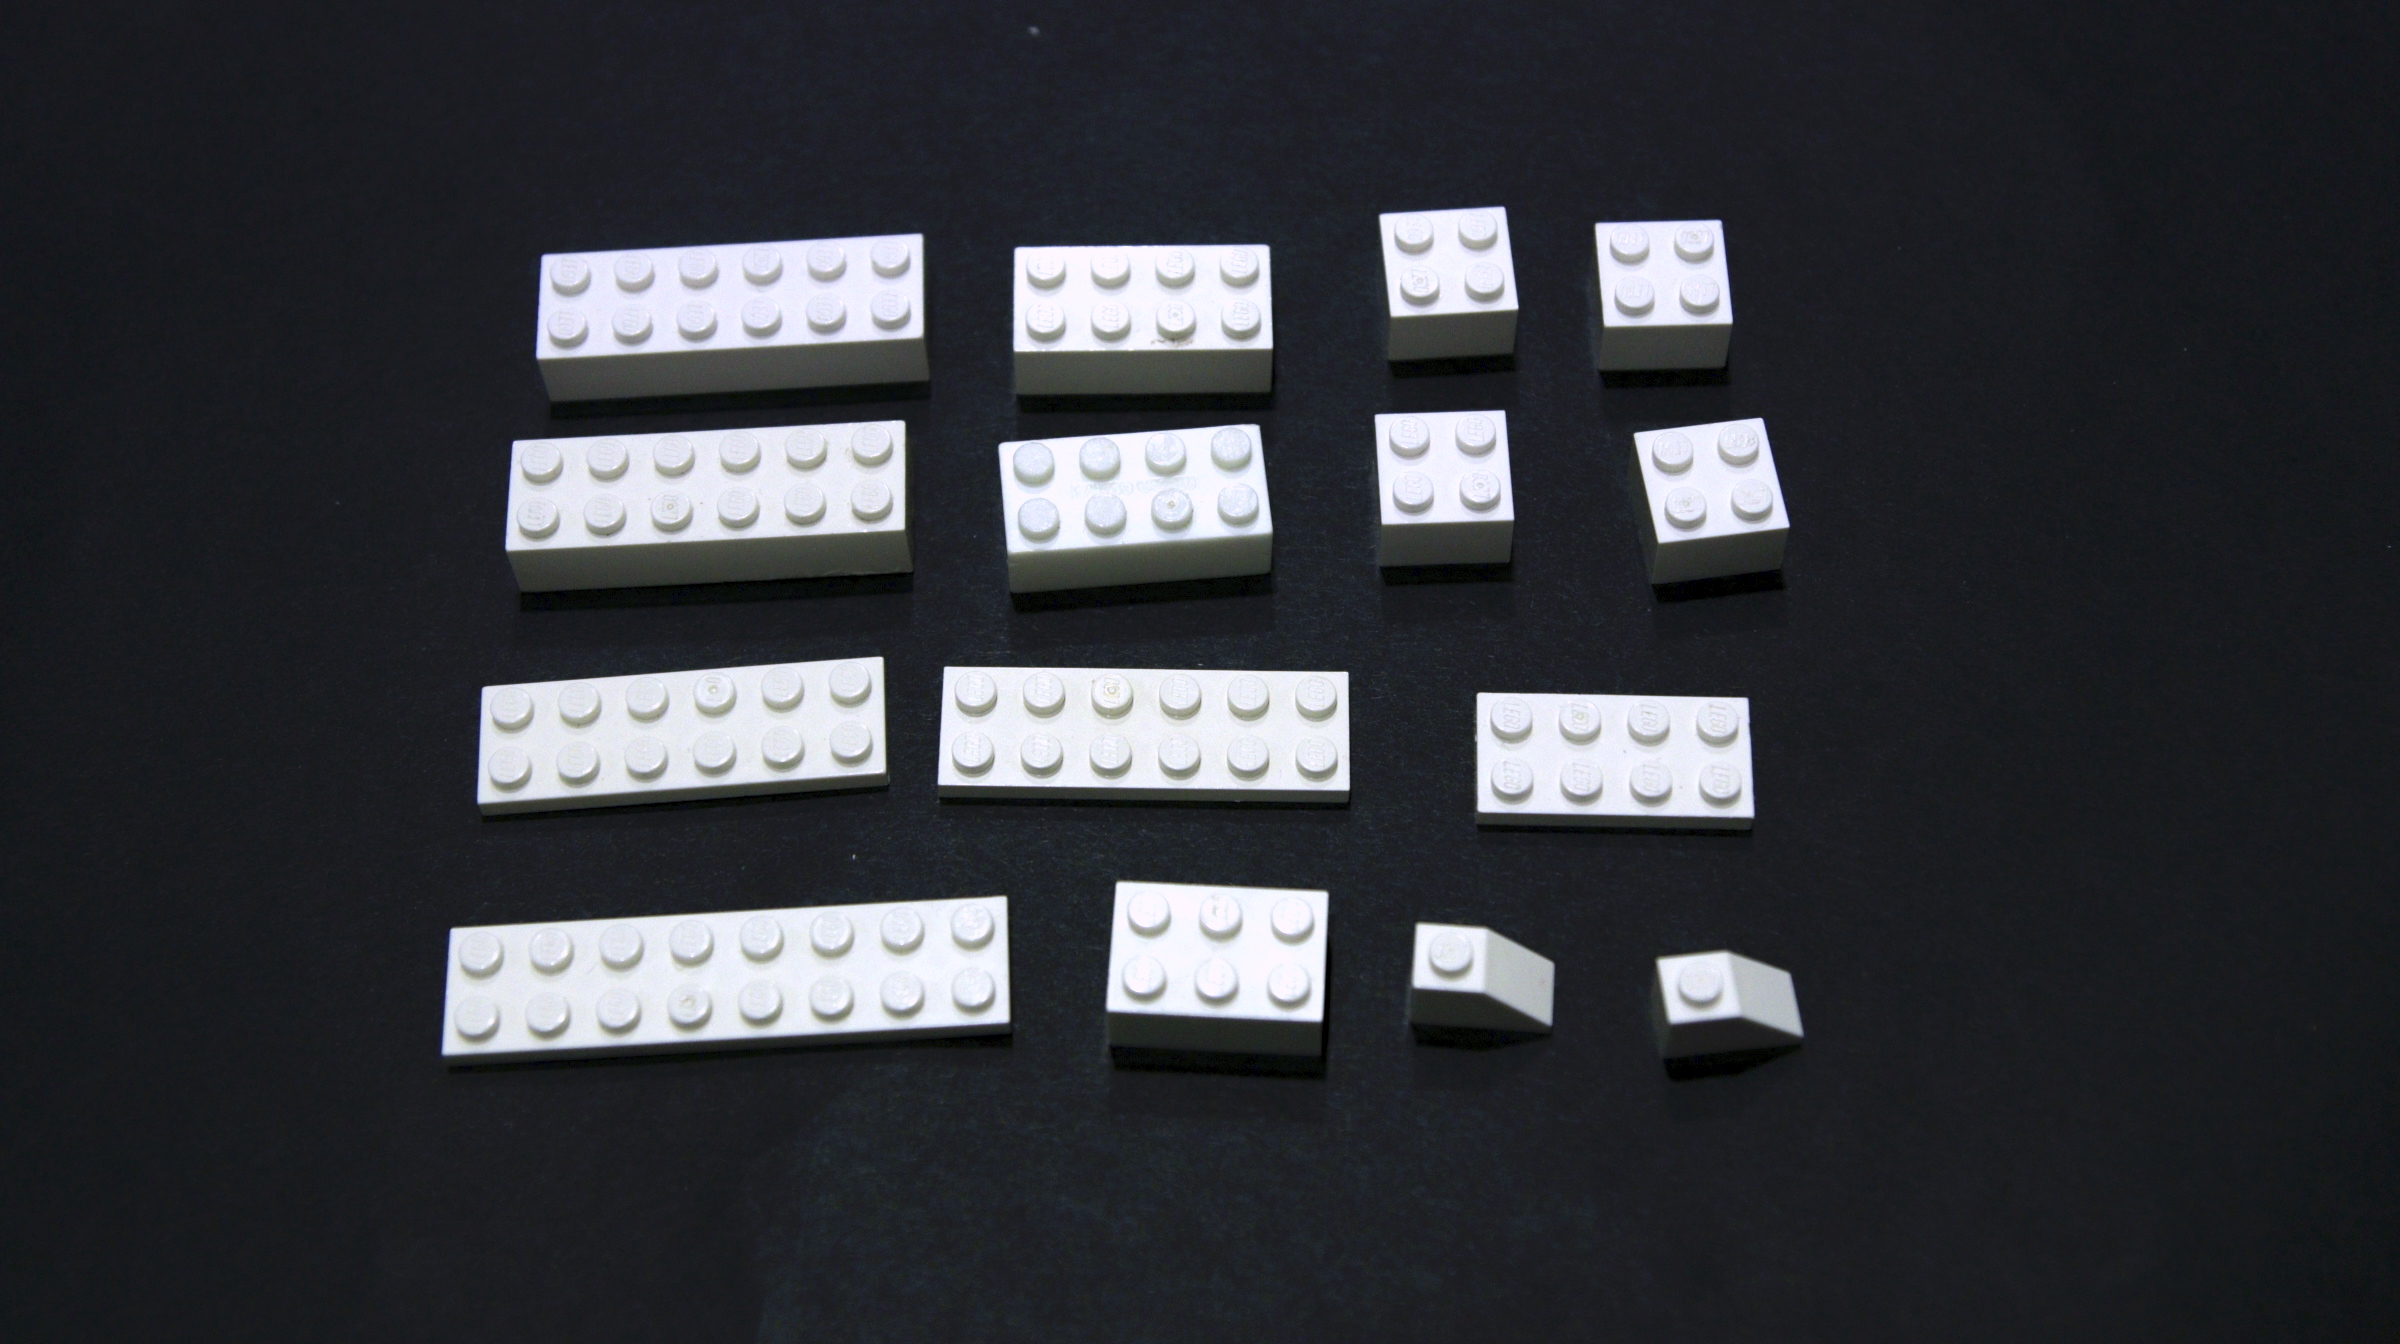
As for what Legos to use, I started by creating a sample set from a box of Legos Golan loaned me. I had a few heuristics in mind: if I believe that a certain piece would only be used one way by everyone (ie. a wheel or windshield) then it was off limits. I wanted to stick to pretty classic, blocky Legos. I also used only white pieces so color was a factor; I wanted people to focus on shape. I also wanted the set to have enough pieces that I got highly varied solutions (can you imagine how boring the 2-piece solutions would be?) but few enough that people had to sacrifice some details.

At about this time, I decided that I wanted to require that all Legos be used in the final construction. I thought that as long as this didn’t significantly hamper people’s creative freedom, it would be a lot more satisfying. The results become “ways to rearrange these same Legos into airplanes” instead of just “many Lego airplanes.”

A potential Lego set I was considering.
A beautiful biplane made by a pilot participant.
This pilot participant forgot to include wings on his airplane.

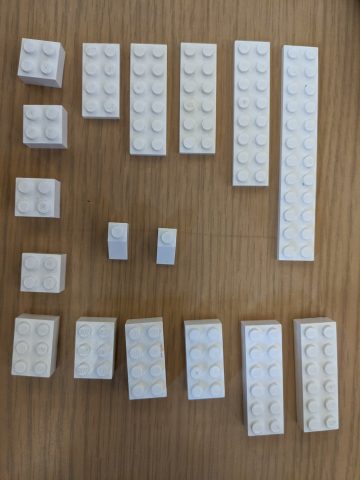
I tried out my brick set on many people before finding the one I ended up using. One very long flat piece from the original set was used by everyone as part of the wings, so it was no longer interesting, so I removed it. I also reduced the number of bricks slightly, as most people were finishing with bricks to spare and struggling to find uses for the leftover ones (I liked a little bit of this, as it gave me interesting features like wing flaps, exhaust trails, and wheels made out of bricks. But it got to be too much with some of my sets). I was also very pleased with my preliminary results, since the airplanes I was getting looked quite different from each other.

Interestingly, after I decided on my 15-brick set, I found this video of a similar 15-brick Lego building experiment (in this one, participants are given 15 random bricks and told to make anything they want, something I definitely did not want to do). So I guess I’m not the only one who found that to be a pretty good number!

Data Collection

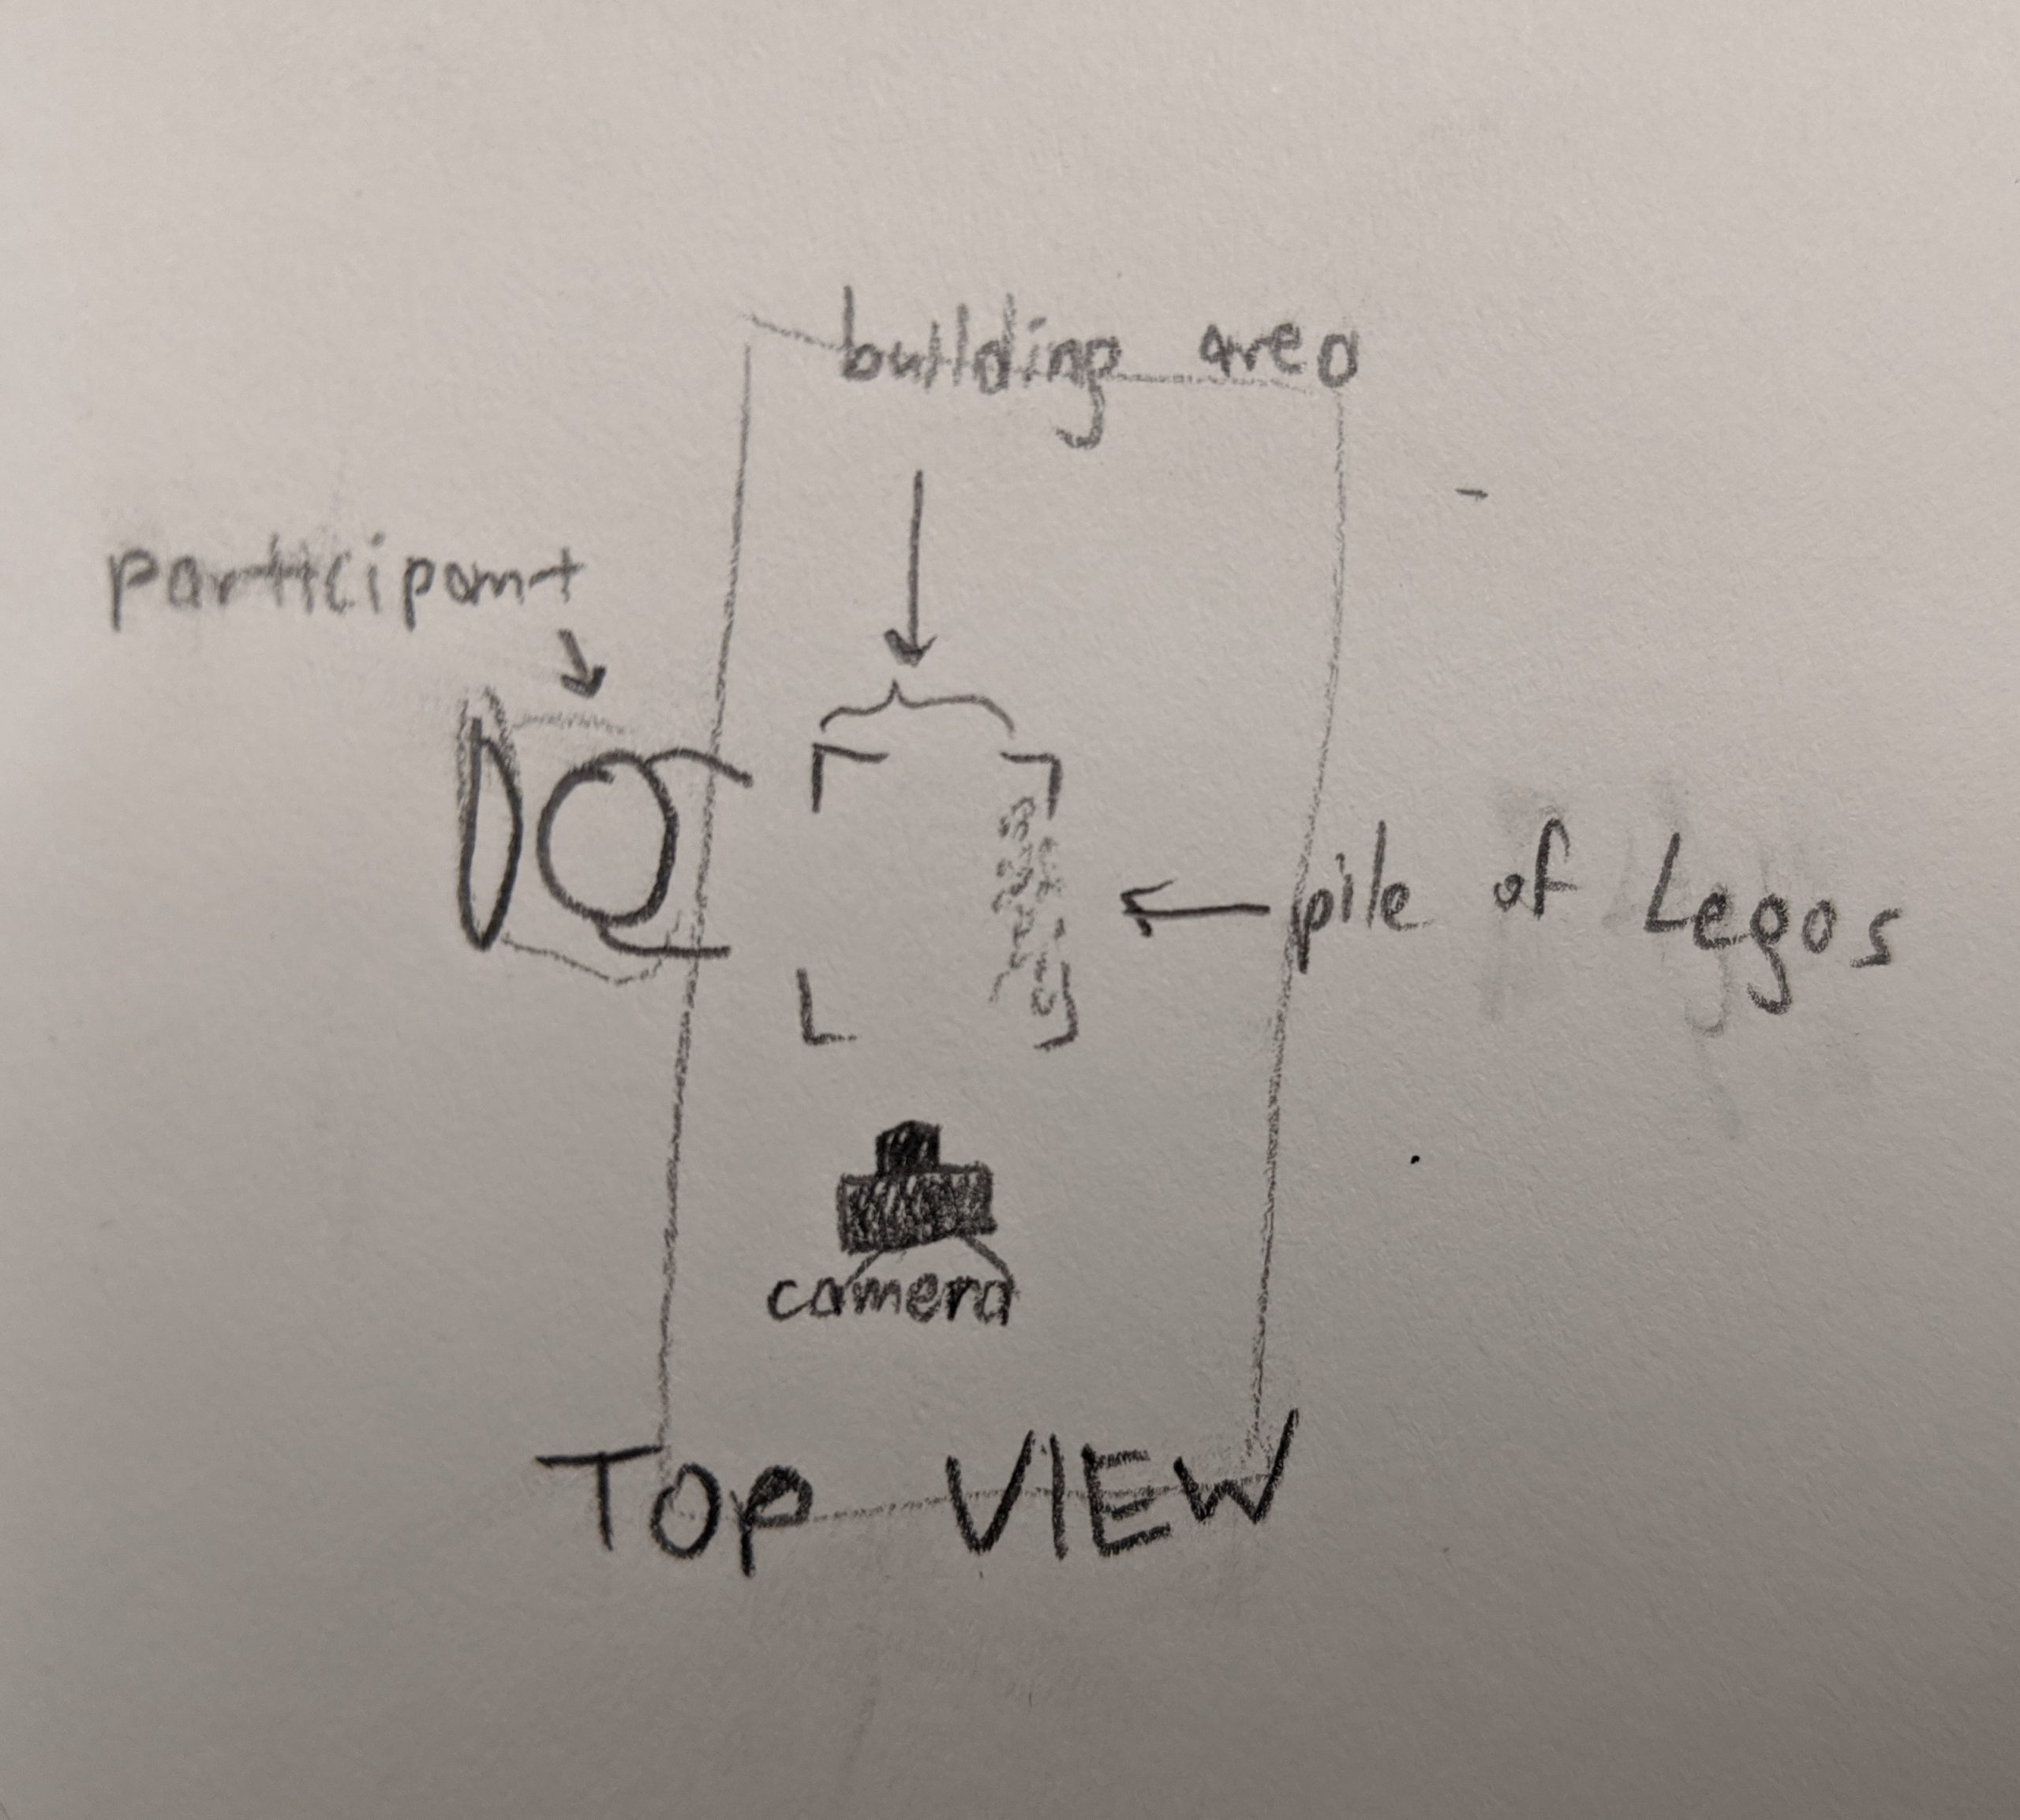
When I first started collecting my airplane designs formally, I wasn’t sure how I would present them. So, just to be safe, I thought I should capture the entire building process, in case I wanted to display the videos of every plane being created or make a list of all the steps people took.

My very enticing CUC table

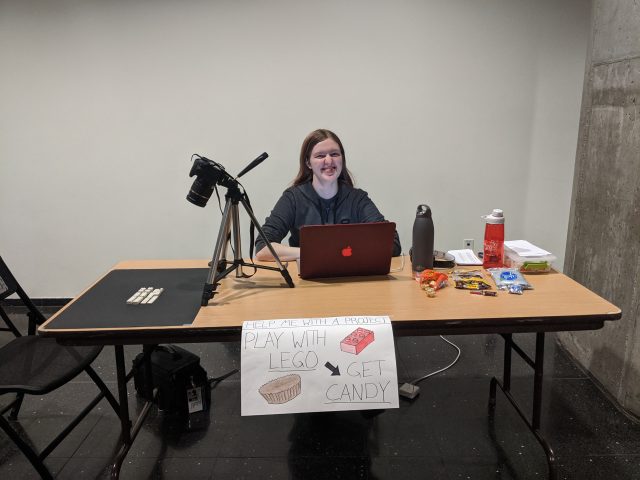
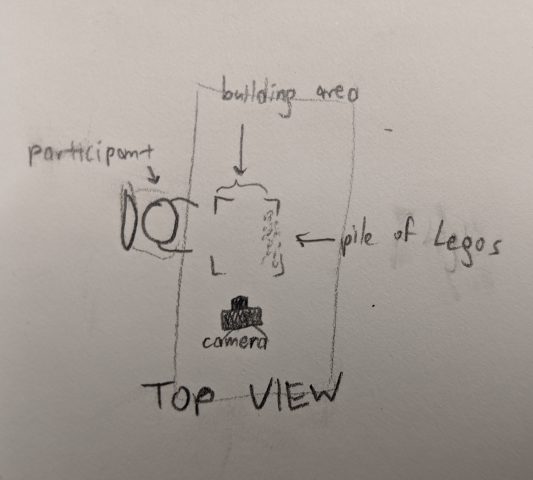
I set up a table in the University Center with the very enticing poster “Play with Lego, Get Candy.” I had a camera set up pointing at the Lego-building area, and I would record any time someone was building anything. I also had people sign a release saying I could use their design in this project and optionally use the footage of their hands in my documentation (which I ended up not doing). I got about fifteen volunteers this way. Some of them found very creative approaches to the problem that weren’t considered “valid” Lego constructions. Initially, I allowed people to do this, but I later decided that I shouldn’t, so a few contributions had to be thrown out.

Once I knew that all I was going to need from people was their plane design (not the footage of their hands), collection was even easier. I’d carry around my little bag of Legos, and when I had a moment, would ask the people around me to make airplanes with them. Then I’d photograph every angle of the planes that were made. After this, I had a total of 20 valid airplanes.

Encoding the Airplanes

In my initial research for this project, I came across Mecabricks, an in-browser tool for designing Lego models. It has thousands of Lego bricks that you can use, a great interface for moving them and snapping them together, and it’s totally free. Best of all, it has an extension for Blender that lets you animate and render nearly photo-realistic images of your Lego models (if I had bought the paid version, I could have chosen just how scuffed up I wanted the surface of the bricks to look, and how many fingerprints they had on them–how cool!). If you want to make a Lego animation for some reason, I can’t recommend this enough. My only complaint is that the documentation for some features is pretty poor.

Me using Mecabricks in a browser

I decided to model and render people’s airplanes in Blender because I wanted their contribution to be not the physical figure they created, but their design. Mecabricks models let one uniquely describe a Lego creation with no extraneous detail–exactly what I wanted. It also allowed me to render them all with exactly the same lighting/camera conditions, which is always good for a typology. Finally, it’s a format that people can potentially explore in 3D (Mecabricks has a model-sharing website for this), without the loss I would incur doing something like photogrammetry. The only downside of this decision is that it meant I had to learn Blender, which while probably valuable was not very much fun.

Animating in Blender

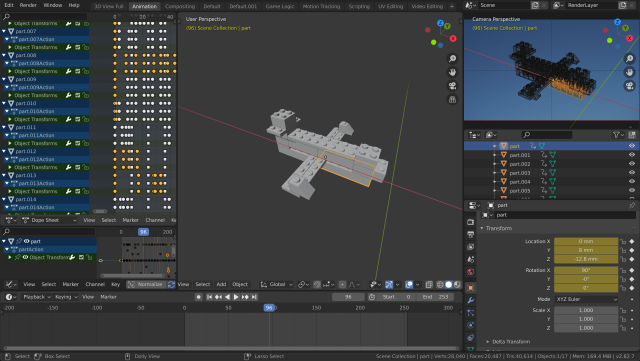
After I put all the models in Blender, I had the idea of animating transitions between them to really drive home the combinatorial element of this: it’s all the same blocks being rearranged every time. I ordered the airplanes based on my own subjective preferences, putting two next to each other when they had something interesting in common that I wanted to highlight. Then I animated all of the bricks moving, which took WAY longer than I thought, but also was pretty rewarding! I find the resulting video (top of this post)  extremely satisfying to watch.

Claimed a row of computers for rendering

Results and Discussion

Below is an image of all 20 rendered airplane designs, ordered by participant first name.

I have really enjoyed comparing and contrasting them so far. Here are some things I’ve noticed:

  • Most people used the small sloping bricks as the nose of the plane, but a few did put them on the wings or tail.
  • Many people used the two 2×6 flat bricks as the wings, but they were also popular as support bricks for the body of the plane. The 2×8 flat brick was a common substitute, but some people made their wings out of thicker pieces.
  • People had pretty different approaches to the tail end of their airplanes, with many adding some small crossbar, some making a very pronounced tail, and some just letting their airplanes taper off.
  • People LOVE to make their airplanes symmetric. 19 of the planes are symmetric up to overall shape, and 18 of these are symmetric even down to the exact Lego (somewhat impressive given the fact that I included some odd-sized Legos with no matching partner).
  • A few categories of airplane have emerged, like those that are just plus signs, or those that are triangular.

The similarities/patterns above are especially evident in the animated video, I think. You can, for example, watch the slope pieces sit there near the front for many planes in a row.

I’m really happy with this project, but I do wish there were a little more to it. I would love to try this again with a different prompt. Maybe I can get 20 people each to make a Lego chair? Or maybe I can keep scaling down the number of Legos and see at what point they converge with many people making the same thing? Hopefully I can pursue this in the future–I’ve had a lot of fun with this project so far!

Typology Proposal: How to Build a Spaceship

For my typology project, I plan to use Legos to explore people’s ideas of space travel. In short, I’m going to present different people with the same set of Lego pieces and ask them to build a spaceship. I am interested in both what they think (the ultimate structure they create) and how they think (their process of construction). I was inspired by the typologies we were shown in class where people were asked to create things, like Kim Dingle’s “The United Shapes of America.”

Why a spaceship?

I had a few criteria in mind when deciding what my prompt would be. I want it to be vague enough that people could use their own creativity, which is one of the joys of Lego. Showing a picture and telling them to “make this” would not only be less fun for them, but would probably yield less interesting and varied results. On the other hand, I don’t want to overdo the vagueness and make the participants feel pressured to generate artistically meaningful ideas themselves (ie. “build what love means to you” or “build whatever you want”). I think those results would also not be very interesting. Finally, I want the prompt to investigate a question I find meaningful. This one’s certainly subjective, but I kept it in mind anyway. I have to like this project after all.

I landed on “spaceship” because it’s a wonderfully overloaded term. Am I talking about a NASA rocket, a flying saucer, or a sci-fi warship? For any given person, chances are they already have a mental image of a “spaceship,” and it’s different from someone else’s. Space travel has been explored in the news and media in many different ways, and I want to see which of these emerge in people’s designs. How many will add some kind of weaponry? Will they be grounded in science? Will they resemble particular spaceships from franchises? I think this has the potential to be interesting.

Also, spaceships feel very “on brand” for Legos, which I always associated with STEM and sci-fi. It feels like an appropriate use of the medium. I also considered “robot” for the prompt, because it’s also sci-fi and has been widely explored in the media. But I thought it was a little too vague: people know robots can be anything from boxes on wheels to giant arms to realistic humanoids, so I expect many would either require further clarification or default to a sort of “boxy humanoid” that I don’t find very interesting.

What’s the procedure?

I will set up a building area on a table in an area with consistent lighting. The table will be covered in black (or possibly something space-patterned if I can find that) and have a pile of Legos. This set will include a lot of curvy, slanty, and smooth pieces, which are important to spaceships. There will be a camera on a tripod pointed at the building area, about 45 degrees downward and to the right side of the builder. When the participant arrives, I’ll ask them to build a spaceship in the building area (having already explained that I’d be recording them building with Legos). Then I’ll record video of them while they build. Once they finish, I’ll get a quick statement from them about what their process and what they were going for. Finally, I’ll transfer their spaceship to some sort of rotating tray, if I can, and record a video of it spinning around. Then I will disassemble it and start again with someone new.

What’s the display method?

So I’m not totally decided on this yet; we’ll see what kind of results I get. I’m hoping that the process of watching people build is interesting: maybe some people will sort out the Legos, some will go right into it and then have to backtrack, some will build larger sub-pieces and put those together, etc. If this is the case, then I think I’ll display these videos in a grid, sped up something like 10x, so you can watch the different building processes at the same time. Once each person finishes, we’ll stop on an image on their completed spaceship, so at the end you can see them all in a grid (before it loops back to the start). If this looks so busy that it’s disorienting, or if the building process turns out not to be interesting, I can just make a grid of the spinning spaceship videos.

One thing that would be very fun is to keep all of the Lego spaceships, and then display them together like a typology of sculptures. I think that would be the most interesting to look at, but it presents some challenges: I want everyone to have the same set of Legos. In other words, if the first participant uses up a lot of curvy pieces, I don’t want that to limit the next participant’s design. So if I’m not disassembling the ships, I’ll have to somehow replace the pieces that were just used between each trial? That seems logistically tricky, not to mention expensive (I’m shopping for the Legos now and already surprised how expensive some of the fancy stuff is). One potential option, then, is to do this virtually. Take lots of pictures of the spaceships, do photogrammetry on them, and put them in a digital outer space. I generally don’t love photogrammetry as a display method, but it may be appropriate here. Then again, this virtual version still looses the magical thingy-ness of actual Lego bricks.

I will continue to think about methods of display, and would love to discuss it with someone. One of the reasons I’m capturing video is because I’m still undecided on the display–a spinning video can become a set of images for photogrammetry, or series of progress images, or any number of things I may need.

Postphotography

I completely agree with Zylinska’s comment. The distinction between human and nonhuman photography, at least as those terms are used in this reading, is blurry at best. There have always been humans involved at some point in the photography process (in most cases; see the last reading), and there have always been machines/technical processes. The procedure for developing negatives is in its own way an algorithm, but no one could call that “postphotography.” However, using technology to capture images that humans physically cannot see with our own eyes does create exciting opportunities that would not have been possible with only traditional photography. One example that comes to mind is the recent image of black hole M87* that was captured by a team of scientists.

They could not simply point a camera at the black hole and take a picture, because no light can escape from a black hole. So they took a series of photos with a network of telescopes, combined them and filtered out noise using algorithms they developed, and ultimately obtained an image of the black hole’s shadow against the light of all the luminous gas around it. Though this was a very complex technical process, it was also the result of a lot of human work and ingenuity–not truly “postphotography” or “nonhuman photography,” then. Just a new method of capture.

SEM Results

Getting to use the electron scanning microscope was such a cool experience. I chose to scan some of my favorite tea (Bigelow Constant Comment, a very common spiced black tea), thinking there would be a lot of different types of things mixed together. Well, maybe the components were too well mixed together, or maybe only the same kind of component stuck to the tape, but it all looked more homogenous than I expected. Here are some familiar views that I captured (20x and 27x zoom, respectively):

I believe the big chunk may be a piece of orange peel, with the rest being standard “tea leaves.” I couldn’t decide what to zoom in on, so I did a few different unfamiliar views. The first is of that hole in the largest chunk:

I took several pictures of this from different angles, making two of them into this 3D image:

The second unfamiliar view is of a trichome (a little hair that helps leaves retain moisture) on one of the smallest tea leaves:

Which I made into this 3D image:

I think this trichome looks delightfully creepy. However, I  took a look at both of the 3D pictures I made with red/blue glasses, and didn’t find either of them very successful. There just isn’t much depth, and some parts don’t look in focus anymore. Perhaps it’s the angles I chose, but if anyone can see where I went wrong and how I might fix it, I’d love suggestions.

Finally, I took one more unfamiliar view at about the highest zoom I could get before losing all clarity (15000x). It doesn’t look like much, so I didn’t do a 3D image of this one, but it certainly is unfamiliar. Maybe the added surface area that the roughness provides somehow helps it diffuse its flavor into the water more?

Photography and Observation

With most photographs, there is assumed to be some amount of objectivity, an assumption that I think for the most part is appropriate. Yes, the photographer needed to choose the angle, and the exposure time, and many details like that, but the image that was captured still represents the actual light that was there at the time. With typologies, the assumption of objectivity is even stronger. Because the images captured are methodological, they beg to be compared and contrasted with each other, comparisons that can only be meaningfully made if we assume the images are accurate. But what they need even more than accuracy is consistency: each subject being captured with the same medium, from the same angle, in the same fashion. As the reading describes, this is often very difficult to achieve, but advances in technology make it increasingly more possible. Though no method of capture can be totally objective, careful procedural photography is still a powerful tool for observation, and a great medium for scientific and artistic typologies.

Project Response

This is a response to Steven’s post about Marmalade Type:

I know that the primary interest of this piece seems to be its optical illusion, but it got me thinking about how one could merge ExCap with typography. I am 90% sure that in a past class with Golan I saw someone make a project using Kinect where the shape of one’s body controlled various details of a font, so they could dance around and create their own personal typeface. I looked for it a while and couldn’t find it, so instead I offer you a link to this website about manually manipulating fonts (still pretty fun): https://v-fonts.com/

Also read: Joyce’s post on “Delusional Crime and Punshiment”, Philippe’s post on “The Clock”, Izzy’s post on “Learning to See”, and Stacy’s post on “Tea Ceremony”.

Reading 01 – Jacqui

As any task becomes automated by machines, the relationship between operator and machine changes. For example, sewing clothes once had to be done entirely manually, then more effectively with mechanical sewing machines, and now one person can oversee a massive factory machine mass producing items of clothing. I don’t think these new advancements in cameras are much different than that, though they may feel that way since photography is generally considered a creative act. Many of the boring or difficult parts of photography (like snapping the picture at just the right moment or editing a face to look more beautiful) can now be done with machine learning, which frees up people to do more of the interesting stuff, like choosing what to point the camera at. Even if this itself becomes automated (as in some ways it has), then the “art” just shifts to be something different, like choosing an image from a set, or deciding how to print and display a photo. The person responsible is still the author of the work, but what that means can vary depending on what exactly they did. This is nothing new, either. Even without ML, some photos are carefully arranged and lit in a studio by the photographer, while others are taken candidly “in the field.” Both are artwork, but the art-making act is different. So if a person creates a photograph by setting a smart camera in a certain location and waiting for it to snap a picture, then that decision itself is their art, and that’s how audiences will think about it. It doesn’t make them less of an author, and I don’t think it radically changes the notion of a “camera” either.

Project To Share: Unpainted Sculpture by Charles Ray

Unpainted Sculpture, by Charles Ray, is a recreation of a real car that was part of a fatal crash. Every visible part of the car, from the engine to the license plate to the leather seats, was cast and duplicated in fiberglass and then reassembled to create this sculpture (it was also, despite its name, painted gray). The result is a haunting shadow of the original car, frozen in time and missing any stains, dirt, or chipped paint we would expect on a crashed car. Though the car’s pieces are mangled, they are cleanly and evenly colored, putting all of the focus on the shape itself.

I think that 3D casts like this are an interesting form of capture. Though the premise here is very simple, the sculpture is very impactful, especially in person. It’s also not entirely objective. In addition to choosing what car to cast, Ray made some other artistic decisions, like not to cast any of the windows (I’m assuming they didn’t all break away completely, and that he instead omitted them so we could see inside), and what material to use. I think that the smooth gray color makes this look like a figurine that has yet to be painted, like it’s been mass produced exactly like this, which adds to its eerie energy.