Yoshi Torralva—Looking Outwards—09

eCloud installation in the San José Airport
Schematics of the eClouds for the San José Airport
Tiles used that can go from transparent to opaque.

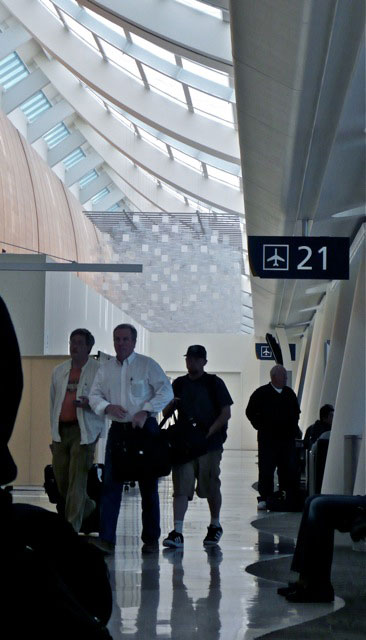
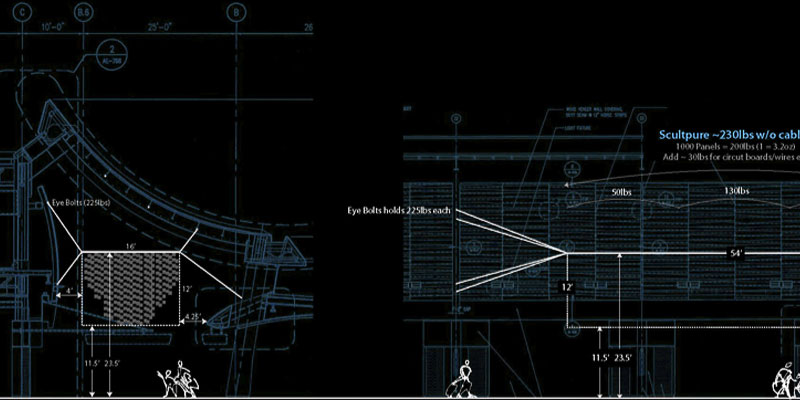
For this looking outwards post, I found Joseph Zhang’s looking outwards post on the eCloud for data visualization quite interesting. eCloud is a physical representation of weather conditions in the current location. On the side of the walkway, different computer-generated Created in 2010 and a permanent installment in the San Jose Airport, eClouds are generated from other sites on a screen. I want to add to Joseph’s comments on the eCoud to how this physical data-visualization of weather data improves the overall space. As a whole, the opaque tiles create a feeling of direction, leading people to move across the terminal. Additionally, I admire how unobtrusive it is to both allow people to take a glance at the screen to understand the meaning of the formation of tiles but also move quickly through space. At first, it looks as if there is no technology equipped to these tiles, but through live-imputed data, it slightly shifts from transparent to opaque.

Yoshi Torralva—Project 9—Portrait

sketch

//Yoshi Torralva
//yrt@andrew.cmu.edu
//Section E
//Project—09—Portrait
var underlyingImage;

function preload() {
    var myImageURL = "https://i.imgur.com/htGpgok.jpg";
    underlyingImage = loadImage(myImageURL);
}

function setup() {
    createCanvas(480, 480);
    background(0);
    underlyingImage.loadPixels();
}

function draw() {
    //variables to randomize location
    var px = random(width);
    var py = random(height);
    var ix = constrain(floor(px), 0, width-1);
    var iy = constrain(floor(py), 0, height-1);
    var theColorAtLocationXY = underlyingImage.get(ix, iy);
    frameRate(360);

    //large border that indicates which pixel is drawn
    // rectangles redrawn at different angles that creates circular border
    push();
    rectMode(CENTER);
    translate(240, 240);
    noFill();
    stroke(theColorAtLocationXY);
    strokeWeight(1);
    rotate(random(0, 10));
    rect(10, 10, 460, 460);
    pop();

    //light beams formed by random length
    noStroke();
    fill(theColorAtLocationXY);
    //shorter beams for greater quality 
    rect(px, py, random(1), random(4, 50));
    //longer beams for greater expression 
    rect(px, py, random(1), random(50, 100));

    //placed on top layer to create a more visible image
    //end points of the beams
    push();
    rectMode(CENTER);
    rect(px, py, 3, 3);
    pop();
}

start of the portrait
in the middle of the generation of the portrait
nearing the end of the generative portrait
Self-portrait

With this project, I wanted to use an image that was simple which would allow me to have an increased focus on the formulation of forms. I decided to use this self-portrait photo from the mattress factory as it only relies on black and blue. I was inspired by light beams and achieved this through randomly sized length rectangles with squares placed on the top of each randomized length rectangle. To add an additional element, I placed a rotating square that formed a circular border informed by called pixel colors.

Caroline Song – Project 09 – Computational Portrait

sketch

//Caroline Song
//chsong@andrew.cmu.edu
//Section E
//Project 09

var imageUnderneath;
var imageColor;
var constrainX;
var constrainY;

function preload(){
    //preload image
    var myImageURL = "https://i.imgur.com/SHu7RYA.jpg";
    imageUnderneath = loadImage(myImageURL);
}

function setup(){
    createCanvas(450, 450);
    background(0);
    imageUnderneath.loadPixels();
    frameRate(1000);
}

function draw(){
    var rectX = random(width); //rectangles are placed randomly along width of canvas
    var rectY = random(height); //rectangles are placed randomly along height of canvas
    var rectSize = 10; //size of rectangle
    var ellipseSize = 10; //size of ellipse

    //constrain rectangles to canvas size
    constrainX = constrain(floor(rectX), 0, width);
    constrainY = constrain(floor(rectY), 0, height);
    
    //get and fill colors according to picture underneath
    imageColor = imageUnderneath.get(constrainX, constrainY);
    noStroke();
    fill(imageColor);

    //ellipses are drawn instead of rectangles when key 'e' is pressed
    if(key == 'e' || key == 'E'){
        ellipse(constrainX, constrainY, ellipseSize);
    } else{
        rect(constrainX, constrainY, rectSize, rectSize);
    }
}

This project was very interesting, however, I didn’t know how to approach it at first. I wanted to have some sort of interactive element to my self-portrait project. In my final piece, I chose to switch the shapes that the code draws in, from rectangles to ellipses.

Final project after 30 seconds
Final project after 3 min
Original picture

Mihika Bansal – Project 09 – Portrait

sketch

//Mihika Bansal 
//mbansal@andrew.cmu.edu 
//Section E 
//Project 9

var portrait; 

function preload(){
    var url = "https://i.imgur.com/rh2ehQc.jpg"; 
    portrait = loadImage(url); 
}

function setup() {
    createCanvas(480, 480);
    background(0);
    portrait.loadPixels(); 
    frameRate(2000); 
}
   
function draw() {
    //random pixel 
    var px = floor(random(width)); 
    var py = floor(random(height)); 

    //color variables for that pixel 
    var cx = constrain(px, 0, width - 1); 
    var cy = constrain(py, 0, height - 1); 

    var colorLoc = portrait.get(cx, cy); 

    noStroke(); 
    fill(colorLoc); 

    //person (rectangles)
    if(px > 120 & px < 430 && py > 30 && py < height){
        rect(px, py, 5, 5); 
    }
    //background (ellipses)
    else{
        ellipse(px, py, 10, 10); 
    }
    
}
  

This project was very interesting to complete. I enjoyed the process of playing with different shapes to complete the different colored sections that worked together to form the portrait. I wanted to use larger ellipses in the background to create a more hazy background.

Screenshot 1
Nearly final image
The original image

Margot Gersing – Looking Outwards -09

Death Mask representing the past, present and future.

I decided to look at Julia Nishizaki’s post on the Vespers. Theses are 3D-printed ‘death masks’ by Neri Oxman and her Mediated Matter Group at MIT. These are modern interpretations of traditional death masks using cutting edge materials, processes and visuals. Part of the reason why I decided to write on this post in particular was because I had never heard of a death mask before. After reading about this a death mask is a traditional mask that was supposed to capture the wearer’s last breath.

At MIT, Oxman, has interpreted this as a representation of the past present and future. My favorite part about these mask is the part representing the future synthetically engineered microorganisms to produce specific pigments or chemicals and are specific to the individual’s genetic makeup. It is so cool how they utilize living organisms within the artificial mask and they work together to create one cohesive piece.

Julia mentions the possibilities of this being a step towards wearable technology and interfaces and I thought this was a really interesting point. I like the idea that these technologies in the future might use microorganisms as part of the piece.

Charmaine Qiu – Project 09


sketch

Finished Portrait

When mouse is dragged on canvas

In this project, I had fun creating an interactive portrait of myself. I mimicked splashes of paint dropping down when the mouse is dragged on the canvas. I got to utilize what I learned from the previous assignments and incorporate them in my project.

//Charmaine Qiu
//charmaiq@andrew.cmu.edu
//Section E
//Project 09

var underlyingImage;
//create an empty array
var xarray = []
var yarray = []
//load the image from imgur.com
function preload() {
    var myImageURL = "https://i.imgur.com/cplu0CL.jpg";
    image = loadImage(myImageURL);
}

function setup() {
    createCanvas(400, 300);
    background(0);
    image.loadPixels();
    frameRate(100000000); //generate the image in a faster speed
}

function draw() {
    var px = random(width); //the location for x coordinate
    var py = random(height); //the location for y coordinate
    var ix = constrain(floor(px), 0, width-1); //constraining within the canvas
    var iy = constrain(floor(py), 0, height-1); //constraining within the canvas
    var theColorAtLocationXY = image.get(ix, iy);//fill in the color according to color of image
    noStroke();
    fill(theColorAtLocationXY);
    //draw the ellipses
    ellipse(px, py, 6, 6);
    //get the color of image at the mouse
    var theColorAtTheMouse = image.get(mouseX, mouseY);
    stroke(theColorAtTheMouse);
    //loop over the length of the array
    for (var i = 0; i < xarray.length; i ++){
        //fill with the color at the mouse
        fill(theColorAtTheMouse);
        ellipse(xarray[i], yarray[i], 5, 5);
        //make the ellipses go down mimicking paint drooling down
        yarray[i] += 0.5;
        }
  }
  //when mouse is dragged, add the mouse position to the array
function mouseDragged(){
    xarray.push(mouseX);
    yarray.push(mouseY);
  }

 //when mouse is pressed, a new array is created
function mousePressed(){
    xarray = [];
    yarray = [];
  }

Margot Gersing – Project 09

mgersing-09

//Margot Gersing - Project 09 - mgersing@andrew.cmu.edu - section E

var img; //original image
var sizeOne; //pixel size one
var sizeTwo; //pixel size two


function preload() {
    img = loadImage('https://i.imgur.com/Tx6sITJ.jpg?2'); //preload the image
}

function setup() {
    createCanvas(500, 761); //cnavas side of the image
    sizeOne = 1; //setting pixel size one to one
    sizeTwo = 20; //setting pixel size two to 20
    imageMode(CENTER);
    noStroke();
    background(255);
    img.loadPixels(); //pixelate the image
    frameRate(10000); //fast frame rate to load pixels faster

}

function draw() {
    //map the pixels size from 1 to 20, based on mouse postion
    var size = map(mouseY, 0, height, sizeOne, sizeTwo);
    var sizeW = map(mouseX, 0, width, sizeOne, sizeTwo);
    var x = floor(random(img.width));
    var y = floor(random(img.height));
    var pix = img.get(x, y);
    fill(pix, 128);
    ellipse(x, y, size, sizeW); //pixel is a ellipse based on the mapped size from mouse position
}

My grandmother, 11 or 12 (1940s)

For this project I decided to do a portrait of my grandmother when she was 11 or 12. I really like this photo of her and how it serves as a view into the past. It’s interesting to use such an old photo (1940s) in such a modern context and project.

I decided to have the pixels size dependent on the mouse position. This way you can control the way the image looks. The timing of when and where your mouse is also affects how the image will turn out.

variations on the image dependent on the mouse location and time.

Mihika Bansal – Looking Outwards – 09

The looking outwards post I want to look at for this post is Angela Lee’s post from week 6. This post deals with the artist Matt Deslauriers. The piece of work she specifically analyzes is a generative art piece that creates random colors and lines that generate based on the click of the mouse. I agree with Angela’s analysis of the importance of color in the artist’s piece. The artist used color palettes that pre-exist and are already established as well liked. This move is particularly smart as it is something that will appeal to the masses which is important in the pieces that he is creating. Angela also notes this in her own post. She also touches upon the importance of finding a balance in his piece which can be hard with the randomness of it, but she addresses this situation well as well.

Image of the piece that is created when you click the canvas.

Joseph Zhang – Looking Outwards – 09

http://refikanadol.com/works/melting-memories/

For this week, I looked at Jenny Lee’s Looking Outward-07 article focused on Refik Anadol and his project Melting Memories. Refik is a computational media artist who blurs the lines between computation and installation-based digital art.

https://courses.ideate.cmu.edu/15-104/f2019/category/looking-outwards-07/

Like Jenni, I am also completely fascinated by Refik’s algorithmic methods and uses of brain data. It’s always really incredible to see the thought process behind certain projects and this was one of them. I was also in love with the way Refik decided to actually render the information in visual graphics. The forms are so elegant and natural, but so clearly computational.

Below are screenshots of data used in the project. Seeing the backend of Refik’s practices is really inspiring to analyze.

YouieCho-LookingOutwards-09

A snapshot of “blue scrolling” by Dan Gries

Blog: https://courses.ideate.cmu.edu/15-104/f2019/2019/10/04/jina-lee-looking-outwards-06/

Original Work: http://rectangleworld.com/blog/archives/733

This is a randomness project that Jina explored on her LO. When I first took a look at this project on the artist’s website, I was surprised to see that it was animated because I didn’t imagine “scrolling endlessly” in such a dynamically animated way. Like Jina said, it is very interesting that the color and pattern is randomized, but the overarching system is very systematic. I was personally fascinated by the choice of spot color and gradient in this specific work. The gradient is not used simply in a decorative way, but it adds an interesting depth across the work, and the red becomes an important spot color that highlights the form and flow of a single braid. To add on to the post, the braid group consists of braid diagrams that have n strings that are attached to n points at the top and bottom of the diagram. Each braid is attached at the string ends to another braid to form a longer braid, then the whole braid is shrunk down vertically in half for an appropriate scale.