Sijings-LookingOutwards03

My first encounter with Madeline Gannon’s project helped me think about things from another perspective. Can this organic and hand-made like wearable decoration be made by computational digital fabrication? Watching Gannon’s video, I was attracted by this combination. Exploring even deeper, I found many similar ideas where digital fabrication and computational algorithms are used to produce wearable and fashionable objects. One project that I really like is the “Kinematics Dress” by Nervous System. Jessica Rosenkrantz and Jesse Louis-Rosenberg, which is also called as “Nervous System”,  have been doing highly influential work in the computational design of constructing decorative objects and garments.

The Kinematics Dress is a technical achievement made by a 3D-printed garment to satisfy people’s needs of wearing a dress made out of current technology that is comfortable and durable. The Kinematics Dress is fabricated in nylon by 3D printing with Selection Laser Sintering. The first idea of the project is to make a necklace where the necklace is printed flat and can be folded later. The object will be made in computer code relating to kinematics algorithms first and then printed in a 3D printer.

X-Ray View Rendering Showing Hinge Structure | 2014.12.04|in Studio

The Nervous System intends the move from assembling all little pieces and construct a larger piece to making a smart material that will self-assemble itself. They start with computational folding and simulation to construct the dress in one piece. They then create a large object of a 3d scanned person that is larger than the 3d printer and then fold to suit the fabrication. Then, when taking out of the machine, the dress gets unfold. The final presentation of the dress is hard material connected with softer connections where they link with each other and can move freely. I really admire this project as it combines engineering and science with design and fabrication. It presents me with a bigger idea that opens up more possibilities to create garments with today’s technology.

Swatch of Kinematics Structure Showing Hinge Details| 2014. 12. 04|in Studio
Dynamic Picture of The Whole Dress | 2014. 12. 04|in Studio

Kinematics Dress

yunzhous- Looking Outwards 01


Flower Forest1

Flower Forest2


Flower Forest3

I went to this immersive and interactive art exhibition by TeamLab this summer. The exhibition was installed in eight rooms, each room featuring one theme. The theme that interested the most is the Flower Forest. The exhibition uses digital technology to blur the boundaries between the physical world and the digital world. People can interact with the flowers, grow them, move them around, etc. The flower also “grow” on people’s clothing. I suppose the artists used commercial software because this installation only requires a sensor to detect people’s motion. A custom software wouldn’t be necessary.
I really admire the concept of the exhibition. In comparison with the traditional art exhibition where the audience should stay away from the artwork, the artists intend to have the audience to touch, feel, and even interact with the artwork. The audience can understand the artwork from their own perspective and I think it’s pretty amazing.

You can view more images here

Project-03-Dynamic-Drawing

As I was creating this, I didn’t really know what my end goal was going to be. I mostly let creative freedom have its way while I tried out different shapes and movements to see what I liked best. Altogether, this project was pretty tough for me, as a couple of things I wanted to do were a little too complicated (and it was all getting too jumbled and confusing), so I tried to keep it simpler, but with interesting-enough shapes. I tried to experiment more with triangles and mouseX/mouseY, which is why I focused so much on it.

sketch

//Natalie Schmidt
//nkschmid@andrew.cmu.edu
//Section D
//Project-03

function setup() {
    createCanvas(480, 600);
    rectMode(CENTER);
}

function draw() {
    background(248, 207, 233);
//background lines
    var x = 0
    fill(0, 255, 0);
    strokeWeight(.3);
//these lines will shake back and forth - it
//   will change the position of each line with a value
//   between 1 and 5 as well as move with the mouse
//half of them will move up with the mouse,
//half will move down with the mouse
    x = x + random(1, 3);
    line(x + 5, 0, x + 5, mouseY);
    line(x + 25, 600, x + 25, mouseY);
    line(x + 45, 0, x + 45, mouseY);
    line(x + 65, 600, x + 65, mouseY);
    line(x + 85, 0, x + 85, mouseY);
    line(x + 105, 600, x + 105, mouseY);
    line(x + 125, 0, x + 125, mouseY);
    line(x + 145, 600, x + 145, mouseY);
    line(x + 165, 0, x + 165, mouseY);
    line(x + 185, 600, x + 185, mouseY);
    line(x + 205, 0, x + 205, mouseY);
    line(x + 225, 600, x + 225, mouseY);
    line(x + 245, 0, x + 245, mouseY);
    line(x + 265, 600, x + 265, mouseY);
    line(x + 285, 0, x + 285, mouseY);
    line(x + 305, 600, x + 305, mouseY);
    line(x + 325, 0, x + 325, mouseY);
    line(x + 345, 600, x + 345, mouseY);
    line(x + 365, 0, x + 365, mouseY);
    line(x + 385, 600, x + 385, mouseY);
    line(x + 405, 0, x + 405, mouseY);
    line(x + 425, 600, x + 425, mouseY);
    line(x + 445, 0, x + 445, mouseY);
    line(x + 465, 600, x + 465, mouseY);
//triangles
//the top points of each triangle will follow mouse
    fill(155, 44, 75);
    push();
    noStroke();
//top triangles
//constrain mouseX within the canvas
    var mouse1 = max(min(mouseX, 480), 0);
    var mouse2 = max(min(mouseY, 640), 0);
    triangle(mouse1, 50, 50, 150, 125, 150);
    triangle(mouse1, 50, 200, 150, 275, 150);
    triangle(mouse1, 50, 350, 150, 425, 150);
//center triangles - these will go in opposite direction
    triangle(-mouse1 + 480, 225, 50, 325, 125, 325);
    triangle(-mouse1 + 480, 225, 200, 325, 275, 325);
    triangle(-mouse1 + 480, 225, 350, 325, 425, 325);
//bottom triangles
    triangle(mouse1, 400, 50, 500, 125, 500);
    triangle(mouse1, 400, 200, 500, 275, 500);
    triangle(mouse1, 400, 350, 500, 425, 500);
    pop();
//these circles wil move vertically with the mouse
//larger circles
    push();
    noStroke();
    fill(201, 50, 93);
    ellipse(75, 10 + mouse2 * 225 / 600,
        40, 40);
    ellipse(75, 200 + mouse2 * 225 / 600,
        40, 40);
    ellipse(240, 10 + mouse2 * 225 / 600,
          40, 40);
    ellipse(240, 200 + mouse2 * 225 / 600,
          40, 40);
    ellipse(400, 10 + mouse2 * 225 / 600,
         40, 40)
    ellipse(400, 200 + mouse2 * 225 / 600,
          40, 40);
//smaller circles
    ellipse(165, 10 + (-mouse2+1000) * 225 / 600,
          20, 20);
    ellipse(165, 200 + (-mouse2+1000) * 225 / 600,
          20, 20);
    ellipse(320, 10 + (-mouse2+1000) * 225 / 600,
           20, 20);
    ellipse(320, 200 + (-mouse2+1000) * 225 / 600,
           20, 20);
    pop();
}

LookingOutwards-03

One of the projects at the Computational Fabrication Group at Massachusetts Institute of Technology involves analyzing faces and recreating them on a computer. Faces are challenging because we are sensitive to the minute details on a face, and algorithms can only do so much. The CFG managed to develop algorithms to analyze and reproduce human appearances in real-time. They use this technology to make advances in cosmetics, movies, computer vision, and even virtual reality.

This is fascinating to me because human face details are so intricate and complex. All of my projects have been very simple so I can’t imagine how they managed to develop an algorithm to track and recreate faces in real-time.

monicah1-project-03

sketch

var x;
var y;
var offset = 300;

function setup() {
    createCanvas(640, 480);
    ellipse (CENTER);

}

function draw() {
	background (245,255,0);
	fill (30,255,0);
	noStroke();

	var m = max (min(mouseX, 640), 0);
	var size = m *100.0 / 200.0;
	ellipse (10 + m *190.0 / 400.0, 200.0, size, size);

	fill (0,0,255);
	size = 350 - size;
	ellipse(200 + m * 190.0/400.0, 200.0. size, size);
	ellipse (10 + m *190.0 / 250.0, 200.0, size, size);
	ellipse (40 + m *190.0 / 100.0, 150.0, size, size);

	fill (240,70,20);
	rect (40 + m *300.0 / 100.0, 150.0, size, size);
	rect (50 + m *100.0 / 50.0, 70.0, size, size);


	var line1 = map(mouseY, 100, 400, 76, 310);
    stroke(240, 10, 150);
    strokeWeight(10);
    line(240, line1, 240, 311);


    var line2 = map(mouseY, 100, 400, 76, 312);
    stroke(240, 10, 150);
    strokeWeight(10);
    line(252, line1, 253, 313);

    var line3 = map(200, mouseY, 400, 76, 310);
    stroke(240, 10, 150);
    strokeWeight(10);
    line(240, line4, 240, 311);


    var line4 = map(200, mouseY, 400, 76, 312);
    stroke(240, 10, 150);
    strokeWeight(10);
    line(252, line2, 253, 313);


    noStroke();
  
 
    fill(255);
    ellipse(mouseX, 100, 60, 60);

    fill(0);
    ellipse(width - mouseX, 200, 60, 60);

    if (mouseX > x) {
    	x += 10;
    	offset = -10;
    }

    if (mouseX > x){
    	x -= -10;
    	offset = 10;
    }

}

I tried to play with depth, rotation, and colors of objects in this assignment.

Nayeon_Looking Outwards03

Marius Watz is an new media artist using generative software processes. I found his work is very interesting because he is using visual algorithms not only for fabricate installation art, but animation and sound-responsive performances. It is very interesting that those open sauce languages provide new form of arts to new media artist like Marius. I’m not sure how he generate images with algorithm since I have a very little knowledge about programming, I know one thing that he creates all images with numbers with generative code. I’m quite suprised about the fact that this random generative numbers could create such beautiful images.

Prime Hex 2011

Cornical 2009

You can find more amazing works from Marius on this website.

Marius Watz website

enwandu-Project-03-Dynamic-Drawing

AvengersTower

/*  Emmanuel Nwandu
    enwandu@andrew.cmu.edu
    Section D
    Project-03-Dynamic-Drawing
*/

// Lower Window Lights Color
var WindowR = 49
var WindowG = 92
var WindowB = 98
//Controls background color and Building color
var bRed = 77;
var bGreen = 125;
var bBlue = 135;
// Controls the color of the Avengers Symbol
var AvengersR = 124;
var AvengersG = 198;
var AvengersB = 218;

function setup() {
    createCanvas(480, 640);
}

function draw() {
    background (bRed, bGreen, bBlue);
    stroke(255);
    strokeWeight(3);

//Changes Sky and building color as mouseY moves the length of the canvas
    if (mouseY > 0 || mouseY < 640){
        bRed = mouseY * ((77 -75)/640) + 40;
        bGreen = mouseY * ((125 -75)/640) + 40;
        bBlue = mouseY * ((135 -75)/640) + 40;
    }

//Changes "A" symbol color as mouseY moves the length of the canvas
    if(mouseY > 0 || mouseY < 640){
        AvengersR = mouseY * ((124 -75)/640) + 40;
        AvengersG = mouseY * (198/ 640);
        AvengersB = mouseY * (218/640);
        // WindowR = mouseY * ((124 -75)/640) + 40;
        // WindowG = mouseY * (198/ 640);
        // WindowB = mouseY * (218/640);

    }

//Changes "A" symbol as mouse X moves across canvas if mouseY less than 270
    if(mouseX > 0 & mouseY < 270 || mouseX < 480 && mouseY <270){
        AvengersR = mouseX * ((212-50)/640) + 4;
        AvengersG = mouseX * ((30 -10)/640) + 4;
        AvengersB = mouseX * ((16-5)/640) + 4;
        // WindowR = mouseX * ((212-50)/640) + 4;
        // WindowG = mouseX * ((30 -10)/640) + 4;
        // WindowB = mouseX * ((16-5)/640) + 4;

    }

// Window Detailing
    strokeWeight(0.5);
// Verticals
    line(105, 271, 105, 640);
    line(143, 143, 143, 521);
    line(181, 271, 181, 405);
    line(219, 271, 219, 345);
    line(257, 271, 257, 305);
// Horizontals
    line(67, 21, 98, 21);
    line(67, 49, 104, 49);
    line(67, 78, 111, 78);
    line(67, 102, 117, 102);
    line(67, 127, 127, 127);
    line(67, 154, 157, 154);
    line(67, 181, 342, 181);
    line(67, 215, 108, 215);

// Lower Window Color
    fill(WindowR, WindowG, WindowB);
    noStroke();
    strokeJoin(ROUND);
    beginShape();
    vertex(195, 407);
    vertex(278, 640);
    vertex(132, 640);
    vertex(144, 575);
    vertex(150, 540);
    vertex(161, 500);
    vertex(164, 487);
    vertex(166, 480);
    endShape();
// Lower Window Detailing
    stroke(200);
    strokeWeight(7);
    line(185, 432, 202, 432);
    line(174, 462, 211, 462);
    line(164, 492, 223, 492);
    line(156, 522, 234, 522);
    line(150, 552, 244, 552);
    line(144, 582, 254, 582);
    line(138, 612, 265, 612);
    stroke(255);
    strokeWeight(2);
    line(138, 600, 138, 640);
    line(147, 554, 147, 640);
    line(156, 518, 156, 640);
    line(165, 484, 164, 640);
    line(174, 459, 174, 640);
    line(183, 434, 183, 640);
    line(192, 410, 192, 640);
    line(201, 425, 201, 640);
    line(210, 434, 210, 640);
    line(219, 459, 219, 640);
    line(228, 484, 228, 640);
    line(237, 518, 237, 640);
    line(246, 530, 246, 640);
    line(255, 554, 255, 640);
    line(264, 582, 264, 640);

// General Building form
    stroke(255);
    strokeWeight(2);
    line(67, 0, 67, 640);
    fill(200);
    quad(234, 347, 227, 355, 325, 640, 337, 640);
    quad(212, 377, 195, 404, 278, 640, 300, 640);

    noFill();
    bezier(93, 0, 123, 195, 154, 155, 334, 175);
    bezier(121, 640, 158, 408, 203, 325, 319, 269);
    bezier(127, 640, 164, 408, 209, 325, 338, 269);
    bezier(131, 640, 166, 408, 221, 325, 335, 271);

//Dark Glazing behind "A" symbol
    fill(31, 51, 70);
    stroke(255);
    strokeWeight(2);
    ellipse(138, 220, 80, 80);
    noStroke();
    quad(328, 182, 319, 224, 153, 224, 153, 182);
    quad(279, 231, 265, 257, 153, 257, 153, 231);
    fill(200);
    stroke(255);
    ellipse(138, 220, 68, 68);
    fill(31, 51, 70);
    ellipse(138, 220, 60, 60);

    fill(200);
    noStroke();
    strokeJoin(ROUND);
    beginShape();
    vertex(275, 266);
    vertex(154, 266);
    vertex(154, 257);
    vertex(265, 257);
    vertex(279, 231);
    vertex(177, 231);
    vertex(179, 224);
    vertex(354, 224);
    vertex(354, 231);
    vertex(295, 231);
    endShape();
    ellipse(354, 227.5, 7, 7);

// Extends landing pad using mouseX within the range of 365 to 448
// and 335 to 418
    var LeftWall = 365;
    var RightWall = 448;
    var LeftWallb = 335;
    var RightWallb = 418;

    var xc = constrain(mouseX + 30, LeftWall, RightWall);
    var xcb = constrain(mouseX, LeftWallb, RightWallb);

    fill(31, 51, 70); // Controls color of landing pad explicitly
    stroke(255);
    strokeWeight(2);
    quad(59, 266, xc, 266, xcb, 271, 65, 271);// Draws landing pad

//Lighter Glazing
    fill(89, 116, 135);
    stroke(255);
    strokeWeight(1);
    quad(93, 0, 105, 0, 111, 19, 97, 19);
    quad(97, 20, 111, 20, 117, 39, 101, 39);
    quad(101, 40, 117, 40, 123, 59, 105, 59);
    quad(105, 60, 123, 60, 129, 79, 109, 79);
    quad(110, 80, 129, 80, 137, 99, 115, 99);
    quad(115, 100, 137, 100, 147, 119, 124, 119);
    quad(124, 120, 147, 120, 162, 139, 138, 139);
    triangle(139, 140, 162, 140, 175, 159);

//Avengers symbol
    fill(AvengersR, AvengersG, AvengersB);
    strokeWeight(2);
    strokeJoin(MITER);
    beginShape();
    vertex(108, 263);
    vertex(97, 263);
    vertex(144, 180);
    vertex(155, 180);
    vertex(155, 226);
    vertex(146, 218);
    vertex(146, 198);
    vertex(132, 223);
    vertex(146, 223);
    vertex(146, 220);
    vertex(157, 228);
    vertex(146, 236);
    vertex(146, 233);
    vertex(127, 233);
    vertex(108, 263);
    endShape();

    beginShape();
    vertex(155, 234);
    vertex(155, 249);
    vertex(147, 249);
    vertex(147, 240);
    vertex(155, 234);
    endShape();

}

function mousePressed(){
    if(mouseX > 0 & mouseY < 270 || mouseX < 480 && mouseY <270){
    WindowR = 194;
    WindowG = 209;
    WindowB = 15;
} else if (true) {
    WindowR = 42;
    WindowG = 92;
    WindowB = 98;
}
}

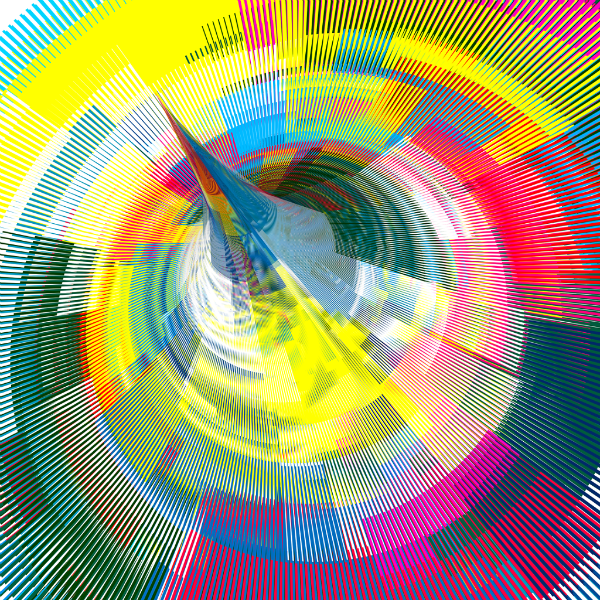
This project took a while. I started by simply drawing the form/design I wanted, defining a few variables along the way. When the initial form was near completion I started to explore the change of color and size, of a few elements in the drawing. I struggled with getting a smooth gradient of color change when the mouse moves, but eventually I found something that worked for me.

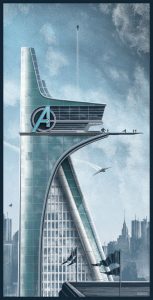
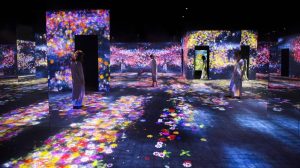
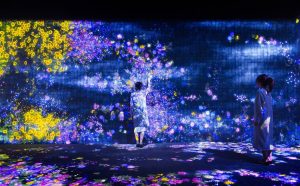
I based my drawing and design on this image. It was also my intention to have some avengers flying through the sky, but I broke my code when I tried.

I was inspired by my love of Marvel to code the Avengers Tower, in dedication of the fearless Avengers. Thank you for all you have done, and keep on avenging.

LookingOutwards03-jooheek

Silk Pavillion

Site: https://www.media.mit.edu/projects/silk-pavilion/overview/


This project is part of Mediated Matter of the MIT Media Lab. It exploresthe interaction between digital fabrication and natural fabrication by mimicing the silk thread structure of a silkworm’scocoon through a Computer-Numerically Controlled (CNC) machine and then having silkworms create their own silk structures from that primary, fabricated structure. Inspired by how silkworms can create their silk structure through one continuous

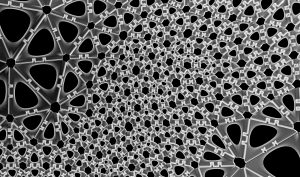
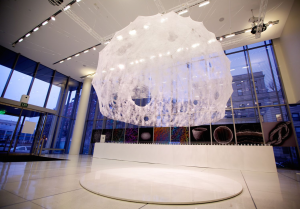
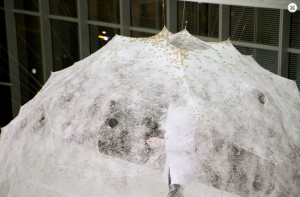
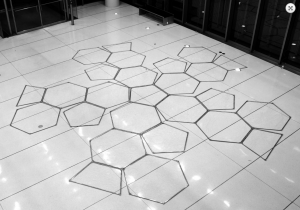
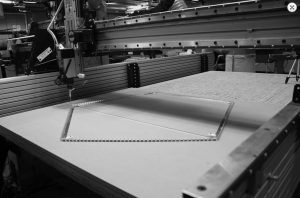
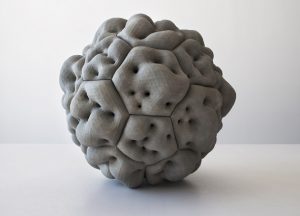
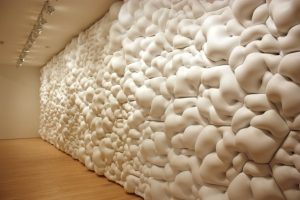
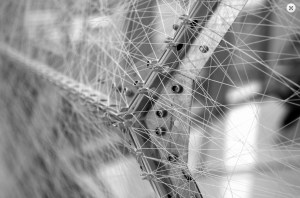
line of thread, an algorithm was created to mimic the single continuous style of the natural silkworm pattern and the variation of density of the fabricated threads. 26 panels of this silk scaffold was made and put together to make a dome. Then, silkworms were put into the dome structure to fill in the gaps with their own biological silk structures.

What admired me the most about this project was how mechanically fabricated structures can work alongside biologically, naturally created structures. It demonstrates how mechanic and natural physical worlds can work together to create beautiful outcomes. Another interesting aspect about this project was how because these two drastically different worlds worked together, they created a beautiful, artistic outcome. By generating an algorithm, scientists were able to mimic the natural world.

heeseoc-LookingOutwards-03

http://matsysdesign.com/

I really enjoyed looking at Andrew Kudless’ P-series. They immediately grabbed my attention as I browsed through the options because they have some seemingly organic qualities to their form, but are definitely generated digitally. I wanted to figure out the process and the mechanism behind it. The artist first started off with exploring some “evocative” texture on his computer, generating a cloud of points that are then turned into constraints that would hold the elasticity in the fabric which he used as the cover material. For his first piece in 2006, called the P-Wall, he used plaster poured into the mould with the fabric expanding under the weight of the plaster. For the next piece in the series, he explores more of the self-organization of material under force, leaving the fabric sag, expand, and wrinkle under pressure. He also has created something named the P-ball, which is a 3D printed concrete prototype. It is super interesting how it is possible to experiment with different materials with digitally created forms.


test

sketch

//Shariwa Sharada
//Section-A
//ssharada@andrew.cmu.edu
//Assignment-03-A

var ssw = 135;
var ssh = 160;

function setup(){
    createCanvas (400, 300);
    rectMode(CENTER);
}

function draw(){
//changing the background depending on the position of the cursor    
    background(mouseX, mouseY, 191);
    push();
    //limiting the colour change to certain types - dependent on the mouse placement within a 4x3 grid
    //changing colours dependent on the x-axis placement
    if (mouseX>0 & mouseX < ssw){
        mouseX = 246    
    }
    if (mouseX>ssw && mouseX < ssw*2){
        mouseX = 236
    }
    if (mouseX>ssw*2 && mouseX < ssw*3){
        mouseX = 226
    }
    if (mouseX>ssw*2 && mouseX < width){
        mouseX = 216
    }
    //changing colours dependent on the y-axis placement
    if (mouseY>0 && mouseY < ssh){
        mouseX = 180
    }
    if (mouseY>ssh && mouseY < ssh*2){
        mouseX = 170
    }
    if (mouseY>ssh*2 && mouseY < height){
        mouseX = 160
    }
    pop();

    push();
//creating the translating and moving squares
    translate (width/2, height/2);
    //stating the number of squares i want within the first level - 
    //using the increment command to have the squares rotated with equal distances.
    for (var a = 0; a < 15; a++){
        push();
        //rotation and pasting
        rotate(TWO_PI * a / 15);
        //making the placement of the level dependent 
        //on the y-axis placement of the cursor
        var X = mouseY;
        translate(X, 0);
        //the colour of this rectangles and randomising the transparancy
        //of the white to make the quares appear to flicker
        fill(255, random(20,90));
        noStroke();
        //the size of the first level of rectangles.
        rect(0,0,60,60);
        //stating the number of squares i want within the second level - 
        //using the increment command to have the squares rotated with equal distances.
        for (var b = 0; b < 12; b++){
            push();
            //rotation and pasting
            rotate(TWO_PI * b/12);
            //making the placement of the level dependent 
            //on the x-axis placement of the cursor
            var Y = mouseX;
            //the size of the second level of rectangles.
            rect (Y,0,30,30);
            //the colour of this rectangles and randomising the 
            //transparancy of the white to make the quares appear to flicker
            fill(255, random(10,80));
            noStroke();
            //stating the number of squares i want within the third level - 
            //using the increment command to have the squares rotated with equal distances.
            for (var c = 0; c < 8; c++){
                push();
                //rotation and pasting
                rotate(TWO_PI* c/8);
                //making the placement of the level dependent 
                //on the y-axis placement of the cursor
                var Z = mouseY;
                //the size of the third level of rectangles.
                rect (0,Z,10,10);
                //the colour of this rectangles and randomising the 
                //transparancy of the white to make the quares appear to flicker
                fill(255, random(10,50));
                noStroke();
                //preventing the code from affecting other factors of the program
                pop();
            }

            //preventing the code from affecting other factors of the program
            pop();
            }

        //preventing the code from affecting other factors of the program
        pop();
    }
    pop();
}