![[OLD FALL 2017] 15-104 • Introduction to Computing for Creative Practice](../../../../wp-content/uploads/2020/08/stop-banner.png)
For this week’s Looking Outwards assignment, I looked at the writing by my close friend, Na Hyun Kim. On week 4, she looked at different types of sound arts and decided to further explore loop sounds in music. She linked the topic of sound art to something that she is interested in. She further discusses loop music by giving an example of a youtube musician who used sound loops to cover songs. This is the youtube video mentioned before, and Na Hyun’s Looking Outwards post can be found here.
Category: Section B
mmirho – Looking Outwards 9 – Morphogenic Creations
I enjoyed reading Hamza’s post on Andy Lomas’s Morphogenic Creations.
The project, according to Hamza, was on display at the LACDA on September 29th of this year.
This is Hamza’s original post:
I think this project is especially interesting, simply because it caught my eye extremely well. The way the form twitches and moves felt like it made sense, that it was natural, or at least based on natural phenomenon. I was listening to music at the time, and I was mesmerized by the movement and unnerved. However, I agree with Hamza that a big part of the allure is the space it creates between the “Cells”. That’s part of what makes it fit in my mind because we don’t tend to interpret shapes as much as we interpret the space between them and the spaces they shape.
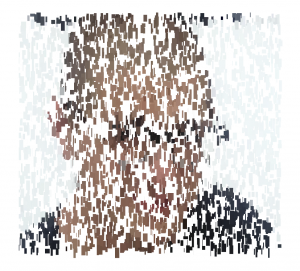
mmirho – Project 9 – Portrait – Saturated Pixelation
var underlyingImage; // The image used

var index; //The variable used to loop through the built in pixels array

var pixelation = 10; //The width of each pixel

var colorDiff = 15; //The variable used to compare the colors, and find if
// one color in the RGB spectrum is significantly larger

var r = 0; //the variable that measures the number of clicks you've done

var clickIndex; // The variable that decides if the number of clicks is
// divisible by 1, 2 or 3

function preload() {
    var myImageURL = "https://i.imgur.com/SMNCOc6.jpg";
    //Image of a portrait of me and my girlfriend at a botanical garden 🙂
    underlyingImage = loadImage(myImageURL);
    //Load the image into the variable underlying image
}

function setup() {
    createCanvas(400, 380);
    background(0);
    underlyingImage.loadPixels();
}

function draw() {
    noStroke();

    for (var y = pixelation/2; y <= 1000; y += pixelation) {
        for (var x = pixelation/2; x <= 1000; x += pixelation) {
            //These nested loops move through each and every pixel in the given image
            //They also move with relation to the pixelation intensity

            index = (x*2 + y*3200)*4 - pixelation*width/2;
            //A balancing act on looping through the colors of the image
            //using the built in pixels

            var redish = underlyingImage.pixels[index+0];
            //The red intensity of the current pixel
            var greenish = underlyingImage.pixels[index+1];
            //The green intensity of the current pixel
            var blueish = underlyingImage.pixels[index+2];
            //The blue intensity of the current pixel

            if ((redish > greenish+colorDiff) & (redish > blueish+colorDiff)) {

                fill(255, greenish , blueish);

                //If the red intensity of the observed cell is significantly
                // greater than the blue and green both, then the cell is
                // made much more red

            } else if ((blueish > greenish+colorDiff) & (blueish > redish+colorDiff)) {

                fill(redish, greenish , 255);

                //Same as above, but for the blue intensity

            } else if ((greenish > redish+colorDiff) & (greenish > blueish+colorDiff)) {

                fill(redish, 255 , blueish);

                //Same as above, but for the green intensity

            } else {

                fill(redish, greenish , blueish);
                //if there isn't a significant difference, then the cell
                //color remains normal

            }

            rectMode(CENTER);
            rect(x, y, pixelation, pixelation);
            //Makes the rectangle at each x and y with relation to the pixel intensity

        }
    }
}

function mousePressed () {

    r += 1;
    //Increment r each time you click

    clickIndex = r%3
    // clickIndex will only ever be 0, 1, or 2
    //and so we can set conditionals on it

    if (clickIndex == 0) {
        //if the number of clicks you've done is
        //divisible by three, the difference threshold
        //is much smaller, so more cells are colored
        colorDiff = 15;
    }
    if (clickIndex == 1) {
        //if you've done 3(n) +1 clicks, increase the threshold for less color
        colorDiff = 23;
    }
    if (clickIndex == 2) {
        //if 3(n) +2 clicks, decrease the threshold further for even less color
        colorDiff = 45;
    } //Here, only the most intense colored cells are effected

}
Click it! The “Saturation” decreases and then resets in increments.
This was very interesting, I had trouble balancing the pixels array and looping through it appropriately. But, once I had the pixelation formed correctly, it was easy to affect individual cells, so the setup was important to increase ease of use.
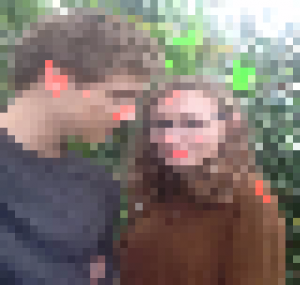
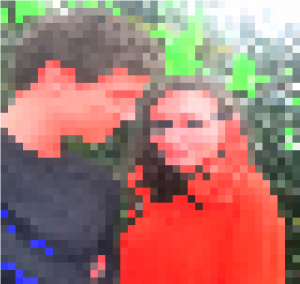
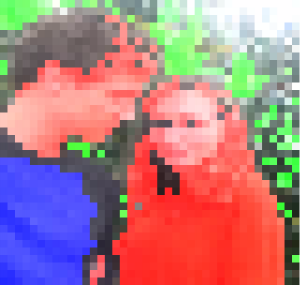
These are the three stages of intensity the image saturates the image of me and my girlfriend.
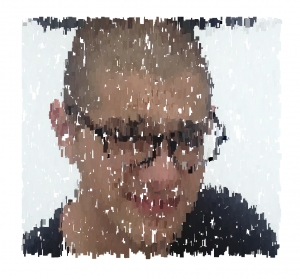
mjanco – Project09 – Portrait – SectionB
For this project I used a portrait I took of my friend David. I did the pointillistic approach, and mapped the rectangle sizes to change slightly based on mouseX and mouseY to create a very subtle variation of texture of the image as it comes into fruition.
rsp1-Project-09-Portrait
/*Rachel Park
rsp1@andrew.cmu.edu
Section B @ 10:30AM
Project 09: Pointilism Portrait*/

//initializing global variables
var img;
var Psmall;
var Plarge;
var x;

function setup() {
  createCanvas(480,480);
  background(255);
  img = loadImage("http://i.imgur.com/lSfjznd.jpg");//loading image uploaded onto imgur
  Psmall = 4;//ellipse size; small
  Plarge = 20;//ellipse size; large
  imageMode(CENTER);
  noStroke();
  frameRate(50);//speed at which ellipses are drawn
}

function draw() {
  var pointy = map(x, 0, width, Psmall, Plarge);//remapping different sizes of ellipses
  x = int(random(img.width));//setting random values gained from width of image as integer to use as location of ellipses drawn
  y = int(random(img.height));

  Pcolor = color(img.get(x,y));//initializing new variable where color of ellipses follows color of image being drawn
  fill(Pcolor, 255);
  ellipse(x, y, pointy, pointy);//drawing each ellipses
}
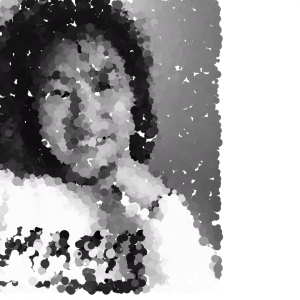
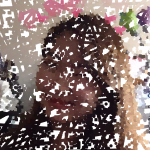
I decided to go with a selfie for this project. I chose to use a pose which engages the whole canvas and shows the features of the face. I really enjoyed the concept of this project because it is so abstract, and at the same time fun to see actual images of yourself emerge from a conglomerate of shapes.
rgroves – Looking Outwards 09
For this Looking Outwards I read Isadora Krsek’s post about Giorgia Lupi and Stephanie Posavec’s eyeo talk, which focused on their year long project Dear Data. She did a great job going into detail about the two artist’s backgrounds and careers, which helped explain why the two would be so attracted to collaborating with each other. They are both extremely successful and knowledgable in the fields of design and data representation, and all that combined experience allowed this project to become something really beautiful. The only thing I would change from Isadora’s post would be to include some pictures of the postcards, which are incredibly beautiful, intricate, and painstaking. It’s also fascinating how the two of them come up with methods of representing the same kinds of data. Sometimes they come up with very similar methods, like in drawing that represents times they loved their SOs versus times they were annoyed by them:
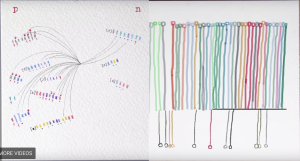
Other times, like in these drawings which track all the times the two artists complained, it’s impossible to tell that the two drawings represent the same kind of data.
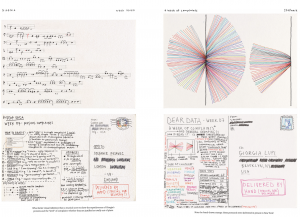
Considering they made 52 postcards, this project is an absolute goldmine of inspiration for anyone interested in data or data art.
I should also mention that I love the double meaning of the title, which both references the medium of postcards and the love the artists have for data itself.
https://courses.ideate.cmu.edu/15-104/f2017/author/ikrsekandrew-cmu-edu/
kyungak-project-09-portrait
//Kyunga Ko
//15104B
//kyungak@andrew.cmu.edu
//Project 09

var selfportrait; //self portrait image
var x = []; //x position array
var y = []; //y position array
var dx = []; //x velocity array
var dy = []; //y velocity array

function preload() {
    var imageURL = "https://i.imgur.com/pvmAYGW.jpg"
    selfportrait = loadImage(imageURL); // preloads the image
}

function setup() {
  createCanvas(480, 480);
  noStroke();

  //for loop for assigning random values for x,y,dx,dy
  for (var i=0; i<150; i++) {
        x.push(random(width));
        y.push(random(height));
        dx.push(random(-10,10));
        dy.push(random(-10,10));
  }
}

function draw() {
  //image(selfportrait,-250,-50);

  //for loop for
  for (var j=0; j<x.length; j++) {
    //pixel colors from image is stored into x and y array
    var color = selfportrait.get((x[j]+250), y[j]+50);
        //canvas is filled with image color
        fill(color);
        //ellipse fills the canvas + random movements with dx,dy
        ellipse(x[j],y[j],10,10);
        x[j]+=dx[j];
        y[j]+=dy[j];
    }

    //xpos and ypos is determined by mousex and mousey
    var xpos = floor(mouseX);
    var ypos = floor(mouseY);
    //color is assigned to mousex and mousey
    var color = selfportrait.get((xpos+250), ypos+50);

    fill(color,25);
    noStroke();
    //according to mouse position canvas is colored
    rect(xpos,ypos,10,10);

}
1 2 3
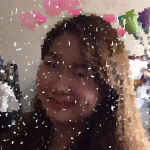
- A loop of 150 ellipses initially color the canvas
- MouseX and MouseY function is used to fill in the blanks
- Final portrait is done
For this project, I was able to reuse functions and skills that I previously learned from this class. I set up a series of position and velocity arrays to form a loop of circles that randomly moved across the canvas with the image colors. After most of the image was colored, you can also custom color the blanks with the mousex and mousey function. I thought this project was really interesting, and I am pretty satisfied with the result.
Looking Outwards 09 – Yugyeong Lee
‘A Musical Wall where Little People Live’ (2017) by teamLab is an interactive projection on a wall which reacts to physical objects that are placed on the wall. I agree that this project is “effective in its simplicity” which allows children to play and easily interact with the game-like aspect of the project. In addition, the project evoke a “sense of delight” not only for children but also for an adult as the projected plot and the characters stimulate genuine atmosphere for any age to enjoy. Exploring the relationship between virtual and physical world, the project blends the two different worlds through generative and creative way in which the users wander off and explore to find patterns. As interactive installations “allow for unlimited possibilities of expression and transformation,” the project definitely opens up possibilities for filed of art. As Fon assessed the possibility of this technology that “helps us rethink and expand the field of art,” its appliance in architecture could also be an interesting adaptation where architecture can incorporate interactive designs to explore different experiences of a single space.
link: https://courses.ideate.cmu.edu/15-104/f2017/2017/09/01/keuchuka-looking-outwards-01/
Project-09 Portrait
//Yoonseo(Dave) Choi
//Section B
//yoonseo1@andrew.cmu.edu
//Project 09

var portrait; // global variable for the image
var px = []; // array for storing previous x value
var py = []; // array for storing previous y value
var pp = []; //array for storing previous pixel

function setup() {
    createCanvas(275,480); //canvas size
    background(0); //set background 0

}

function preload(){
    portrait = loadImage("https://courses.ideate.cmu.edu/15-104/f2017/wp-content/uploads/2017/10/yoonseo1_bro-172x300.jpg"); //load image from the asset folder
}
function draw() {
var x = floor(random(portrait.width)); // create x point in random place of image
var y = floor(random(portrait.height)); //create y point in random place of image
var pix = portrait.get(x,y); //get color of image at x,y coordinate
pp.push(pix); //push the color into the array
noStroke(); //no stroke
px.push(x); //append the x coordinate to the array
py.push(y); //append the y coordinate to the array

for(var i = 0; i < px.length; i ++){
    strokeWeight(0.5); // stroke weight of 0.5
    stroke(pp[i],1); //create stroke color to be color of x,y location.
    line(px[i],py[i],px[i-1],py[i-1]); //create line between previous x,y and current x,y
}
}
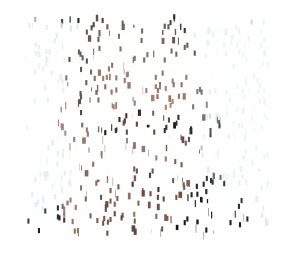
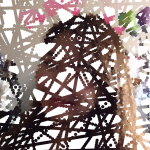
For this project, I have used my brother’s photo for the portrait to use. I wanted to see what are ways to draw a portrait without illustrating direct same image at the location, but rather something that connects with previous point with current. For this project, I have made code to create random lines using randomly generated points. x and y coordinates are randomly generated and lines are created based on current points and previous points with color of the the pixel at the current x and y. By having code to do such a motion allows the portrait to be abstract image of color but end product shows the resemblance of the original image

left is original and right is portrait
nahyunk1 – Looking Outwards 09
For this assignment, I read Harry’s looking outwards post 6, which talked about Mark Wilson’s,‘e4708’(2008), an artwork generated by a computer. When I read his post, I was able to quickly connect to the post of my own which also talked about randomly generated artworks that computers created “on its own”. The notion which Harry brings up in his post questioning whether the computer’s ability to randomly create artworks is a valid statement or not was something that I wondered as I read the post about my article.
https://courses.ideate.cmu.edu/15-104/f2017/2017/10/06/dnam-looking-outwards-06/