rmanagad-project03-sectionE

sketch

//Robert Managad
//Section E
//rmanagad@andrew.cmu.edu
//Project-03

//changes in color, position, size, and angle
//contrary behaviours in rotations.

//attributes of the wave vector "big circle"
var circleHW = 200; //height and width of circle
	circleColorR = 141;
	circleColorG = 168;
	circleColorB = 186;
	circlestrokeW = 0;

//attributes of dot rings. All rotating objects follow these conventions.
var dotcircleHW = 100;
	dotcircleStrokeW  = 0;
	dotstrokeW = 0; 

	dotcircle2HW = 200
	dotcirclestrokeW2 = 0;
	dotstrokeW2 = 0;


function setup(){
	createCanvas(640, 480);
	angleMode(DEGREES);
}

function draw(){
	background(5);
	//wave vector
	noFill();
	stroke(141, circleColorG, 186);
	strokeWeight(circlestrokeW);
		ellipse(width/2, height/2, circleHW, circleHW);
			circleHW = mouseY*4; // Size of circle gets bigger as mouse moves downward by a factor of 4.
			circleColorG = mouseX/3; // color of circle changes as mouse moves downward by a factor of 1/3.
			circlestrokeW = mouseY/25; // strokeweight of circle changes as mouse moves downward by a factor of 1/25.
	
	//dot circle outer
		noFill();
		stroke(circleColorR, 168, 186);
		strokeWeight(dotcirclestrokeW2);
			ellipse(width/2, height/2, dotcircle2HW, dotcircle2HW);
				dotcircle2HW = mouseY*8; // size of circle gets bigger as mouse moves downward by a factor of 8
				circleColorR = mouseX/3;// Red channel of circle changes as mouse moves downward by a favtor of 1/3
				dotcirclestrokeW2 = mouseY/20;// strokeweight changes as mouse moves downward by  factor of 20
	//dots outer
	fill(5);
	stroke(141, circleColorG, 186);
	strokeWeight(dotstrokeW2);
	
	push(); //performing rotations only for these elements
		translate(width/2, height/2);
		rotate(-mouseY); //negative mouseY makes element rotate counter-clockwise.
		//dotcircle is the diameter of the orbited circle, placing each dot at the edge of the circle when the other coordinate is 0.
			ellipse(dotcircle2HW/2, 0, dotcircle2HW/8, dotcircle2HW/8); 
			dotstrokeW2 = mouseY/15;
	pop();
	push(); 
		translate(width/2, height/2);
		rotate(mouseY);
			ellipse(dotcircle2HW/2, dotcircle2HW/2, dotcircle2HW/8, dotcircle2HW/8);
			dotstrokeW2 = mouseY/15;
	pop();
	push(); 
		translate(width/2, height/2);
		rotate(-mouseY);
			ellipse(0 - dotcircle2HW/2, 0, dotcircle2HW/8, dotcircle2HW/8); 
			dotstrokeW2 = mouseY/15;
	pop();
	push(); 
		translate(width/2, height/2);
		rotate(mouseY);
			ellipse(0 - dotcircle2HW/2, 0 - dotcircle2HW/2, dotcircle2HW/8, dotcircle2HW/8); 
			dotstrokeW2 = mouseY/15;
	pop();
	push(); 
		translate(width/2, height/2);
		rotate(-mouseY);
			ellipse(0, dotcircle2HW/2, dotcircle2HW/8, dotcircle2HW/8); 
			dotstrokeW2 = mouseY/15;
	pop();
	push(); 
		translate(width/2, height/2);
		rotate(-mouseY);
			ellipse(0, 0 -dotcircle2HW/2, dotcircle2HW/8, dotcircle2HW/8);
			dotstrokeW2 = mouseY/15;
	pop();


	//dot circle inner
	fill(5);
	stroke(circleColorR, 168, 186);
	strokeWeight(dotcircleStrokeW);
		ellipse(width/2, height/2, dotcircleHW, dotcircleHW);
			dotcircleHW = mouseY; // Expands at slower rate than first circle.
			circleColorR = mouseX/3;
			dotcircleStrokeW = mouseY/45;
	//dots inner
	fill(5);
	stroke(141, circleColorG, 186);
	strokeWeight(dotstrokeW);
	
	push(); //performing rotations only for these elements
		translate(width/2, height/2);
		rotate(mouseY);
			ellipse(dotcircleHW/2, 0, dotcircleHW/5, dotcircleHW/5); //dotcircle is the diameter of the orbited circle.
			dotstrokeW = mouseY/80;
	pop();
	push();
		translate(width/2, height/2);
		rotate(mouseY);
			ellipse(0 - dotcircleHW/2, 0, dotcircleHW/5, dotcircleHW/5);
			dostrokeW = mouseY/100;
	pop();
	push();
		translate(width/2, height/2);
		rotate(-mouseY);
			ellipse(0 - dotcircleHW/2, 0 - dotcircleHW/2, dotcircleHW/5, dotcircleHW/5);
			dostrokeW = mouseY/100;
	pop();
	push();
		translate(width/2, height/2);
		rotate(mouseY);
			ellipse (0, dotcircleHW/2, dotcircleHW/5, dotcircleHW/5);
			dostrokeW = mouseY/100;
	pop();
	push();
		translate(width/2, height/2);
		rotate(-mouseY);
			ellipse (dotcircleHW/2, dotcircleHW/2, dotcircleHW/5, dotcircleHW/5);
			dostrokeW = mouseY/100;
	pop();
	push();
		translate(width/2, height/2);
		rotate(mouseY);
			ellipse (0, 0 - dotcircleHW/2, dotcircleHW/5, dotcircleHW/5);
			dostrokeW = mouseY/100;
	pop()
	

	}

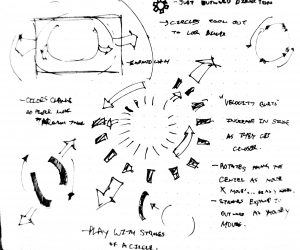
My approach to this project came from motions emulated by a ship moving through space, with waves and particles approaching the person viewing the work by expanding in size. In my sketches, I explored multiple variants of rotational elements before choosing on ellipses to maintain simplicity. As always, I used Adobe Illustrator to assist me in mapping out the composition of the work.

jwchou-project03-dynamicdrawing

sketch 285

//Jackie Chou
//Section E
//jwchou@andrew.cmu.edu
//Project-Week-03

var bkgndR = 241;
var bkgndG = 240;
var bkgndB = 120;
var appleR = 241;
var appleG = 98;
var appleB = 72;

function setup() {
    createCanvas(640, 480);
}

function draw() {
	background(bkgndR, bkgndG, bkgndB);
	noStroke();

    push();
    //rotates apple at the end when mouseX >500
    if (mouseX > 500) {
        translate(670, -50);
        rotate(PI/2.01);
    }

	//stem   
	fill(96, 47, 7);
	beginShape();
	curveVertex(311, 176);
	curveVertex(325, 169);
	curveVertex(323, 137);
	curveVertex(333, 111);
	curveVertex(325, 99);
	curveVertex(315, 106);
	curveVertex(318, 115);
	curveVertex(315, 130);
	curveVertex(312, 146);
	curveVertex(312, 176);
	endShape();

	//apple
	fill(appleR - 0.046 * mouseX, appleG + 0.1109 * mouseX, appleB + 0.09166 * mouseX);
    beginShape();
    curveVertex(315, 149);
    curveVertex(308, 149);
    curveVertex(285, 143);
    curveVertex(257, 149);
    curveVertex(236, 161);
    curveVertex(201, 218);
    curveVertex(214, 311);
    curveVertex(273, 371);
    curveVertex(323, 373);
    curveVertex(354, 376);
    curveVertex(399, 358);
    curveVertex(443, 283);
    curveVertex(451, 236);
    curveVertex(430, 177);
    curveVertex(376, 141);
    curveVertex(338, 140);
    curveVertex(315, 149);
    endShape();

    //bite one when mouseX > 40
    if (mouseX > 40) {
      fill(bkgndR, bkgndG, bkgndB);
      ellipse(440, 170, 80, 80);
    }

    //bite two when mouseX > 80
    if (mouseX > 80) {
      fill(bkgndR, bkgndG, bkgndB);
      ellipse(425, 230, 70, 90);
    }

    //bite three when mouseX > 20
    if (mouseX > 20) {
      fill(bkgndR, bkgndG, bkgndB);
      ellipse (200, 260, 70, 90);
    }

    //bite four when mouseX > 60
    if (mouseX > 60) {
      fill(bkgndR, bkgndG, bkgndB);
      ellipse (210, 290, 80, 60);
    }

    //bite five when mouseX > 200
    if (mouseX > 200) {
      fill(bkgndR, bkgndG, bkgndB);
      ellipse (430, 300, 100, 100);
    }

    //bite six when mouseX > 150
    if (mouseX > 150) {
      fill(bkgndR, bkgndG, bkgndB);
      ellipse (200, 160, 130, 130);
    }

    //bite seven when mouseX > 280
    if (mouseX > 280) {
      fill(bkgndR, bkgndG, bkgndB);
      ellipse (428, 270, 120, 90);
    }

    //bite eight when mouseX and seed one > 320
    if (mouseX > 320) {
      fill(bkgndR, bkgndG, bkgndB);
      ellipse (210, 250, 110, 100);
      fill(140, 98, 57);
      ellipse (300, 235, 12, 25);
    }

    //bite nine and seed two when mouseX > 400
    if (mouseX > 400) {
      fill(bkgndR, bkgndG, bkgndB);
      ellipse (215, 300, 96, 96);
      fill(140, 98, 57);
      ellipse (315, 255, 12, 25);
    }

    //bite ten and seed three when mouseX > 450
    if (mouseX > 450) {
      fill(bkgndR, bkgndG, bkgndB);
      ellipse (415, 160, 90, 105);
      fill(140, 98, 57);
      ellipse (325, 225, 12, 25);
    
    }
    pop();


}

For this project, I started with an idea that I would have a plane take off and land as mouseX moved from left to right. However, I realized that I probably did not have the coding skill to pull it off successfully because I didn’t know how to make a complex object expand/shrink in size.

I was thinking of a good chronological visual, and the idea of having an apple being eaten made sense to me. I used mouseX and background-colored ellipses to convey bites being taken out of the apple. I tried making the background change color as well, but it ultimately distracted from the apple.

dayoungl – Project03

sketch

// Sharon Lee
// Section E
// dayoungl@andrew.cmu.edu
// Project-03
var colour1 = 255;
var colour2 = 235;
var colour3 = 107;
var angle = 0;
var x = 350;
var y = 350;
var dirX = 1;
var dirY = 0.3;
var speed = 5;
var cirSize = 80;
var point1 = 650;
var point2 = 350;
var point3 = 50;
var front = 1;
var count = 0;

function setup() {
    createCanvas(640,480);
    angleMode(DEGREES);
}
function draw() {
    background(0);
    rectMode(CENTER); 
    //moon 1 in front of the planet
    if (front == 1){
        //planet
        fill(colour1,colour2,colour3);
        noStroke();
        ellipse(width/2 +50, height/2, 300,300);
        //moon1
        fill(colour1);
        noStroke();
        ellipse(x, height/2, cirSize, cirSize);
    }
    //moon 1 behind planet
    if (front == 0){
        //moon1
        fill(colour1);
        noStroke();
        ellipse(x, height/2, cirSize, cirSize);
        //planet
        fill(colour1,colour2,colour3);
        noStroke();
        ellipse(width/2 +50, height/2, 300,300);
    }
    //stars that follow mouseX and mouseY
    push();
    angle = angle + 50;
    translate(mouseX,mouseY);
    stroke(139,94,193);
    strokeWeight(10);
    rotate(angle);
    rectMode(CENTER);
    rect(0, 0, 40, 30);
    rotate(angle);
    rect(0, 0, 40, 30);
    rotate(angle);
    rect(0, 0, 40, 30);
    pop();

    //star2
    push();
    angle += 1;
    translate(mouseX -60, mouseY -60);
    stroke(73,50,102);
    strokeWeight(7);
    rotate(angle);
    rect(0,0,10,20);
    rotate(angle);
    rect(0,0,10,20);
    rotate(angle);
    rect(0,0,10,20);
    pop();

    //star3
    fill(73,111,102);
    noStroke();
    ellipse(mouseX, mouseY -100, 10,10);
    //star4
    ellipse(mouseX, mouseY,8,8);
    //star5
    ellipse(mouseX-80, mouseY-55, 15,15);
   
    //location of moon1
    if (x <= point1){  
        x += dirX * speed;
    }
    if (x <= point1 & x >= 350){
        cirSize -= 1;
    }
    if (x <= 350 & x >= point3){
        cirSize += 1;
    }
    if (x >= point1) {
        dirX = -dirX;
        front = 0;
    }
    if (cirSize <= 350 & x <= point3) {
        dirX = -dirX;
        front = 1;
        count += 1;
    }

    // planet changes color every revolution
    if (count % 10 == 1) {
        colour1 = 255;
        colour2 = 235;
        colour3 = 68;
    }
    if (count % 10 == 2) {
        colour1 = 255;
        colour2 = 215;
        colour3 = 68;

    }
    if (count % 10 == 3) {
        colour1 = 255;
        colour2 = 195;
        colour3 = 68;
    } 
    if (count % 10 == 4) {
        colour1 = 255;
        colour2 = 180;
        colour3 = 68;
    }
    if (count % 10 == 5){
        colour1 = 255;
        colour2 = 165;
        colour3 = 68;
    }
    if (count % 10 == 6){
        colour1 = 255;
        colour2 = 150;
        colour3 = 68;
    }
    if (count % 10 == 7){
        colour1 = 255;
        colour2 = 135;
        colour3 = 68;
    }
    if (count % 10 == 8){
        colour1 = 255;
        colour2 = 120;
        colour3 = 68;
    }
    if (count % 10 == 9){
        colour1 = 255;
        colour2 = 105;
        colour3 = 68;
    }
}

Orbital system
I wanted to make an image of moon orbiting the planet along with with other visual decorations that move around as the mouse moves. I had difficulty making the moon go behind the planet every revolution but I eventually figured it out.

adev_looking outwards_03

Living Mushtari

This piece is by the Mediated Matter Group at the MIT Media Lab. I find there work to be extremely groundbreaking and extremely relevant. They play with biology and synthetic fabrication, how the synthetic and the organic can come together to augment the way we live. I think this is a crucial part of sustainable innovation.

This project in particular involves microbes attached —via a 3D printed belt— to the body. Once these microbes are exposed to sunlight, they create by products that are supposed to compliment the human body. I think synthetic symbiosis is a very poetic lens through which we can solve very real problems. The organic and the inorganic fuse to create something that helps sustain life, by replicating mechanisms of life. I think that is a very evolved, nuanced relationship.

adev_Project 03_Dynamic Drawing

project_03

var angle = 0;

var rectX = 0;

var r = 255;
var g = 0;
var b = 0;

var col = 0;

function setup() {
    createCanvas(640, 480);  
    background(255,225,53);
    fill(255);
    noStroke();
    rect(0,0,320,4800);
    angleMode(DEGREES);
    rectMode(CENTER);
    
}

function draw() {
    
    //rotating rectangle1
     push();
    translate (130,100);
        rotate (angle);
    fill (r,g,b);
    stroke(255);
    strokeWeight(2)
;        rect(rectX, 0,100,30);
     rect(rectX+50, 20,100,30);
    rect(rectX+100, 40,100,30);
    rect(rectX+150, 60,100,30);
    angle = mouseY + 2;
        pop();
    
    //rotating rectangle 2
     push();
    translate (300,300);
        rotate (angle);
    fill (r,g,b);
    stroke(255);
    strokeWeight(2);
        rect(rectX, 0,100,30);
     rect(rectX+50, 20,100,30);
    rect(rectX+100, 40,100,30);
    rect(rectX+150, 60,100,30);
    angle = mouseY + 2;
        pop();
    
       //rotating rectangle 3
      push();
    translate (50,400);
        rotate (angle);
    fill (r,g,b);
    stroke(255);
    strokeWeight(2);
        rect(rectX, 0,100,30);
     rect(rectX+50, 20,100,30);
    rect(rectX+100, 40,100,30);
    rect(rectX+150, 60,100,30);
    angle = mouseY + 2;
        pop();
    
    //yellow half of the composition
    fill(255,225,53);
    noStroke();
    rect(160+320,240,320,480);  
    
    //white rectangle
      if (mouseX > 480){
        fill(col);
        noStroke();
        rect(480,240,200,380);
          
          col = col +2;
    }
      
    var height1 = map(mouseY,0, 480, 0, 240);
    
    //semicricles
    fill(244, 148, 4);
    noStroke();
    arc(480, 0, 320, height1, 0,0, OPEN);
    arc(480, 480, 320, -height1 , 0,0, OPEN);
    
    //pink lines
    stroke(255, 63, 232);
    strokeWeight(20);
    line(20,0,20,mouseY);
   line(106,0,106,mouseY);
    line(212,0,212,mouseY);
    line(310,0,310,mouseY);


}


dayoungc- Project-03- Dynamic Drawing

sketch

//Dayoung Chung
//SECTION E
//dayoungc@andrew.cmu.edu
//Project-03

function setup() {
   createCanvas(640, 480);
    //background(0);
}

function draw() { 

/*
   stroke(255);
   strokeWeight(3);
   for (var i = 0; i < 20; i++) {
       for (var j = 0; j < 20; j++) {
           line(i*30+i, j*30+j, i*30-i, j*30-j);
       }
   }
*/

  background(0);
  //i: x j:y
  for(var i= 0; i<20; i++) {
      for (var j= 0; j<20; j++) {

     
           stroke((255 - (i+j)*5)*mouseX/100, (255 - (i+j)*5)*mouseX/400, (255 - (i+j)*5)*mouseX/600);
           //stroke(202,192,253);      
           strokeWeight(6 * mouseY/600);
           line(i*30 + (30*mouseX/600), j*30+(30*mouseY/600), i*30+30-(30*mouseX/600), j*30+30-(30*mouseY/600));
      }
  }
}

I made a large number of lines to make a pattern of my own. Wave your mouse around to adjust the color and shape of lines.When you move your mouse to right or down, the lines get thicker. And when you move your mouse to left or up, then the lines disappear. In future, I would like to learn more about mapping and making angles to make a complicated pattern.

jooheek-Project03-DynamicDrawing

sketch

//Joo Hee Kim
//Section E
//jooheek@andrew.cmu.edu
//Project-03

var faceW = 300;
var faceH = 300;
var eyeW = 50;
var eyeH = 50;
var pupilW = 20;
var pupilH = 20;
var mouthW = 40;
var mouthH = 20;
var candyW = 70;
var candyH = 50;
var r = 255;
var g = 100;
var b = 171;

function setup() {
    createCanvas(640, 480);
}

function draw() {
	background(55, 55, 175);
	noStroke();

	var mouthX = width/2;
	var mouthY = height/2 + faceH/4;
	
	//face
	fill(249, 225, 197);
	ellipse(width/2, height/2, faceW, faceH);

	//eye-white
	fill(255);
	ellipse(width/2 - faceW/4, height/2, eyeW, eyeH);

	fill(255);
	ellipse(width/2 + faceW/4, height/2, eyeW, eyeH);

	//mouth
	fill(204, 64, 64);
	ellipse(width/2, height/2 + faceH/4, mouthW, mouthH);

	//pupil-left
	push();
	translate(width/2 - faceW/4, height/2);//make point of rotation the middle of eye
	rotate(mouseX/100);
	fill(0);
	ellipse(10, 10, pupilW, pupilH);
	pop();

	//pupil-right
	push();
	translate(width/2 + faceW/4, height/2);
	rotate(mouseX/100);
	fill(0);
	ellipse(10, 10, pupilW, pupilH);
	pop();

	//candy
	fill(r, g, b);
	ellipse(mouseX, mouseY, 70, 50);

	fill(r, g, b);
	triangle(mouseX, mouseY, mouseX - 40, mouseY + 40, mouseX - 40, mouseY -40);

	fill(r, g, b);
	triangle(mouseX, mouseY, mouseX + 40, mouseY -40, mouseX + 40, mouseY + 40);


	//mouth gets bigger & color gets random as candy gets closer to the face
	if (mouseX > width/2-faceW/2 & mouseX < width/2+faceW/2 && mouseY > height/2 - faceH/2 && mouseY < height/2 + faceH/2) {
		mouthW = mouthW+1;
		mouthH = mouthH+1;
		r = random(0, 255);
		g = random(0, 255);
		b = random(0, 255);
	}

	//mouth resets when it reaches certain size
	if (mouthW > 200 & mouthH > 100) {
		mouthW = 40;
		mouthH = 20;
	}

	if (dist(mouseX, mouseY, width/2, height/2 + faceH/4) < 50) {
		faceW = 450;
		faceH = 450;
		eyeW = 100;
		eyeH = 100;
		pupilW = 50;
		pupilH = 50;
		mouthW = 200;
		mouthH = 100;
	}

	if (dist(mouseX, mouseY, width/2, height/2) > 225) {
		faceW = 300;
		faceH = 300;
		eyeW = 50;
		eyeH = 50;
		pupilW = 20;
		pupilH = 20;
		mouthW = 40;
		mouthH = 20;

	}
	
}

For this assignment, I started with the concept of a guy desperate for a piece of candy. Then, I worked out how to include interactive properties that were associated with mouseX and mouseY.

ifv-Looking-Outwards-03

MIT’s Self-Folding Origami Technology

Creators create designs digitally that when printed and inflated with air they self-fold into origami forms.

After reading the prompt this project immediately came to mind. I admire the gesture of taking a step towards creating technology that can completely assemble itself. This technology could be used not only for artistic purposes but also for practical functions, the video above addresses this by saying these principles could be applied to the design of airbags. The materials and designs used consciously imitate the aesthetics and traditions of origami. As the program for designing is developed I hope there becomes a way to make more randomized forms which can still have a significant transformation. After doing some more research I found this video which shows that the project has taken a a turn for practicality and autonomy.

Sheenu-Looking Outwards 3


The Bizarre, Bony-Looking Future of Algorithmic Design

What you’re looking at are parts for a motorcycle made from algorithms in Autodesk’s software. According to Autodesk’s resident futurist Jordan Brandt, computers can help you create the ideas in your head faster and better.
Whether designing a building or a trashcan with certain criterion and aspects we want, computers with algorithms can help design them better because unlike people, computers have no bias. They simply have the goal to make what you want. “But a machine-Autodesk’s software, in this instance-is an unbiased agent.”[It’s] simply looking to optimize the criteria we set forward”.

With Autodesk’s algorithmic software, lighter and more organic looking motorcycle parts can be made. Not only will they make the bike perform better, but also look better. The software can also be used to design much better and smaller lattice structures for medical applications; working far better compared to other medical lattice structures that exist.

I find it interesting and inspiring that parts for machines and bodies that look so artistic and organic can also perform better than other parts. I used to believe that art and strength cannot mix well together. Either it be artistic and fragile or ugly and sturdy. I think it’s great that Autodesk is finding a way to bridge the gap between art and function along with man and machine. It will help creators out there to create.

dayoungc- Looking Outwards -03

“Making Information Beautiful”

This week, I was inspired by the work of David Wicks <sansumbrella.com>, who explores data visualization. I was struck specifically by his project “Drawing Water” <http://sansumbrella.com/works/2011/drawing-water/>, first because of its beauty and second because of how effective it is in helping people experience information in a new way.

http://sansumbrella.com/works/2011/drawing-water/winter2011.jpg

“A representation of rainfall vs. water consumption in Winter 2001.”

In the print representation above, lines going from blue to black represent the general direction of rainfall toward where it is consumed. Although Wicks cautions that the pathways themselves are imagined, he uses real data: Wicks uses water consumption data from the United States Geological Survey and rainfall data from the NOAA National Weather Service. He inputs this information into code that visualizes rain sources going toward areas of water consumption.

<iframe src=”https://player.vimeo.com/video/24157130″ width=”640″ height=”360″ frameborder=”0″ webkitallowfullscreen mozallowfullscreen allowfullscreen></iframe>

“A video showing a dynamic and interactive representation of the Drawing Water project.”

This is fascinating, as it allows viewers to see and understand data that would otherwise be mere numbers on a page. Only scholars would be able to understand the information properly. But Wicks allows normal people to comprehend it through a printed image generated through computation.