yushano_Project 7 – Curves

sketch


function setup() {
    createCanvas(400, 400);
    frameRate(10);
}


function draw() {
    background(226,236,236);
    
    strokeWeight(2);
    noFill();
    
    // draw the curve
    push();
    translate(width / 2, height / 2);

    // the curve inside
    for (var i = 0; i < 8; i++) {
        var r = 207-(207-152)/6*i;
        var g = 171-(171-92)/6*i;
        var b = 177-(177-103)/6*i;
        stroke(r,g,b);
        drawTetracuspidCurve();
        rotate(PI/14);
    }

    // the circle curve outside
    for (var i = 0; i < 6; i++){
        var r = 215-(215-147)/6*i;
        var g = 195-(195-126)/6*i;
        var b = 186-(186-118)/6*i;
        stroke(r,g,b);
        drawRanunculoidCurve();
        rotate(PI/3);
    } 
    pop();


}

function drawRanunculoidCurve() {
    var nPoints = 100;
    var x;
    var y; 
    var a = 100;
    var b = a / 5;   
    var ph = mouseX / 40;
    // control the shape in two opposite sides
    if (mouseY <height/2){
        var h = constrain(mouseY / 8, 0, b);
    } else {
        var h = constrain((height - mouseY) / 8, 0, b);
    }
    
    beginShape();
    for (var i = 0; i < nPoints; i++) {
        // map the points onto angles
        var t = map(i, 0, nPoints, 0, TWO_PI);
        x = (a + b) * cos(t) - h * cos(ph + t * (a + b) / b);
        y = (a + b) * sin(t) - h * sin(ph + t * (a + b) / b);
        vertex(x, y);
    }
    endShape(CLOSE);    
}

function drawTetracuspidCurve(){
    var nPoints = 200;
    var x;
    var y;
    var a = 120;
    var ph = mouseX / 40;

    beginShape();
    for (var i = 0; i < nPoints; i++) {
        var t = map(i, 0, nPoints, 0, TWO_PI);
        x = a / 4 * (3*cos(t) -  cos(ph + 3 * t));
        y = a / 4 * (3*sin(t) +  sin(ph + 3 * t));
        vertex(x, y);
    }
    endShape(CLOSE);    
}


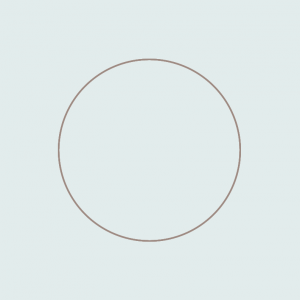
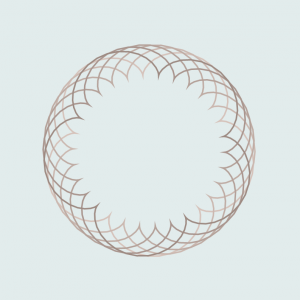
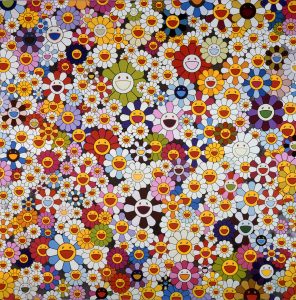
Above are the process of my work. So, I combined two different kinds of curves in my project: Ranuncuidloid and Tetracuspid curves. The first shape is inspired from the form of flowers, and the other is inspired from the shape of a star. These two curves are all rotatable according to the x-coordinates of the mouse. Also, the flower shapes is generated from the y-coordinates of the mouse. The flower shape is more visible if the y-coordinates of your mouse is more towards the center, is like the flower is blooming. This project helps me understand more about the use of translate() and rotate(), which are my weakness. Also, I learned about many control elements in the curve equation, which is also meaningful.

yushano_Looking Outwards 07


Amsterdam SMS by Aaron Koblin for MIT Senseable City Lab, 2012

This work is a visualization for SMS messages in Amsterdam. It is interactive using the realtime data provided by KPN Mobile. They algorithm he Koblin used is Processing and OpenGL.
OpenGL is a cross-platform programming interface that majorly used for rendering 2D and 3D vectors. One of its wide use is scientific visualization, which is shown perfectly here in this project. I personally like this project a lot because it visualizes a scientific research in a more aesthetic form. The research itself it is also meaningful. The idea of collecting the message data on New Year’s Eve shows the wide use of technology in this modern society. People rely more on communication through digital devices now. The representation of the building is interesting and aesthetic that I like it a lot.
This project is very inspiring in the way that it visualizes the useful message in a clear and artistic way. I think this method will be useful for me to do architecture research. The information visualization can help represent a lot like the site condition, the people’s access to the buildling or around and so on. It plays a very important part in architecture that I think it is very good for me to learn this skill.

Aaron Koblin

yushano_Project 06 – Abstract Clock

sketch

var xS = []; //for seconds
var yS = [];
var xM = []; //for minutes
var yM = [];
var xL = []; //for hours
var yL = [];
var dxS = []; // velocity in x direction 
var dyS = []; // velocity in y direction
var dxM = []; 
var dyM = []; 
var colS = []; //color array
var colM = [];
var colL = [];
var smR = 15;
var mdR = 25;
var lgR = 35;

function setup() {
    createCanvas(480, 480);  
    
	for (var i = 1; i < 61; i++) { // for loop initializing 60 seconds
        xS[i] = random(width/3+smR,width/3*2-smR);
        yS[i] = random(height/3+smR,width/3*2-smR);
        dxS[i] = random(-5, 5);
        dyS[i] = random(-5, 5);
        var colR = random(102,199);
        var colScale = (colR-137)/(199-137);
        colS[i] = color(colR, 85+(173-85)*colScale, 96+(190-96)*colScale);
    }
    
    for (var i = 1; i < 61; i++) { // for loop initializing 60 minutes
        xM[i] = random(mdR,width-mdR);
        yM[i] = random(mdR,height-mdR);
        while (dist(xM[i],yM[i],width/2,height/2) <= width/4+mdR/2) {
        	xM[i] = random(width);
        	yM[i] = random(height);
        }
        dxM[i] = random(-5, 5);
        dyM[i] = random(-5, 5);
        var colR = random(99,179);
        var colScale = (colR-99)/(179-99);
        colM[i] = color(colR, 59+(143-59)*colScale, 61+(145-61)*colScale);
    }

    for (var i = 1; i < 25; i++) { // for loop initializing 24 hrs
        xL[i] = random(lgR,width-lgR);
        yL[i] = random(lgR,height-lgR);
        while (dist(xL[i],yL[i],width/2,height/2) <= width/4+lgR/2) {
        	xL[i] = random(width);
        	yL[i] = random(height);
        }
        dxM[i] = random(-3, 3);
        dyM[i] = random(-3, 3);
        var colR = random(151,232);
        var colScale = (colR-151)/(232-151);
        colL[i] = color(colR, 120+(215-120)*colScale, 157+(241-180)*colScale);
    }
}

function draw() {
	var H = hour();
	var M = minute();
	var S = second();
	var cirC = [];
	
	background(241,227,228);
	noStroke();
	fill(235,219,204);
	ellipse(width/2, height/2,width/2);
	
    frameRate(4);
	for (var i = 1; i < S+1; i++) {  //for each ellipse - seconds
        fill(colS[i]);
        ellipse(xS[i], yS[i], smR);
        xS[i] += dxS[i];
        yS[i] += dyS[i];
		if (dist(xS[i],yS[i],width/2,height/2)>=width/4-smR/2) {
        	dxS[i] = - dxS[i];
        	dyS[i] = - dyS[i];        	
        }
	}
	for (var j = 1; j < M+1; j++) { //for each ellipse - minutes
		fill(colM[j]);
		ellipse(xM[j], yM[j], mdR);
		xM[j] += dxM[j];
		yM[j] += dyM[j];
		if (dist(xM[j],yM[j],width/2,height/2) <= width/4+mdR/2) {
        	dxM[j] = - dxM[j];
        	dyM[j] = - dyM[j];
        } else if (xM[j]+mdR>width || xM[j]-mdR<0){
        	dxM[j] = - dxM[j];
        	dyM[j] = - dyM[j];
    	} else if (yM[j]+mdR>width || yM[j]-mdR<0){
    		dxM[j] = - dxM[j];
    		dyM[j] = - dyM[j];
    	}
        
	}
	for (var j = 1; j < H+1; j++) { //for each ellipse - hours
		fill(colL[j]);
		ellipse(xL[j], yL[j], lgR);
		xL[j] += dxM[j];
		yL[j] += dyM[j];
		if (dist(xL[j],yL[j],width/2,height/2) <= width/4+lgR/2) {
        	dxM[j] = - dxM[j];
        	dyM[j] = - dyM[j];
        } else if (xL[j]+lgR>width || xL[j]-lgR<0){
        	dxM[j] = - dxM[j];
        	dyM[j] = - dyM[j];
    	} else if (yL[j]+lgR>width || yL[j]-lgR<0){
    		dxM[j] = - dxM[j];
    		dyM[j] = - dyM[j];
    	}
        
	}


}

For my project, I used the amount of circles to represent the time. Then central circle represents the seconds that are randomly distributed within the circle. The circles outside of the central circle represents the minutes. The other larger moving circles represent the hours. They have different moving velocity to show the difference among them.

yushano_Looking Outwards 06

Website introducing Takashi Murakami


Takashi Murakami, Flowers, flowers, flowers, 2010, acrylic and platinum leaf on canvas mounted on aluminum frame.

The Japanese Artist Takashi Murakami is known as the Japanese Andy Warhol because of his style- superflat. He is a typical pop artist who tries to blend high art and street art together. The characters that he uses in all his drawings are from a cartoon. He then turns them into artwork to blur the boundary between high and street art. He also collaborates with many brands like Louis Vuitton, Marc Jacobs, Shu uemura, and Vans to bring his art to a higher level.

In his artwork, most of them have a highly repetitive patten. They bascially have one single prototype first. Then, after scaling, coloring, placing “randomly”, it can create a sense of depth out of the superflat drawing. The scale, angle, color, position, and overlapping all seem random by computational method. However, they are also chosen under consideration and randomness. His art is designed under randomness and to control it to be random.

His use of a bold graphic and colorful anime and manga cartoon style brings historical Japanese art, the cartoon from his youth, and comtemporary art together. The seeming randomness of this artwork makes it even more interesting to the audience.


Project 5 – Wallpaper

sketch

function setup() {
    createCanvas(480, 440);
    background(169,201,203);

    //First level of diamond
    var y0 = 0;
    var quaSize = sqrt(1.5)*width/8
    for (var quaCol=0; quaCol<5; quaCol++) {
        var x0 = width/8;
        for (var quaRow=0; quaRow<5; quaRow++) {
            stroke (117,180,208);
            strokeWeight (3);
            noFill();    
            quad (x0, y0, x0-width/8, y0+quaSize, x0, y0+quaSize*2, x0+width/8, y0+quaSize);    
            x0 += width/4;
        }
        y0 += quaSize*2;  
    }

    //Secondary diamond
    var y1 = quaSize/3;
    var quaSize1 = quaSize/3*2;
    for (var quaCol=0; quaCol<5; quaCol++) {
        var x1 = 0;
        for (var quaRow=0; quaRow<5; quaRow++) {
            stroke (208,208,117);
            strokeWeight (5);
            noFill();    
            quad (x1, y1, x1-width/12, y1+quaSize1, x1, y1+quaSize1*2, x1+width/12, y1+quaSize1);    
            x1 += width/4;
        }
        y1 += quaSize*2;  
    }
    
    //Fourth level diamond
    var quaSize4 = quaSize/3*2;
    var y4 = 0 - quaSize4;
    for (var quaCol=0; quaCol<6; quaCol++) {
        var x4 = width/8;
        for (var quaRow=0; quaRow<5; quaRow++) {
            stroke (124,186,112);
            strokeWeight (3);
            quad (x4, y4, x4-width/12, y4+quaSize4, x4, y4+quaSize4*2, x4+width/12, y4+quaSize4);
            x4 += width/6 + width/12;
        }
        y4 += quaSize4*3;
    }

    //Thirdary diamond
    var quaSize2 = quaSize/3;
    var y2 = quaSize2*2;
    for (var quaCol=0; quaCol<5; quaCol++) {
        var x2 = width/12 + width/24;
        for (var quaRow=0; quaRow<5; quaRow++) {
            stroke (230,230,75);
            strokeWeight (3);
            quad (x2, y2, x2-width/24, y2+quaSize2, x2, y2+quaSize2*2, x2+width/24, y2+quaSize2);
            x2 += width/4;
        }
        y2 += quaSize*2;
    }
    var y3 = 0 - quaSize/3;
    for (var quaCol=0; quaCol<5; quaCol++) {
        var x3 = 0;
        for (var quaRow=0; quaRow<5; quaRow++) {
            strokeWeight (4);
            quad (x3, y3, x3-width/24, y3+quaSize2, x3, y3+quaSize2*2, x3+width/24, y3+quaSize2);
            x3 += width/4;
        }
        y3 += quaSize*2;
    }


    //Decorated dots
    //vertical ones
    var sizeC = width/64;
    var yC = quaSize - sizeC*2;
    for (var cCol=0; cCol<8; cCol++) {
        var xC = 0;
        for (var cRow=0; cRow<6; cRow++) {
        noStroke();
        fill (124,186,112);
        ellipse (xC, yC, sizeC);
        xC += width/4;
        }
        if (cCol % 2 == 0) {
            yC += sizeC*4;
        } else {
            yC += quaSize*2 - sizeC*4;
        }
    }

    //horizontal ones
    var yC1 = quaSize;
    for (var cCol=0; cCol<8; cCol++) {
        var xC1 = sizeC*2;
        for (var cRow=0; cRow<8; cRow++) {
            ellipse (xC1, yC1, sizeC);
            if (cRow % 2 == 0) {
                xC1 += width/4 - sizeC*4;
            } else {
                xC1 += sizeC*4;
            }
        }
        yC1 += quaSize*2;   
    }
    

    noLoop();
}

function draw() {
}

This wallpaper that I design has a vintage feel. I used yellow green and blue as the swatch. The geometries that I used are circles and diamonds, which are simple but timeless.

LookingOutwards 05

Artist’s Website

Time Travelers House by Tolgahan Gungor


I found this post in the CGSSociety website, which is a large platform for creative digital artists. After browsing the pages, I found this Time Travelers House most attractive to me.
This set of renderings are most inspiring to me because as an architecture student, I am well aware of the difficulty of 3D renderings. First, the author needs to build a 3D model in SketchUp or Rhino even though the result is only a 2D image. When she was trying to render the model the materials are really hard to find or choose. After rendering the model, you need to render the background using Photoshop. It is so amazing that I could not find any flaw in these renderings. It really inspires me to learn photoshop and vray well so that one day, I can do the renderings as cool as she does.
I think the purpose of those photo-realistic renderings are that, first, they can give people to realistic overall sense towards the context of the house- the imitated experience of being there. Then, good renderings for household can really attract more buyers to purchase the house. Finally, I feel like every rendering has its own emotion as well. It conveys to audience some feeling, sometimes regretness, sometimes sadness, and sometimes curiosity. I think this one gives me the feeling of curiosity, which matches with its theme Time Travelers House as well.
It is quite amazing that the 3D rendering technologies nowadays are so advanced that 3D computer graphics are able to create images that sometimes even seem more realistic than photograph.

Project 4 – String Art

sketch


function setup() {
    createCanvas(400, 300);
    
}

function draw() {
  var x0 = 100;
  var y0 = 50;
  var x1 = 300;
  var y1 = 250;
  var xX = 100;
  var yX = 50;
  var gap = 5;
  var redness = 220;
	background (0, 0, 0);
  //the first shape which is a square
	for (var i=1; i<41; i++){
    stroke (255, redness, redness);
    line (xX, y0, x1, yX);
    line (width-xX, y1, x0, height-yX);
    stroke (255, 220-redness, 220-redness);
    line (width-xX, y0, x0, yX);
    line (xX, y1, x1, height-yX);
    xX += gap;
    yX += gap;
    redness -= gap;
  }

  //the second shape that is like a cross
  var xC = width/2;
  var yC = 0;
  var greeness = 100;
  for (var j=0; j<31; j++){
    stroke (255, greeness, 0);
    line (width/2, yC, xC, height/2);
    line (width/2, yC, width-xC, height/2);
    line (width/2, height-yC, xC, height/2);
    line (width/2, height-yC, width-xC, height/2);
    xC += gap;
    yC += gap;
    greeness += gap;
  }

  //the third shape that connects the cross
  var yM = 0;
  var xM = width/4*3;
  var blueness = 50;
  for (var x=0; x<11; x++){
    stroke (blueness, blueness, 255);
    line (width/2, yM, xM, height/2);
    line (width/2, yM, width-xM, height/2);
    line (width/2, height-yM, xM, height/2);
    line (width/2, height-yM, width-xM, height/2);
    yM += gap;
    xM += gap;
    blueness += gap*2;
  }

  //the fourth shape that rotates from the center
  var centerX = width/2;
  var centerY = height/2;
  var radius = 200;
  var angle = 0;
  var factor = dist(mouseX, mouseY, centerX, centerY);
  //map the distance to the scale of radians
  var angleC = map(factor, 0, (200^2+150^2)^(1/2), 0, PI);
  for (var y=0;y<36;y++){
    x1 = centerX + radius * Math.cos( angle );
    y1 = centerY + radius * Math.sin( angle );
    x2 = centerX - radius * Math.cos( angle );
    y2 = centerY - radius * Math.sin( angle );
    stroke (204,255,153);
    line (x1, y1, x2, y2);
    //the angle of the rotation is related to the mouse
    angle += angleC;
  }
}

My project was inspired by the idea of centralization. All the curves point to the center or rotate through the center. Also, I look for the string art online and get some inspiration of the form.

Looking Outward 4


658 prepared dc-motors, cotton balls, cardboard boxes 70x70x70cm, Zimoun 2017

What is so fascinated about this artwork by Zimoun is that it looks really neat and simple at first. The form and the scale of this art attracts my attention. Withe the huge amount of boxes piled up and tons of sensors and cotton balls, audience are amazed by the scale. His idea is really surprising as well because the he wants the audience to focus more on the sound effect with such simple and accessible material. The use of daily life materials, like cotton balls and cardboard boxes, connects people more with the artwork itself. The cotton balls are connected to mottors that create the sound. Although the motors that connect to the balls are low-tech, the deep, pounding sound that is produced by them resonates throughout the exhibition space.

“As you walk through the labyrinth of boxes, the constant humming and vibrating builds, and can be felt both behind and inside you”.

This artwork tries to encourage people to pay more attention to the beauty of sound. Sound can also be appreciated as art, which is the main idea of Zimoun’s art.

“The purpose of keeping the visual aspect of the art basic and subtle is to allow the person to take in all the auditory effects and be free from distractions”.

Sound Art at Beall

http://www.zimoun.net/2017-658.html


Project 3

sketch

var radius=40;
var shape="cir";
var startX = 120;
var startY = 40;
var coorX = 0;
var coorY = 0;
var radChange = 0;
var shade = 255;

function setup() {
    createCanvas(640, 480);
    
}

function draw() {
	background(0);
	//rectangle mode
	if (shape == "rect"){
		//make a grid
    	for(var row=0;row<10;row++){
   			for(var col=0;col<10;col++){
   				coorX=startX+radius*col
           		coorY=startY+radius*row
           		//the mouse inside control the size and the color of the rectangle
 				if(mouseX<520 & mouseX>120 && mouseY<440 && mouseY>40){
 					dis = dist(coorX,coorY,mouseX,mouseY)
 					radChange = dis*0.08
 					shade = dis*0.4
 				}else{
 					radChange = radius
 					shade=shade+20
 					if (shade>=230){
 						shade=0
 					}
 				}
 				fill(shade,shade,255)
   				rect(coorX,coorY,radChange,radChange);
           	}
        }
    //circle mode
    }else{
    	for(var row=0;row<10;row++){
   			for(var col=0;col<10;col++){
           		coorX=startX+radius/2+radius*col
           		coorY=startY+radius/2+radius*row
           		//the mouse inside control the size and color of the circle
 				if(mouseX<520 & mouseX>120 && mouseY<440 && mouseY>40){
 					dis = dist(coorX,coorY,mouseX,mouseY)
 					radChange = dis*0.08
 					shade = dis*0.4
 				}else{
 					radChange = radius
 					shade=shade+20
 					if (shade>=230){
 						shade=0
 					}
 				}
 				fill(shade,shade,255)
 				ellipse(coorX, coorY,radChange);
 			}
 		}
 	}
}
    

function mousePressed() {
	//mouse press control the shape of the objects
    if (shape != "rect"){
        shape = "rect";
    } else{
        shape = "cir";
    }
}


I was inspired by the grasshopper plug-in in rhino that we are learning right now in architecture generative modeling class. Therefore, I made this interactive drawings.

Looking Outward 3


The Institute for Computational Design (ICD) and the Institute of Building Structures and Structural Design (ITKE) at the University of Stuttgart construct a research pavilion every year since 2010. The one that I admire the most, however, is not the latest and most complicated one, but the 2012 one. In November 2012 ICD and ITKE have completed a research pavilion that is entirely robotically fabricated from carbon and glass fibre composites. What I admire is that “the research focused on the material and morphological principles of arthropods’ exoskeletons as a source of exploration for a new composite construction paradigm in architecture”. When I was watching the Vimeo video that records the procedure of the model making. I feel that robots and computing really take a big part in the future architecture. I am an architecture major student, so I am really curious about the future trend of buildings. This pavilion makes me feel very excited because using robots are actually helping architects to build a bigger dream. When using robots, your models can be in a much larger scale in a higher level of precision and elaboration. It can reduce the amount of labor and improve the efficiency. Also, it can human’s thoughts into In the video, they also show that they are using Grasshopper, a plug-in, in Rhino to control the robots. I am now taking the Grasshopper course which makes me more excited about this. We also need to learn about coding, python, in grasshopper to write programs to make a model. I think this project really gives me the direction, inspiring me what grasshopper and robots can do to achieve your dream, and guides me to go further and further with technology. .