
function setup() {

    createCanvas(200, 200);
    background(220);
    ellipse(100,100,50,50);
    fill(100,100,30);
    rect(50,50,100,30);
}

function draw() {

}
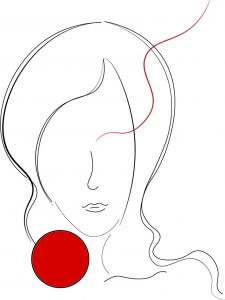
heyangc-portrait-01
//Heyang Chen
//heyangc@andrew.cmu.edu
//Section D
//project-01 self-portrait


function setup() {

    createCanvas(840, 1060);

}


function draw() {

    background(247, 208, 223);
    stroke (0);
    strokeWeight (3.5);

    //hair-left
    noFill();
    beginShape();
    vertex(399, 82);
    bezierVertex(56, 122, 39, 558, 143, 633);
    endShape();

    noFill ();
    beginShape ();
    vertex (143, 633);
    bezierVertex (202, 701, 108, 768, 175, 872);
    endShape ();

    //hair-right
    noFill ();
    beginShape ();
    vertex (410, 85);
    bezierVertex (729, 178, 636, 501, 579, 628);
    endShape ();

    noFill ();
    beginShape ();
    vertex (579, 628);
    bezierVertex (525, 742, 560, 781, 587, 809);
    endShape ();

    noFill ();
    beginShape ();
    vertex (587, 809);
    bezierVertex (655, 844, 560, 891, 607, 915);
    bezierVertex (690, 966, 707, 875, 790, 913);
    bezierVertex (838, 935, 760, 1014, 825, 1036);
    endShape();

    //fringe-right
    strokeWeight (2)
    noFill ();
    beginShape ();
    vertex (412, 210);
    bezierVertex (583, 447, 503, 674, 463, 797);
    endShape ();

    //fringe-left
    noFill ();
    beginShape ();
    vertex (406, 210);
    bezierVertex (388, 412, 252, 362, 190, 479);
    endShape ();

    noFill ();
    beginShape ();
    vertex (190, 479);
    bezierVertex (177, 540, 167, 610, 226, 713);
    endShape ();

    //nose
    noFill ();
    beginShape ();
    vertex (362, 535);
    bezierVertex (390, 628, 334, 631, 375, 667);
    endShape ();

    //mouth
    noFill ();
    beginShape ();
    vertex (344, 732);
    bezierVertex (363, 747, 402, 743, 412, 727);
    endShape ();

    //face
    strokeWeight (3.5)
    noFill ();
    beginShape ();
    vertex (235, 711);
    bezierVertex (288, 783, 375, 875, 462, 760);
    endShape ();


    //neeck
    noFill ();
    beginShape ();
    vertex (433, 828);
    bezierVertex (405, 882, 403, 924, 426, 965);
    endShape ();

    //colar bone
    noFill ();
    beginShape ();
    vertex (410, 994);
    bezierVertex (429, 982, 453, 975, 477, 980);
    endShape ();

    noFill ();
    beginShape ();
    vertex (477, 980);
    bezierVertex (581, 992, 610, 955, 636, 970);
    endShape ();


    //circle
    fill (203, 32, 39);
    ellipse (255, 914, 180, 170);

    //curve
    noFill ();
    stroke (147, 26, 29);
    strokeWeight (5)
    beginShape ();
    vertex (387, 502);
    bezierVertex (419, 407, 463, 492, 567, 401);
    bezierVertex (603, 353, 548, 293, 560, 238);
    bezierVertex (575, 187, 683, 206, 798, 20);
    endShape ();

}
I made a drawing in illustrator first, then translated out. During the process, I found difficulties in making curves. first, I tried out the curvevertex syntax, but resulted in rather unsmooth curves. Then I tried to make the curves out of bezier curves. However, problems showed when making bezier curves out of more than 4 control points. After experimenting, I divided those curves into segments. Each of them consists of 4 control points.
![[OLD FALL 2017] 15-104 • Introduction to Computing for Creative Practice](https://courses.ideate.cmu.edu/15-104/f2017/wp-content/uploads/2020/08/stop-banner.png)