cchau1 – Project05 – Wallpaper

sketch


var w = 60; //adjusts the spacing between seeds
var h = 60; //adjusts vertical distance between seeds
var spaceY = 30; //y-circle offset
var spaceX = 30; //x-circle offset
var rad; //radius of circle component of "seed"
var wid; //width of rectangle component of "seed"
var x = 1;
var y = 1;
var columns;
var spacing = 10; //for the white lined grid-feature

function setup() {
    createCanvas(480, 480);
    background(255,174,185);

    for (var x = 0; x < height; x++) {
      strokeWeight(1.5)
      stroke(255);
      noFill();
      rect(x*spacing,x*spacing,width-50,height-150);
    } //this creates the white lines on the pink watermelon flesh
  //wanted to maintain the "square grid" feature in the corners of the
  //watermelon flesh so I subtracted from the canvas dimensions

    noStroke(); //colors of the rind
    fill(141,213,149);
    rect(0,height-100,width,height);
    fill(56,167,69);
    rect(0,height-60,width,height);
    fill(49,141,60);
    rect(0,height-40, width, height);


    var rowChange = 7;
    for (var row = 0; row < 6; row++) {
      if(row%2==0) {
        rad = 10;
        w = 420/7;
        spaceX = 60;
        wid = 5;
        columns = 7;
      } else{
        rad = 24;
        w = 60;
        spaceX = 30;
        columns = 8;
        wid = 12;
      }

//loop draw the "seeds" and depending on the row #, will alternate
      for (var col = 0; col < columns; col++){
        var py = spaceY + row * h;
        var px = spaceX + col * w;
        fill(52,54,52);
        rect(px,py,wid,wid);
        console.log(px, py);
        ellipse(px, py,rad);
      } //the combination of a square on top of an ellipse creates
        //the shape of a "seed"

    }

    noLoop();
}

function draw() {
}

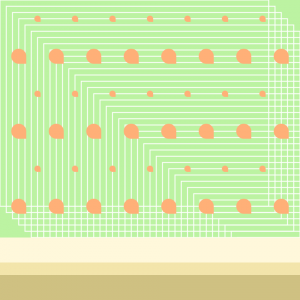
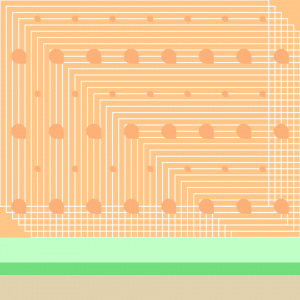
I decided to go for a design that would be more like an entire motif rather than small objects. I had other ideas to do things such as leaves or flowers but after having Founder’s Day for CMU constantly surrounding me, I chose to go for something more quirky: a watermelon. I had some struggle creating the perfect seed “shape” but got a little more creative by overlaying the square on top of the ellipse (using math). I didn’t want to add too much detail since I was going for a more minimalist approach: seeds, rind, and for added “texture”, a loop of rectangles that also crossed to create an eye-catching “grid” design in the corners of the flesh (if you look closely at watermelon, you will see these little white veins).

honeydew version

cantaloupe

Connie – LookingOutwards – 05

I decided to look for 3D art that is meant to mimic the incredible intricacy of OUR real world. It’s easy to be amazed by how wonderful and creative the things in fantasy worlds are but I think that even “mundane” real life holds many wonders.

Architect and CGI artist, Ibrahim Saad from Cairo, Egypt uses a texture/material-adding software known as Substance created by a company known as Allegorithmic. Saad uses Substance Painter to actualize his project, the “Black & White Apartment (2017)” by using it to add incredible details to his models of everyday objects that really reflect everyday life in this apartment he has designed.

In this image, Saad uses the Substance texture features to be able to add even fingerprints to this model. (Credit: https://www.allegorithmic.com/blog/interior-design-fingerprint-ibrahim-saad )

I find this project inspiring because his works are so beautiful and I am in awe of the capabilities of Substance to be able to add such a strikingly realistic and life-like quality to these models.

Examples of his work. (Credit:https://www.allegorithmic.com/blog/interior-design-fingerprint-ibrahim-saad)

From the dishevelment of the hammock to the cups and bowls stacked on top of the cabinets in the kitchen, there is something particularly beautiful of being able to capture “real life” in an honest visual that feels so real like you could feel the fabric of those pillows on the floor.

cchau1 – Project04 – String Art

proj04


var spaceX = 2;
var spaceY = 10;
var x1 = 30;
var y1 = 300;
var x2 = 400;
var y2 = 200;

function setup(){
	createCanvas(400, 300);
	background(80,50,255); //different background color to set the mood
}

function draw() {

	for(var i = 0; i < height; i ++){
		stroke(244,25,0); //red sunrays
		line(i*80,x1-3*spaceX,x1+i,y1+spaceX);
    strokeWeight(0.03);
    stroke(240,203,10); //yellow sunrays
    line(i*10,x1-5*spaceY,x1,y1+spaceY+60);
	} //additional numbers were manipulated to fit the canvas size

    for (var k = 0; k < height; k ++) {
      stroke(255); //white space in top right corner; "cloudscape"
      line(x2,spaceY*k,2*spaceY*k,spaceX);
}

    for (var j = 0; j < height; j ++) { //grass
      strokeWeight(2);
      stroke(0,100,0,10);
      line(x1-30,spaceY*j,2*spaceY*j,y1);
    } //the grass and cloudscape are related in increments (reflections)

    var rad = 150 //mock sun
      fill(255,230,0);
      ellipse(rad/4,height-30,rad,rad);
}

I tried to manipulate and play around with some of the variables, as well as figure out how to coordinate with the dimensions of the canvas. I had an original idea that I eventually tossed out (which involved a sort of “playing field” using “stroke(240,203,10); line(i*30,height/-4,width,(2*height-3)/i);” in the for loop() ). I ended up deciding to manipulate straighter lines and thought that they resembled sun rays which also created a cool color-blending effect in the bottom right corner so I kept it. I made two curves that would represent “grass” and “clouds”. Personally, I like creating objects and shapes more than just mere lines becayse I am not the most familiar with loops yet (though it was fun to figure out the values) but I will probably do more projects like string art in the future!

Connie – LookingOutwards – 04

My previous LookingOutwards example for week 3 would have also fit perfectly for this week’s theme but the Turkish artist, Memo Akten, has many other interesting projects that combine interactivity, music, and smart algorithms. Another of his projects is Webcam Piano 2.0 (2010).

This is a class(-ical) example of creating sound and music through an unconventional means. Users are able to generate beautiful music through an algorithm, made with openFrameworks, that tracks their fingers, hand gestures, and other body movements. The updated 2.0 version introduces additional features including finer, more precise movement tracking and even interpreting the movement to create music that reflects different emotions by playing a different musical mode and changing color scheme. I find this project particularly beautiful, especially the 2.0, because it makes musical expression more accessible to those who may not be classically or technically-trained on the piano, or even in music, yet gives users an outlet to express themselves and their emotions through the fine-tuning of reading their facial expressions or body language.

Users playing around with the Webcam Piano. Image Credit: http://www.memo.tv/webcam-piano-2/

*Unlike some other of his works, the code for this project is unavailable.

cchau1 – Project03 – Dynamic Drawing

sketch

var rectT = 300;
var rectB = 500;
var rectW = 80;
var blackH = 10;
var blackW = 80;
var boxH = 150;
var crayonPos = 10;
var windowW = 20;
var angle = 0;

function setup() {
    createCanvas(600, 500);

}

function draw() {
    var color1 = color(60,200,255);
    var color2 = color(200,212,240);
    var t = map(mouseY,0,width,0,1);
    var bgColor = lerpColor(color1,color2,t);
  // wanted to try the lerpColor function and the hues are controlled
  // by the mouseY function; supposedly represents a sky

    background(bgColor);

  //mock sun
     push();
     fill(255,240,20);
     rotate(radians(mouseX));
     rectMode(CENTER); // center rect around 0,0
     rect(10,10, 200,200);
     pop();
     angle = angle + 5;

  //windows to emulate a classroom
    fill(255);
    rect(0,0,windowW,height);
    rect(0,0,width,windowW);
    rect(height/2,0,windowW,height);
    rect(width-40,0,windowW,height);
    rect(0,height/2,width,windowW);

//these if-statements are to control the height of the specific crayon
//when the cursor is within the range of that specific crayon
//controls red crayon
    if (10<=mouseX & mouseX<=100){
      fill(255,0,0);
      rect(10, mouseY,rectW,height-boxH-mouseY);

    }
//controls orange crayon
    if (110<=mouseX & mouseX<=200){
      fill(255,165,2);
      rect(110, mouseY,rectW,height-boxH-mouseY);

//controls yellow crayon
    }
    if (210<=mouseX & mouseX<=300){
      fill(255,252,17);
      rect(210, mouseY,rectW,height-boxH-mouseY);

//controls green crayon
    }
    if (310<=mouseX & mouseX<=400){
      fill(48,201,63);
      rect(310, mouseY,rectW,height-boxH-mouseY);

//controls blue crayon
    }
    if (410<=mouseX & mouseX<=500){
      fill(45,76,255);
      rect(410, mouseY,rectW,height-boxH-mouseY);
//controls purple crayon
    }
    if (510<=mouseX & mouseX<=600){
      fill(132,21,255);
      rect(510, mouseY,rectW,height-boxH-mouseY);

//draws all the crayons by calling it (mostly for practice calling functions)
    }
    Red();
    Orange();
    Yellow();
    Green();
    Blue();
    Purple();

    //crayon box remains constant
    fill(243,201,48);
    rect(0,height-boxH,width,boxH);

    //symbol
    fill(51,141,62);
    ellipse(width/2,height-75,200,80)

    //green lines on box
    fill(51,141,62);
    rect(0,height-boxH,width,10);
    rect(0,height-boxH+20,width,10);

}

 //crayon functions:
function Red() {
  noStroke();
  fill(255,0,0);
  rect(crayonPos,height-(rectB-rectT),rectW,rectB-rectT)
  fill(0);
  rect(crayonPos,rectT+20,blackW,blackH);
}

function Orange() { //orange crayon
  fill(255,165,2);
  rect(crayonPos + 100,height-(rectB-rectT),rectW,rectB-rectT);
  fill(0);
  rect(crayonPos+100,rectT+20,blackW,blackH);
}

function Yellow() {
  fill(255,252,17);
  rect(crayonPos + 200,height-(rectB-rectT),rectW,rectB-rectT);
  fill(0);
  rect(crayonPos+200,rectT+20,blackW,blackH);
}

function Green() {
  fill(48,201,63);
  rect(crayonPos + 300,height-(rectB-rectT),rectW,rectB-rectT);
  fill(0);
  rect(crayonPos+300,rectT+20,blackW,blackH);
}

function Blue() {
  fill(45,76,255);
  rect(crayonPos + 400,height-(rectB-rectT),rectW,rectB-rectT);
  fill(0);
  rect(crayonPos+400,rectT+20,blackW,blackH);
}

function Purple() {
  fill(132,21,255);
  rect(crayonPos + 500,height-(rectB-rectT),rectW,rectB-rectT);
  fill(0);
  rect(crayonPos+500,rectT+20,blackW,blackH);
}

I got the idea from looking at a crayon box as I was finishing the Autolab assignments and had an idea about “selecting” crayons from a crayon box. It was a little difficult to try and alter the parameter using the mouseX function so that each individual crayon will go up to mouseY height. I had wanted to use an array but decided to work with using just if statements using the “width” of crayons.
I wanted to experiment with other options with color, which using lerpColor() to combine the two rgb hues and controlling that with the mouseY.

This is the rough draft of the process. I illustrated how many crayons and listed the various r,g,b values and how where the mouse would be to trigger an event (that is, the height of the crayon).

Connie – LookingOutwards – 03

A project that I found particularly inspiring was “Sketch Furniture” (beginning in 2005) by FrontDesign.

The generative furniture works that were created by FrontDesign artists. (Image Credit: Front)

I found this project to be intriguing for what the artists might have been aiming to convey; that is, that their project follows the complete process of creation: the birth of an idea or sketch, the execution of the movements tracked by the Motion Capture, and the final product materialized in the real world via Rapid Prototyping. It surprises me that this project is over 10 years old and it boggles my mind the kind of potential we have today when it comes to 3D-printing (especially with regards to better, more efficient, and more optimized programs and technological advances that permeate into other fields such as bioengineering, architecture, and fashion.)

As for algorithms, the programming involved with the Motion Capture must be able to track and follow the strokes of the artists as they sketch while being able to maintain that form, save it within a 3D print file, and consequently materialize the sketch accurately using a machine to provide Rapid Prototyping.

Note: Unlike some other projects, the exact process and/or code and exact machinery involved with the project was not disclosed.

Connie-Looking Outwards-02

The project that I found inspirational and interesting was the “Laser Forest (2013)” by Memo Akten.

Video of the “Laser Forest shown on Akten’s website.

What I admire most about the project is that it combines music, light, and interactivity to create a unique experience. The “forest” consists of rods and lasers which can be pulled, waved, twirled, etc. to create sound. Each tree is tuned to a specific note and the material used to create the forest has a “natural springiness” to it. I think the artist’s sensibilities were manifested in the algorithm through the emphasis on interacting with the musical rods to create something more than what is presently there (that is, the music; otherwise the forest is silent).

The forest’s algorithm was created using openFrameworks and Akten and his studio, Marshmallow Laser Feast, have posted their code and process on Github. There are files that map out the order of the 150 trees within the 450 sq.meters along with the specific note/frequency to which each “tree” is tuned to. I don’t know specifically how the algorithm works but in their source code, they have functions that I would imagine work similarly to the mousePresssed/mouseDragged functions which involve a conditional trigger in order to start an event (in this case, the trigger would be movement of the rods to trigger the tune from each tree).

cchau1 – Project02 – Variable Faces

sketch


var eyeSize = 35;
var whiteSize = 15;
var faceWidth = 200;
var faceHeight = 200;
var r, g, b
var noseX = 20
var noseY = 10
var whiteHeight = 100
var whiteWidth = 35
var pinkHeight = 120
var pinkWidth = 40
var bodyW = 200
var bodyH = 250

function setup() {
    createCanvas(480,640);
    angleMode(CENTER)
    smooth()
    r = random(255);
    g = random(255);
    b = random(255);
}

function draw() {
    noStroke();
    background(165,216,255);

//bunny ears
    noStroke()
    ellipseMode(RADIUS);
    fill(250,249,250);
    ellipse(290,180,whiteWidth,whiteHeight);

    ellipseMode(CENTER);
    fill(255,225,242);
    ellipse(290,180,pinkWidth,pinkHeight);

    ellipseMode(RADIUS);
    fill(250,249,250);
    ellipse(180,180,whiteWidth,whiteHeight);

    ellipseMode(CENTER);
    fill(255,225,242);
    ellipse(180,180,pinkWidth,pinkHeight);

//head
    fill(250,249,250);
    ellipse(width / 2, height / 2, faceWidth, faceHeight);
    var eyeLX = width / 2.5 - faceWidth * 0.25;
    var eyeRX = width / 2.5 + faceWidth * 0.25;

    fill(r,g,b); //applied r,g,b random color variables to eyes
    ellipse(eyeLX, height / 2, eyeSize, eyeSize);
    ellipse(eyeRX, height / 2, eyeSize, eyeSize);

    fill(255); //white eye shine
    ellipse(eyeLX-9, height / 2 -10, eyeSize/1.5, eyeSize/1.5);
    ellipse(eyeRX-9, height / 2 -10, eyeSize/1.5, eyeSize/1.5);

    fill(255,186,223); //nose
    ellipse((width/2)-50, height/2,noseX,noseY);

//body
    fill(250,249,250);
    ellipse(width/2,height-100,bodyW,bodyH);

//flower
    translate(300,265);
    noStroke()
   for (var i = 0; i < 10; i ++) {
     fill(r,g,b);
     ellipse(0, 10, 20, 60);
     rotate(PI/5)
}

}

function mousePressed() {
    var d = dist(mouseX, mouseY, 20,60);
    if (d < 500) {
      r = random(255);
      g = random(255);
      b = random(255);
    }
    faceWidth = random(170, 250);
    faceHeight = random(15, 250);
    eyeSize = random(20,60);
    whiteHeight = random(80,140);
    whiteWidth = random(20,50);
    pinkHeight = random(90,150);
    pinkWidth = random(20,40);
    bodyW = random(200,250);
    bodyH = random(250,300);

  }

I initially planned to have only the face, eyes, and ear length to change but decided to also add a random color-changing function which was applied to the eyes and additional flower function. As I was deciding the range for the random width/height for the head, I thought to myself that in nature, there are many beautiful mathematical proportions that have allowed species to thrive but in our imagination and in cartoons, these proportions can be as hilarious or wacky as we desire!

Connie – LookingOutwards – 01

In my senior year of high school, our top orchestral and symphony groups were invited to perform at a music festival in Washington D.C. and during our free time while on tour, we went to visit the Renwick Museum. The museum featured a work by Janet Echelman, entitled “1.8 Renwick” because the earthquake shortened the length of a single day by 1.8 microseconds.

It was inspired by the 2011 Tohoku earthquake and incredible heights of the tsunami waves in the Pacific Ocean and uses some technology that links it to a map of the energy released by the powerful tsunamis across the Pacific Ocean. Many artists are inspired by their surroundings or historical events; the impacts of earthquakes on human society have been also noted by other artists such as Ai Weiwei.

I love this project for its interesting link between the vibrancy of spectacular colors and use of technology to bring a visual experience that symbolizes the powerful impact of a natural disaster. The dramatic color shifts in the netting show viewers how quickly things in our natural world can change and how deadly these shifts and changes can be. I don’t know how exactly or how long it took Echelman to create this project or specifically what algorithm she used but I do know the lights are linked to the energy maps of the tsunamis in the Pacific Ocean during the earthquake, hence the shifts in color.

cchau1 – Project01 – Face

cwchau face

function setup() {
  createCanvas(500,500);
  angleMode(RADIANS);
}
function draw(){
  background(201,227,255);

//bunny ears!!
  noStroke()
  ellipseMode(RADIUS);
  fill(255);
  ellipse(320,100,40,95);

  ellipseMode(CENTER);
  fill(255,225,242);
  ellipse(320,100,45,110);

  ellipseMode(RADIUS);
  fill(255);
  ellipse(180,100,40,95);

  ellipseMode(CENTER);
  fill(255,225,242);
  ellipse(180,100,45,110);

//behind head
  fill(39,3,0)
  ellipse(250,300,280,340)

//neck
    noStroke()
    fill(253,215,189);
    rect(220,350,60,60);

//face
    noStroke()
    fill(255,230,204);
    ellipse(250,250, 210, 230);

//hair
  push()
  rotate(PI/-6)
  fill(39,3,0)
  ellipse(100,270,175,100)
  pop()

  push()
  fill(39,3,0);
  rotate(PI/-8)
  arc(140,245,190,150,0, HALF_PI + HALF_PI);
  pop()

  push()
  fill(39,3,0)
  rotate(PI/-9)
  ellipse(240,330,35,150)
  pop()

//mouth
  fill(0)
  rect(235,320,28,4)

//shirt
  fill(225,189,255)
  ellipse(250,490,180,230)

//blush
  fill(255,204,222)
  ellipse(185,290,20,10)

  fill(255,204,222)
  ellipse(310,290,20,10)

//eyes
  noStroke()
  fill(39,3,0)
  ellipse(195,270,25,18)

  noStroke()
  fill(39,3,0)
  ellipse(300,270,25,18)

//eyebrows
  push();
  noStroke()
  fill(39,3,0)
  translate(width/2, height/2);
  rotate(PI/1.25);
  rect(-45,-30,24,5);
  pop();

  push();
  noStroke()
  fill(39,3,0)
  translate(width/2, height/2);
  rotate(PI/4.75);
  rect(-50,30,24,5);
  pop();

//flower
  translate(330,200)
  noStroke()
    for (var i = 0; i < 10; i ++) {
      fill(255,204,222);
      ellipse(0, 10, 20, 60);
      rotate(PI/5);
}

noLoop();
  }

This is one of the first projects I’ve worked on in p5.js and I discovered that it is time-consuming to try and figure out the position of every shape on the canvas. I hope that I can learn, understand, and become more familiar with how to translate/rotate/position shapes so the entire process will be more efficient. I don’t have rabbit ears in real life (would be cool though) but I typically draw myself with rabbits ears anyway. I am feeling determined in this self-portrait.