jamieh-project-09-portrait

sketch

/*
Jamie Ho
jamieh@andrew.cmu.edu
10:30
Project 09
*/

var underlyingImage;
var press = 1;			//to store value based on amt of times 
						//left and right arrow keys are pressed

function preload() {
    var myImageURL = "https://i.imgur.com/bJEDJSJ.jpg";
    underlyingImage = loadImage(myImageURL);
}

function setup() {
    createCanvas(480, 320);
    background(255);
    underlyingImage.loadPixels();
    frameRate(5000);
}

function draw() {
    var px = random(width);
    var py = random(height);
    var ix = constrain(floor(px), 0, width-1);
    var iy = constrain(floor(py), 0, height-1);
    var theColorAtLocationXY = underlyingImage.get(ix, iy);

    var lengthX = map(mouseX, 0, width, 5, 20);		//2nd X coordinate based on mouseX
    var lengthY = map(mouseY, 0, height, 5, 20);	//2nd y coordiante based on mouseY
    
    stroke(theColorAtLocationXY);
    strokeWeight(press);							//based on key presses
    line(px, py, px+lengthX, py+lengthY);			//draw line based on mousex mousey
}

function keyPressed(){
	if(keyCode == LEFT_ARROW & press > 1.0){		//if left arrow pressed
		press -= 0.5;								//strokeWeight decreases by 0.5
	} else if(keyCode == RIGHT_ARROW & press < 5.0) {		//if right arrow pressed
		press += 0.5;										//strokeWeight increases by 0.5
	}
	
}

The code allows for interactive changes to the product by using mouse positions to change the direction and length of the lines, whereas using left and right arrow keys on the keyboard adjusts the thickness of the lines. Thicker lines give less details but the product will be finished faster. I experimented with directions of the lines as well, which I think produces a much more dynamic and sketchy type of image (last image).

Thick strokeWeight with one angle


Thick strokeWeight with different angles
Thin strokeWeight with one angle
Thin strokeWeight with different angles

keuchuka-project-09

project9

//Fon Euchukanonchai
//15-104 Section A
//keuchuka@andrew.cmu.edu
//Project-09

//preloading two hugh faces into varialbes
function preload() {
    var hughFronturl = "https://i.imgur.com/fKUjDi7.jpg";
    var hughSideurl = "https://i.imgur.com/vNGpU0e.jpg";    
    hughFrontImage = loadImage(hughFronturl);
    hughSideImage = loadImage(hughSideurl);
    }

//load pixels from the two pictures of hugh's faces
function setup() {
    createCanvas(200, 267);
    hughFrontImage.loadPixels();
    hughSideImage.loadPixels();
    
    }

function draw() {

    frameRate(300);

    //setting background color
    background(255,0,255);
    noStroke();

    //drawing the two green rectangles
    fill(0, 255,0)
    rect(0, 0, 130, 70)
    rect(188, width/2, 12, 167)


    //creating a grid for image sampling
    for (x = 0; x < width/6; x++) {
        for(y = 0; y < height/6; y++){

            //the sample grid interacts with mouse horizontal movement
            var pixelX = x * 6 + mouseX - width/2;
            var pixelY = y * 6

            //getting pixels of the images according to sample grid, and also their brightness
            var theColorAtLocationXY = hughFrontImage.get(pixelX, pixelY);
            var pixelBrightness = brightness(theColorAtLocationXY);

            var theColorAtLocationXY2 = hughSideImage.get(pixelX, pixelY);
            var pixelBrightness2 = brightness(theColorAtLocationXY2);


            //draws the front face if mouse is on left-ish side of the frame
            if (mouseX < (5/8)*width){

                //maps pixel brightness for the width of rectangles created
                var rWidth = map(-pixelBrightness, -255, 0, -4, 7)
                var rHeight = 10;
                //maps pixel brightness to the darkness of the rectangles
                G = map(pixelBrightness, 0, 200, 255, 0)
                fill(255, G, 255)
                
                rect (pixelX,pixelY, rWidth, rHeight)
                
                }

            //draws the "turn"
            //draws the side face if mouse is on right-ish side of the frame
            if (mouseX > (5/8)*width){

                var rWidth = map(-pixelBrightness2, -255, 0, -4, 7)
                var rHeight = 10;
                G = map(pixelBrightness2, 0, 200, 255, 0)
                fill(255, G, 255)

                rect (pixelX,pixelY, rWidth, rHeight)
                
                }

        }
    }

}

I created a portrait of Hugh and wanted to emphasize horizontality, especially with the turning of the face when you move the mouse. The code was really slow so I tried making the images even smaller, but it is still slow. I don’t know what to do.

front face

turned face

selinal-Project-09

sketch

var underlyingImage; //global variable for image that is not shown

function preload() {
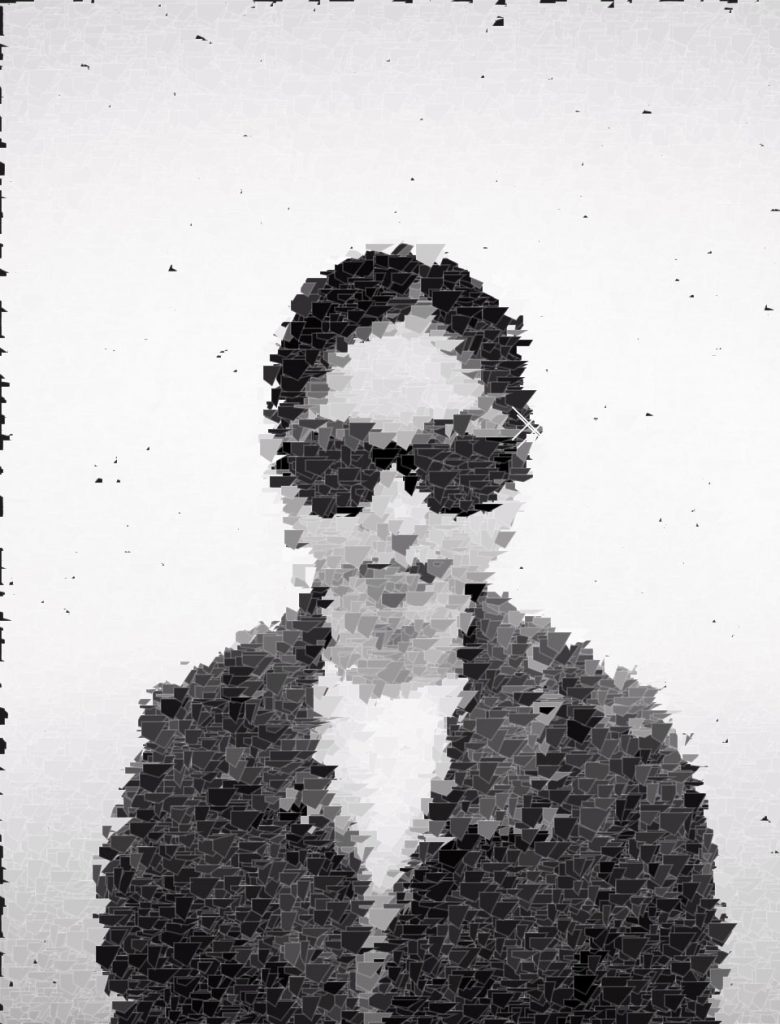
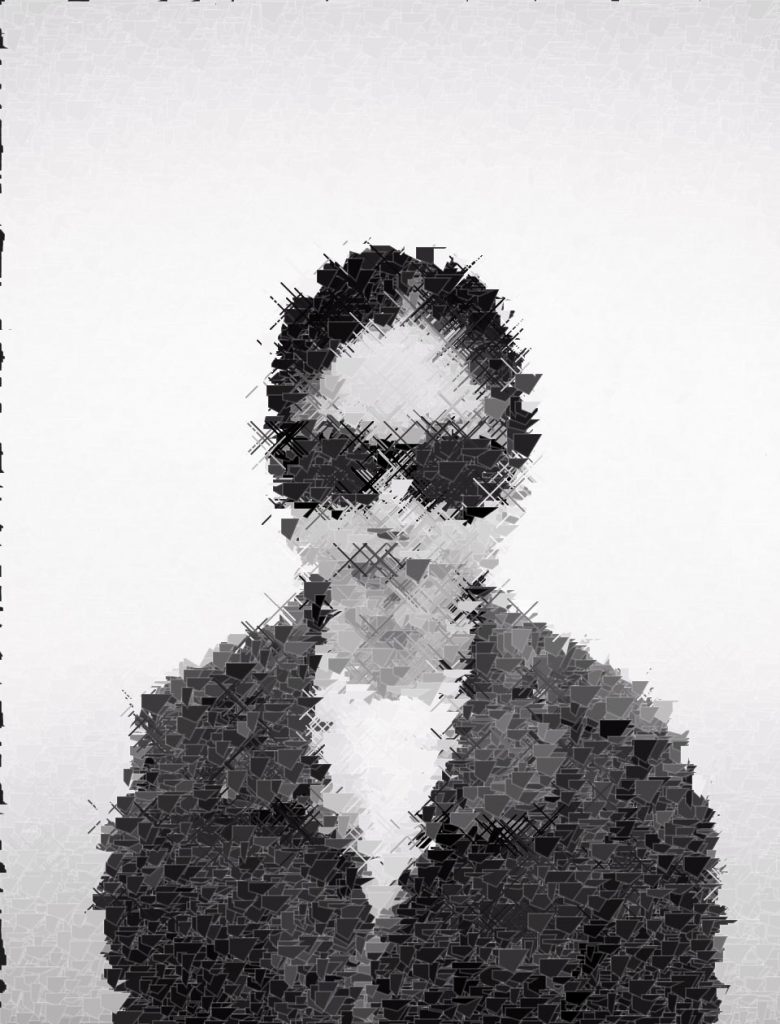
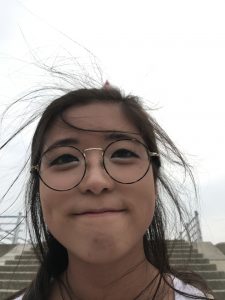
    var myImageURL = "https://i.imgur.com/wSnQo5j.jpg"; //image of dad
    underlyingImage = loadImage(myImageURL);
}

function setup() {
    createCanvas(700, 600); 
    background(0); //black background
    underlyingImage.loadPixels(); //load pixels
    frameRate(10); //slow placement of objects when pixels called
}

function draw() {
    var px = random(width); //random x and y variables to place something at 
    var py = random(height);
    var ix = constrain(floor(px), 0, width-1); //constrain the x and y variables for color sake
    var iy = constrain(floor(py), 0, height-1);
    var theColorAtLocationXY = underlyingImage.get(ix, iy); //getting color of each pixel
	var r = theColorAtLocationXY[0]; //r value of color
    var g = theColorAtLocationXY[1]; // g value of pixel color
    var b = theColorAtLocationXY[2]; //b value of color
    var r2 = 255- r; //opposite r value
    var g2 = 255-r; //opposite g value
    var b2 = 255 - r; //opposite b value
    noStroke(); 

    if(g < 150 & b < 150) { //if g and b values are lower, make a clear ellipse of that pixel color and a smaller circle inside that is slightly redder
    	fill(r, g, b, 170);
    	ellipse(px, py, 20, 20);
    	fill(r + 10, g - 10, b - 10);
    	ellipse(px, py, 5, 5);
    }

    if(b > 230) { //if the b value is large, make an ellipse that is bluer than the pixel and make an arrangement of other blue circles surrounding it
    	fill(r- 10, g - 10, b + 10, 150);
    	ellipse(px, py, 5, 5);
    	var numObjects = 5;
    	var angleObject = 360/numObjects;																																																							
    	for(var i = 0; i < numObjects; i++) {
    		var posX = px + random(2, 7) *cos(radians(angleObject*i) );
			var posY = py + 5 *sin(radians(angleObject*i) );
			ellipse(posX, posY, 10, 10);
    	}
    } 
    if(g > 150) { //if the green value is low, make a circle slightly greener that is random in radius
    	fill(r, g + 10, b, 100);
    	var pointSize = random(10, 60);
    	ellipse(px, py, pointSize, pointSize);
    }

    if(r > 200) { //if the r value is large, make an arrangement of circles with strokes that is slightly redder
    	var numObjects = 8;
    	var angleObject = 360/numObjects;
    	for(var i = 0; i < numObjects; i++) {
    		var posX = px + random(-5, 5) *cos(radians(angleObject*i) );
			var posY = py + 5 *sin(radians(angleObject*i) );
			noFill();
			stroke(r +20, g - 10, b - 10);
			strokeWeight(random(.25, 5));
			ellipse(posX, posY, 10, 10);
    	}
    }
    if(r < 50 & g < 50 && b < 50) { //if all r g b values are on the lower end, make a row of five circles of that color which is moving downwards to the right
    	for(var i = 0; i < 5; i++) {
    		fill(theColorAtLocationXY, 300 - i*40);
    		ellipse((px - 15) +5* i, (py-15)+ 5* i, 2, 2);
    	}
    }
    else {
    	noFill(); //if the pixel does not meet any of the conditional statements, make a blank circle with the strokeWeight random and the stroke of the color at the pixel
    	stroke(theColorAtLocationXY);
    	strokeWeight(random(1, 8));
    	ellipse(px,py, 10, 10);
    }

    var sx = mouseX; //when the mouse runs over the canvas
    var sy = mouseY;
    var mx = constrain(floor(sx), 0, width-1); //constrain the mouse value for color
    var my = constrain(floor(sy), 0, height-1);
    var theColorAtLocationMxMy = underlyingImage.get(mx, my); //color at point of mouse

    var drawSize = dist(pmouseX, pmouseY, mouseX, mouseY); //distance between mouse coordinates at previous to current point
    fill(r2, g2, b2, 200); //opposite color
    ellipse(sx, sy, drawSize/10, drawSize/10); //draw a circle with mouse stroke depending on the mouse speed
	
	if(mouseIsPressed) { //if the mouse is pressed, make a circle the color of that pixel
		fill(theColorAtLocationMxMy);
		ellipse(mouseX, mouseY, 7, 7);
	}
}


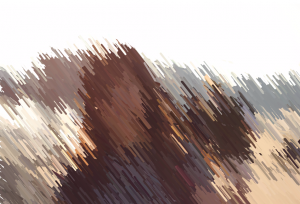
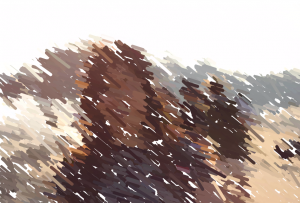
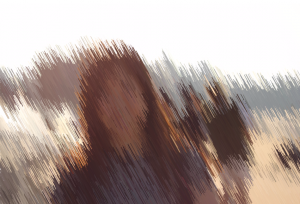
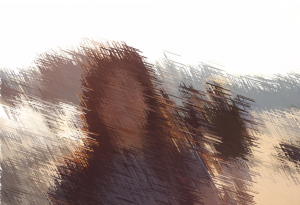
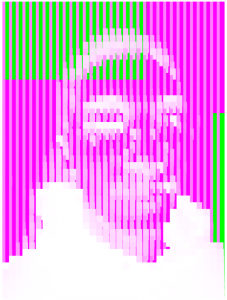
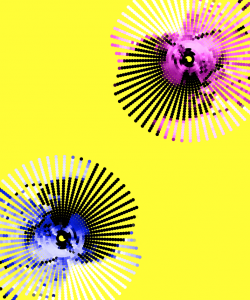
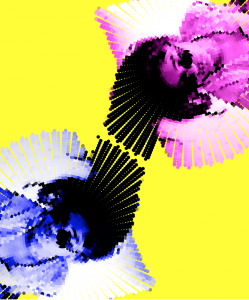
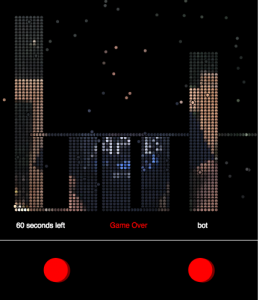
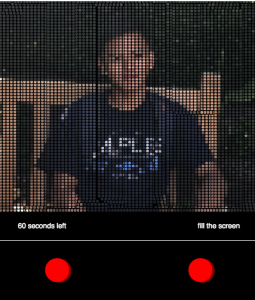
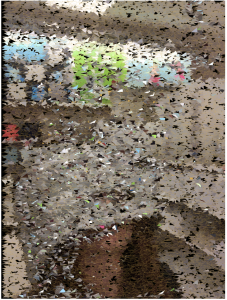
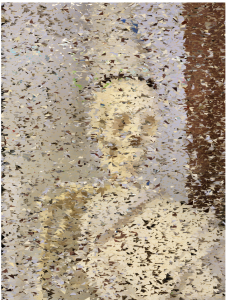
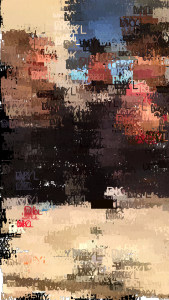
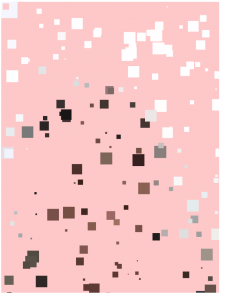
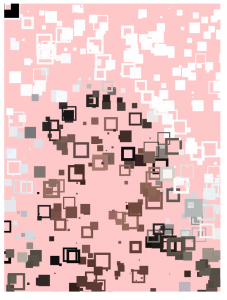
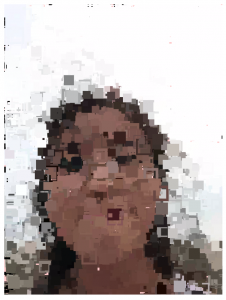
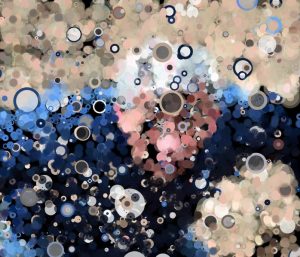
I liked playing with opacity in the shapes we make in class. I think the randomization of pixels along with the overlapping of the colors is nice.
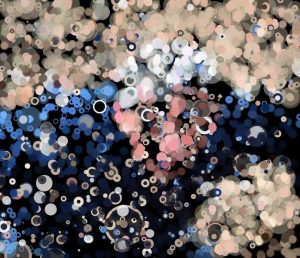
ssharada-project-09-computational-portrait

project09.js

//shariwa sharada
//ssharada@andrew.cmu.edu
//section a
//project 09

var pinkShari;
var blueShari;
var sAngle = 1;
var sRadius = 5;
var sFrameCount = 0;
var pEllipseW = 5;
var bEllipseW = 5;


var pinkShariArray = []

function preload(){
    //initialising my portraits 
    var pinkShariUrl = "https://i.imgur.com/Kglw2lq.png"
    var blueShariUrl = "https://i.imgur.com/4ODxlV0.png" 
 
    //loading my portraits 
    pinkShari = loadImage(pinkShariUrl);
    blueShari = loadImage(blueShariUrl);


}

function setup(){
    createCanvas(400,480); 
    background(255,255,0);
    noStroke(); //the ellipses should have no border 

    //initiallising the pixels in each of my portraits 
    pinkShari.loadPixels(); 
    blueShari.loadPixels();

}

//creating the spirals for the pink portrait 
function pinkDrawSpiral(){
    push();
    //the image begins at a part of the canvas determined by the trasnslate
    translate(300, 100);
    //creating variables to relate the spirals to the pink image 
    var pinkShariCenterX = 0;
    var pinkShariCenterY = 0;
    var pX = cos(radians(sAngle)) * sRadius; 
    var pY = sin(radians(sAngle)) * sRadius;

    //getting the colour of each of the pixels 
    var pinkColourAtpXpY = pinkShari.get(width/2 - pX, height/2 + pY);
    fill(pinkColourAtpXpY);

    //alloting the pixels so that each one matches up to the above obtained colour
    ellipseMode(CENTER);
    ellipse(pinkShariCenterX - pX, pinkShariCenterY + pY, pEllipseW, pEllipseW);

    //setting up the sizing of the pixels 
    sAngle = sAngle +3;
    sRadius = sRadius + 0.035;
    sFrameCount = sFrameCount + 1;
    pEllipseW = pEllipseW + 0.0002;


    //my image has borders but since the canvas borders aren't the image's
    //border, i had to accoung for the spiralling to only go to a certain
    //limit otherwise it would look very tacky

    //if there are more than 4750 pixels made, the spiralling will restart
    if (sFrameCount > 4750){
        sAngle = 5;
        sFrameCount = 0;
        sRadius = 1;
        pEllipseW = 5;
    }
    pop();

    print(frameCount)
}

//creating the spirals for the blue portrait 
function blueDrawSpiral(){
    push();
    //the image begins at a part of the canvas determined by the translate
    translate(100, 380);
    //creating variables to relate the spirals to the blue image 
    var blueShariCenterX = 0;
    var blueShariCenterY = 0;
    var bX = cos(radians(sAngle)) * sRadius;
    var bY = sin(radians(sAngle)) * sRadius;

    //getting the colour of each of the pixels 
    var blueColourAtpXpY = blueShari.get(width/2 - bX, height/2 + bY);
    fill(blueColourAtpXpY);

    //alloting the pixels so that each one matches up to the above obtained colour
    ellipseMode(CENTER);
    ellipse(blueShariCenterX + bX, blueShariCenterY - bY, bEllipseW, bEllipseW);

    //setting up the sizing of the pixels 
    sAngle = sAngle +3;
    sRadius = sRadius + 0.035;
    sFrameCount = sFrameCount + 1;
    bEllipseW = bEllipseW + 0.0002;

    //my image has borders but since the canvas borders aren't the image's
    //border, i had to accoung for the spiralling to only go to a certain
    //limit otherwise it would look very tacky

    //if there are more than 4750 pixels made, the spiralling will restart
    if (sFrameCount > 4750){
        sAngle = 5;
        sFrameCount = 0;
        sRadius = 1;
        bEllipseW = 5;
    }
    pop();

    print(frameCount)
}


//Creating the spirals using the ellipses of colour from the images 
function draw(){

    pinkDrawSpiral();

    blueDrawSpiral();

}


For this project I wanted to use a photo of me in two different colour filters. To do this I edited the same photo of me in photoshop in a magenta filter and in a blue filter. I then wanted to create this gradual emergence of me from the centre of the image, and then the two images would almost blend into each other.

For each of my images I had the issue of where to place it on the canvas because I had to take into account that each image was a PNG and it had no background but the code would still read the entire image and then draw the ellipses which is why I chose to mirror and translate the images.

^initial run of the spiral

^possible final outcome

amui1-Project-09-Portrait

amui1-p9

//Allison Mui
//15-104 Section A
//amui1@andrew.cmu.edu
//Project-09

//variables for image
var portraitImg = "https://i.imgur.com/UMgur46.png";
var portrait;

//list of random words
var words = ["cat","dog", "bun", "sun", "pot",
            "pen", "bot", "run", "fill the screen"];
var idx;
var word;

//variables for random coordinates
var px;
var py;


function preload() {
    //loads image into portrait variable
    portrait = loadImage(portraitImg);
}

function setup() {
    createCanvas(431,480);
    background(0);

    //variables for starting positions
    tpx = 30;
    tpy = 30;

    //identifies random word in word list
    fill(255);
    //stores length of array
    var length = words.length
    //picks random index in array
    var idx = int(random(0,length));
    //stores random word
    var word = words[idx];
    //displays random word
    text(word,width-100,380);

    //draw game like structure
    stroke(255);
    //border line
    line(0,400,width,400);
    fill(139,0,0)
    noStroke();
    //slight 3d effect
    ellipse(width/2-116,443,40,40);
    ellipse(width/2+124,443,40,40);
    fill(255,0,0);
    noStroke();
    //red buttons
    ellipse(width/2-120,445,40,40);
    ellipse(width/2+120,445,40,40);

    //loads picture pixels
    portrait.loadPixels();
}

function draw() {
    //shows timer
    fill(255);
    //if 900 frames already passed, show time alert
    if (frameCount == 500) {
      text("60 seconds left", 30, 380);
    }
    //if 1800 frames already passed, show game over alert
    if (frameCount >= 800) {
      frameRate = 60;
      fill(255,0,0);
      text("Game Over", width/2-30,380);
      //if game is over randomize locations
      px = random(0,width);
      py = random(0,height-150);
      var randomColor = portrait.get(px,py);
      fill(randomColor);
      //place circles in random locations to show the underlying picture
      ellipse(px,py,4,4);

    }

    stroke(0);

    //tfactor represents the number circle in the row
    var tfactor = 0;
    //run 8 circles/times
    for (t = 0; t < 8; t++){
      var tportraitColor = portrait.get(tpx+tfactor,tpy);
      fill(tportraitColor);
      //draw circle for the row
      ellipse(tpx+tfactor,tpy,6,6);
      tfactor += 6;
    }
    // if game is not over, allow user to move row
    if (frameCount < 800) {
      if (keyIsDown(LEFT_ARROW)) {
        tpx -= 5;

      }
      if (keyIsDown(UP_ARROW)) {
        tpy -= 5;

      }
      if (keyIsDown(DOWN_ARROW)) {
        tpy += 5;

      }
      if (keyIsDown(RIGHT_ARROW)) {
        tpx += 5;

      }
    }
    //create boundaries
    if (tpx > width - 1) {
      tpx = width-5;
    }
    if (tpx < 1) {
      tpx = 1;
    }
    if (tpy > height - 150) {
      tpy = height-150;
    }
    if (tpy < 1) {
      tpy = 1;
    }
}

I thought this project was rather difficult. I had a lot of ideas in mind and struggled with liking my final product. However, I became inspired by a childhood toy “etch-a-sketch”. So the idea behind my project, is a random word is generated which you have to try to write before the timer runs out.

Caption: Above are different states of the project. Below is a picture of the toy I was referring to.


Disclaimer: the page will move up and down if you press the keys as well.  This was not intended. :/

jiaxinw-Project 09-Computational Portrait

sketch

function preload() {
    img = loadImage("https://i.imgur.com/rHE8Y7e.jpg");
}

function setup() {
    createCanvas(480, 630);
    background(30);
    img.loadPixels();
}

function draw() {
    // pick x,y randomly from the image
    var x = floor(random(img.width))
    var y = floor(random(img.height))
    // set random values for creating irregular shapes
    var rw = random(5,20);
    var rh = random(2,15);
    //get color from x,y point of the image
    var pcolor = img.get(x,y)
    //fill irregular shapes with the x,y point color
    fill(pcolor)
    stroke(255,40)
    quad(x,y,x+rw,y,x+rw/2,y+rh,x,y+rh/1.5)
}

function mouseDragged(){
    //when mouse is dragged, keep drawing crosses 
    //and get color from the mouseX, mouseY point
    var dcolor = img.get(mouseX,mouseY);
    var l = 10;
    stroke(dcolor);
    line(mouseX,mouseY,mouseX+l,mouseY+l);
    line(mouseX,mouseY,mouseX-l,mouseY+l);
    line(mouseX,mouseY,mouseX+l,mouseY-l);
    line(mouseX,mouseY,mouseX-l,mouseY-l);

}


function mousePressed(){
    //when mouse is dragged, draw one cross 
    //and get color from the mouseX, mouseY point
    var dcolor = img.get(mouseX,mouseY);
    var l = 10;
    stroke(dcolor)
    line(mouseX,mouseY,mouseX+l,mouseY+l);
    line(mouseX,mouseY,mouseX-l,mouseY+l);
    line(mouseX,mouseY,mouseX+l,mouseY-l);
    line(mouseX,mouseY,mouseX-l,mouseY-l);
}

I wanted to use irregular shapes to “draw” the image, so I decided to use quad() and add random numbers to change the shapes randomly. Since I wanted to make the image become interactive, I used mousePressed() to make the image change when the mouse is clicked. The reason why I put crosses in the image since I thought about when I was a child, I liked to draw lines on pictures to “destroy” it. 🙂

abradbur – Project – 09

sketch

var myFace; //image of my face
var skeleton; //skeleton image
var currentImageIndex;

function preload(){
    //load my face and the skeleton
    myFace = loadImage("https://i.imgur.com/m10glof.jpg");
    skeleton = loadImage("https://i.imgur.com/9cviAOv.jpg");
    currentImageIndex = 0;
}

function setup() {
    createCanvas(360, 480);
    background(0);
    fill(218, 172, 75);
    textSize(50);
    text("We are all Skeletons Underneath", 50, 120, 310, 340);
    currentImage = myFace;
    currentImage.loadPixels();

}

function draw() {
    var px = random(width);
    var py = random(height);
    //keeps the color within the constraints of the image
    var ix = constrain(floor(px), 0, width);
    var iy = constrain(floor(py), 0, height);
    var col = currentImage.get(ix, iy); //color of the image
    strokeWeight(0.1);
    stroke(218, 174, 75);
    fill(col);
    //draw random triangles
    triangle(px, py, px + random(6, 12), py + random(-8, 8),
    px + random(6, 12), py);
    
    //just draw on the triangles if you're bored
    var mouseCol = currentImage.get(mouseX, mouseY);//color at the moouse
    stroke(mouseCol);
    triangle(mouseX, mouseY, mouseX + random(6, 12), mouseY + random(-8, 8),
    mouseX + random(6, 12), mouseY);
}

//flip between myFace and skeleton
//when you press the mouse
function mousePressed(){
    currentImageIndex = (currentImageIndex +1)%2;
    if (currentImageIndex === 0){
        currentImage = myFace;
    } else{
        currentImage = skeleton;
    }
}

For this project I decided to use my own face because I wanted to use a silly photo I’ve been unable to as of yet show the world. I also wanted to keep with the theme of the Halloween season and make something a little spooky. Random triangles pop up to make the image but if you click on it, instead of my face, a skeleton may begin to emerge. (Not actually my skeleton, all credit to Evil Sheila the skeleton in my High School art department, whom I love). I’d actually hoped to switch between shapes (triangles to circles) as well as images, but I couldn’t quite get it to work. So I settled.

Here are the original images I used.

Me
Evil Sheila

And here are some screen shots if you don’t want to sit through the creation process. (You can also use the mouse to speed things up)

A Spooky Truth
The Illusion
Spooky Reality

danakim-Project-09

sketch

//Dana Kim
//danakim@andrew.cmu.edu
//Section D
// Project-09

var Image;
var initials = []; //my friends and my initials

function preload() {
  var imageURL = "https://i.imgur.com/6U7x1D3.jpg"
  Image = loadImage(imageURL);
}

function setup(){
  createCanvas(270, 480);
  Image.loadPixels();
}

function draw(){
  var initials = ["DK", "MC", "WYL"];
  var InitialsIndex = 0;
  var px = random(width); //x-coordinate of text
  var py = random(height);// y-coordinate of text
  var qx = constrain(floor(px), 0, width);
  var qy = constrain(floor(py), 0, height);
  var colorAtXY = Image.get(qx, qy);
  var colorAtMouse = Image.get(mouseX, mouseY);

  for ( var i = 0; i < initials.length; i++){
    InitialsIndex = i;

    //draws text with image color at randomized x and y-coordinates
    textSize(random(10,20));
    strokeWeight(random(3,6));
    fill(colorAtXY);
    text(initials[InitialsIndex], px, py);

    //draws text with image color at mouse x and y-coordinates
    textSize(random(10,20));
    strokeWeight(random(3,6));
    fill(colorAtMouse);
    text(initials[InitialsIndex], mouseX, mouseY);
  }
}

I used a picture of my friends and I that I took last winter. I used my friends and my initials to draw the image. The locations and who’s initials were drawn were randomized.

heeseoc-Project-09-Portrait

sketch

//Steph Chun
//15-104 section #A
//heeseoc@andrew.cmu.edu
//Project-09

var img;

// load image
function preload() {
	var imageurl = "https://i.imgur.com/jYztupF.jpg";
  	img = loadImage(imageurl);
}

function setup() {
	createCanvas(500, 500);
	background(0);
	img.loadPixels();
	frameRate(20);
}

function draw() {
	
	//array for the letters that comes up in random sizes and position
	//which spells out the name of my roomate in order
	var name = [];
	name[0] = "j";
	name[1] = "o";
	name[2] = "o";
	name[3] = "h";
	name[4] = "e";
	name[5] = "e";

	//the position of the letters
	var x = random(width);
	var y = random(height);

	//assigning colors to the letters according to the pixel of the image
	var ix = constrain(floor(x), 0, width-1);
	var iy = constrain(floor(y), 0, height-1);
	var dotcolor = img.get(ix, iy); 

	//letters of random sizes that shows up constantly
	noStroke();
	fill(dotcolor);
	textSize(random(10, 30));
	text(name[frameCount%6], x, y);

	//text that follows the mouse
 	var mousecolor = img.get(mouseX, mouseY);
	fill(mousecolor);
	textSize(10);
 	text("I don't know man", mouseX, mouseY);

}

I made a portrait of my roommate, Joohee, out of the letters of alphabet in her name and the phrase that she uses a lot. I wanted to somewhat capture her personality through this project, by the photo I chose and the text in a more minimal way. Below are the original photo and different experiments that I’ve done, only with text.

jooheek-Project09-ComputationalPortrait

sketch

//JooHee Kim
//Section E
//jooheek@andrew.cmu.edu
//Project09-ComputationalPortrait

//global variable for image
var susieImg;
var susieImgURL;

function preload() {
	//loading image
	susieImgURL = "https://i.imgur.com/ezOtPFw.jpg?1";
	susieImg = loadImage(susieImgURL);
}

function setup() {
    createCanvas(360, 480);
    background(255, 200, 200);
    //load image pixels
    susieImg.loadPixels();
    //at a frame rate of 30
    frameRate(30);
}

function draw() {

	//variables for drawing circles
	var pixelX = random(width);//for position of circles
	var pixelY = random(height);
	var imageX = constrain(floor(pixelX), 0, width-1);//position of image pixel that we need to get color from
	var imageY = constrain(floor(pixelY), 0, height-1);
	var pixelDiam = random(1, 20);//for size of circles
	var colorOfImgPixel = susieImg.get(imageX, imageY);//getting color of pixel at imageX & imageY

	//drawing circles positioned at random with random sizes
	//filled with color of pixel at that position
	noStroke();
	fill(colorOfImgPixel);
	rect(pixelX, pixelY, pixelDiam, pixelDiam);

	//drawing outlined circles at mouse position
	//with stroke outline color of pixel at mouse position

	var strokeEllipseSize = random(15, 25);
	var ellipseStroke = random(1, 5);
	var colorOfImgPixelAtMouse = susieImg.get(mouseX, mouseY);
	stroke(colorOfImgPixelAtMouse);
	strokeWeight(ellipseStroke);
	noFill();
	rect(mouseX, mouseY, strokeEllipseSize, strokeEllipseSize);
}

The portrait I used for this project is of my dear friend, Susie. I decided to make the image out of rectangles to kind of make it look very pixelated. I also made stroke rectangles following my mouse position so that there is a contrast of solid and outlined rectangles.

Original Photo of Susie
First stage
Second Stage